Tag Archives: Heat tool

Christmas card #7 Spirited Snowmen

Hey Guys!,

I am having so much fun making Christmas Cards for my local girls.  The class is in October, and we spend all day eating, stamping and having fun!  Everyone brings a dish to share, I have everything cut and ready for everyone to stamp and use the Big Shot.  16 cards are what all attendees take home with them!  3 each of 5 designs and 1 Special card.  Stampin’ Up! has the BEST Christmas stamps!

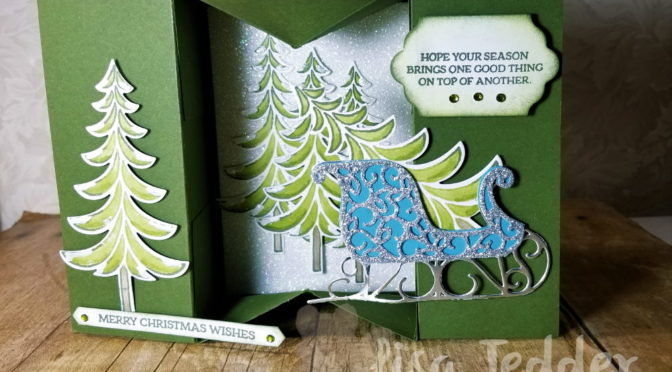
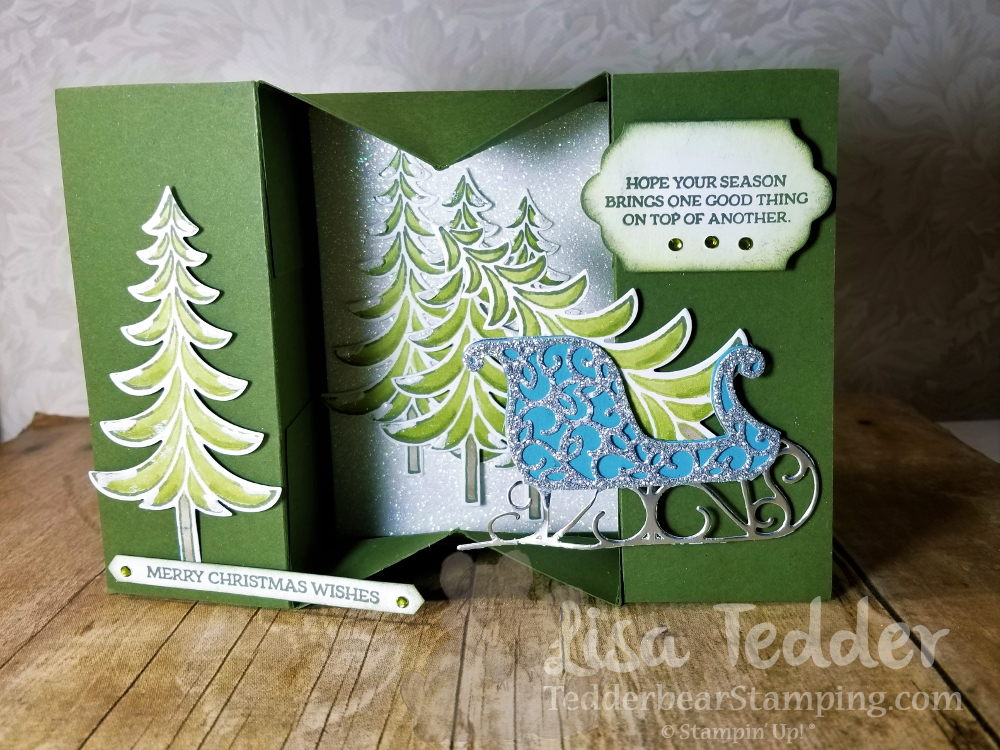
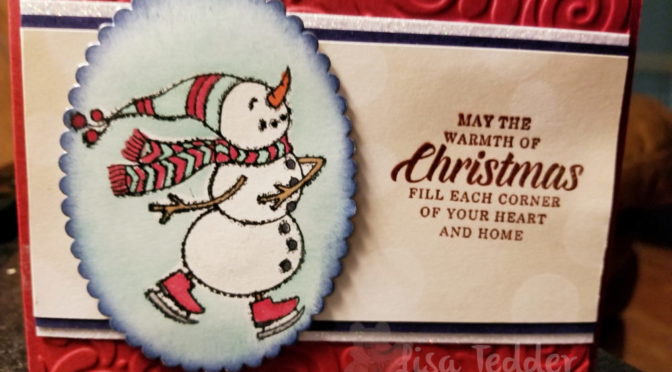
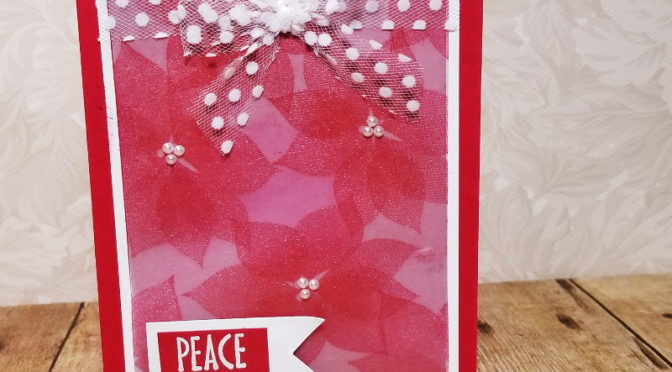
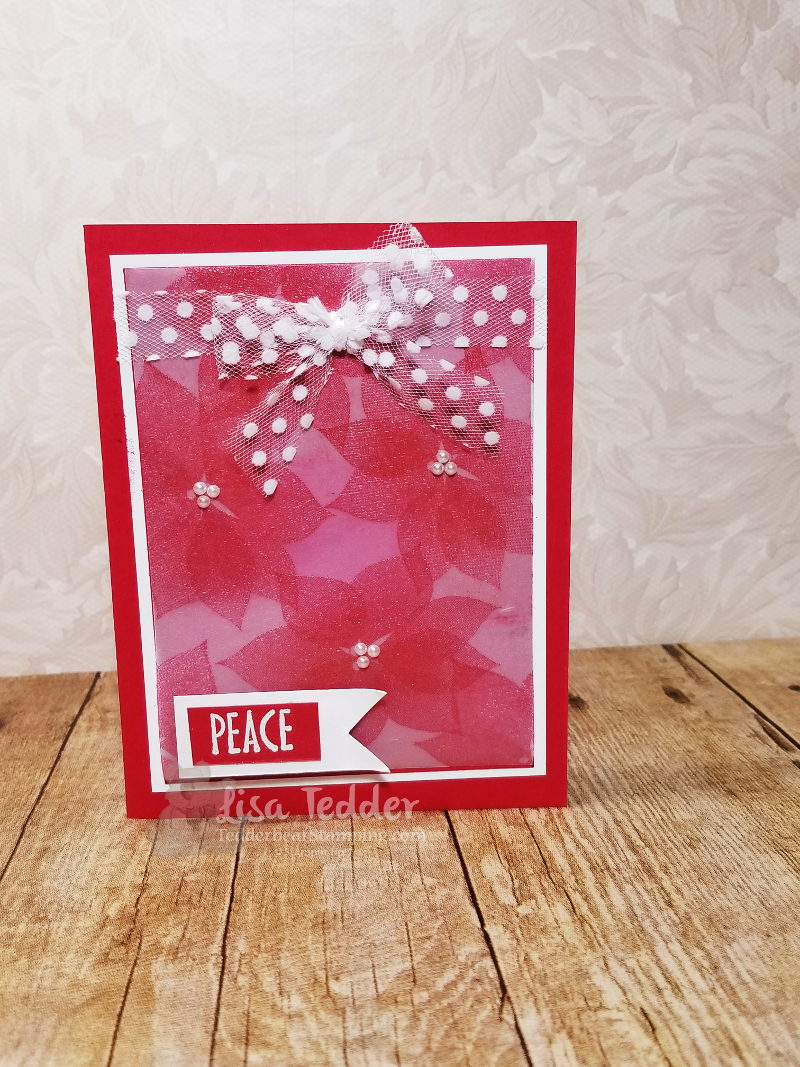
Here is the card I am sharing today:

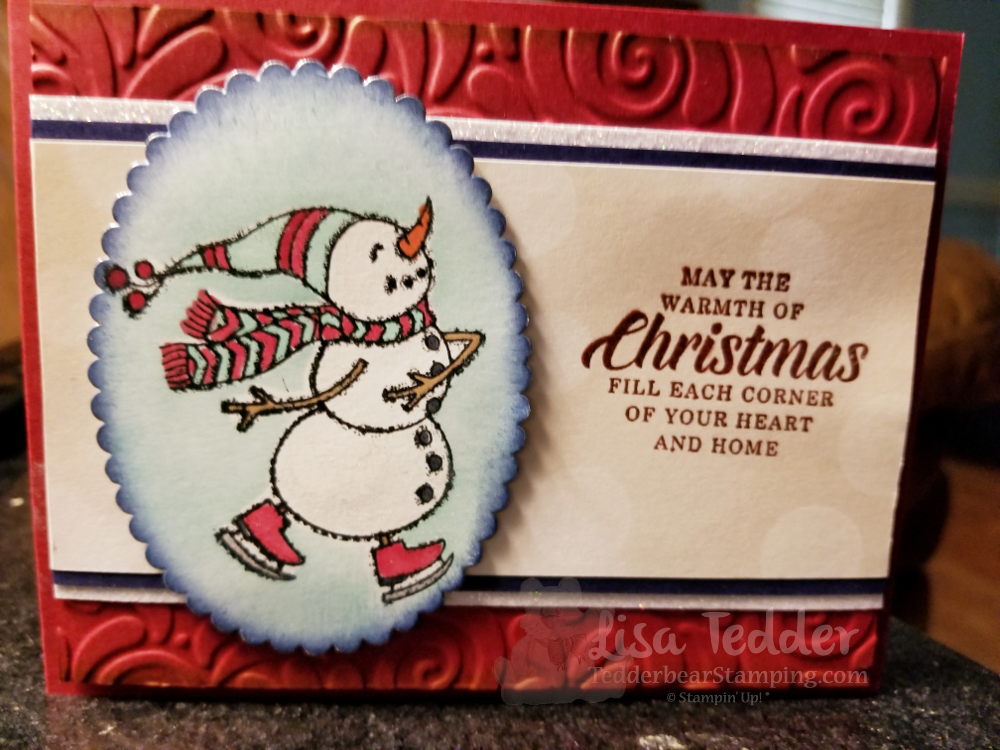
Isn’t this snowman the cutest!?   This card is easy but still a lot of fun to make!  I stamped the snowman on white, then put a mask of the snowman on top of him so I could sponge Pool Party behind the snowman and not get him blue.  I then colored him with Blends.

All the supplies used on this card are listed below, just click on any picture and you will be taken to my OnLine Store!  I would love to be your SU! Demonstrator!

Here are the particulars for this card:

Stamp Sets: Spirited Snowmen, Timeless Tidings
Cardstock: Cherry Cobbler 8 ½” x 5 ½”, 5 ¼” x 4”, All Is Bright DSP 2 ½” x 5 ¼”, Night of Navy 5 ¼” x ½” (x2), Sparkle Glimmer paper 5 ¼” x ½” (x2), Whisper White 4” x 3” (for oval), Crumb cake 5” x 3 ¾”
Inks: Memento Black, Cherry Cobbler, Pool Party, Night of Navy, Versamark, Blends: Cherry Cobbler combo, Pool Party combo, Soft Suede light, Black lt, Calypso Coral dk
Misc: Layering Oval Framelits, Wink of Stella, Swirls & Curls Folder, Embossing Buddy, White EP, Heat tool, Big Shot

This card makes me smile!  I hope you like it!

Lisa Tedder
A California girl living in North Carolina
Product List

Christmas card # 6 Beautiful Blizzard

Hey Guys!,

I am sharing with you my Christmas cards that I am doing with my classes in October.  For my class my girls make 3 cards each of 5 different designs and one special card that they only make 1 of.  They end up going home with 16 Christmas cards!  We make a day of it, everyone brings food to share and we play Christmas songs!  It’s a great way to get your Christmas cards done!

Here is the card that I am sharing with you today:

This is so pretty in person!

I LOVE Pool Party with Silver!

Here are the specifics:

Stamp Sets: Beautiful Blizzard Bundle
Cardstock: Pool Party 8 ½” x 5 ½”, Silver Glitter Paper 5 ¼” x 4”, Whisper White 4 ¾” x 3 ½”, 4” x 5 ¼” (inside), 3 ¼” x ¾”, Sparkle Glimmer scrap for snowflakes
Inks: Versamark, Pool Party
Misc: Embossing Buddy, Heat tool, Silver EP, Pool Party Shimmer ribbon, Fine Tip Glue Pen, sponges

Below are all the supplies used in picture form.  Just click on any of the pics and you will be taken to my OnLine Store!  I would love to be your SU! Demonstrator if you live in the US.

Lisa Tedder
A California girl living in North Carolina
Product List

Moonlit Owl using NEW Occasions catalog!

Hey Guys!

Today I am showing you a card using the new stamp set Still Night.  It’s from the Occasions Catalog from Stampin’ Up!  I love owls, and this one called to me!  I was in bed last night and this design came to me.

This was so much fun to make!  And very easy too.  I did a video walking you through making this card, you can catch it here.

I love sponging and using the brayer.  It adds that extra oooomph!  LOL  Couldn’t think of another word that fit better!

The supplies used for this card are listed below.  Click on any pic and you will taken to OnLine Store!

I hope you like this card as much as I do!

Lisa Tedder
A California Girl living in North Carolina


Christmas in July Card # 4

Hey Guys,

I’ve been showing you the 6 Christmas Cards that I have done for my Christmas in July stamp class.  We are now on card #4!  If you missed any of the ones before, click on my header and you can find them that way.

The card today is using Sheltering Tree from Stampin’ Up!

Here is the front of the card:

We Stamped the tree in Versamark and then embossed it with Silver Embossing Powder.  It’s quite beautiful in person!  The bow is from the Stamp set Beautiful Bouquet from SU! as well.

I got this idea on Pinterest by Bibi Cameron, I changed up a little by using a different sentiment and bow, but the idea was hers!  Thank you Bibi!

Here is the inside:

VERY easy yet extremely beautiful and elegant!  Everyone in class loved this!

The supplies are listed below, click on any picture to be taken to my OnLine Store!

Come back for card # 5!  Thanks for stopping by!

Lisa Tedder
A California girl living in North Carolina
Product List

Christmas in July card #1

Hey Guys,

Today I am sharing with you the first of 6 Christmas cards I did in a class in July.

Stamping on Vellum is one of my favorite things!  I used Real Red ink and the stamp set Stylish Christmas by Stampin’ Up!

Here is the card:

Isn’t this pretty?  I used pearls in the center of the flowers.  I have a YouTube video if you would like to see how it was done!

I TRY to do a video every week.  I would love it if you would subscribe to my channel and support me!

Below is the supplies used to make this card, click on any picture to be taken to my OnLine Store!

Thanks for stopping by!

Lisa Tedder
A California girl living in North Carolina
Product List

<!——– TAMS End —


Sneak Peek Animal Outing

Hey guys!

I’m not sure that I’ve told you before, but I LOVE Giraffe!  They fascinate me.  I got to feed one by hand when I visited my daughter in MN!  NOW when I go to  visit we’ll HAVE to go feed them again!

Here is a card I made by creating a second giraffe facing the other way.

To get the image to face the other way, stamp onto the Silicone Craft Sheet and then immediately turn over and ‘stamp’ the image onto your cardstock.  This works really well, since the image doesn’t dry as fast on the mat.  Then color as usual!  Now, you have two Giraffe facing each other!

Dimensions:

Soft Sky 8 1/2″ x 5 1/2″
Daffodil Delight 3 7/8″ x 5 1/8″ (x2 for inside also)
Cajun Craze 5″ x 3 3/4″
Very Vanilla 5″ x 3 3/4″
Scraps of Garden Green and Very Vanilla

I embossed the Cajun Craze with the Layered Leaves Embossing folder, then ran the Versamark over the images GENTLY to have it only on the raised areas.  Then embossed with Copper embossing powder.

The Stitched framelits is a MUST for any stamper, I use it all the time!

If you would like to choose me as your demonstrator, I would love to have you purchase from me!  Just click on any image below to be taken to my Online Store!

Lisa Tedder
A California girl living in North Carolina
Product List

Cool Treats – Get yours before it’s gone!

Hey Guys!

I was perusing Pinterest and saw this Beautiful card by Robin Feicht.  I loved it so much I CASE’d it just like it was!

Here is my card:

Here is the inside:

She didn’t show her inside, so this is what I came up with.  I LOVE this set and am sad to see it go.  If you want this set, be sure to check out my OnLine Store to get yours!  Just click on any of the pictures below to be taken there!

Dimensions:
Whisper White 8 1/2″ x 5 1/2″
Very Vanilla 5 1/4″ x 4″ (x2)
Watercolor paper 2 3/4″ sq then cut out with biggest Square (stitched shapes)
Gold Foil same as watercolor paper

I hope you enjoyed my card, if you are in the neighborhood of Kernersville NC, come attend a class!

Lisa Tedder
A California girl living in NC
Product List


Painting with Brusho!

Hey Guys!

Today is Tuesday so that means I have a new video to offer you!!   I wanted to show how easy it is to paint with Brusho.  Brusho gives you such a vibrant color and I am now asking myself why haven’t I done this before!?

Here is the card I made:

Another great thing is that I can make my own colors!  Just mix the yellow with the blue and get a nice green…..add more of one than the other and the hue changes!  I can’t wait to see what colors I can make!

Here are the dimensions to this card:

Dapper Denim 8 1/2″ x 5 1/2″, 3 3/4″ x 5″
Whisper White 3 7/8″ x 5 1/8″
Gold Glimmer Paper 3 1/4″ x 4 1/4″
Watercolor paper 3″ x 4″

I hope that this card encourages you to  try the Brusho!

Thank you for stopping by, I hope you continue to touch base with me!  I enjoy making handmade cards and I hope that I inspire you to do the same!

Below is pictures of the items used for this project, click on any picture and you will be taken to my OnLine Store!

Lisa Tedder
A California Girl living in North Carolina

Make your own Dimensional Snow!

Hey Guys!!

I was making a Christmas card (Yes, I DO know that it’s March, but I had an idea!) and needed my trees to have snow on them.  I wanted to try something and it worked!  NOT sure it’s been done before, but I’ve never heard of it!

First, here’s the card:

It’s really hard to see on this picture, but the trees have touchable snow.  It’s puffy, shiny, white and sparkly!  If you want to see it made in person (along with other stamping tips) you can go see my video here!  I was super excited to see that my idea not only worked, but it was EASY! AND you probably have the supplies in your stash already!

You need to get your Fine Tip Glue Pen, and draw lines with the glue where you want your snow.  Once you have all your lines, then dip it STILL WET into White Embossing Powder, set aside for about 10-15 minutes.  You can use that time to create the box card.  Go to this blog post to see how to make the box part.   You can see the video for that on my YouTube channel here.

This Christmas card is SUPER pretty!  Even prettier than the one I made with the Magical Day and I loved that one too.

Below you will see all the product used for this project, click on any picture to be taken to my OnLine Store. I would love to be your Stampin’ Up! Demonstrator if you live in the US.

Thank you for stopping by.  Hope to see you again soon!

Lisa Tedder
A California Girl living in North Carolina


Product List

Coming Soon! Sneak Peek to Magical Day!

Today I am sharing with you a couple of cards that I made for my YouTube Channel.  I have a very simple fold but the cards are stunning!  You can see the video here!

While I was at OnStage in Salt Lake City in UT I got to see first hand cards that were made using this set!!  I fell in LOVE!

Here is the front of my card:

The Designer Series Paper (DSP) is called Myths & Magic, it is embossed and GORGEOUS!!  ON the Video you can see how shiny and beautiful they are!

Here it is partially open:

I embossed the ‘sparkles’ on the side using Silver embossing powder.

Here is this card open all the way, isn’t it pretty!!?

I used Stampin’ Blends, and just love this card so much!!

Now, here is the other card, same design, different stamps!

I used the Myths & Magic Washi Tape on the side, isn’t it gorgeous!?

I am already planning on ordering MORE of this DSP and Washi Tape!

Well?  Do you love it?!  If you want a catalog, just let me know and I will get it to you!!

Click on any picture below and you will be taken to my OnLine Store!

Have a great day!

Lisa Tedder
A California girl living in North Carolina
Product List