Tag Archives: Christmas

Sunflowers made easy!

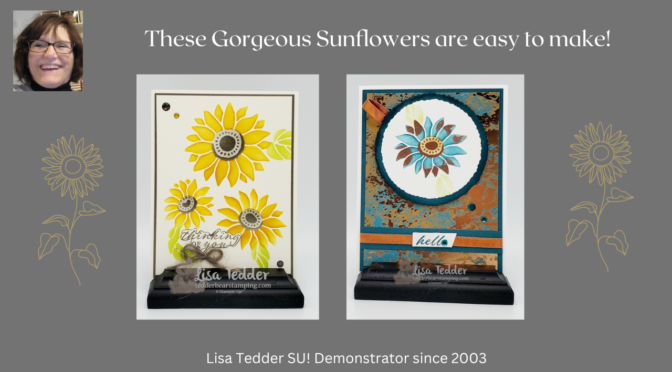
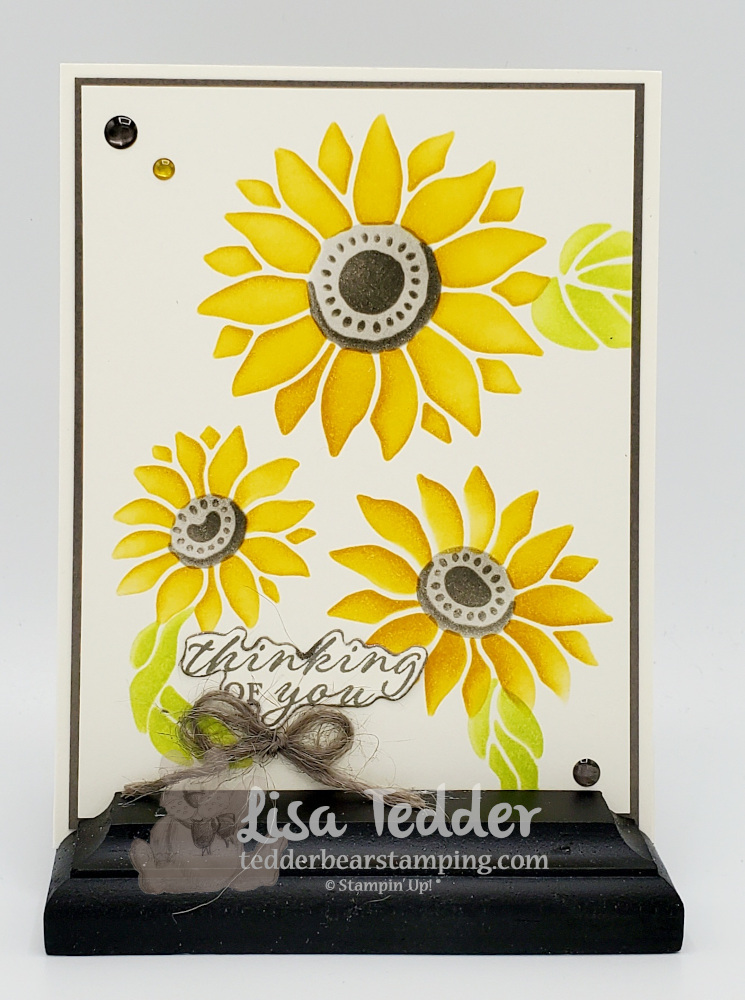
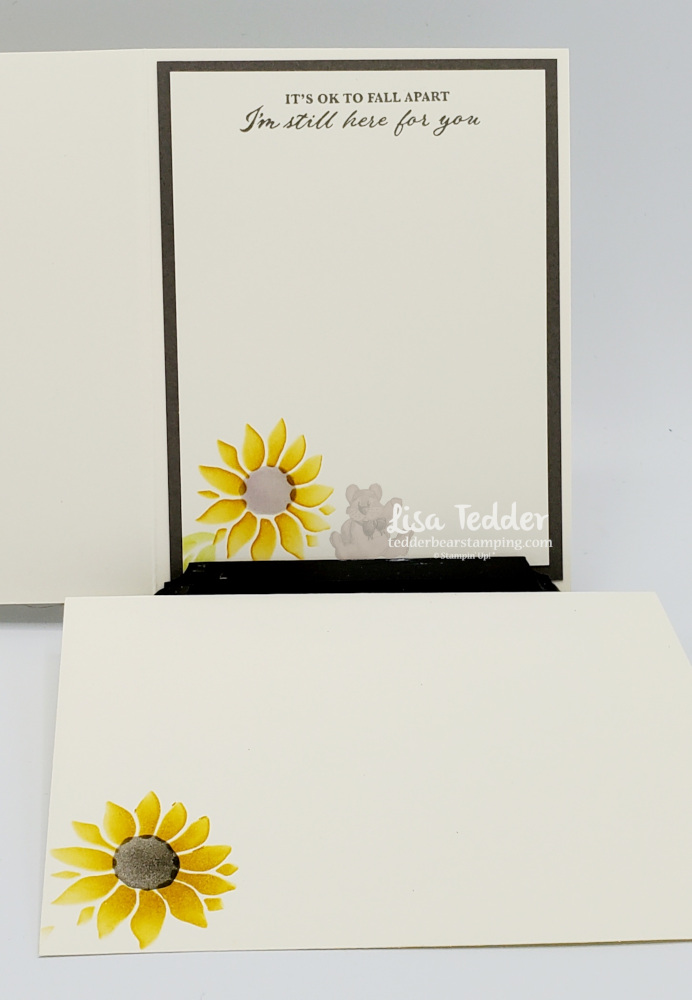
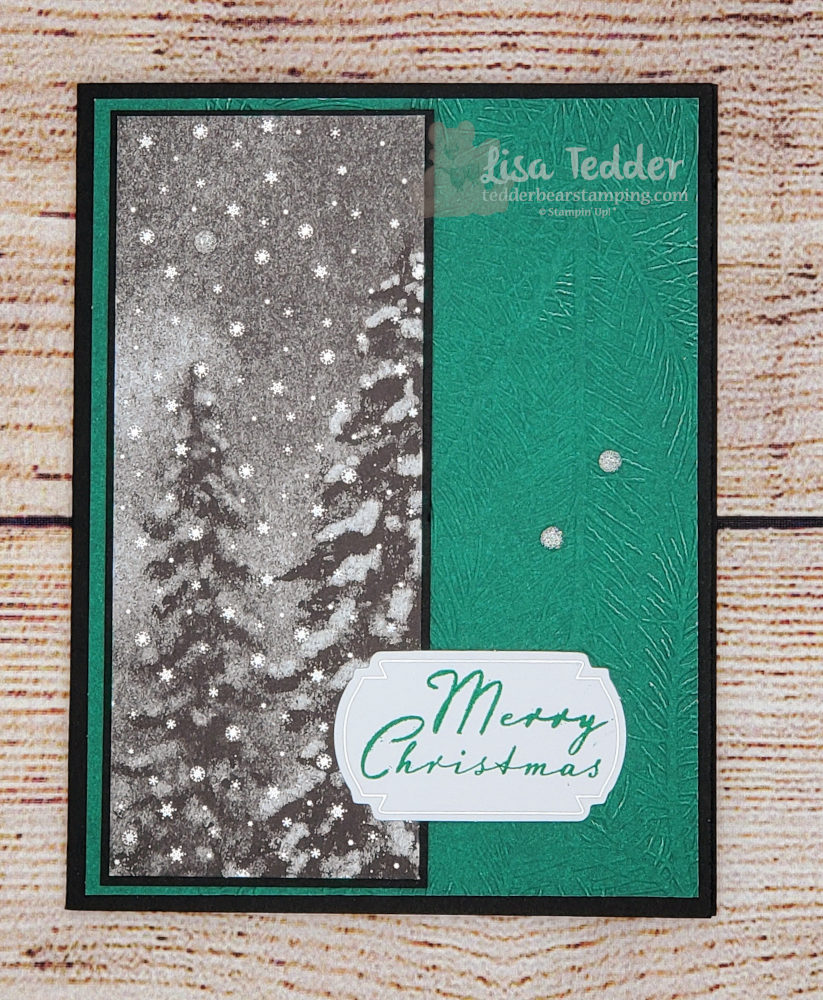
Hey Guys, Today I’m showing Sunflowers made easy! Because I don’t use Masks very often I thought maybe you don’t either. Undeniably Sunflowers are one of the most popular flowers, so when I saw these Masks and how pretty the flowers are, I had to get it! Certainly, if by chance you missed my video showing how easy and fun it is, click here to see it! Surely you know that I give away my cards to those watching Live (in a drawing, of course)!

Sunflowers made easy AND Houndstooth

Sunflowers made easy
Sunflowers made easy as well as Houndstooth!
Sunflowers made easy, So Pretty!!
Sunflowers made easy

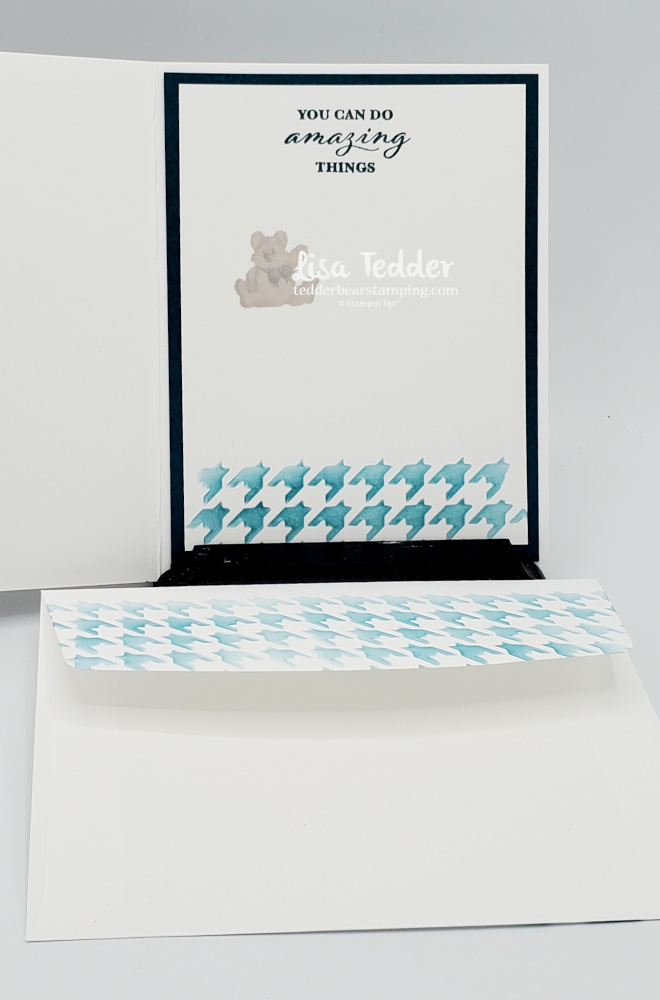
So I showed you Sunflowers made easy, I didn’t mention that the masks also have Houndstooth! Indeed doing the flap on the envelope with Houndstooth is really pretty!! Of course, let me know what you think!

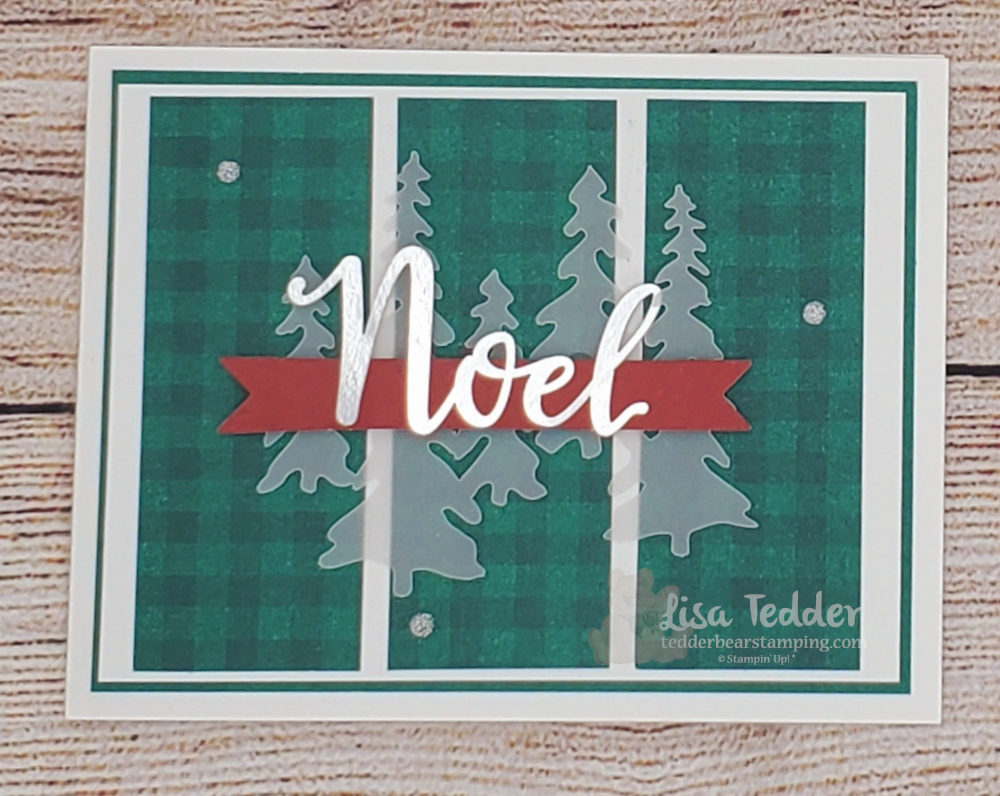
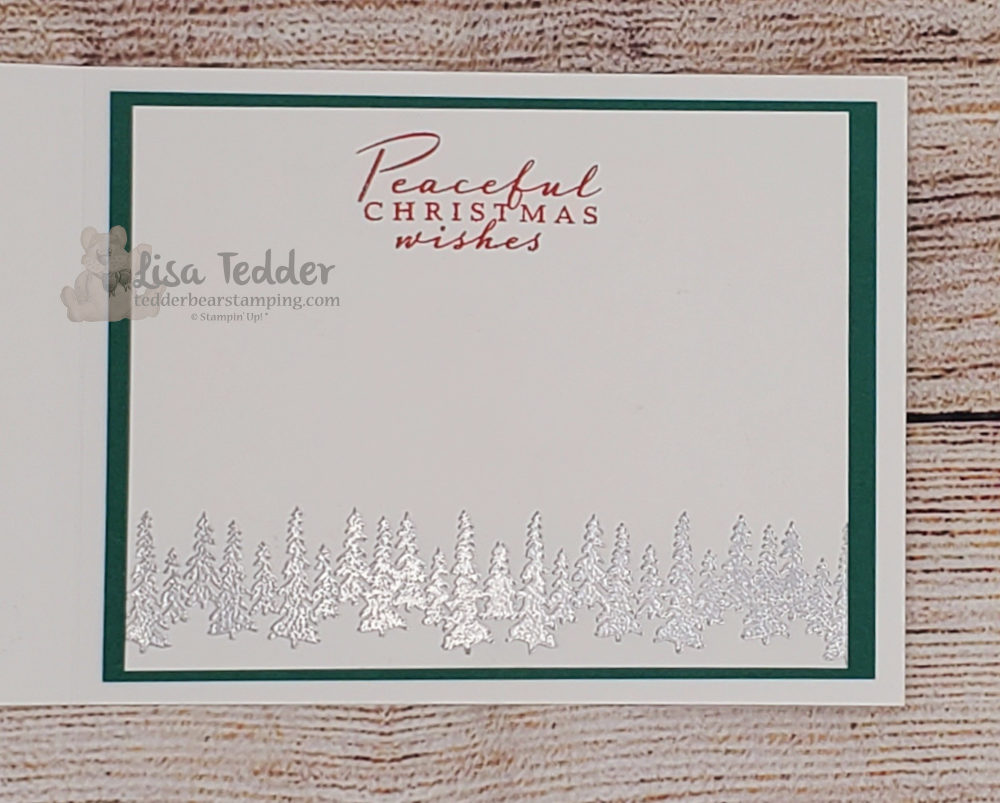
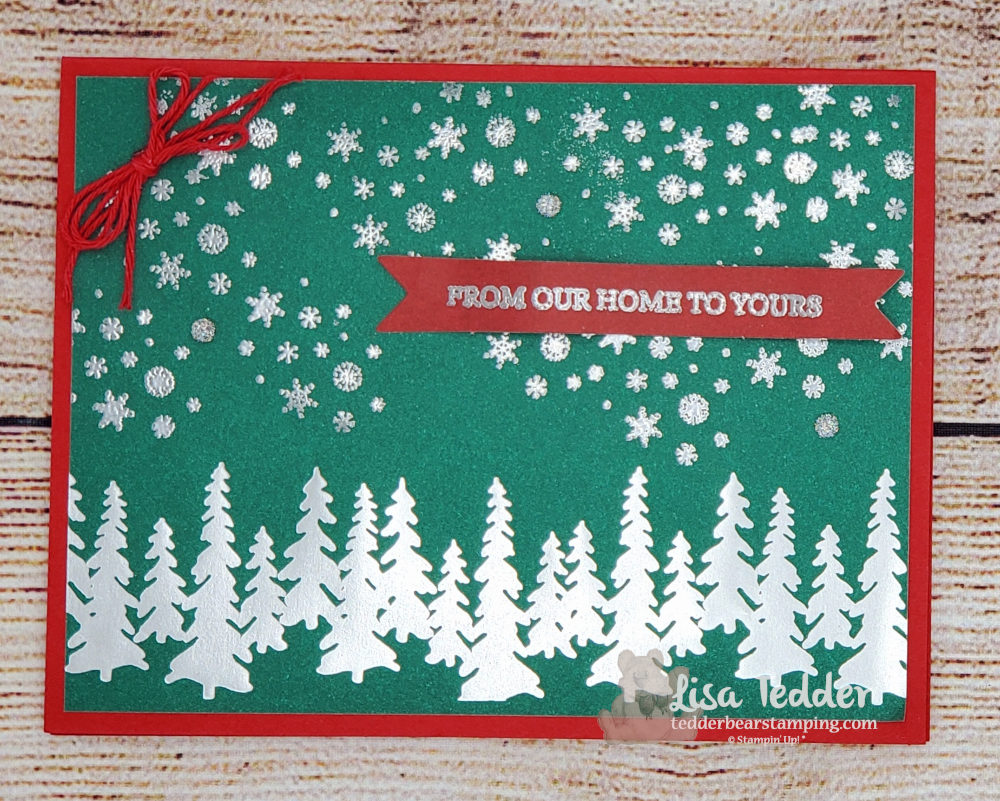
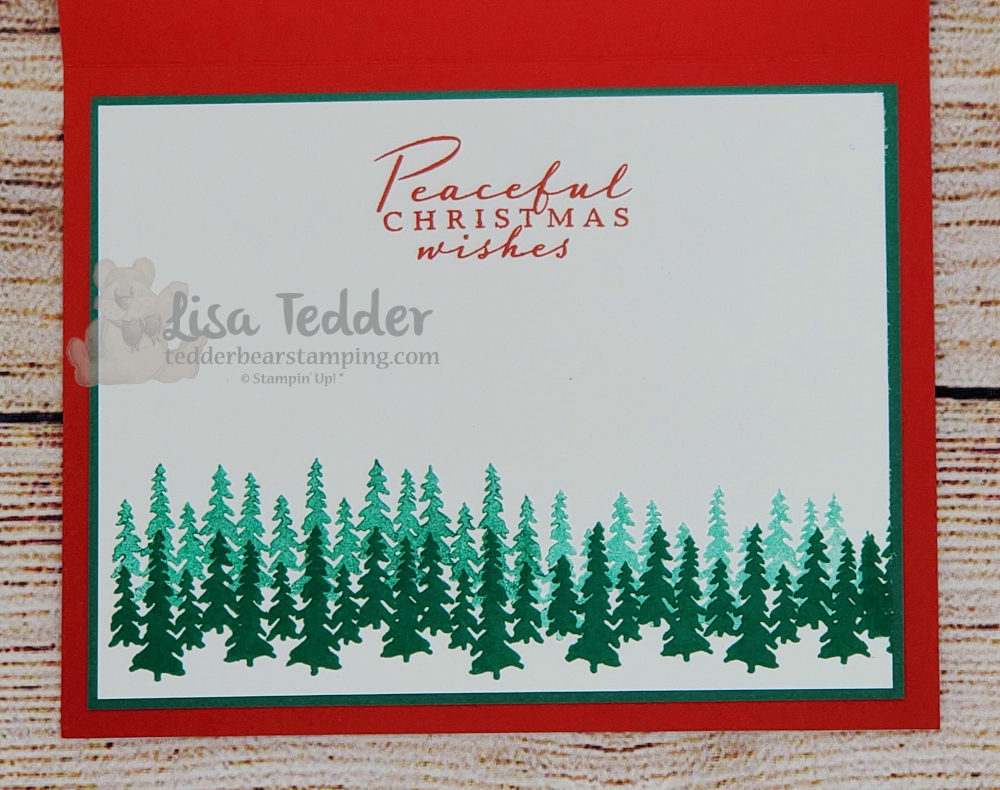
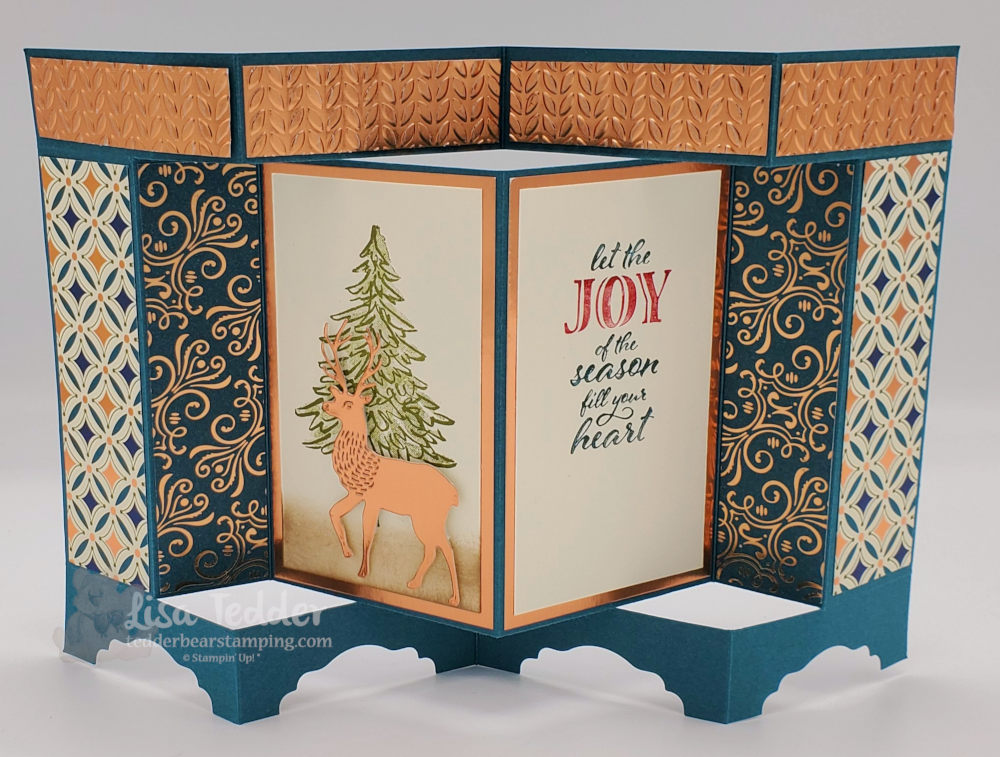
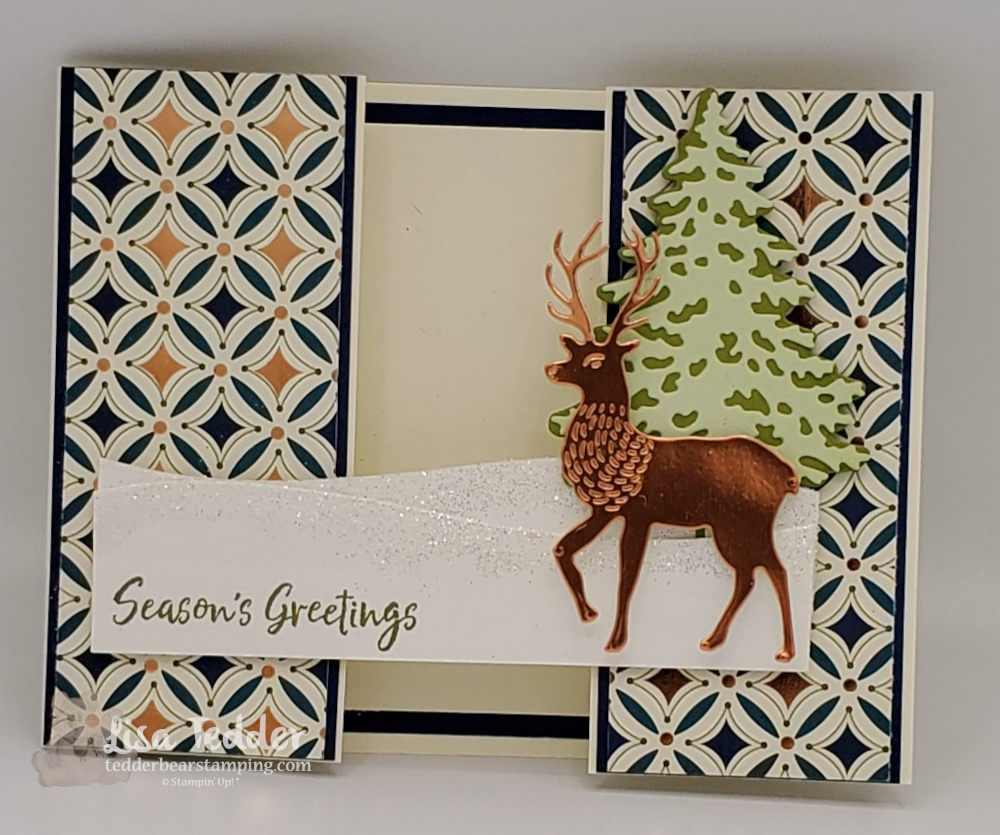
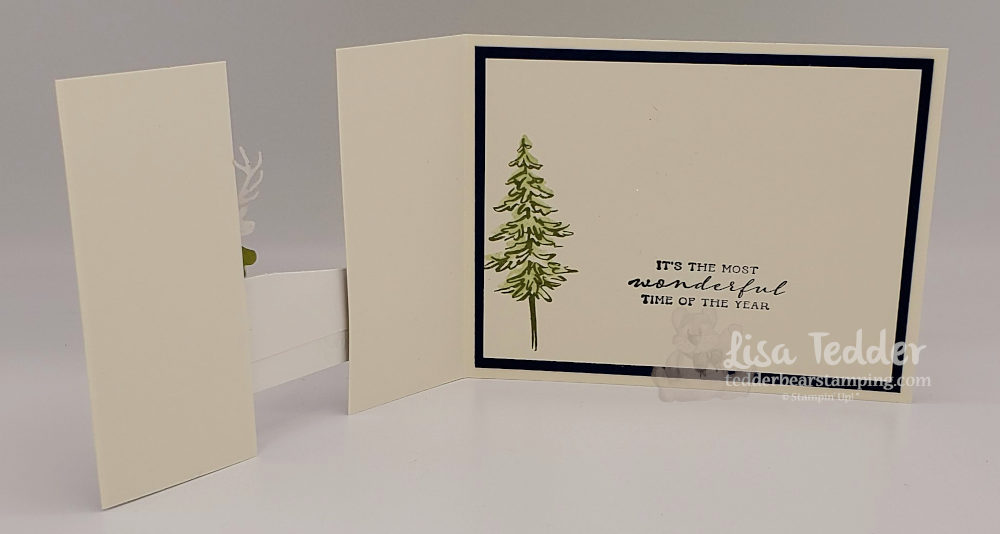
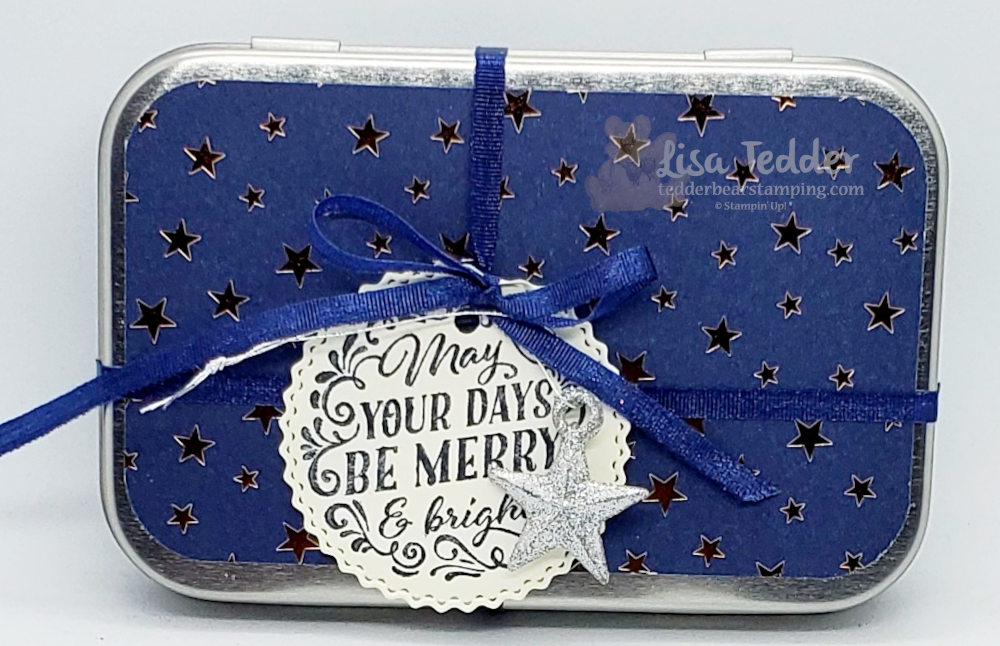
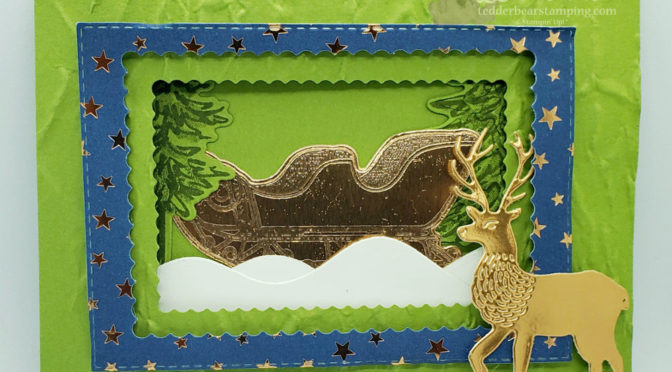
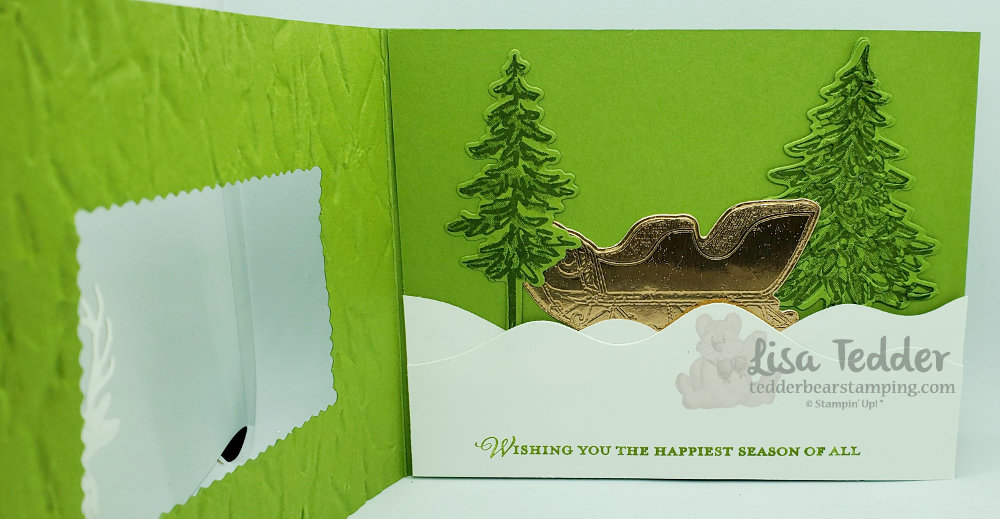
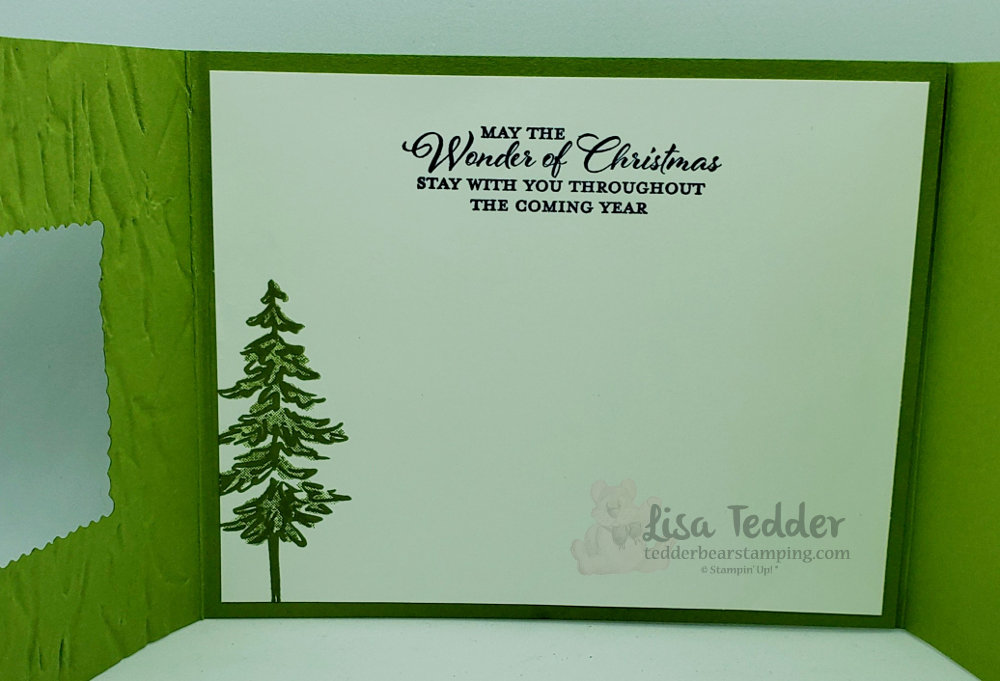
Are you ready for Christmas? Early Bird Special!

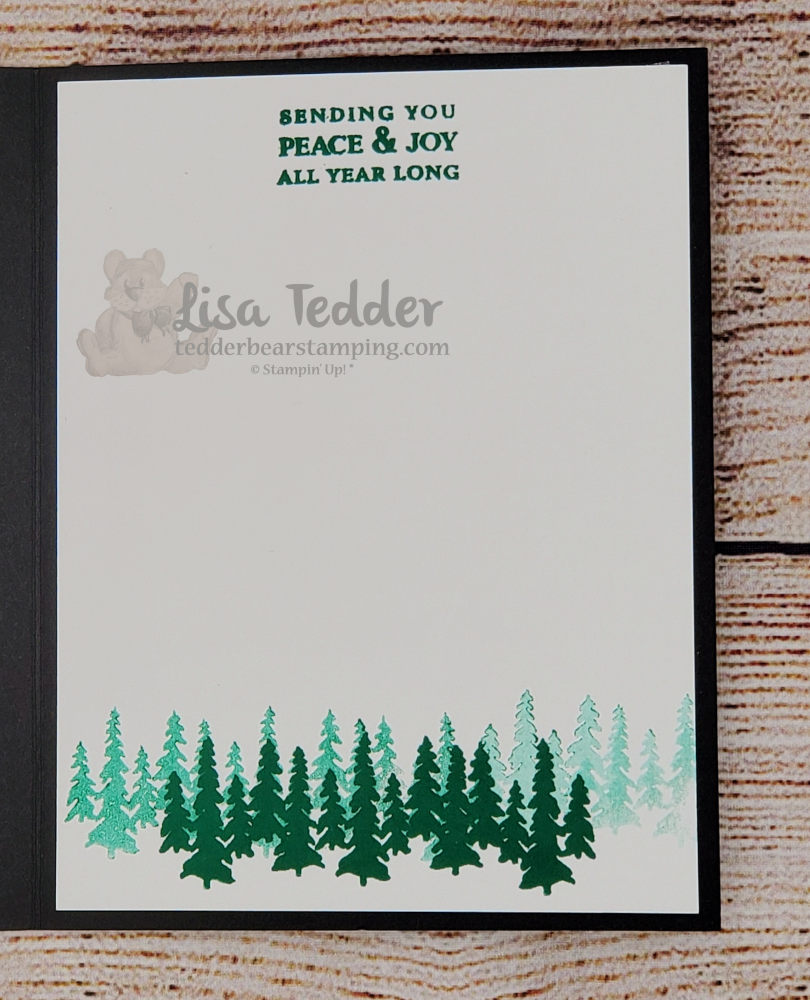
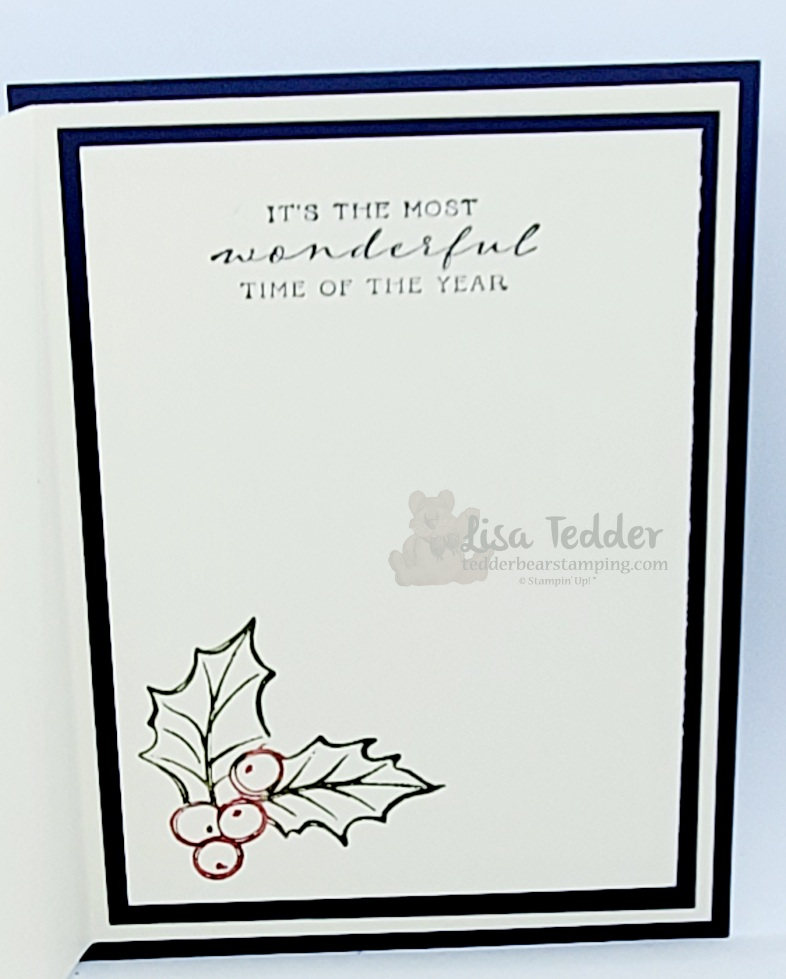
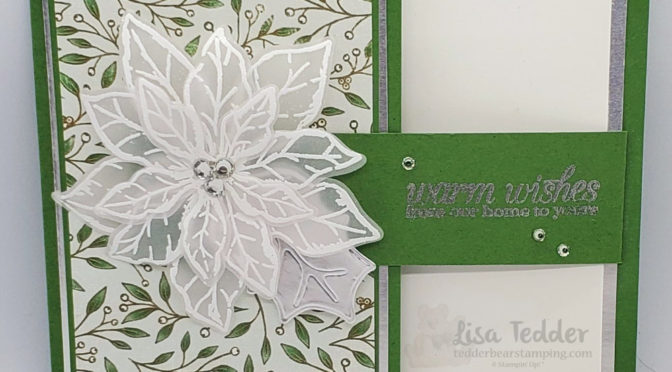
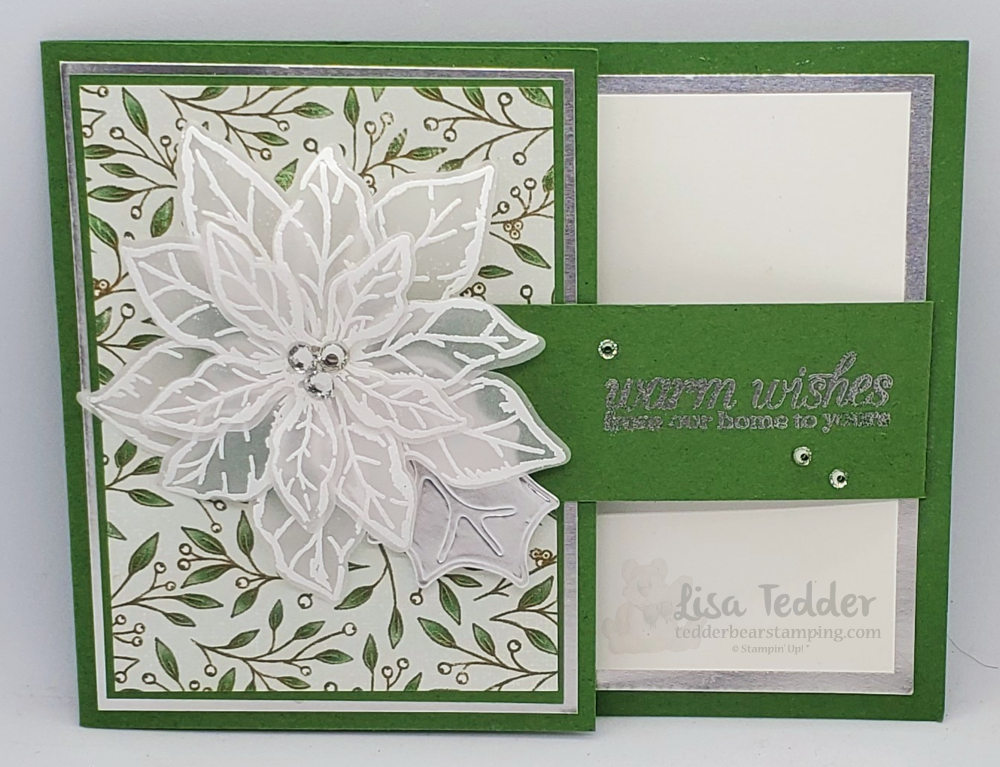
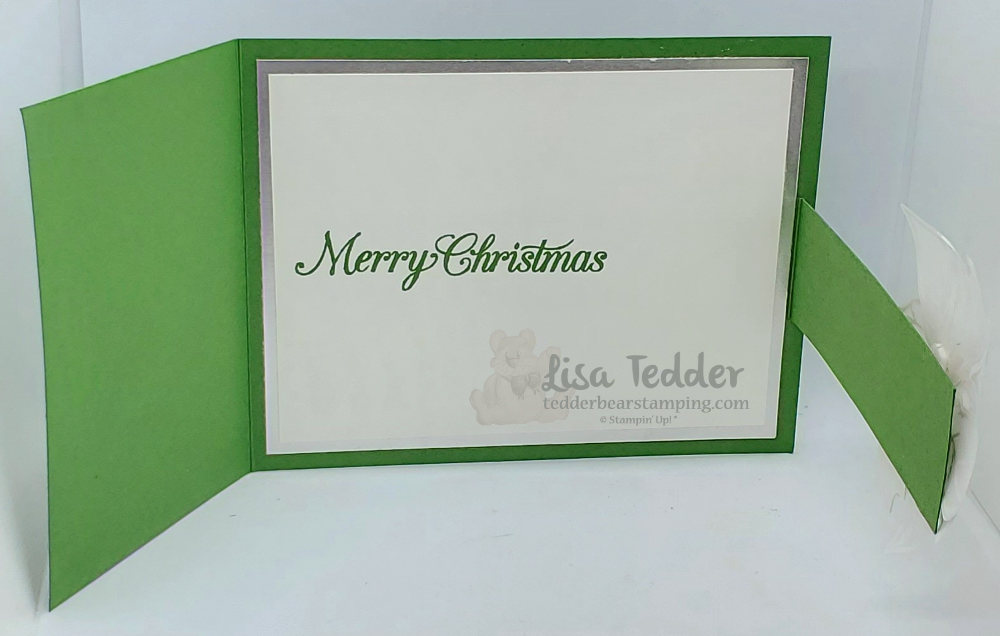
What? Christmas already?! Well, I’m not quite ready for Christmas but I can help you make your Christmas cards AND have fun visiting, crafting and meeting new Friends! Every year I have Christmas card classes and it’s all day where we listen to Christmas music, craft, eat, laugh and generally have a ton of fun! I also suggest if you can’t make it live, you can get the fixin’s (I’ve lived in the South too long!) for the cards sent to you at your door! Another way you can be ready for Christmas is to buy the PDF’s all by themselves. Of course, If you are interested click here to see how! I have an Early Bird price so don’t wait, it expires September 1st. However, If you have seen the cards I have made, you know that these will WOW your family and friends!

Thank you so much!

Basically, I always tell you how much I appreciate you and I hope you believe me! Surely you know that I know that you can be anywhere, visiting any other site, but you chose mine! Of course that makes me happy and thankful! Especially, the fact that you are reading this tells me that you value what I bring to the crating world! I especially appreciate that you keep coming back! Particularly important, next week, I will be in Vegas for a SU! function, so I won’t be posting, but I’ll only be gone a week! So, stay tuned!!

Lisa Tedder
A former California girl living in North Carolina

Product List

I surprised myself!

New to me!

Hey Guys, I surprised myself with my cards today! I was playing around and kept changing up what I was doing when all of a sudden I had something new to me! If you want to see how I made them click here for my YouTube Live! With around 400+ videos there’s something for everyone, subscribe to my YouTube channel to let me know you like what you see! Of course, I’ve been doing weekly videos for almost 2 years and have hundreds of videos since 2017!

This one’s where I surprised myself!

See how I surprised myself!?

Card 2 was so much fun!!

This is just too stinkin' Cute!!
Inspired by Annette Elias from Netherlands

Can you see how I surprised myself?

Normally when I stamp I get ideas online (which I did with my 2nd card), but seriously the first card really morphed into this beauty, after Many tries! Don’t you LOVE when that happens?! Especially I love how the Designer Series Paper (DSP) looks like it is one piece. Also that the Parakeet Party is STUNNING with the Gold Shimmer Specialty paper is behind it! Of course, I apologize for using the Retired DSP from SAB Ring of Love, but it is so pretty and if anyone purchases $35 before my next video (10/13/22) I will send you the fixin’s for both cards including the DSP!!

A Sweet Deal just got SWEETER!

During the month of October, Stampin’ Up! is having a joining special! Usually the starter kit is perfect just the way it is, but this time they have upped the amount you get to spend!! For $99 you get to pick out $155 worth of product PLUS get catalogs, a paper pumpkin and ordering forms! Of course, you don’t have to sell to anyone else, I played with my friends and bought what I wanted to keep me happy. Laughingly I NEVER thought that I would STILL be playing with the product AND getting a Discount 19 years later! I have got to tell you, joining SU! was the BEST decision I’ve made (other than having kids and marrying my awesome hubby!)

Undoubtedly you would enjoy being a part of my team where we get together monthly and stamp together! We also get prizes and laugh together! If you are interested in Making the most from your investment please don’t hesitate to contact me for more info!

Lastly

Of course I want to thank you for being here! YOU are the reason I keep going! I get so tickled when I see my friends learn something new! Please let me know if there is anything you would like to see! Until next week!

Lisa Tedder
A former California Girl living in North Carolina

Product List

Peaceful Christmas Paper Pumpkin

‘Out of the Box’ Alternatives for Peaceful Christmas

Hey Guys,

Once a month I bring you ‘Out of the Box’ Alternatives for Paper Pumpkin, today I am using Peaceful Christmas! Of course, I love making Christmas cards, not sure why I love it so much, but every year it brings a smile to my face! For this reason, I am hoping that you will smile too! In detail, I have gone through each card on my YouTube Live today, here is the video if you missed it! Equally important, I have Lives every Thursday (sans Thanksgiving/Christmas) that you can catch, or watch the replays!

Occasionally, I will make three cards and that’s what I did this time! Once in a while the Paper Pumpkin kit inspires me so much I just HAVE to make more! Of course, I like to make my own designs for you, then I look online and make some others have made after I show you what I have done. That is to say that I get a LOT of use from thinking ‘out of the box’ and giving you alternatives!

To demonstrate how much I love this Peaceful Christmas Paper Pumpkin box here are my three cards!

Peaceful Christmas Paper Pumpkin
‘Out of the Box’ Alternatives for Peaceful Christmas
Peaceful Christmas Paper Pumpkin
‘Out of the Box’ Alternatives for Peaceful Christmas

As Always here are all the specifics for each card:

Stamps:

  • Peaceful Christmas Paper Pumpkin kit

Inks:

  • Real Red
  • Shaded Spruce
  • Versamark

Paper

Card 1:

  • Basic White Thick 4 1/4″ x 11″, score @ 5 1/2″, 3 3/4″ x 5″ (x2)
  • Shaded Spruce card from kit 4″ x 5 1/4″ (x2)
  • Checkered green from kit 1 3/8″ x 3 5/8″ (x3)
  • Other parts from the kit see picture

Card 2:

  • Real Red 4 1/4″ x 11 score @ 5 1/2″
  • Envelope opened up and cut to 5 1/4″ x 4″
  • Shaded Spruce from kit, cut card to 4″ x 5 1/4″ save other side for card 3
  • Basic White 3 3/4″ x 5″

Card 3:

  • Basic Black 5 1/2″ x 8 1/2″ score @ 4 1/4″, 2 1/8″ x 5 1/8″
  • Other half of card in Shaded Spruce cut to 4″ x 5 1/4″, embossed with Wintry 3D folder using the pine bough on right side.
  • Basic White 4″ x 5 1/4″
  • Front of card from kit with trees cut to 2″ x 5″
  • add parts from kit as shown in picture

Misc:

  • Dimensionals included in kit
  • Silver Embossing powder
  • heat tool
  • ribbon in kit

As I have said in the past, if you choose me as your Stampin’ Up! Demonstrator and place a qualifying order ($35 or more) you will get a pdf with 16 designs that you can use that has step by step instructions along with pictures! To illustrate here is a sneak peek of what you can get from shopping with me in October:

FREE 16 project PDF with Qualifying order!

Finally I want to say thank you for stopping by! Please leave me a comment if you did, I always think no one really reads this, and it would make my day if I found otherwise! Also, let me know if there is anything you would like me to make/or use and I will do my best to do that! Another key point is that below is all the supplies I used in picture form, click on any of them and you will be taken to my OnLine store and I would be honored if you chose me to be your Demonstrator! Until next time!

Lisa Tedder
A former California girl living in North Carolina

Product List

TWO Fancy Fold Christmas Cards

Hey Guys!

On my YouTube live video from today the 10th of December, I showed you two Christmas Cards that have a Fancy Fold! I LOVE cards that have something added to them that makes them more interesting and different folds definitely make them interesting!

First, I am going to show you the one that I am absolutely over the moon happy with!!

One of my Two Christmas cards with a Fancy Fold

Did you notice that other than the fold, this card isn’t all that detailed? Furthermore you only have to stamp Two images! Even though it doesn’t take a lot of stamps, it is STUNNING! Sitting here in my stamp room, I love to look at this card! Subsequently this will have to go to someone special who will really appreciate it!

As always here are the ingredients to make this card:

  • Stamps:
  • In The Pines
  • Wrapped in Christmas
  • Inks:
  • Old Olive
  • Crumb Cake
  • Markers: Pretty Peacock & Real Red
  • Paper:
  • Pretty Peacock: 11″ x 6 1/2″, scored @ 2 3/4″, 5 1/2″ & 8 1/4″ (Landscape), Turn to portrait: Score @ 1″ on BOTH sides. Cut while in portrait Place on 1″ mark then cut from 1 1/2″ to 9 1/2″, do this cut on BOTH sides!! Place back in so it is Landscape place cardstock to 1 1/2″ and score BETWEEN the cuts, flip and do the same on other side.
  • Copper: 2 1/2″ x 7/8″ (x4), 4 3/8″ x 2 5/8″ (x2), scrap for Deer
  • Brightly Gleaming Specialty DSP: 4 3/8″ x 1 3/8″ (x4….2 designs)
  • Very Vanilla 4 1/8″ x 2 3/8″ (x2)
  • Misc:
  • North Pole Wonder Dies
  • Dimensionals
  • Greenery folder
  • Paper Trimmer
  • Label Me Lovely punch

Now onto the Second card in my Live YouTube video! Incidentally this one is a peek-a-boo card. As with the first card this one also uses minimal stamps. Furthermore, this card is very striking even though it doesn’t have the folds the first card has.

2nd of my Two Fancy Fold cards

Who doesn’t love a good Die?! This card uses 2 of them and they really make this card Pop! Obviously you can tell that I LOVE the Designer Series Paper Brightly Gleaming, for the last two weeks for my Live’s I have used this awesome paper! It is selling out so be sure to get it before it’s gone! All of the stamp sets are retiring this year and if you go to my OnLine Store you can get them before they are gone & they may be at a discount!!

Here are the particulars for this card:

  • Stamps:
  • In The Pines
  • Wrapped in Christmas
  • Inks:
  • Old Olive
  • Night of Navy
  • Soft Sea Foam
  • Paper:
  • Very Vanilla Thick: 7 1/2″ x 4 1/4″, scored @ 5 1/2″, 4 1/4″ x 2 (x3), 5″ x 3 3/4″
  • Night of Navy: 4 1/4″ x 1 7/8″ (x2), 5 1/4″ x 4″ (inside)
  • Brightly Gleaming Designer Series Paper (DSP): 4 1/4″ x 1 3/4″ (x2)
  • Copper Foil: scrap for Deer
  • Soft Seam Foam: scrap for tree
  • Old Olive: scrap for tree
  • Window Sheet: 5 1/2″ x 4 1/4″
  • Whisper White 4 1/2″ x 2″ (for snow)
  • Misc:
  • North Pole Wonder Dies
  • Pine Woods Dies (or you can get the Bundle and save 10%)
  • Multipurpose Liquid Glue
  • Dazzling Diamonds (or any type of glitter)
  • Sponge & Silicone Craft sheet
  • Dimensionals

Besides showing you the two cards I am making, I also have a Pillow Gift to share with anyone who buys from my OnLine Store $35 or more! Want to see it?! AND if you place that order you also get the cardstock (cut and scored!) and anything I used (Sans Stamps) along with that Pillow Gift in the mail to your house! All orders must be in by Dec 15th, I mail them out to you on the 16th!

Isn’t it cute!?
Yummy Chocolate just for you!

For those of you who want to watch my Live video you can see it here: https://youtu.be/yAJ9eM_xTlU

Lastly, I also offer a PDF of 16 projects if you place a minimum order of $35 and that has Instructions for each project plus pictures! Here is a sneak Peek of the 16 projects:

16 projects with step by step instructions PLUS pictures! With minimum order.

I hope you have enjoyed your time on my Blog today! If you missed my Live last week, you can see it here. And you can see my post about last weeks video!

All the products listed above are in picture form below, just click on any image and you will be taken to my OnLine Store!

Please come back next week, I will be showcasing some NEW products from the Upcoming Catalog! If you would like one, or really two since I would send you the Mini plus the Sale-a-Bration catalog, just let me know!

Lisa Tedder
A former CA girl now living in North Carolina

Product List

Over the Top Christmas Card

Hey Guys!,

Today I am sharing with you a YouTube Live project that featured an Over the Top Christmas card. Of course, since this is part of a Mini Class, I am also showing you another Christmas card! One more thing, if you purchase $35 or more at my Online Store you will receive a Pillow Gift that you will really love!! Here is a link for you to use.

So, are you ready to see the Over the Top card?! I got this idea from Sara Levin, but used my own design!

Over the Top Christmas card!
Closed Over the Top Christmas card

As always, here are the specifics for this card:

  • Stamps:
  • Christmas Gleaming
  • Inks:
  • Pretty Peacock
  • Old Olive
  • Mossy Meadow
  • Real Red Marker
  • Mossy Meadow Marker
  • Blends:
  • Real Red Dk
  • Cinnamon Cider Dk
  • Mossy Meadow Lt
  • Paper:
  • Mossy Meadow 5 1/2″ x 8, 5 1/2″ x 8 1/2″ Score at 1/2″ on the 8 1/2″ piece landscape, watch video to see how to put together, then score @ 4″ & 12″
  • Very Vanilla 8 1/2″ x 3 1/4″, 9″ x 3 1/4″ Score @ 1/2″ on the 9″ piece landscape, watch video to see how to put together, then score @ 2 3/4″, 5 1/2″, 11 1/2″, 14 1/4″
  • Very Vanilla 5 1/4″ x 3 3/4″ (for back side), 2 7/8″ x 2 3/8″ (x2), scraps for stamping
  • Pretty Peacock 3″ x 2 1/2″ (x6)
  • Brightly Gleaming Specialty Designer Paper 2 1/8″ x 2 3/8″ (x4), 5″ x 3 1/2″
  • Copper Foil 5 1/4″ x 3 3/4″ (x5)
  • Misc:
  • Rectangle Stitched Dies sizes: #4 & #5 from biggest
  • Detailed Bands Dies
  • Wonderful Gems
  • All the Trimmings ribbon 27″ of either red or green
  • Dimensionals
  • Foam Adhesive Strips
  • Stampin’ Cut & Emboss Machine
  • Tear & Tape
  • Stampin’ Seal+
  • Gleaming Ornaments Punch Pack

Now, for the 2nd project! This one also uses Christmas Gleaming stamp set from Stampin’ Up!, because I want you to have as many choices for your stamp sets so you can get more for your money!

This one isn’t Over the Top but it’s so pretty!
Inside

Again, here are the specifics for THIS card:

  • Stamps:
  • Christmas Gleaming
  • Wrapped in Christmas
  • Inks:
  • Night of Navy
  • Balmy Blue
  • Old Olive
  • Soft Sea Foam
  • Pretty Peacock
  • Pool Party
  • Mossy Meadow Marker
  • Real Red Marker
  • Paper:
  • Night of Navy 5 1/2″ x 4 1/4″, 5″ x 3 3/4″
  • Very Vanilla 8″ x 5 1/4″ scored at 4″, 4 3/4″ x 3 1/2″, scraps for ornaments
  • Brightly Gleaming Specialty Designer Series Paper 5 1/4″ x 3/4″
  • Misc:
  • Gleaming Ornaments Punch Pack
  • Forever Greenery Trim Combo Pack
  • Dimensionals
  • Glue Dots

NOW onto the Very Pretty Pillow Gift that I featured on my video!

Pillow Gift for all Qualified Orders
Pillow Gift inside

Incidentally, to get the Pillow Gift and All the supplies (sans stamps) to make both cards, you only need to purchase a *Qualifying order to get it all, while supplies last! Of course there is a time limit for this, you must purchase by next Tuesday (December 8th) so I can mail it out on Wednesday!

But wait, there’s more! heehee LOVE saying that! If you purchase the *Qualifying order amount you also get 16 project ideas with step by step instructions plus pictures! Here is a sneak peek to the projects:

If you tuned into my Over the Top Live today you will get to see my project for this!

Finally, all supplies are listed below in picture form, click on any of the pictures and you will be taken to my OnLine Store, remember to get all of the above you will need to purchase a *Qualifying order of $35 or more!

Thank you so much for stopping by! Consequently, when I go Live next time, every Thursday at 4:00 eastern, I hope you can join me! I really love talking to you during my Live.

Lisa Tedder
A North Carolina girl who still loves California

*Qualifying purchase is $35 or more

Product List

Elegant Christmas Card with Magnetic Closure!

Hey Guys!

To begin with, I am showing you a really elegant and pretty Christmas card, that has a magnetic closure, you can see it on YouTube here!

First, have you seen projects using the Poinsettia Petals bundle on Pinterest?! As usual, I get my inspiration from there, but then I branch out on my own.
Second, I LOVE stamping on Vellum using White embossing powder, it makes any project look elegant! Such as my card (at least I think so!):

Christmas card with a magnetic closure, it’s behind the flower
Christmas card with a magnetic closure, the magnet is hidden!
  • As always here are the specifics for this card:
  • Stamps:
  • Poinsettia Petals Bundle
  • Inks:
  • Garden Green
  • Versamark
  • Paper:
  • Garden Green 8 3/4″ x 4 1/4″, 1 1/4″ x 5″ (scored @ 1/2″), 2 7/8″ x 3 7/8″
  • Silver Foil 5 1/8″ x 3 7/8″, 3″ x 4″, scrap for leaf
  • Poinsettia Place Designer Series Paper 2 3/4″ x 3 3/4″
  • Whisper White 4 7/8″ x 3 5/8″
  • Vellum enough to stamp the three layers of flower
  • Misc:
  • Stampin’ Cut & Emboss Machine
  • Magnetic Plate
  • White Embossing Powder
  • Silver Embossing Powder
  • Heat tool
  • Rhinestones
  • Dimensions
  • Stampin’ Seal +
  • Magnets (click to see which ones)

Similarly, as above you will see all the supplies in picture form below, click on any of them to be taken to my OnLine Store!

Therefore, if you purchase $35 or more you will be sent a PDF that has 16 tutorials with pictures and step by step instructions! Subsequently, this is my gift for you! In particular, I appreciate you being here and supporting me! Thus, here is a sneak peek of what you will get:

Sneak peek for purchases $35

Incidentally, last week, like this year…..was a bad one for me! Namely, I had to deal with Migraines and reactions to some new medicine, I didn’t get ANYTHING done.
So, I am off and running this week! Yes, I know it is Friday, but I have been VERY busy all week!

To Summarize, thank you for stopping by! Come back next week I have a great project planned! In addition to this card, if you would like to see another Fancy Fold Christmas Card, click here.

In conclusion, be sure and subscribe to my blog AND sign up for my Newsletter (I send out other project ideas!) one click and you will be added!

Lisa Tedder
A California girl living in North Carolina

Product List

Three Panel Christmas Card your friends & Family will cherish

Hey Guys!

Today I am sharing with you a Christmas in July Card that has three pages! Make a Christmas card this year that your family and friends will cherish forever!

I LOVE cards that make you want to pick them up and check them out! Since there aren’t very many ideas on Pinterest yet for the New Holiday Catalog from Stampin’ Up!, I had to come up with something on my own. I always say that I like CASE’ing (Copy and Share Everything) because then I don’t have to be intimidated by starting from zero. BUT when I do come up with something, I’m usually happy that it’s my own design. You can catch my Youtube video and see how I made this card!

Here is the front of my card:

Doesn’t this make you want to pick it up and turn to the next page?! Your friends and family will cherish getting this card for Christmas!

Middle page:

Middle page of my 3 page Christmas card

And now for the inside:

Inside of my 3 page Christmas card!

I would love to get a card like this in the mail! Wouldn’t you?!

Here are the specifics for this card:

Stamps:
In the Pines Bundle
Wishes & Wonder Bundle

Inks:
Versamark
Night of Navy
Old Olive

Paper:
Old Olive 4 1/4″ x 11″, 6″ x 4 1/4″ (scored @ 5 1/2″), 5 1/2″ x 3 5/8″ (for trees)
Whisper White 5 1/4″ x 4″ (inside), 3″ x 5 1/2″ (for snow)
Copper scraps for deer and sleigh
Brightly Gleaming Designer Series Paper (DSP) 4 1/2″ x 3 1/4″

Misc:
Foam Adhesive Strips
Stitched so Sweetly Die
Stitched Rectangles Dies
Old World Paper 3D folder
Clear embossing powder
Heat tool

As always, below you will see these supplies in picture form. Click on any of them and you will be taken to my OnLine Store. ****NOTE: My OnLine Store is changing as of the 1st of August, the links on my blog before that date will not take you to the exact item after (for the posts I’ve made before then). So, any time after August 3rd if you click on a link (from an earlier post) it will take you to my store, just not to the exact item.

If you decide to shop with me, you will receive a pdf with 16 project ideas with pictures and step by step instructions (you just need to spend $35). Here is a sneak peek of what you will get in the month of August!

Sneak Peek for any purchase of $35 or more.

If you missed my last post doing a Christmas in July card, click here and you can go see what else I made for my class! It’s a Blog Hop so you won’t want to miss out! Like I said your friends and family will cherish getting a handmade Christmas card forever!

Thank you for stopping by! I love it that you take time to check out what I’m doing! Don’t forget to go check out my YouTube Channel to catch up on all my designs!

Lisa Tedder
A California girl living in North Carolina

Product List

Christmas Card #11 Homemade Kindness

Hey Guys!

I hope you are enjoying my posts on my Christmas Cards that I will be doing in classes!  I love showing my girls these cards and hearing their oooh’s and aaaaah’s!  It totally makes my day!

I looked on Pinterest to get some ideas for this stamp set and there aren’t any out there!  So, here is my idea for a christmas card!

I love this Stamp set!  I’ve already started a scrapbook page using this set!

I am not a great colorer (is that a word?) but with the Stampin’ Up! Blends it is really easy!  Here are the particulars for this card:

Stamps: Homemade Kindness
Cardstock: Real Red 4 ¼” x 11”,5 1/8” x 3 7/8”,  Silver Foil 5 ¼” x 4”,  Whisper White 5 ¼” x 4” (inside), 5” x 3 ¾”
Inks: Memento Black, Call Me Clover & Basic Black markers, Blends: Real Red combo, Call Me Clover combo, Crumb Cake Combo, Smoky Slate combo, Color Lifter
Misc: Rhinestones

Below are pictures of what I used to make this card. Click on any picture to be taken to my OnLine Store!  If you live in the US and don’t have a Stampin’ Up! Demonstrator I would love it if you would choose me!

Thank you for stopping by!

Lisa Tedder
A California girl living in North Carolina
Product List


Christmas card #7 Spirited Snowmen

Hey Guys!,

I am having so much fun making Christmas Cards for my local girls.  The class is in October, and we spend all day eating, stamping and having fun!  Everyone brings a dish to share, I have everything cut and ready for everyone to stamp and use the Big Shot.  16 cards are what all attendees take home with them!  3 each of 5 designs and 1 Special card.  Stampin’ Up! has the BEST Christmas stamps!

Here is the card I am sharing today:

Isn’t this snowman the cutest!?   This card is easy but still a lot of fun to make!  I stamped the snowman on white, then put a mask of the snowman on top of him so I could sponge Pool Party behind the snowman and not get him blue.  I then colored him with Blends.

All the supplies used on this card are listed below, just click on any picture and you will be taken to my OnLine Store!  I would love to be your SU! Demonstrator!

Here are the particulars for this card:

Stamp Sets: Spirited Snowmen, Timeless Tidings
Cardstock: Cherry Cobbler 8 ½” x 5 ½”, 5 ¼” x 4”, All Is Bright DSP 2 ½” x 5 ¼”, Night of Navy 5 ¼” x ½” (x2), Sparkle Glimmer paper 5 ¼” x ½” (x2), Whisper White 4” x 3” (for oval), Crumb cake 5” x 3 ¾”
Inks: Memento Black, Cherry Cobbler, Pool Party, Night of Navy, Versamark, Blends: Cherry Cobbler combo, Pool Party combo, Soft Suede light, Black lt, Calypso Coral dk
Misc: Layering Oval Framelits, Wink of Stella, Swirls & Curls Folder, Embossing Buddy, White EP, Heat tool, Big Shot

This card makes me smile!  I hope you like it!

Lisa Tedder
A California girl living in North Carolina
Product List

Christmas Card #5 Dashing Deer meets Joyous Noel

Hey Guys!

Here is another CASE’d card.  I got the idea from Deborah Smart.  You can go see her card here.   I didn’t do the black behind the deer, but that’s all I changed.  Funny thing is that I TRIED to change it up, but kept coming back to her design.  So here it is:

The Designer Paper is absolutely GORGEOUS!  The Deer framelit is small enough that it still showcases this paper!!

Here are the particulars:

Stamp sets: Dashing Deer Bundle, Alpine Adventure
Cardstock: Merry Merlot 5 ½” x 8 ½”, Copper Foil 5 ¼” x 4”, Black 2 5/16” x 3 ¼”, 2 5/16” x 1 5/8”,1 5/16” x 7/16”,1 5/8” x 1 ½”, 7/8” x 2 5/8”, Joyous Noel DSP 2 3/16” x 3 1/8”, 1 ½” x 2 3/16”, 1 5/16” x 3 ¼”, 1 5/16” x 1 3/8, White 5 ¼” x 4”, 2 ½” x ¾”, Copper 2 ¾” x 3 ¾”,
Ink: Merry Merlot, Dk Cherry Cobbler Blend
Misc: Rhinestones, Dimensionals mini/reg., snips, big shot

I know that my girls in my Stamp class are going to love this one!

Below are pictures showing what I used for this card, click on any picture and you will be taken to my OnLine store!  I would love to be your demonstrator if you live in the US!

Lisa Tedder
A California girl living in North Carolina
Product List