Tag Archives: Whisper White 5/8″ (1.6 Cm) Polka Dot Tulle Ribbon

Ornate Garden Quilt Card

Hey Guys!

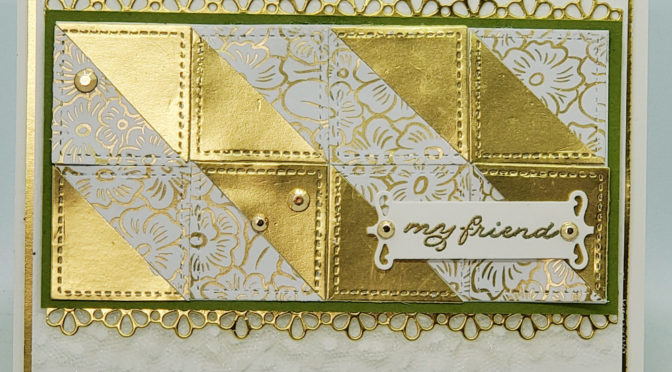
Today I am sharing with you a card where I have used the Ornate Garden Designer Series Paper (DSP), cutting it up with Square dies to make a Quilt card! Also included in the Quilt part is Gold Foil!

Hard to see, but I have ruffled ribbon on the bottom of the focal piece.

Starting out, I cut the Ornate Garden DSP and Gold Foil using the Stitched Shapes Dies (Squares). Then, I cut each square in half, lay them opposite each other until I had a pattern that made me happy. Once I had that done, I cut a piece of Whisper White to fit under and glued them into the desired Quilt shape I wanted. There are so many ways to manipulate the squares, but this is the way I liked it the most.

For the border on the top and bottom, I used the Ornate Borders Dies also using the Gold Foil. But first, I layered the quilt pattern onto Old Olive, to make it pop! Once I had all that done, I used some Polka Dot Tulle Ribbon along the bottom and ‘scalloped’ it so it had a ruffled edge. This turned out so pretty!! It’s very subtle in the picture but in real life it stands out!

After more white cardstock and Gold Foil, my Quilt card is almost done! I needed a sentiment to add to the front so I used ‘my friend’ from the Stamp set Ornate Thanks from Stampin’ Up! NOT sure if you have noticed by now but I LOVE SU! This company has added so much fun/creativity and Friends to my life, not sure what I would do if I didn’t have Stampin’ Up! in my life!

Of course I had to top off my card with some bling! I chose Gilded Gems to add that final touch. So? What do you think? Could it be for a wedding, birthday, pick me up or all of the above!?

As usual, here are all the specifics for this card:

Stamps:
Ornate Thanks

Inks:
Versamark

Paper:
Whisper White Thick 8 1/2″ x 5 1/2″
Whisper White 5 1/8″ x 3 3/4″, 4 3/4″ x 2 3/8″ (for under Quilt)
Gold Foil 5 1/4″ x 4″, 5″ x 3/4″ (x2) for border, scraps for squares
Ornate Garden DSP scraps for squares

Misc:
Ornate Borders Dies
Ornate Frames Dies
Polka Dot Tulle Ribbon (white)
Gilded Gems
Dimensionals
Gold Embossing Powder
Embossing Buddy
Heat tool
Subtle 3D Folder

Also as usual, all the supplies will be listed below in picture form. Click on any of them to be taken to my OnLine Store. If you purchase $35 or more from me, you will receive from me two different tutorial bundles that will have step by step instructions PLUS pictures! Here is a sneak peek of one of the bundles:

One Bundle you will get if you purchase $35

Hope you are doing well! I’m still eating birthday cake from yesterday so of course I am doing well! LOL

Please come back and see me again soon! Don’t forget to sign up for my Newsletter, if you have done it in the past do it again, all the info was deleted! :-O I will be sending out the Newsletter around the 10th of each month.

Lisa Tedder
A California girl living in North Carolina

Product List

Puzzle Card

Hey Guys!

I was on the fence a long time before I decided to get the Love You To Pieces stamp set from Stampin’ Up!  I really love it, the sentiments are too cute!

Here is my card:

I used Designer Series paper for the main picture, you can’t beat the Petal Promenade Paper!

Here are the specifics  for this card:

PROJECT 1: Puzzle
Stamp Sets Pg #
Love you to pieces Bundle
Well Said
Paper
Rich Razzleberry 8 1/2″ x 5 1/2″, 3 1/2″ sq, 3 5/8″ sq
White 3 1/2″ sq, scraps 2 1/2″ x 4 1/4″
Petal Promenade 3 1/2″ sq
Flirty Flamingo 5 1/4″ x 4″ (x2)
Inks
Rich Razzleberry
Accessories
 Big Shot, Clear EP, Heat Tool
Tear n Tape
Polka Dot Tulle ribbon
Rich Razzleberry Velvet ribbon
Tombo Multi Purpose glue
Dimensionals

I recommend putting the DSP onto a piece that’s the same size of thick Whisper White.  This helps it not be so fragile when you run it through the Big Shot with the Puzzle Die.  Then turn it over, put Tear N Tape on the back to help hold it together, but skip the one piece you want to be missing.

Below are the supplies that I used to make this card, click on any picture and you will be taken to my OnLine Store!  I would LOVE to be your SU! Demo if you live in the U.S.!  For every OnLine order I send you a small gift as a token of my appreciation! You can pick this card if you would like it!  If I still have it in my possession I will send it to you!  Just let me know which card you want.

Thanks for stopping by!

Lisa Tedder
A California Girl living in North Carolina
Product List

<!——– TAMS End —-

Want to see what my Customers earned at my Sale-a-Bration Celebration?!

Hey Guys!

Every year after Sale-a-Bration, I have a Party for those who participated in Sale-a-Bration each month.  Not only did they earn FREE goodies from Stampin’ Up!, but they get to attend my Celebration!

My husband cooks a gourmet meal of pasta (made to order for each guest).  I have a scrumptious dessert for those who didn’t eat too much pasta.

After dinner, we got to make 2 cards which I will post about later.  During cardmaking I bring out their first surprise.

I put candy in this,  everyone thought he was stinkin’ cute!  I didn’t come up with this, Susan Campfield made some like this,  I HAD  to make it!

Here are all the other things I made for my group:

Filled with M & M’s!

I got this idea from a  video on someone’s blog……It’s been so long since I made it I can’t find the video anymore! If you know who did this, PLEASE let me know!

I made a card that went with this candy…….

Not sure you can see it, but the inside white is embossed with the Tufted Embossing folder. And for the inside of the card:

They loved the card but the thing they LOVED the most is this………


Inside the pizza box is a scissor Charm!  Put these on your scissors handle and you will never lose them again! I put the initial of the person, a dog or cat (on Shrinky Dink) depending on their preference ( I asked them if they were a dog or cat person…..no context….they were so curious!!), a pretty beaded string, a tassel and then on Shrinky Dink I stamped the SU! Statement of the Heart!

I did a video if you are wanting to know how to make this!  You can find it here!

PLUS we made two cards!  That post will be on Monday so be sure and check in to see what we made!

If you are in need of a Stampin’ Up! Demo, I would love it if you would choose me if you live in the U.S.

Below are the links (in picture form) of what I used, click on any of them and you will taken to my online store!  If you choose, for your gift from me for ordering, I will make you a cute Scissor charm!

Thanks for stopping by!

Lisa Tedder
A California girl living in North Carolina
Product List

Bees, don’t you just love bees?!

Hey Guys!

Today I am sharing with you a card that I saw on Pinterest by Monica Gale.  I only changed up the yellow behind the ‘HI’, so technically I CASE’d it (Copy and Share Everything).

I fell in love with it as soon as I saw it and HAD to make it!  LOVE when that happens, it really gets my creative juices flowing!

I used the Large Letter framelits to cut out the HI, then placed some of the Delightfully Detailed Laser cut behind the panel, added dimensionals and then had the Mango Melody behind.  Colored the Bee  using the Mango Melody  Blend!

Here are the particulars for this card:

PROJECT 3: Hi
Stamp Sets Pg #
Dragonfly Dreams
Paper
Whisper White Thick 8 1/2″ x 5 1/2″
Whisper White 5 1/4″ x 4″ (x2), scrap
Mango Melody 5″ x 3 3/4″ (x2)
Inks
Memento Black
Blends: Mint Macaron light, Mango Melody Dark
Accessories
Large Letter Dies
Delightfully Detailed Laser Cut DSP
Classic Label Punch
Black Bakers Twine
Dimensionals
Wink of Stella/Whisper White Polka Dot Ribbon

Dazzling Diamonds with glue on wings

I was very happy with how it came out, can’t wait to see what my girls think when we do it in class!

Below are pictures of all the supplies used for this card, click on any of them and you will be taken to my OnLine Store!  Every Online order receives a gift from me!

If you are in the market for a Stampin’ Up! Demonstrator, I would love to be her!  Or you could join my Team and become a part of my SU! family!

Thanks for stopping by, hope you come back soon!

Lisa Tedder
A California Girl living in North Carolina

Product List

Dragonfly Dreams Photopolymer Stamp Set

Large Letters Framelits Dies

Delightfully Detailed Laser-Cut Specialty Paper

Whisper White 5/8" (1.6 Cm) Polka Dot Tulle Ribbon

Dazzling Diamonds Stampin' Glitter

Fine-Tip Glue Pen

Stampin' Dimensionals

Classic Label Punch

Whisper White 8-1/2" X 11" Thick Cardstock

Whisper White 8-1/2" X 11" Card Stock

Mango Melody Classic Stampin' Pad

Mango Melody Dark Stampin' Blends

Light Mint Macaron Stampin' Blends Marker

Big Shot

Basic Black Solid Baker's Twine

Christmas in July card #1

Hey Guys,

Today I am sharing with you the first of 6 Christmas cards I did in a class in July.

Stamping on Vellum is one of my favorite things!  I used Real Red ink and the stamp set Stylish Christmas by Stampin’ Up!

Here is the card:

Isn’t this pretty?  I used pearls in the center of the flowers.  I have a YouTube video if you would like to see how it was done!

I TRY to do a video every week.  I would love it if you would subscribe to my channel and support me!

Below is the supplies used to make this card, click on any picture to be taken to my OnLine Store!

Thanks for stopping by!

Lisa Tedder
A California girl living in North Carolina
Product List

<!——– TAMS End —