Tag Archives: Rhinestone Basic Jewels

Painted Glass Clean and Simple card

Hey Guys,

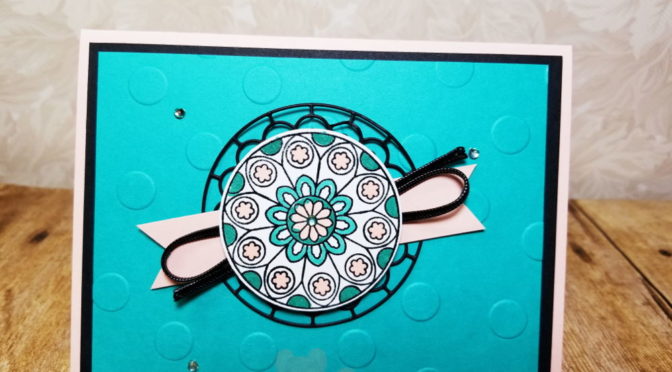
Today I am sharing with you a Clean and Simple (CAS) card.  I don’t do these very often, but I always ask myself why I don’t when I make things this pretty!

I used the Stained glass Bundle, which is a definite need if you haven’t bought it already!  The center of the image is punched out with the 2″ circle punch!  LOVE when I can use a punch!

Here is the card:

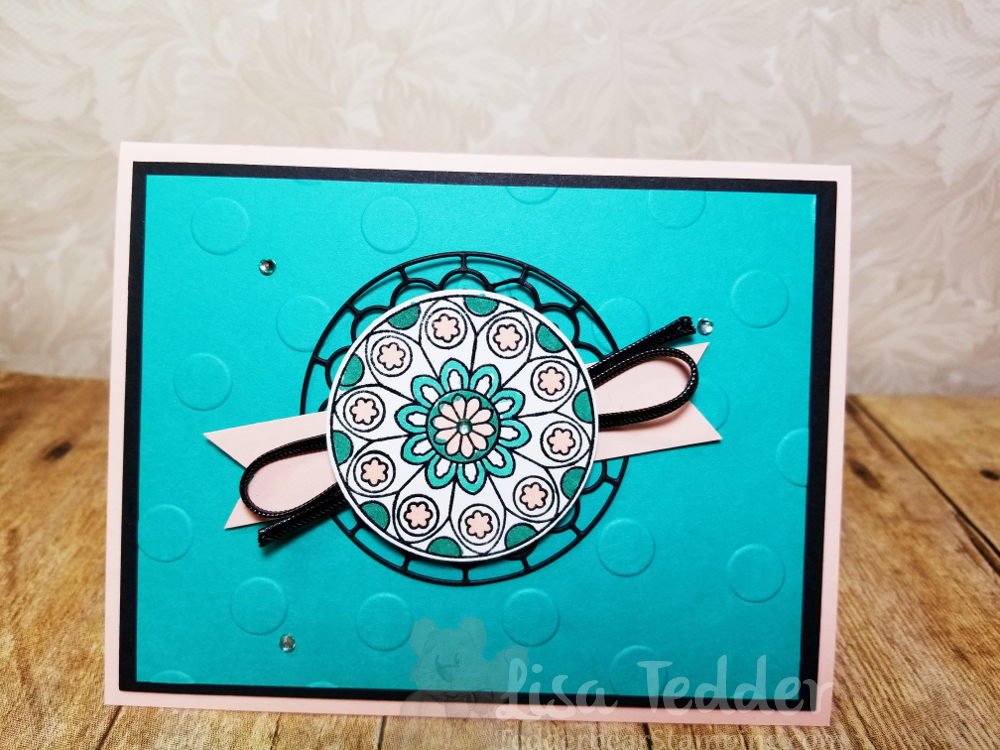
There is a Rhinestone in the center of the medallion that I colored with a Bermuda Bay Blend.  The black outside is from the die, cut twice.  It’s a half circle, but I put them together and hid the seam with the Banner in Petal Pink.  Then the Black Cording.  I also have more Rhinestones colored the same way around the card.  Polka Dot Embossing folder was used also.

Hope you like this as much as I do!!  I’ll be posting again soon!

Thank you for your support!

Lisa Tedder
A California girl living in North Carolina
Product List

<!——– TAMS End ——

Christmas in July Card #5

Hey Guys,

Today I am sharing with you my Christmas in July card #5.  I’ve been sharing, so if you missed it-click on my header and you can find the others.

Today’s card uses the Greatest Stamp set, Lovely as a Tree by Stampin’ Up!  This stamp has been around for a long time, but it is very beloved!  I also used the Hardwood stamp set to get the wood look and some Designer Series Paper.  Check out my pictures below for the supplies and click on any picture to be taken to my Online Store.

Here is the card:

Here is the inside:

This is another easy, but fun card!

Come back for #6!  This is the one that I used for a ‘Bonus Card’, i didn’t have enough of the DSP to make three each for 10 people!

Thank you for joining me today!  I appreciate your support!

Lisa Tedder
A California girl living in North Carolina
Product List


Christmas in July Card # 3

Hey Guys,

My class went really well for my Christmas in July!  We made 5 designs where we made 3 of each design, and then made one of another, so my guests got to make 16 Christmas cards!  We’ll be having  2 – 3 more of these classes but we will use different stamp sets!  I love these classes and it also gets all my cards ready for Christmas!  I don’t have to worry if I already sent a certain card to a family member/loved one because I ALWAYS make new Cards!

Here is the front of this one:

and the inside:

This was a fun one to make!  The white snowflakes are stamped onto the Night of Navy using Versamark and white embossing powder.  What a great way to make your own Designer Paper!

I colored my Rhinetones with my Night of Navy dark Blend!  I also added Wink of Stella underneath the trees.

Hope you like it!

The supplies are listed below, click on any of the pictures and you will be taken to my OnLine Store!

Thanks for stopping by!

Lisa Tedder
A California Girl living in North Carolina
Product List

Sneak Peek Rooted in Nature

Hey Guys!

While at OnStage, an event that demonstrators attend to learn and get product early, I saw a card that made me make this card.  I don’t know about you, but if I get an idea in my head it is very hard to wait to try and make it!  I have a class that is at the Senior Center here in Kernersville that I bring elegant cards for the participants to make, this is one of the cards that we will be making soon.

I used the background stamp set Hardwood from SU!  I stamped it with Versamark and then poured copper Embossing powder on it and heat set to make this dynamic background!  Very easy (and still fun to do even after 17 years…….I LOVE to watch the magic of embossing!) yet this is a Stunner!  The tree is from the NEW catalog from Stampin’ Up! called Rooted in Nature, that will be coming out in June 2018.

I got this set FOR FREE while at On Stage along with 4 other stamp sets!  If you want a job where you get freebies, get to play every day and meet FANTASTIC people, join my team and become a Demonstrator!

I  colored the Rhinestones using the Bronze Blends so it would all coordinate!  THAT is the reason I decided to join SU!, I don’t have to guess which colors coordinate!  Plus, I got the discount!  hahahaha

Thanks for stopping by, if you like what you see and want to buy from me, just click on any pic below and you will be taken to my OnLine Store!

Lisa Tedder
A California girl living in North Carolina
Product List

Wild About Flowers – Get yours before it retires!

Hey Guys!

Once again, I went to Pinterest to get some ideas for my Stamp class.  I ran across a card by Sue Lehrer.  I changed the flowers and the colors, the rest is her design!  I love when I am really busy and can’t come up with ideas that I can get them from others!

Here is my card:

I really love how the Washi is used on this card.  I forget about using it and then wonder why I don’t use it more when I do!

The ribbon is a favorite of mine too!  LOVE that it is staying in the new Catalog!

Dimensions:
Basic Black 8 1/2″ x 5 1/2″, 2 3/8″ x 4 3/8″
Whisper White 5 1/4″ x 4″ (x2), 4″ x 2″
Rich Razzleberry 4 1/8″ x 2 1/8″

If you want to buy this set from me, I would sure appreciate it!  Just click on any picture below to go directly to my OnLine Store!

Lisa Tedder
A California Girl living in North Carolina
Product List


Rainbows and Unicorns!

Hey Guys!

Today I have a really fun and super cute card!  I LOVE rainbows, but who doesn’t?  I also love Unicorns!  So I put them together!  I got this idea from Kirsten Aitchenson on Pinterest.  I gave the card some black to make the image pop, but otherwise it’s all her.  Isn’t it cute?

The Rainbow took a few minutes to cut out each color, but honestly? It didn’t take as long as I thought it would.  I LOVE this card!!

TIP!!:  Cut a small piece of white cardstock that you will use to mount your rainbow on.  The dimensions are 2 3/4″ x 1″.  Place adhesive on your white piece, and start your outer colors going down almost to the bottom of the white.  This will hold your rainbow together AND let you pop it off the card with dimensionals. Your white will be covered up by the cloud!

The sparkle paper is from the Myths and Magic 6″ x 6″ glimmer paper.

Here are the dimensions for this card:

Island Indigo: 5 1/2″ x 8 1/2″, plus scrap for rainbow
Basic Black: 5 1/2″ x 3 5/8″, 5 1/4″ x 4″ for inside
Soft Sky: 3 1/2″ x 5 1/2″
Whisper White: 5″ x 3 3/4″ inside and scrap for Unicorn
Scraps for Rainbow: Real Red, Pumpkin Pie Daffodil Delight, Old Olive, Pacific Point, Island Indigo, Perfect Plum

I colored the Rhinestones to go with the rainbow and also colored the Mane and Tail using the Blends.

I used Wink of Stella for the Unicorn.

Hope you like this as much as I do!!  Please visit my YouTube Channel to see my other creations and see how I make them.

Below are pictures of the supplies I used, click on any picture to be taken to my OnLine Store.  For any purchase you make with me you will receive one of my handmade cards!

Thank you for stopping by!  Please come back.

Lisa Tedder
A California Girl living in North Carolina
Product List

Hold on to Hope Easter Card

Hey Guys!

Today I am sharing with you a card I did for my Senior Center Class (not ALL of the people attending are Seniors!), they loved this card!  It’s so pretty  and uplifting!

I used the Painted with Love Designer Paper.  This paper Is so pretty I HATE calling it paper!  It seems like there should be a better name for how beautiful it is!  LOL

Here is the card:

The colors are so stunning!  And the Gold is very shiny.  I wrapped the Love Mini Tinsel around the Sentiment to mimic the Shroud that Jesus wore.  I hope you think that this card shows love for that awesome sacrifice!!

Below are the items I used, click on any picture and you will be taken straight to my OnLine Store!

Here are the dimensions for this card:

Thick Whisper White:
8 1/2″ x 5 1/2″, 2 7/8″ x 3 1/2″, 3 1/4″ x 2  5/8″

Melon Mambo:
5 1/4″ x 4″, 5″ x 3 3/4″

Painted with Love DSP:
5 1/4″ x 4″

Gold Glimmer:
2″ x 3″ (for the cross)

Thank you for stopping by!  I hope you come see me at my YouTube Channel!

I TRY to make a video every Tuesday, subscribe to my channel so you don’t miss my next fun card/project!!

Lisa Tedder
A California Girl living in North Carolina

Product List

NEW! Sneak Peek from the 2018 Occasions Catalog #2

Are you ready for card #2?  I am using the Petal Palette stamp set that will be coming out in January!  I love how this card came out!

The front uses the Beautiful flowers that I used the Blender Pens to color.  If you look close you can see the dots that I used that remind me of Baby’s Breath flowers, behind the flowers!  I used Smoky Slate stamped off for these.  This was fun to make and I will be doing this in class this month!

Here is the inside:

I love how this stamp has shades in the leaves and I didn’t have to do anything buy ink and stamp!  This will make a great Valentines card for one of your couple friends!  Or you can use it as a Wedding Card and color the flowers to match the colors of the Wedding!

All of the items used are listed below, click on any picture to be taken to my OnLine Store!

Lisa Tedder
A California Girl living in North Carolina
Product List

Card #5 – Christmas Cards

We’re onto card # 5, if you missed card #4 you can see it here!

Card #5 is another easy Christmas card, but it brings memories of my Childhood!  I loved watching Rudolph and this is what I think he looks like all grown up!  Of course it’s a Cartoon, but sometimes my mind likes to revisit!

Here it is!

I colored his nose by using Stampin’ Up!’s Blends in Cherry Cobbler on a Rhinestone!  Really makes it look as if he is lighting the way!

The Stamp set Merry Patterns is no longer available to buy, it was a special by SU! but my hope is that you might have it!

If you would Like my 7 page Tutorial with Instructions, Dimensions and Color Photos of each card, you only need to purchase  $50 from my OnLine Store, and I will email you a copy!  All supplies are listed below, just click on any picture to go straight to my Online Store!  Please use hostess code CGCDT6ZJ

Talk to you again soon, make sure you subscribe so you won’t miss #6!

Lisa Tedder
A California Girl living in North Carolina
Product List

Technique Tuesday Triple Flap Fold Christmas Card

I love when a project comes together! Click here for a video to see the process It took to make this beauty!  The great thing about the video is that I tell you the dimensions and supplies!

I was spending time on YouTube the other day and found this great idea from Dawn, which you can see here.  I loved the idea, but didn’t have her Halloween stamps, even though I LOVE Halloween (need to have new ideas every year for scrapbooking!).  So, I DID have the Christmas stamps from Stampin’ Up! called Father Christmas (I used EVERY stamp!, WooHoo) and Nature Sings.  These Stamp sets are PERFECT for my idea!

When do you use every stamp from a stamp set on ONE project?  I did for this one!  Not sure WHY I am proud of this, but I am.  😉

Here is the project closed:

Partially open:

And now all the way open!:

Isn’t this pretty!?  What I love is other than the front where I colored, there isn’t anything else that needs that much attention!  I DID sponge all the Vanilla pieces but I pretty much sponge everything so this wasn’t a big deal to me.

When I showed this around, I got so many Ooooooh’s and Aaaaaaaah’s!  LOVE when that happens!  Now the question: Who do I send this to?

The next question is what will be my technique for NEXT Tuesday?! Any suggestions? I have a great idea, not sure if I will go with that idea or one YOU give me!

You can click on any of the supplies listed below to be taken to my OnLine Store!

I hope you like this technique, I would love to see a ‘story’ you would like to create using this Fancy Fold!

Until next time!

Lisa Tedder
Tedder Bear Stamping
A California Girl living in North Carolina

Product List