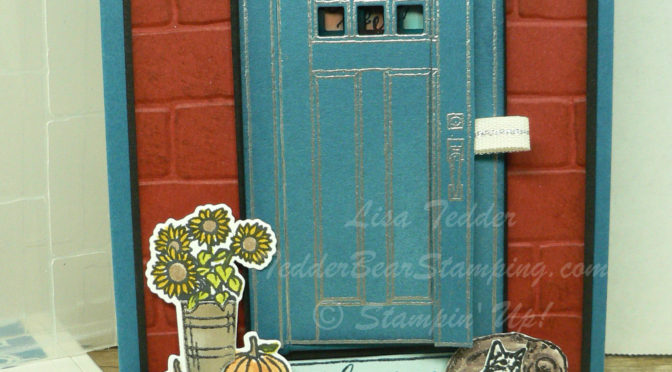
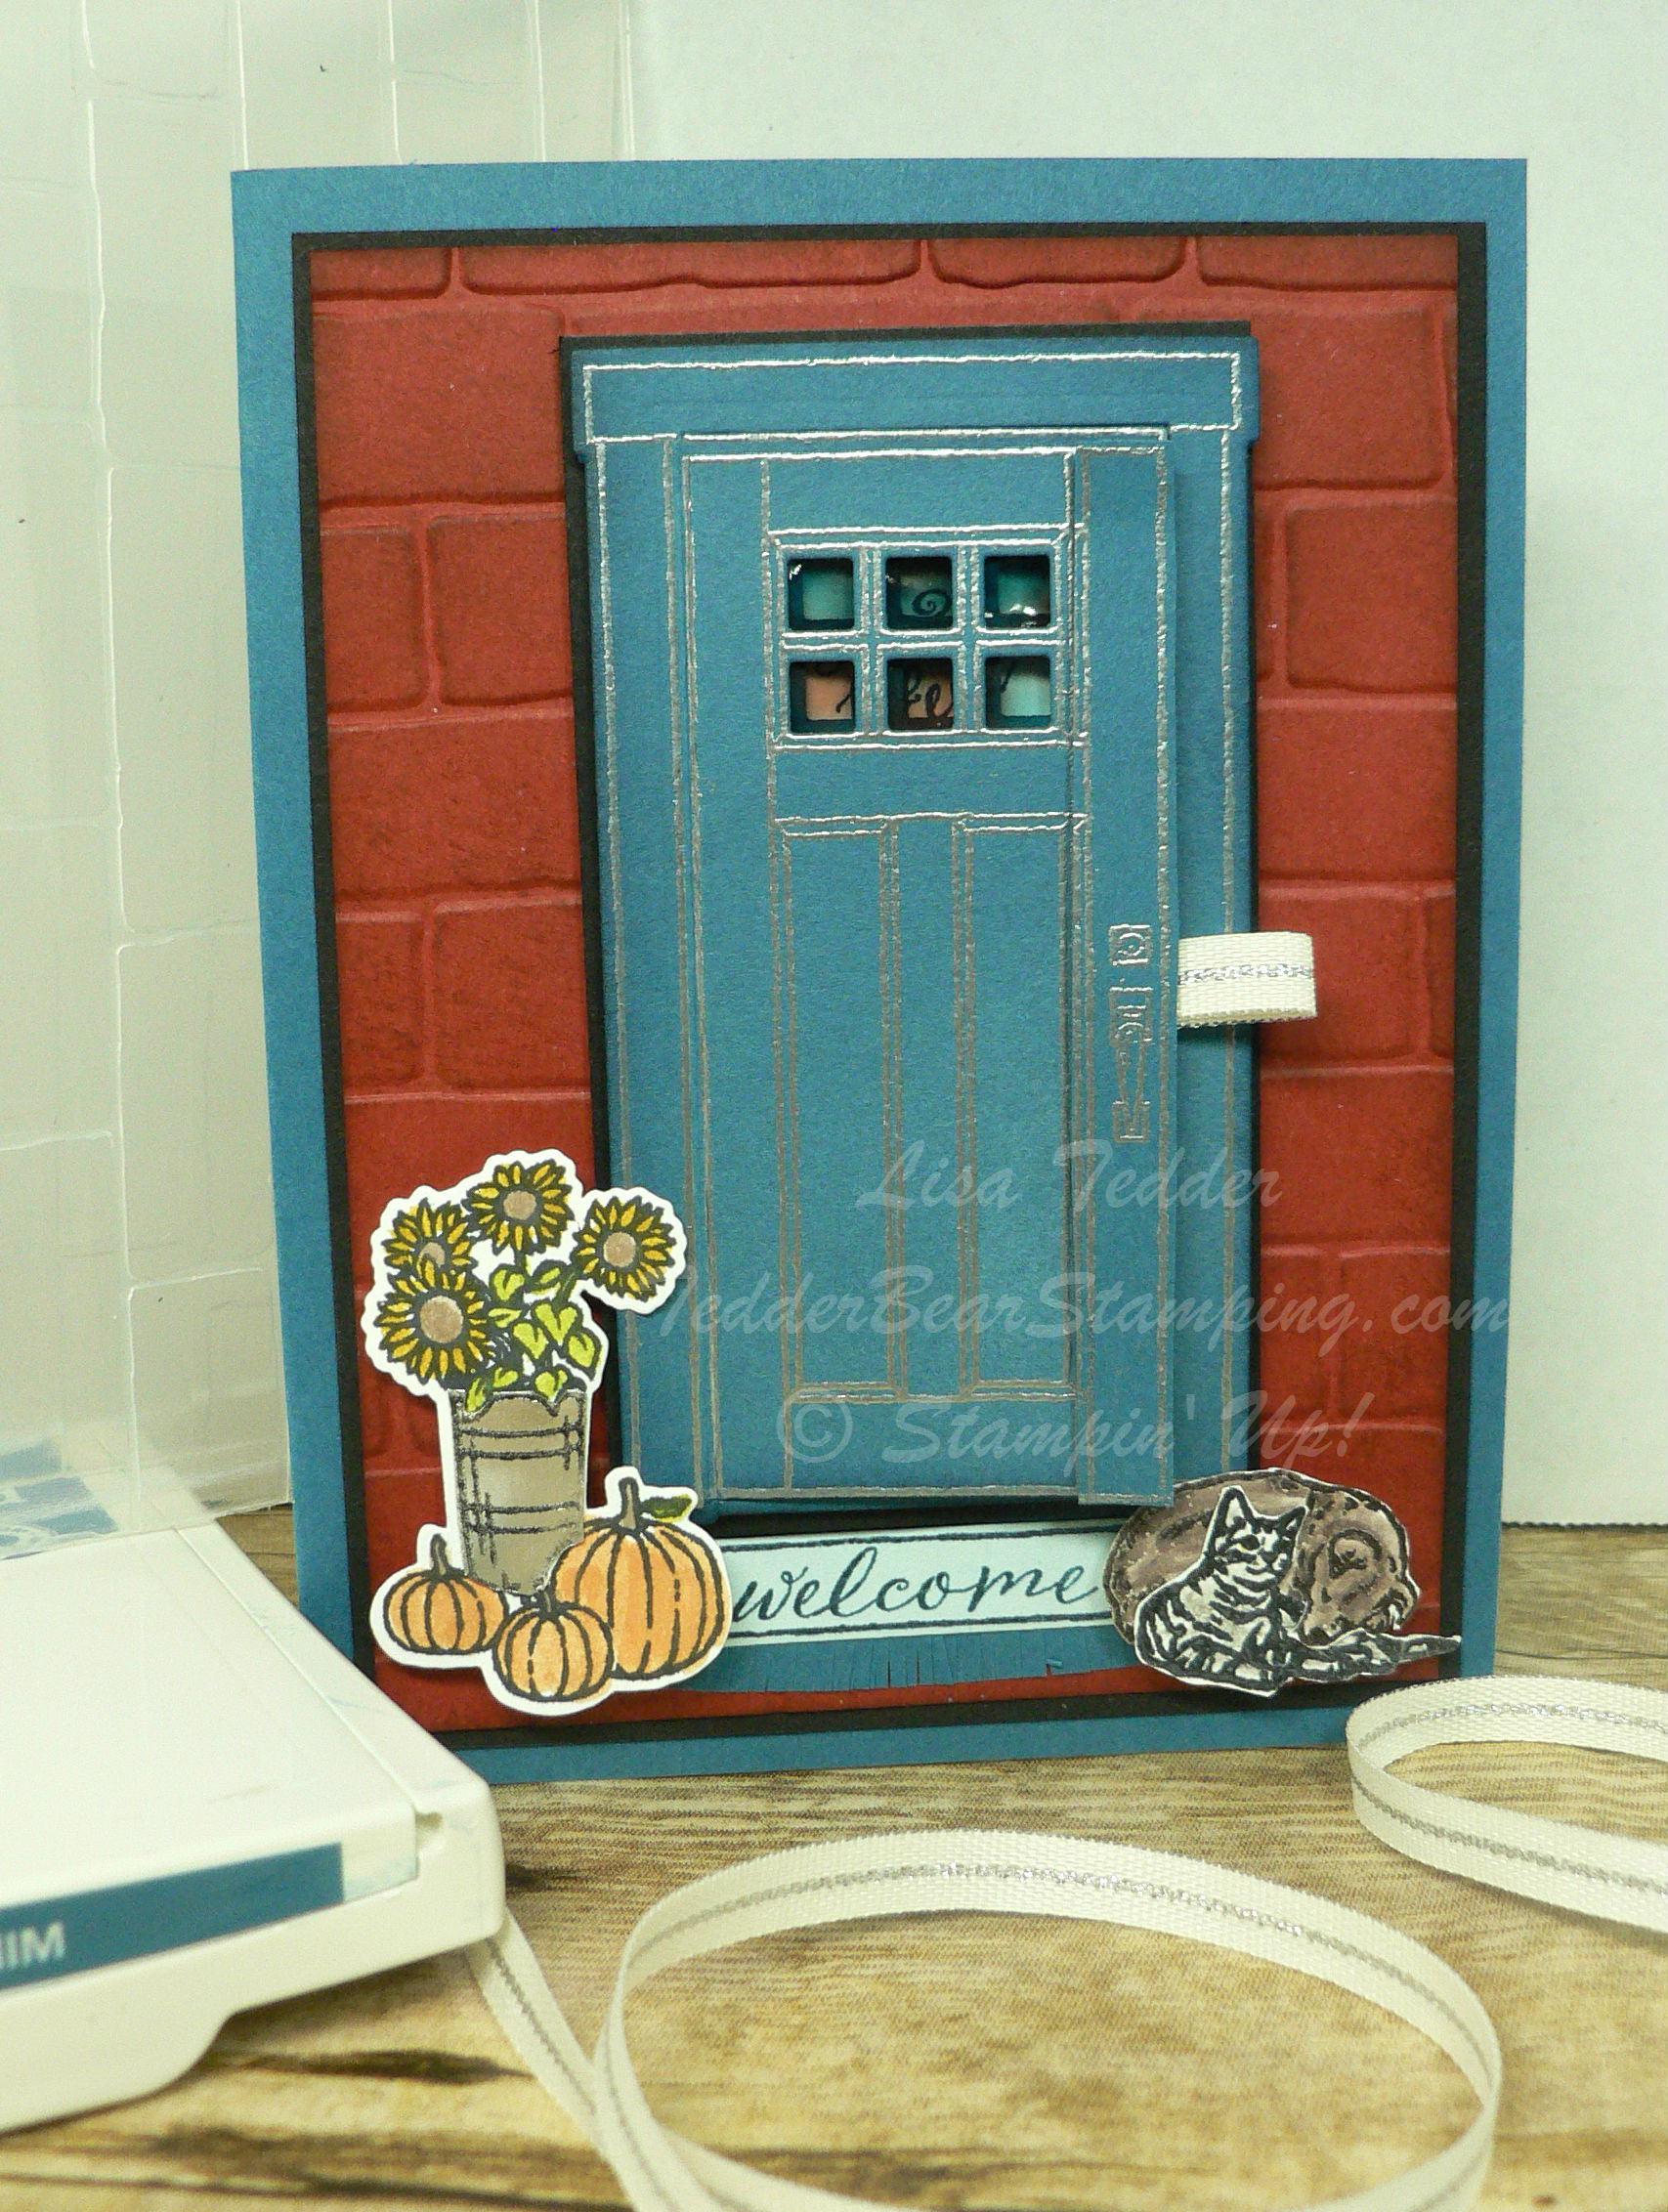
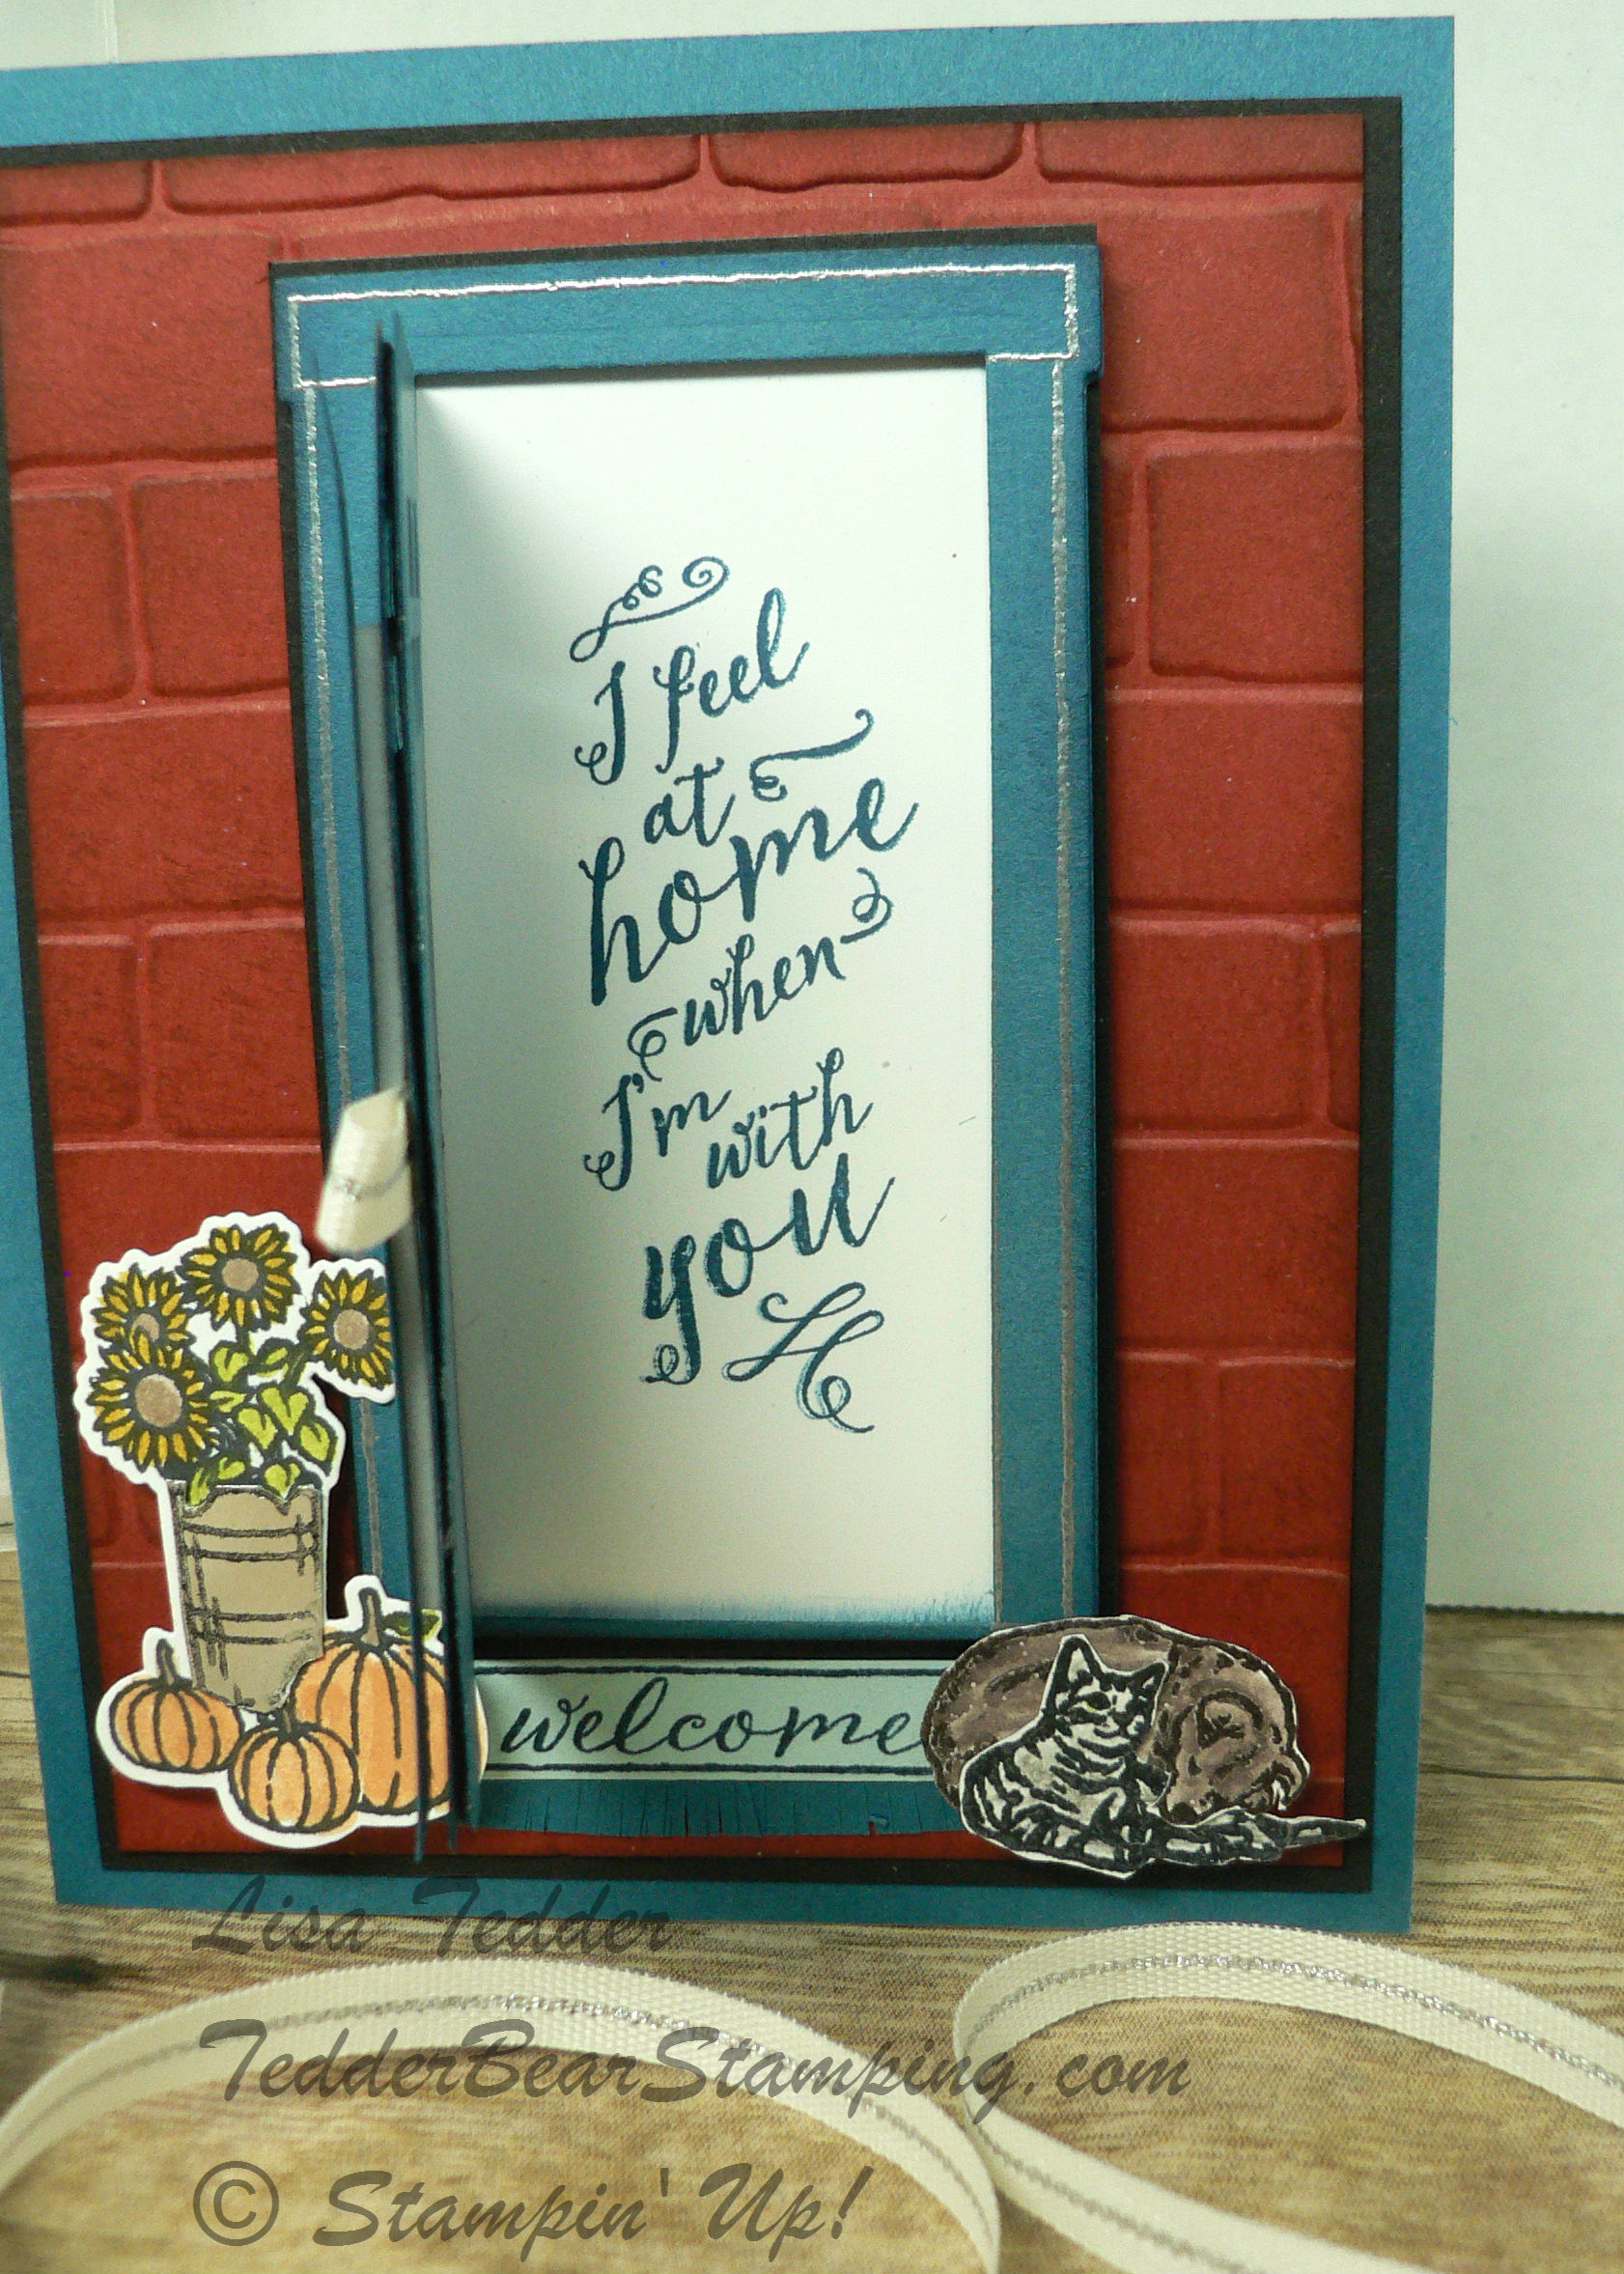
Tag Archives: ribbon

Bees, don’t you just love bees?!

Hey Guys!

Today I am sharing with you a card that I saw on Pinterest by Monica Gale.  I only changed up the yellow behind the ‘HI’, so technically I CASE’d it (Copy and Share Everything).

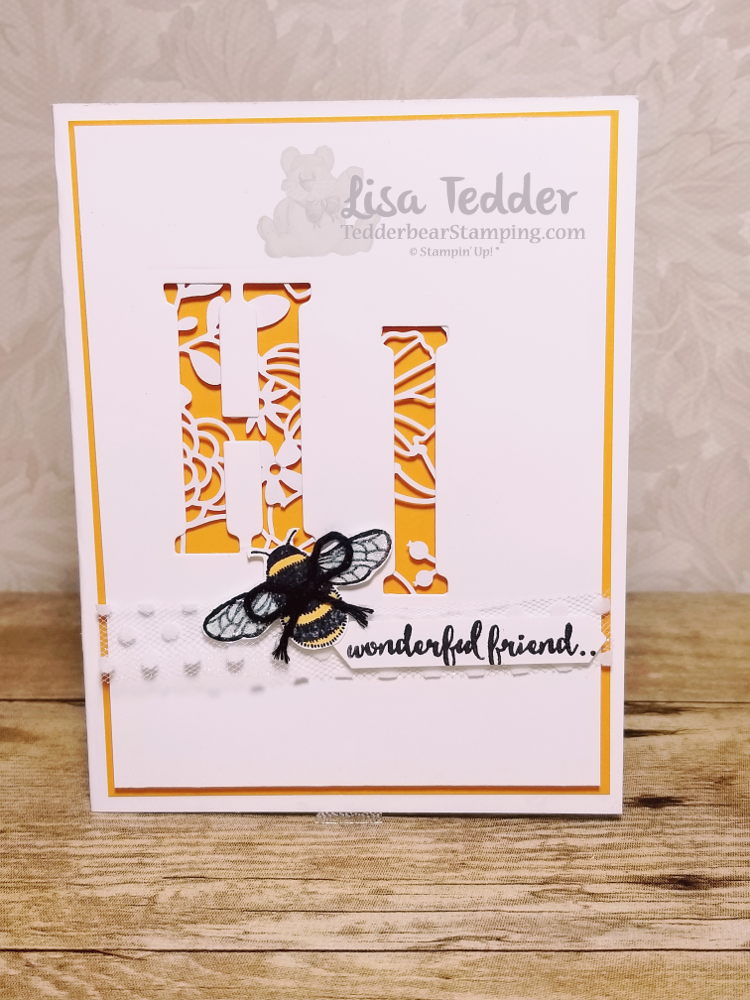
I fell in love with it as soon as I saw it and HAD to make it!  LOVE when that happens, it really gets my creative juices flowing!

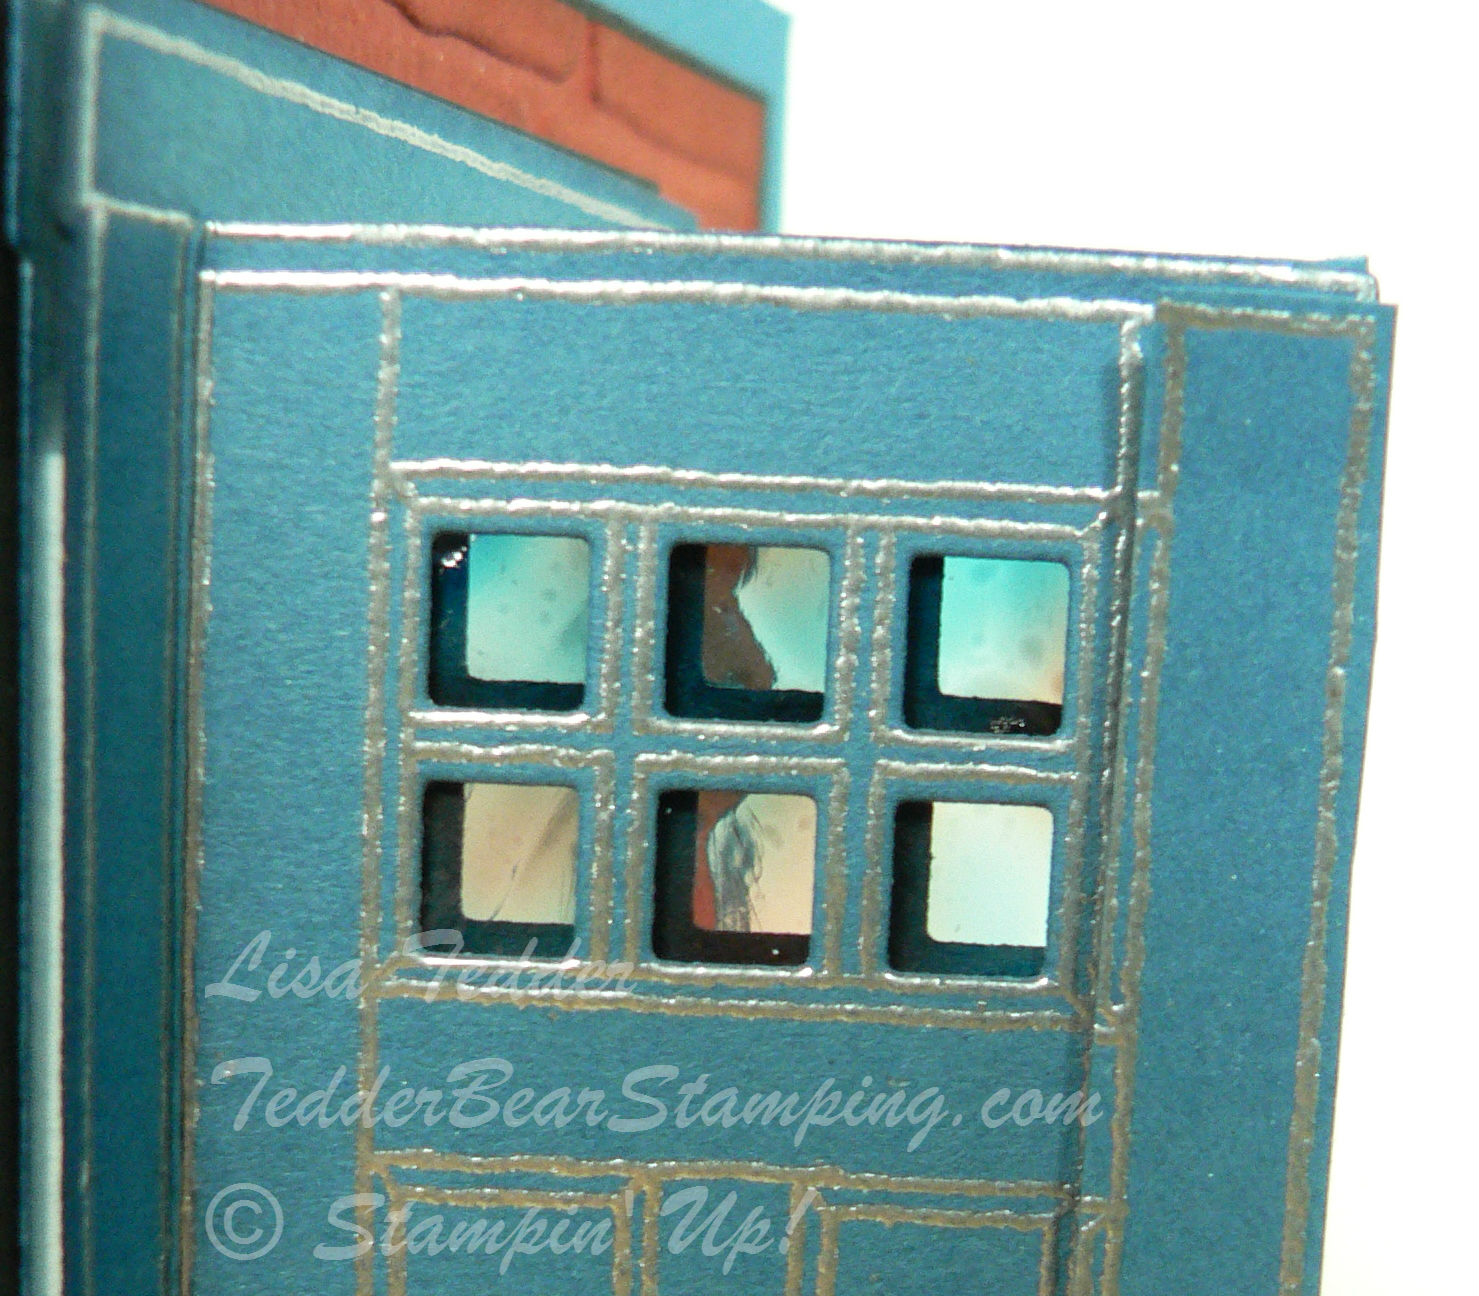
I used the Large Letter framelits to cut out the HI, then placed some of the Delightfully Detailed Laser cut behind the panel, added dimensionals and then had the Mango Melody behind.  Colored the Bee  using the Mango Melody  Blend!

Here are the particulars for this card:

PROJECT 3: Hi
Stamp Sets Pg #
Dragonfly Dreams
Paper
Whisper White Thick 8 1/2″ x 5 1/2″
Whisper White 5 1/4″ x 4″ (x2), scrap
Mango Melody 5″ x 3 3/4″ (x2)
Inks
Memento Black
Blends: Mint Macaron light, Mango Melody Dark
Accessories
Large Letter Dies
Delightfully Detailed Laser Cut DSP
Classic Label Punch
Black Bakers Twine
Dimensionals
Wink of Stella/Whisper White Polka Dot Ribbon

Dazzling Diamonds with glue on wings

I was very happy with how it came out, can’t wait to see what my girls think when we do it in class!

Below are pictures of all the supplies used for this card, click on any of them and you will be taken to my OnLine Store!  Every Online order receives a gift from me!

If you are in the market for a Stampin’ Up! Demonstrator, I would love to be her!  Or you could join my Team and become a part of my SU! family!

Thanks for stopping by, hope you come back soon!

Lisa Tedder
A California Girl living in North Carolina

Product List

Dragonfly Dreams Photopolymer Stamp Set

Large Letters Framelits Dies

Delightfully Detailed Laser-Cut Specialty Paper

Whisper White 5/8" (1.6 Cm) Polka Dot Tulle Ribbon

Dazzling Diamonds Stampin' Glitter

Fine-Tip Glue Pen

Stampin' Dimensionals

Classic Label Punch

Whisper White 8-1/2" X 11" Thick Cardstock

Whisper White 8-1/2" X 11" Card Stock

Mango Melody Classic Stampin' Pad

Mango Melody Dark Stampin' Blends

Light Mint Macaron Stampin' Blends Marker

Big Shot

Basic Black Solid Baker's Twine

Birthday Delivery Fox is Very Sneaky!

Today I am going to share with you a card I am making in this month’s classes!  I just LOOOOOVE this new stamp set Birthday Delivery!  The best part of this set is that the thinlits cut out the stamped image AND the image printed on the DSP!! (Designer Series Paper)

If you are in a hurry and don’t want to stamp and color an image (it doesn’t happen very often!) you can always just take out the DSP and cut your image out of that!  Stampin’ Up! has made it so simple to do a fast and easy card!

Here is the card I am doing in June’s class:

Isn’t he cute!!??  I used the Watercolor Pencils to color him in, and the Blender Pen to smoothe it all out!  This is my new favorite way to color!  No more streaks!  No more worrying about putting too much ink on!  Those pencils makes my job in blending so much easier! You HAVE to try them out!

I used the new punch, Pretty Label to stamp the Surprise! on and it fit perfectly!  I used the Brick Wall embossing folder to make the ‘house’ part of the card and I used the Hearth and Home thinlits to make the window!  Using Window Sheets the same width of the ‘window’ makes this look like a real window!

This is an impressive card, but it really is so easy!  I hope you enjoyed this! Click on any product picture below and you will be taken straight to my online store!!  When you place an order with me, I will send you a handmade card AND a small gift to let you know how much I appreciate you!  Please use this Hostess code when ordering: C62FFAR3

Lisa Tedder
TedderBearStamping
A California Girl living in North Carolina!

Product List

<!——– TAMS End ———

Gorgeous Eastern Beauty card!

I was inspired by Daniela Hödl  when I made this card!  She made this stunning card:

Since I had to translate her blog I wasn’t able to see what size the original was.  I didn’t do the entire part that she did, but when I do a scrapbook page this is what I want!!

So, here’s mine:

And the inside:

Ok, I said I was inspired, but I ended up doing it  totally different!  BUT now I have the other one on my computer to do another time!  🙂

I added pearls to some of the front, they are on the outside of the Medallion and in the middle and right smack dab in the center! It’s hard to see in my picture…….

I used 2 of the New In Colors Lemon Lime Twist and Berry Burst.  For the Berry Burst, I stamped on scrap THEN on my card (this is called stamped off), this gives the Berry two different hues!

The ribbon is #144135, so on June 1st you can order it!   Hostess code for this month is:  97H62RVK   IF you order from me, I will send you a NEW Catalog!  Only US citizens can order from me, so if you need a recommendation from me, I know of a few that might be around you!

The stamp set is: Eastern Beauty #143675
And the Thinlits are Eastern Medallions #143725

Again, if you order from me, I will send you a free Catty!  PLUS a special something in the mail!

Oh!  I almost forgot!  Did you forget?!  I have BLOG CANDY!  This is what you can win just be commenting on my blog or Facebook Page-TedderBearStamping :

ONE entire package of this Beautiful Glitter Paper, plus MOST of another one!  And if that’s not enough, I have some cutouts that I am sending plus a card that I made using this!

Hope you enjoyed my post today!!  Subscribe to my blog to be notified when I post again!  Remember, the more you comment, the more your name gets put in for the drawing!  I will be doing the drawing on June 6th!

Hostess code for this month is:  97H62RVK

Lisa Tedder
TedderBearStamping
A California Girl living in North Carolina

Another Stained Glass Card with At Home With You

I posted earlier that I was going to use this stamp set from Stampin’ Up! for Kylie’s International Blog Hop, but I changed my mind!  I didn’t think, when I was finished with it, that it yelled MASCULINE. So I am sharing it with you now!

Yes! This is the one that I told you about with the stained glass that came out even better than how I did it in the past!  I touched the one that was drying before it was ready so I had to start all over.  I don’t want to pray for Patience because I really don’t want to practice it a lot!  🙂  I’m not very good at it!

To start off, I scribbled on a piece of Window Sheet with some of SU!’s markers.  I then placed little circles of the Fine Tip Glue Pen over the scribbles and the colors bled and create a really cool pattern!

I used Cajun Craze and Dapper Denim.  See how it marbles?!!  Once dry it is see through with the colors showing through what looks like an antique stained glass!!

Once it’s dry………..it takes  time, it’s probably a good idea to leave it overnight so you don’t mess with it!  Trust me!

Once the door is cut out with the thinlit, place the Window Sheet down on the back side (the side that opens).

NOT sure why I took this picture of the door UPSIDE down other than to get a better picture!  Can you see the two colors?!!

I have magnet strips on the door between this layer and the next which will sandwich the Window Sheet so you won’t see it.  I placed magnets under the inside of the door (under the saying too), so when the card is standing the door won’t flap open. It makes it snap together.
Here is a picture of the other side of the door attached so the Window Sheet is between them:

It REALLY looks like Antique glass, right?

Here is a pic of the card:

Can you see the dog and the cat cuddling together?!  I put a piece of ribbon between the door and the ‘sandwich’ so it can’t be seen other than the part I want to help open the door.

Here is the door open:

The welcome mat is stamped and then I cut fringes in the layer under it so it looks like a mat!

I would love to hear what you think!  Too much?
Here is a picture of the inside:

I love the dog basket!!

That’s it for today!!  Hope you liked it!  Subscribe to my blog so you don’t miss anything!!

Don’t forget that I have Blog Candy!!  Here is what you can win:

Just leave a comment here or on my Facebook Page TedderBearStamping, I am doing the drawing on the 15th of May!  Only 3 days left!  Each and Every comment you leave (on any post!) will be counted!  Good Luck!!

Lisa Tedder
TedderBearStamping
A California Girl living in North Carolina

Easy Way to Make a Vintage Card, Plus Blog Candy Winner

I saw on Pinterest a card using the rubber stamp set from Stampin’ Up! called In This World.  I had bought this set because I love anything Vintage and this called to me!

I changed it up so much that I went back to see hers and it was nothing like what mine turned out as!  Has that happened to you? You can find her YouTube video here  It’s very pretty, but not the way I went with mine.  I followed some of her ideas, but that’s as far as I got!

Here is my version:  


What do you think?  It needed a ‘spot’ of color, so I added the ribbon and the Falling In Love Trinket.  This picture has the Burlap ribbon in it, going along the side.  I ran out (I’m making swaps for my Savannah OnStage event!!) so I just went without for the rest of the swaps.

Here is the other version:  

I used VersaMark on the sides of BOTH swaps and added Gold Embossing Powder.  Plus added it to the Sentiment to make it stand out.

Here is a close-up of the treatment on the Soft Sky:  

I used almost every Stamp in this set!  The only one I didn’t use is the chair.  And I LOVE the chair, so I will have to come up with something to use that the next time!

I used the stamp from the In This World that has the long strip of dimensions?  I have a question mark there because I’m not sure what to call it!  Do you know?  I stamped that image in Crumb Cake on the top left and bottom right. Then stamped again, along top and bottom left using Early Espresso ink.  I stamped the one on the right bottom once on a scrap and then on the page, so the key will show up.  That is stamped in Early Espresso too!  I then stamped the blotchy stamp (that’s what I call it!) from the Stamp set Gorgeous Grunge using the Crumb Cake all over the card, stamping off every other time.  I then sponged it with Crumb Cake on ALL sides, sponging really well so it went towards the center.  Then sponged SOFTLY using the Early Espresso ink.  Just to give it a dark outer edge.

I stamped the door on Very Vanilla (it doesn’t look like it does it!), that shows how much I sponged it!  I used Early Espresso for the Door, and Crumb Cake for the sponging.  But first I distressed the edges by ripping, bending and tearing , I tore off the corner.  You have to make sure you do the distressing first, and THEN sponge.  This way the edges that bend over are sponged on both sides.  My shoulders were HURTING by the end of this, and I only made 30 cards!  I usually make a LOT more, but I’m glad I didn’t this time!

Here is the inside: 

I didn’t sponge the inside because I wanted it to stay pristine, so you can see what is written when sending it.  Would you be happy to get this card?  Or is it too messy?

It’s been awhile since I’ve done a Vintage card, have I forgotten how to do it?  I feel needy today for some reason!  It could be because I was winging it the whole time!  LOL

Here is the Blog Candy that I’m giving away today:

Congrat’s to the Winner:  Sue Root!!

I hope you enjoyed the project today!  Please let me know which one you like more, with or without the Burlap Ribbon.  Sometimes you look at something so long you just can’t be the judge!

Hope to see you again, soon!  Make sure you subscribe so you won’t miss when I post.
Lisa Tedder
A California Girl living in North Carolina

Product List

<!——– TAM

A Happy Thing

I just got back from Stampin’ Up’s! Leadership and they had this stamp set EVERYWHERE!  Luckily I had already earned it (it’s a Sale-A-Bration stamp set or SAB, which I got FREE for purchasing $50.00), so I decided to come up with my own card!!

I didn’t CASE anyone!!  I love when my creative juices are flowing!  I used the ‘A Happy Thing’ stamp set (139134) along with ‘Crazy about You’ (137137), which is SO versatile, you can use it on just about EVERY card!!

I am always saying these words “Just Sayin'” so this stamp is  PERFECT for me!  I also used the Daffodil Delight (130998) and Old Olive (130999) Blendabilities (Which you can get for FREE!!) and if you come to my class I will walk you through how to shade this wonderful stamp set!!  I also used the Thinlits “Hello You” (137363).

 AND right now until June 2nd you get the BUNDLE that has the ‘Hello You’ thinlits and the Stamp set ‘Crazy about You’ #139325 (clear) Photopolymer #138873 so you save 15%!!  IF you buy this bundle in the clear or Wood #139324, You can get the ‘A Happy Thing’ stamp set that is used in this card for FREE because it is a SAB set!  If you purchase the Photopolymer, which I LOVE, you will need to add another item to your order to get the FREE ‘A Happy Thing’ stamp set, you need $50 in US.

I used the Daffodil Delight ribbon #125583, the Specialty Designer Series Paper ‘Birthday Bash’ #137783 and some dimensionals #104430 which will give you MORE than enough to get ‘A Happy Thing!

So, are you ready to see the handmade card?

A-Happy-Thing

You will need to zoom in to see what I used at the bottom of the stamped image, I ruffled some plastic from a clear envelope!  THAT was really fun to do!

I hope you like my SU! handmade card!!

Lisa Tedder

Kernersville NC