Category Archives: blog

Impressive but easy Embossing Folder Technique

Today, I decided to do some experimenting!  Ever get an idea in your head and you just HAVE to get it out!?  I get them all the time, USUALLY when I’m trying to go to sleep at night……UGH!

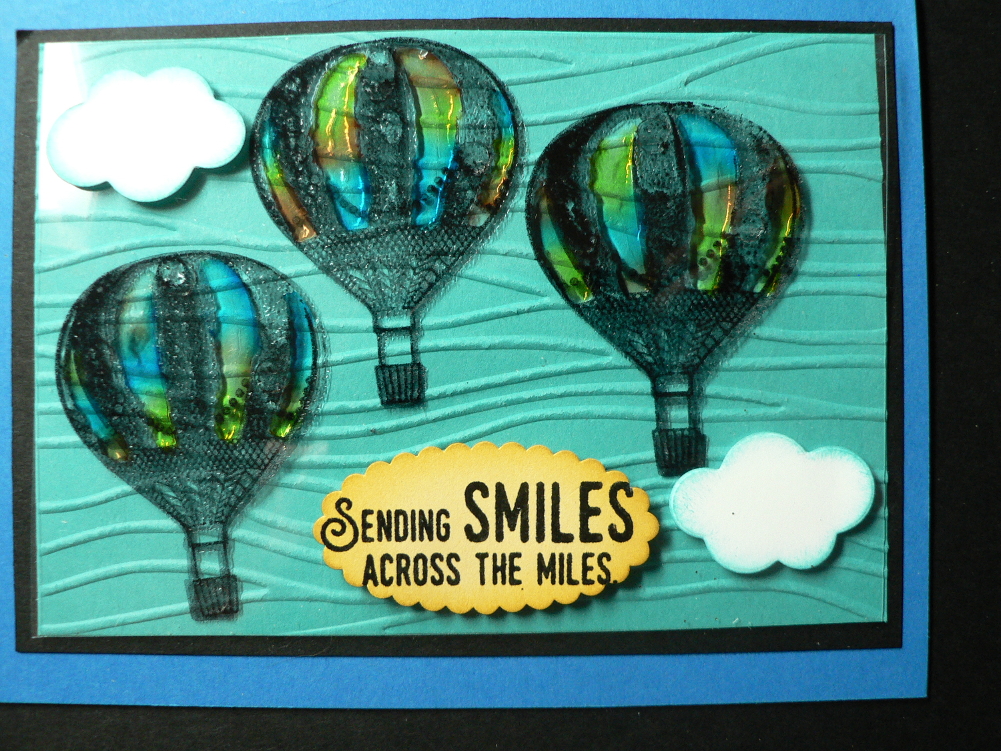
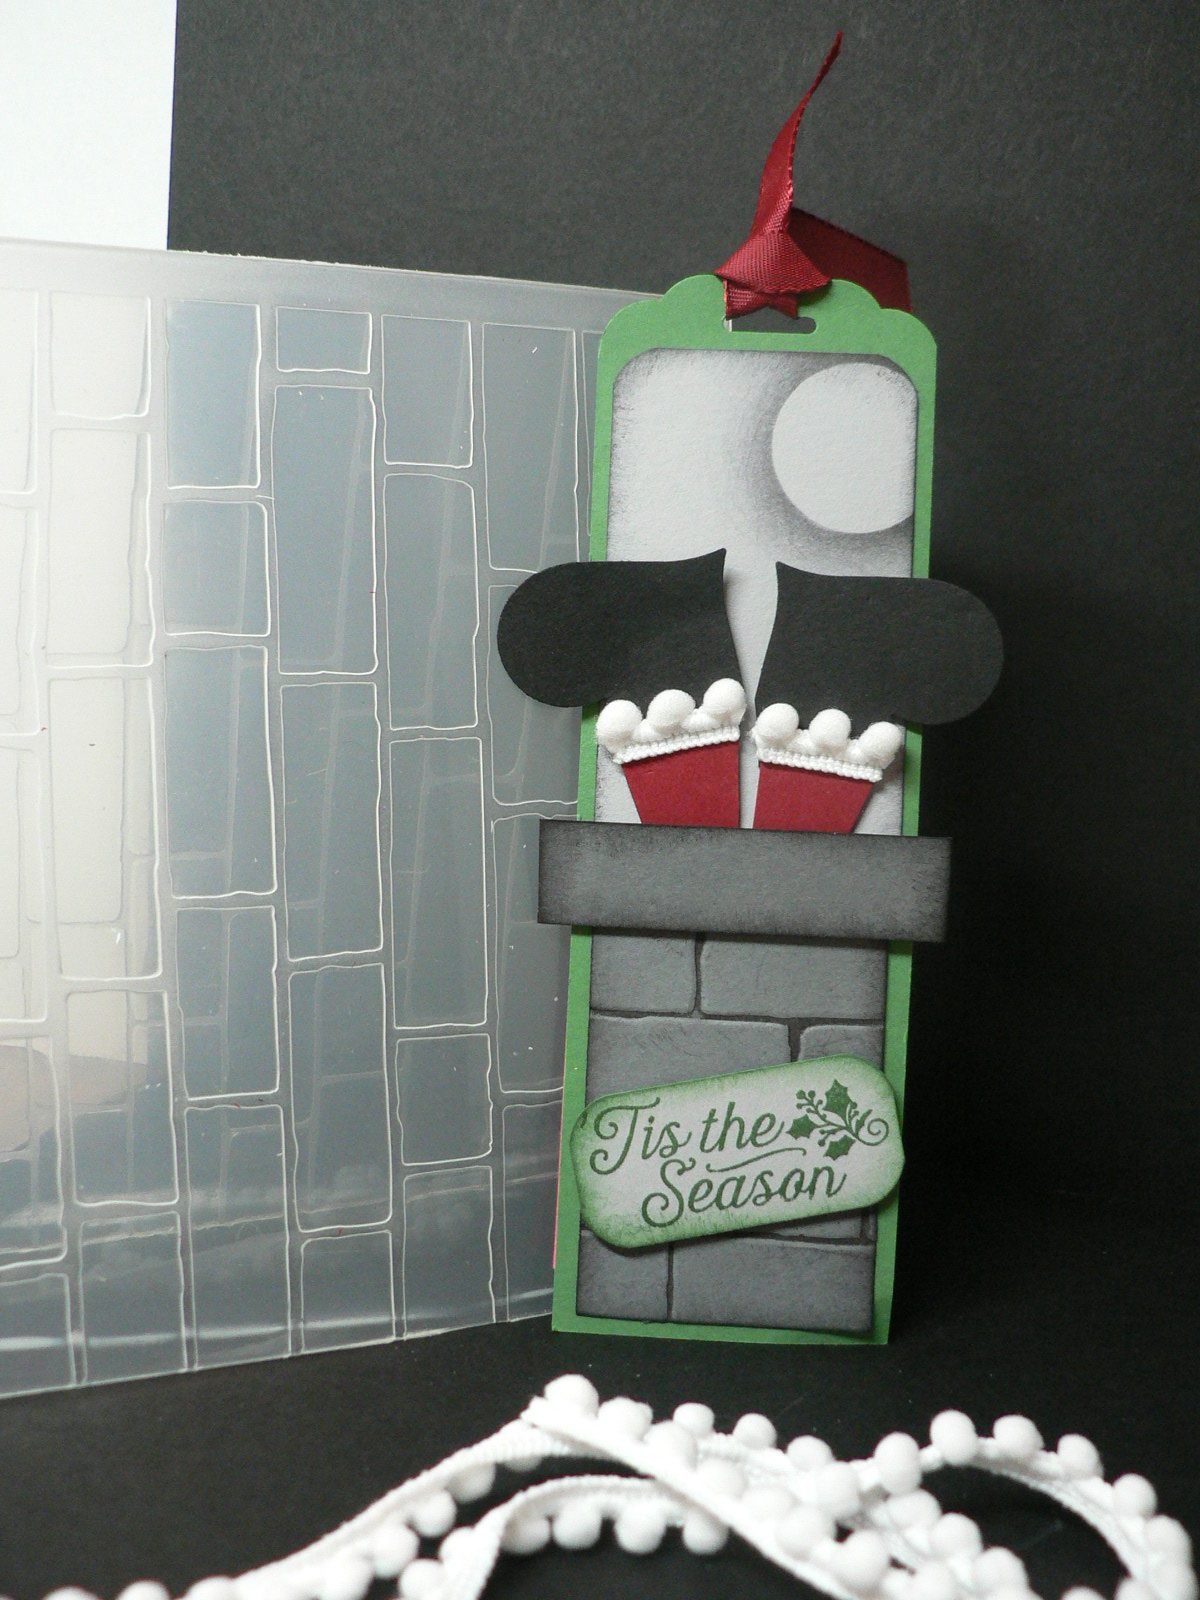
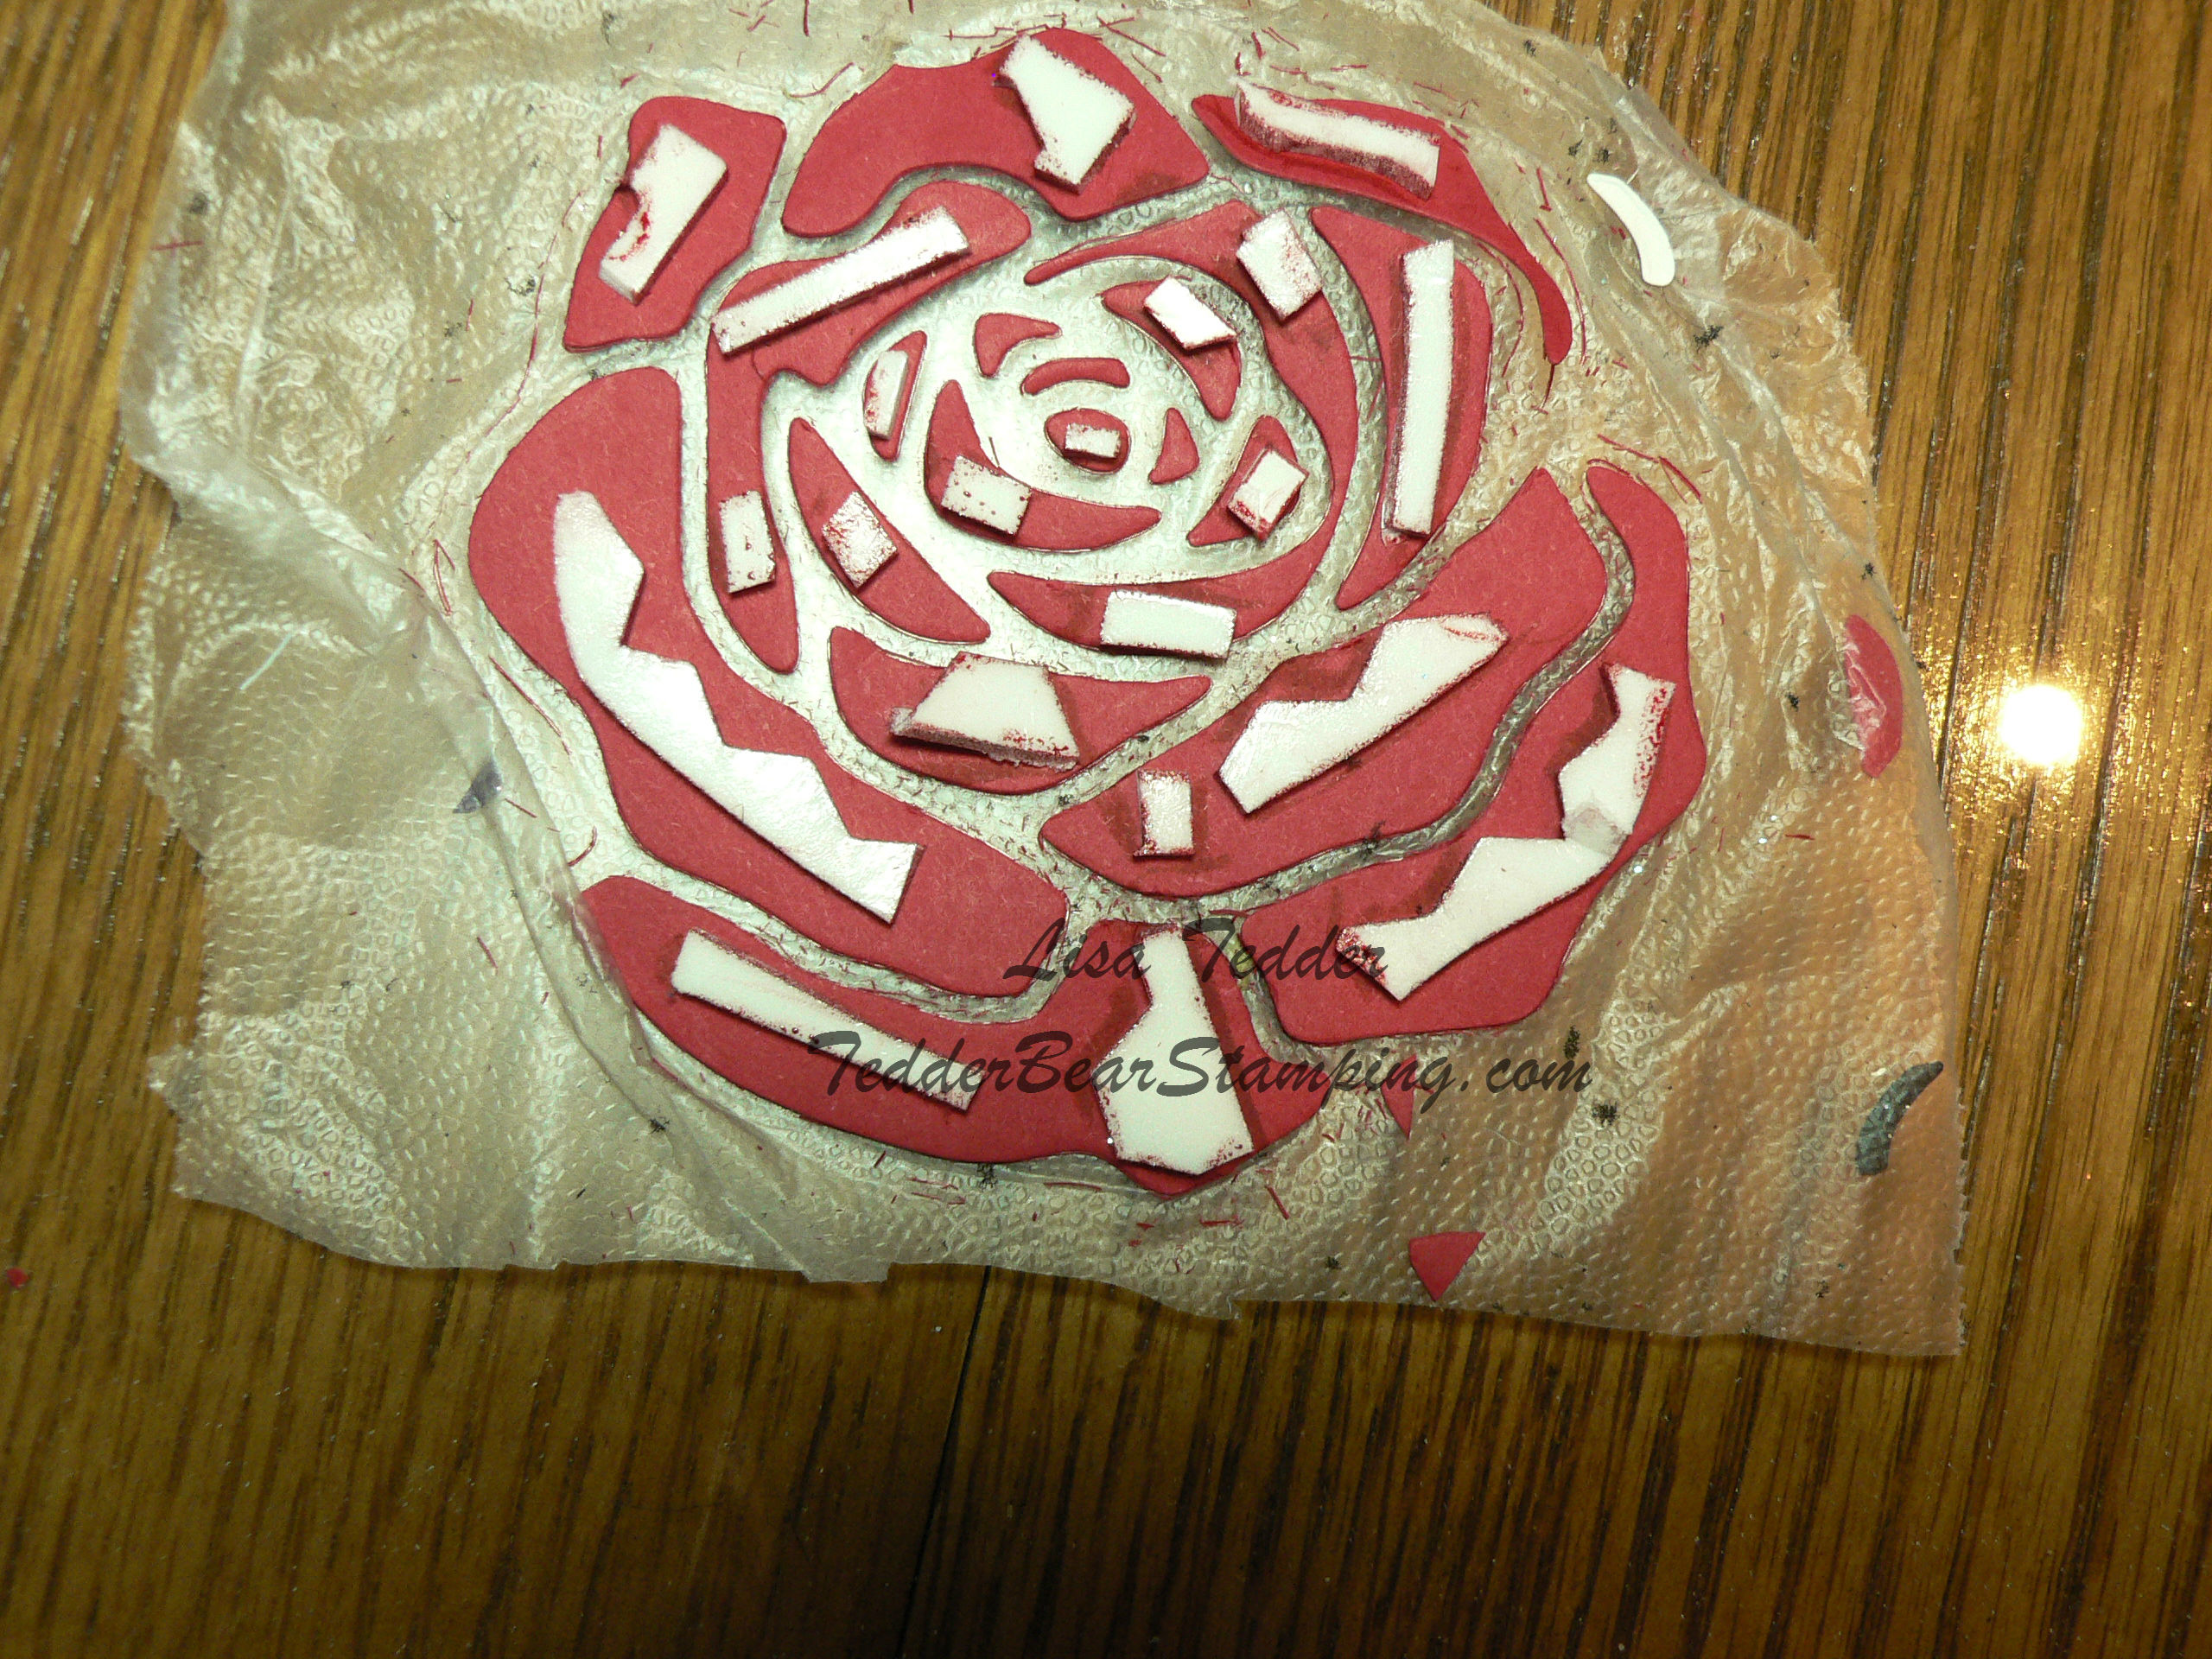
I wanted to see what would happen if you added Mod Podge to SU!’s cardstock so it’s covered and THEN run it through an Embossing Folder.  Yes, it’s messy.  Yes, you will want to wash your folder right away!   And YES it it really cool!!  After running it through (and washing my folder) I heat set it.  I am NOT very patient…….hence the heat drying!  I did it on Garden Green cardstock and I did it on Shimmery White from Stampin’ Up!  LOVE, LOVE LOOOOOVE their paper!  Well, let me be honest, I love all their product! hahaha   This is the main reason I became a SU! Demonstrator!  I wanted the discount since I wanted it ALL!!

After heat setting the paper, it dried so nicely, I just looked at it to decide what to do with it!  Yes, I fly by the set of my pants……Is that the right expression?  Well, the green called me more even though I had sponged the Shimmery White with multiple colors (it was gorgeous!), but the Garden Green looked so striking!

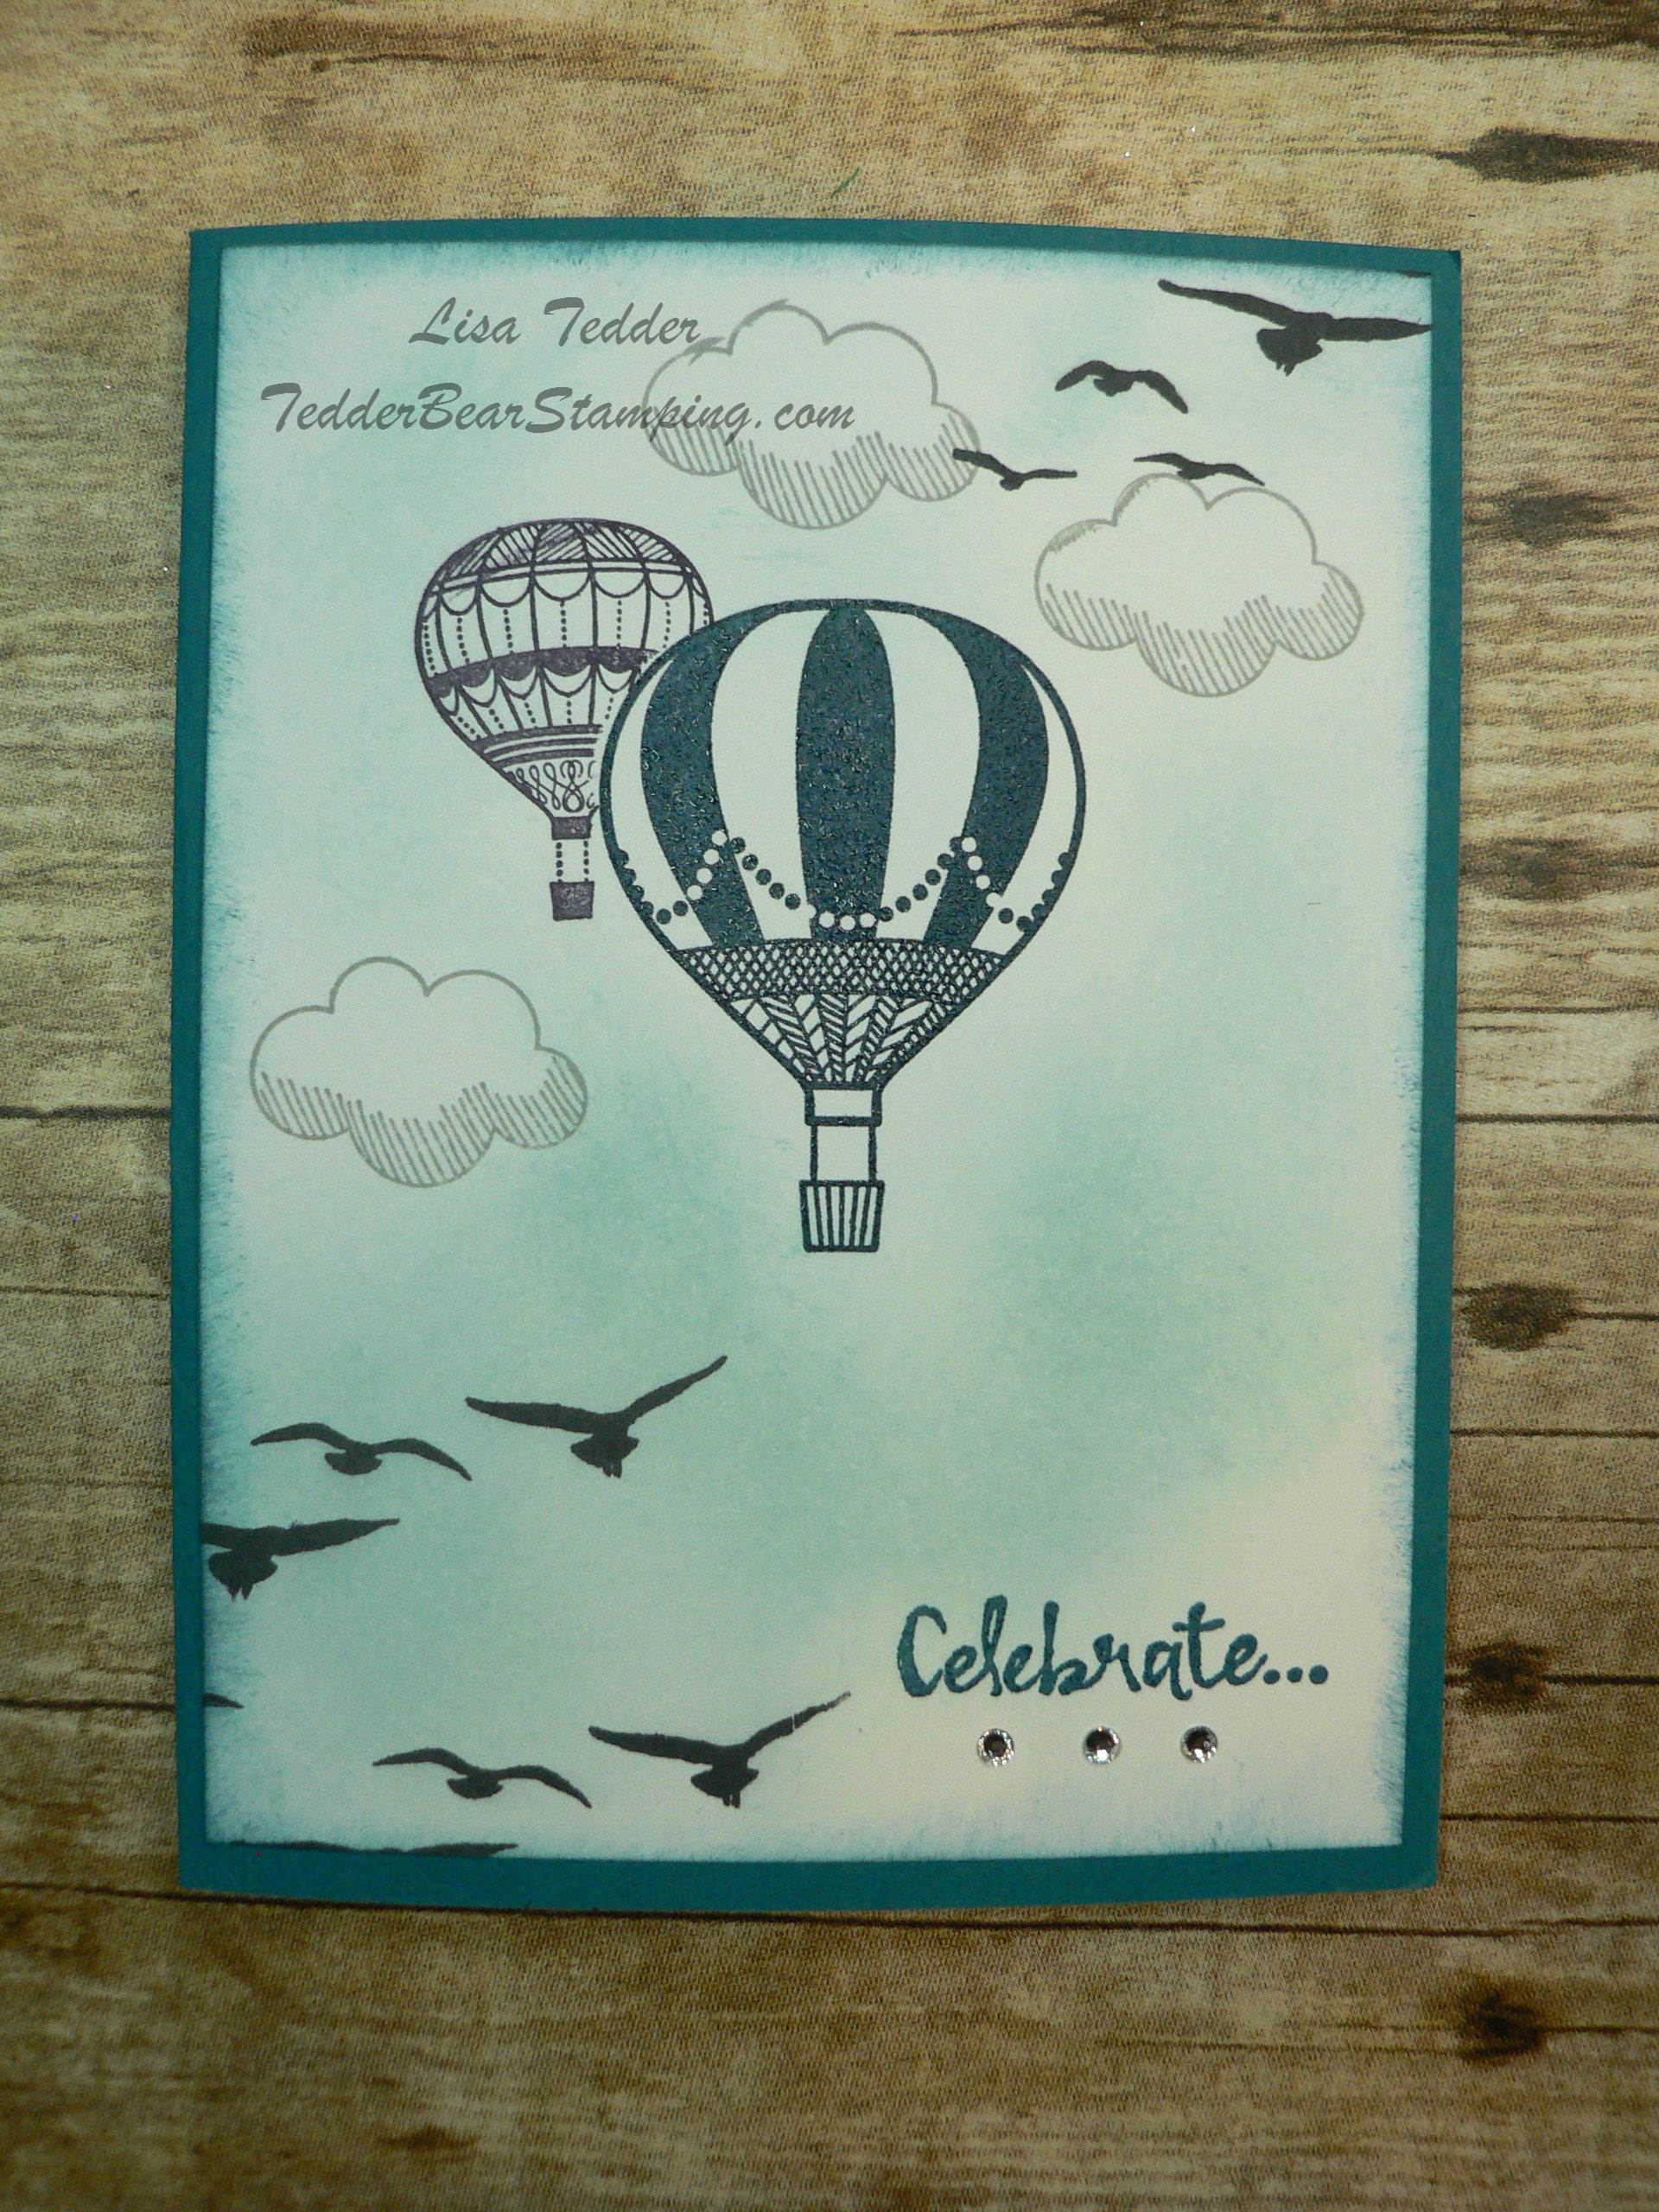
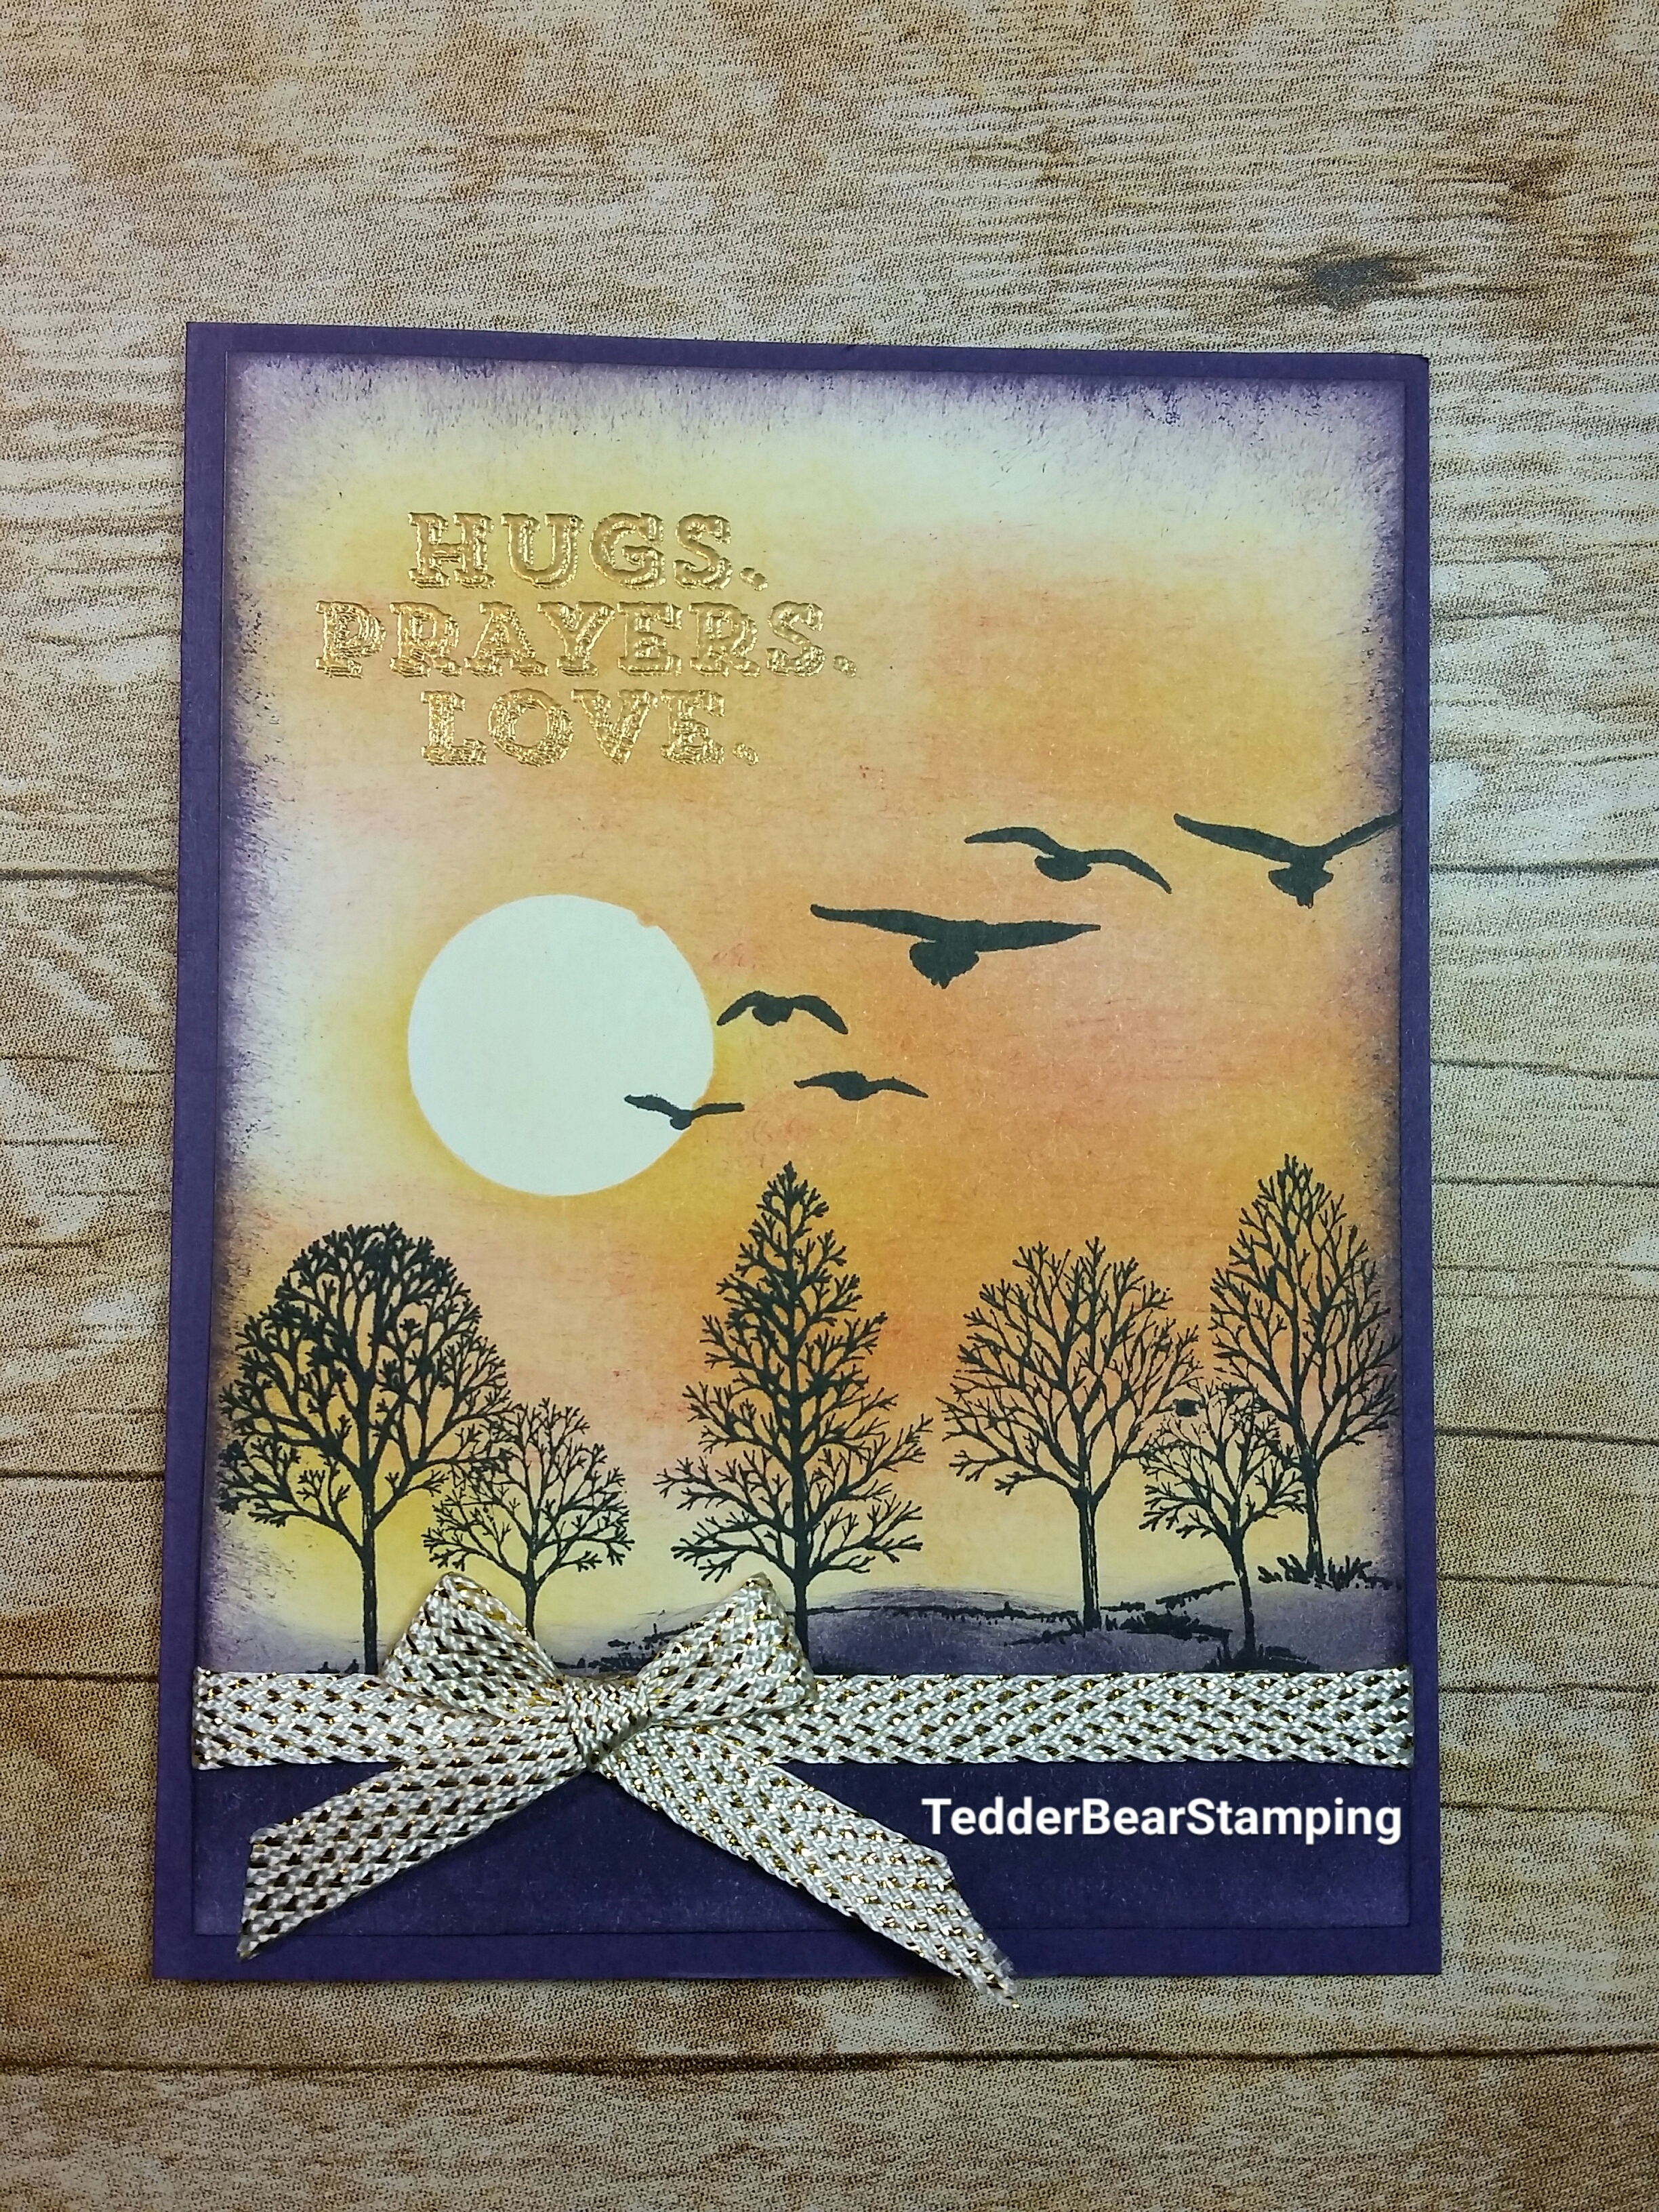
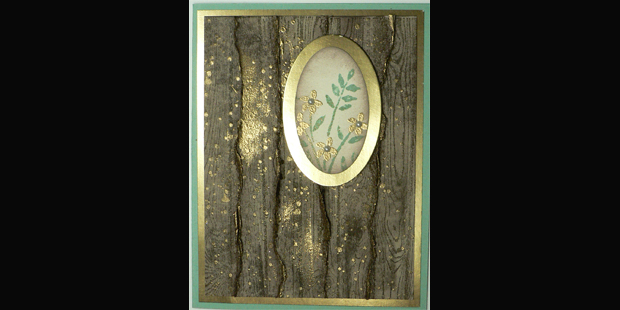
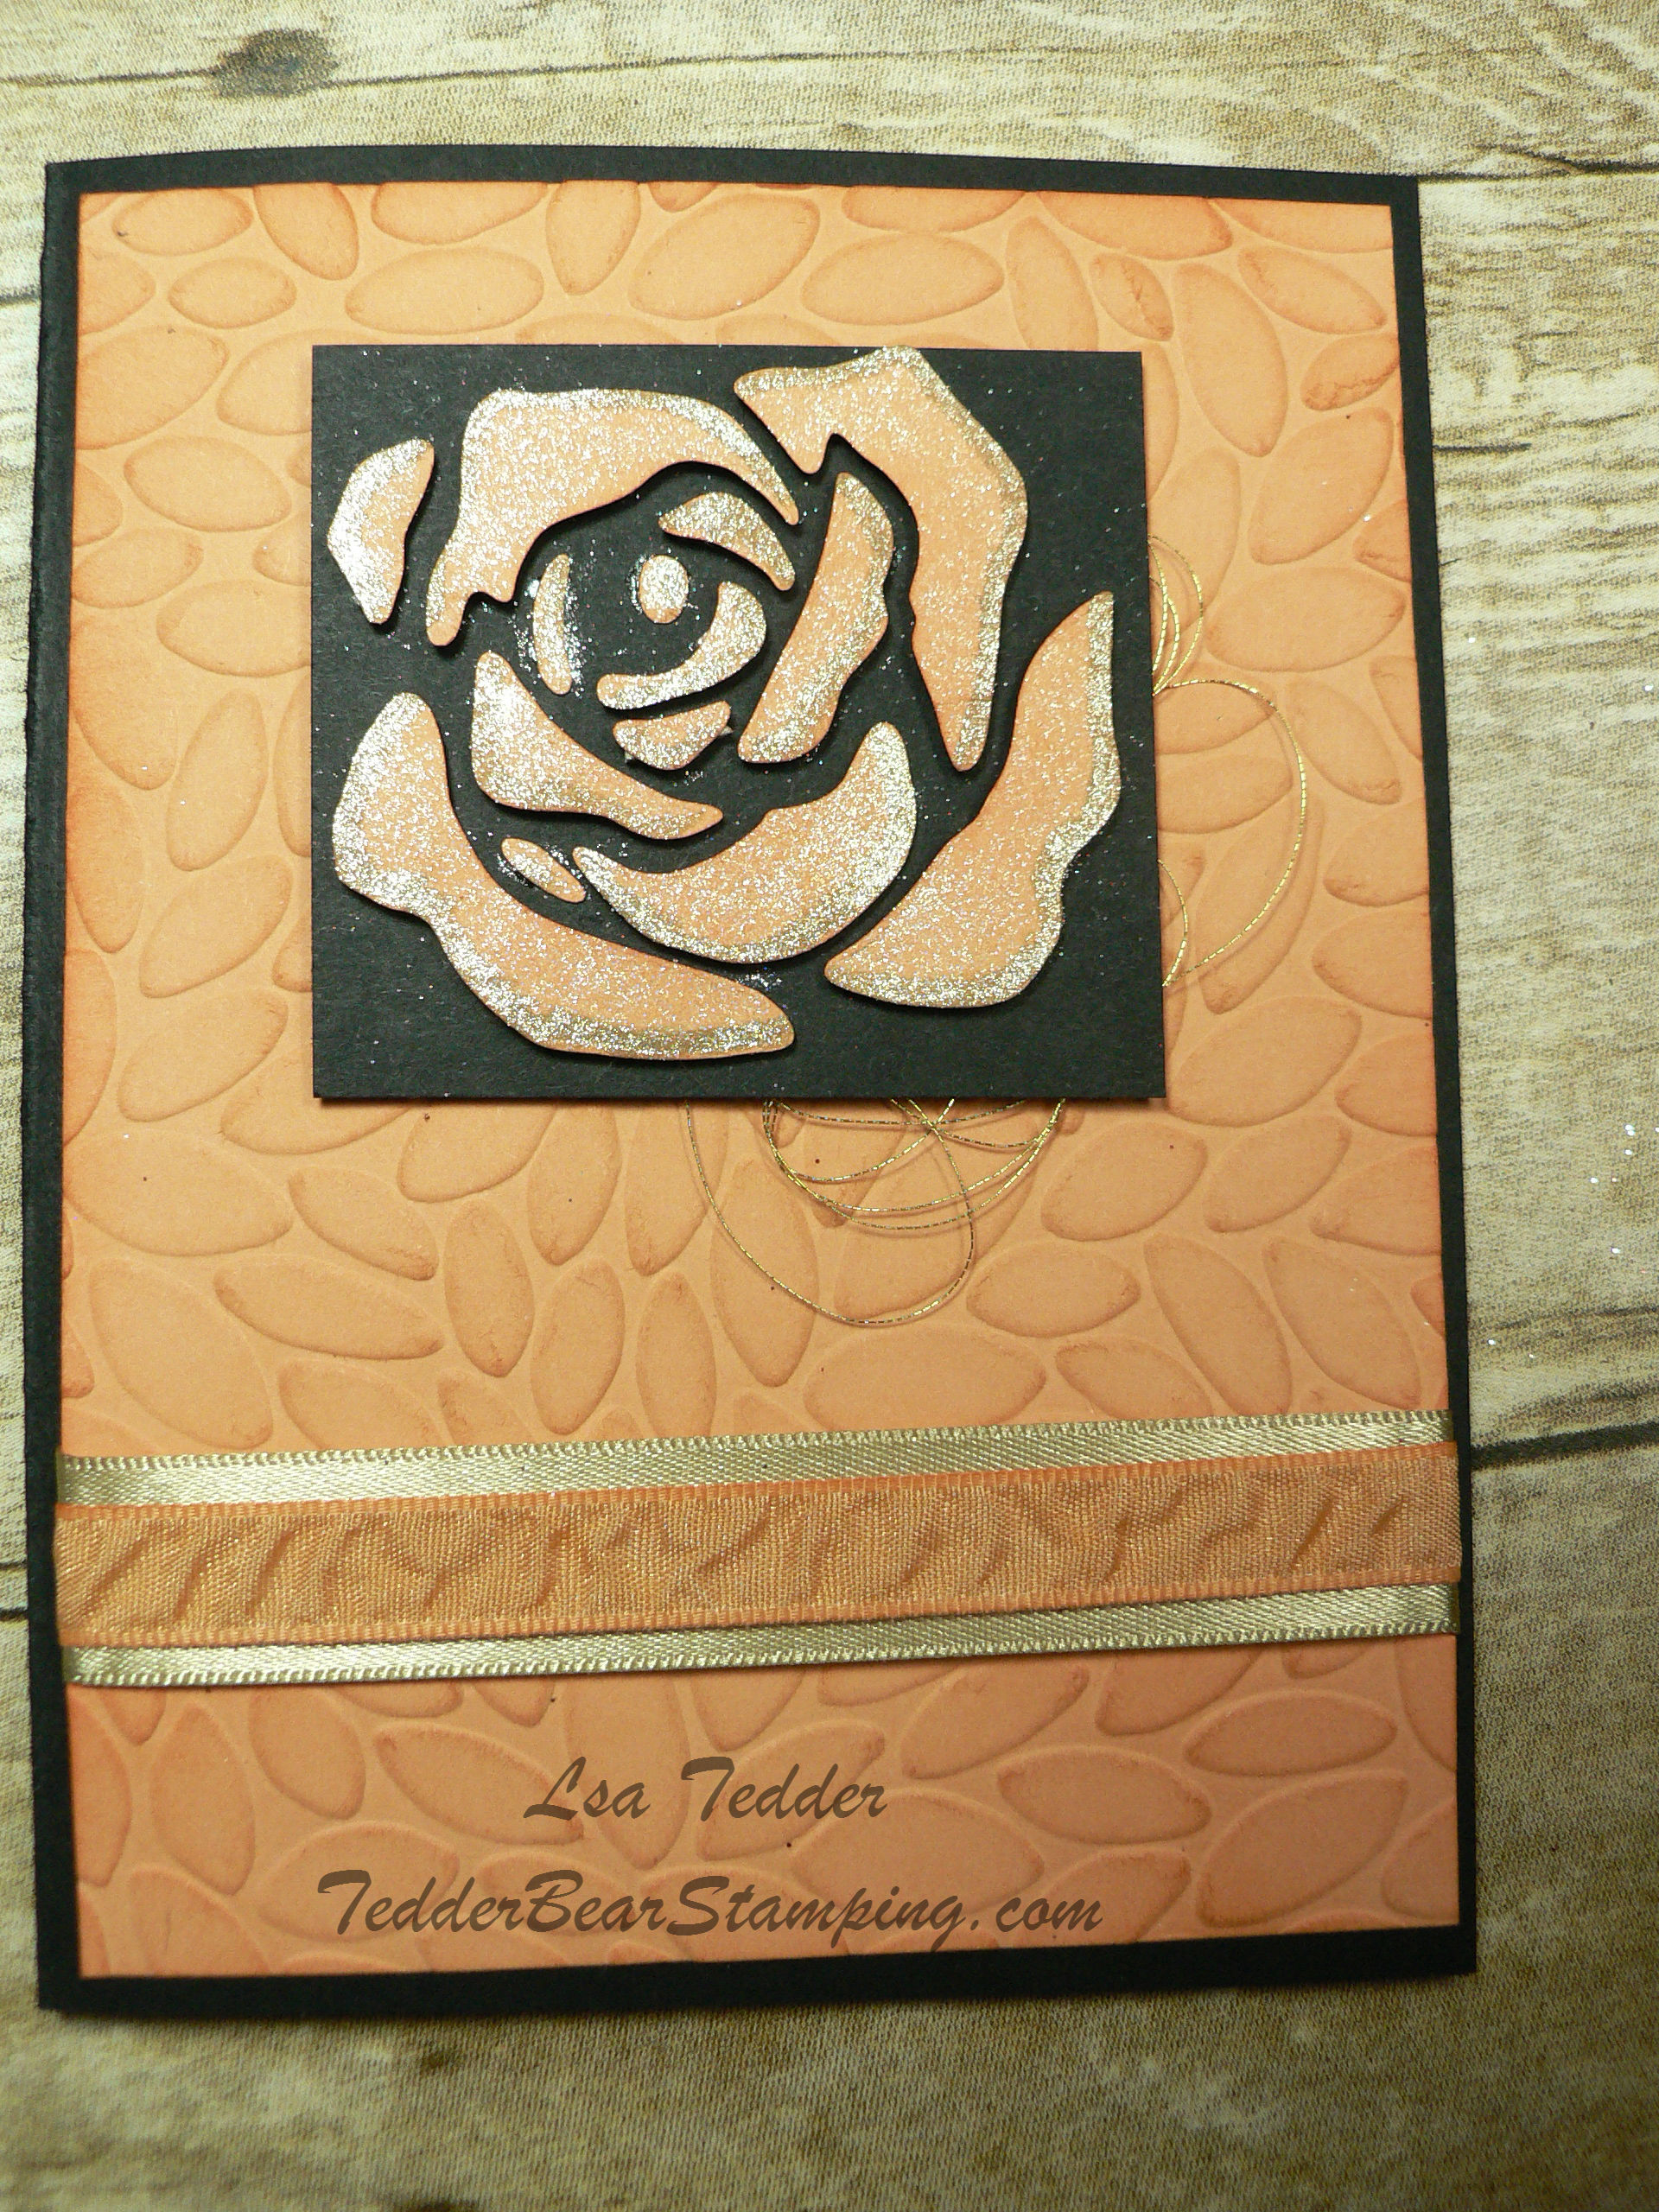
Here is a picture of the finished card and you tell me if you think it is striking!


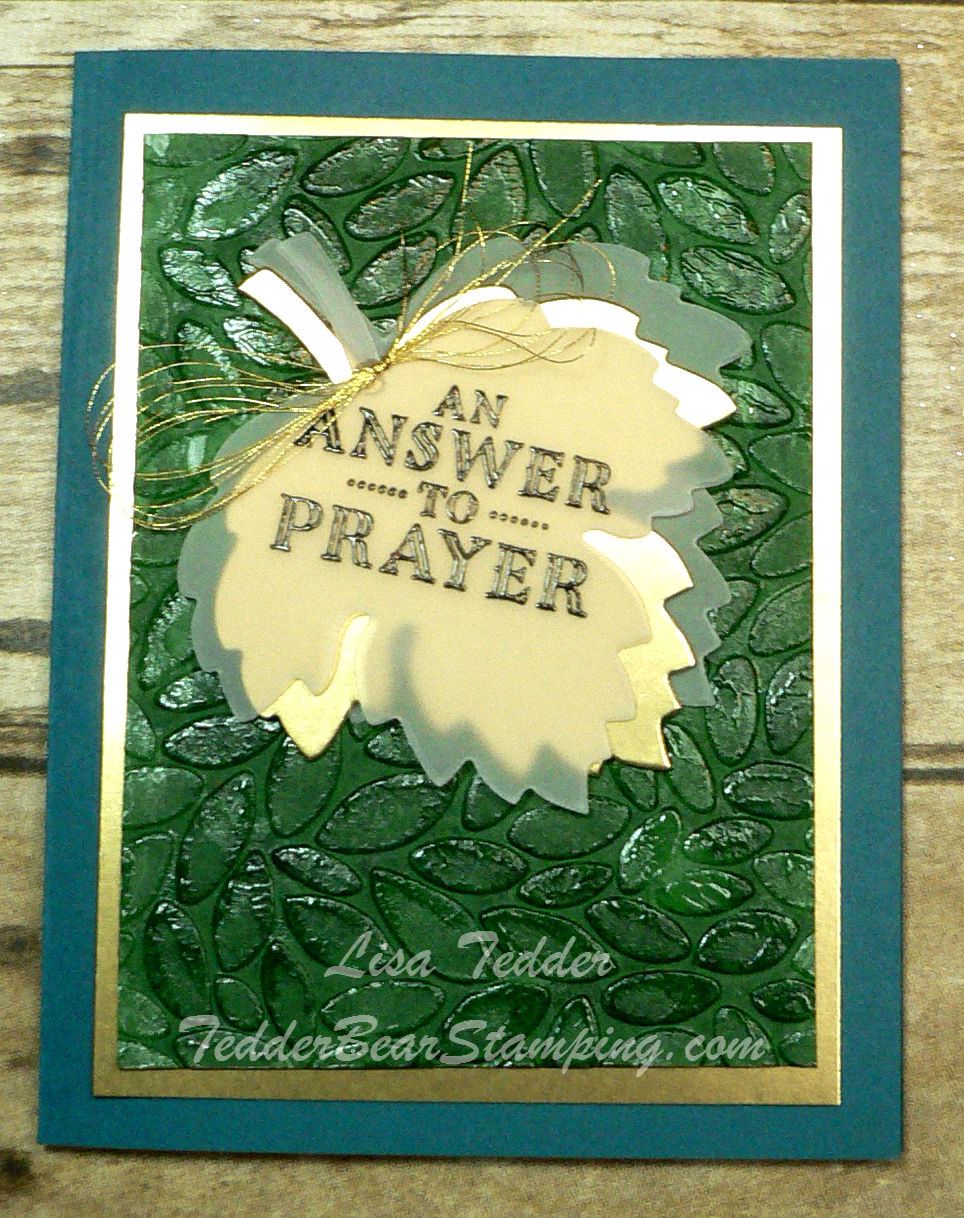
I know! Right!?  It made me want to let the Paper be the STAR!  Since it was leaves, I pulled out my Vintage Leaves Bundle.  The front has the Framelit and the inside has both the stamp and the framelit!  I am so astonished how beautiful this turned out!  I’m going to be honest again……….I’m ALWAYS surprised when I design something and it comes out this good!  Don’t get me wrong, I can CASE with the best of them, but my ‘ideas’ don’t always work out!  I bet there a quite a few of you who can relate!

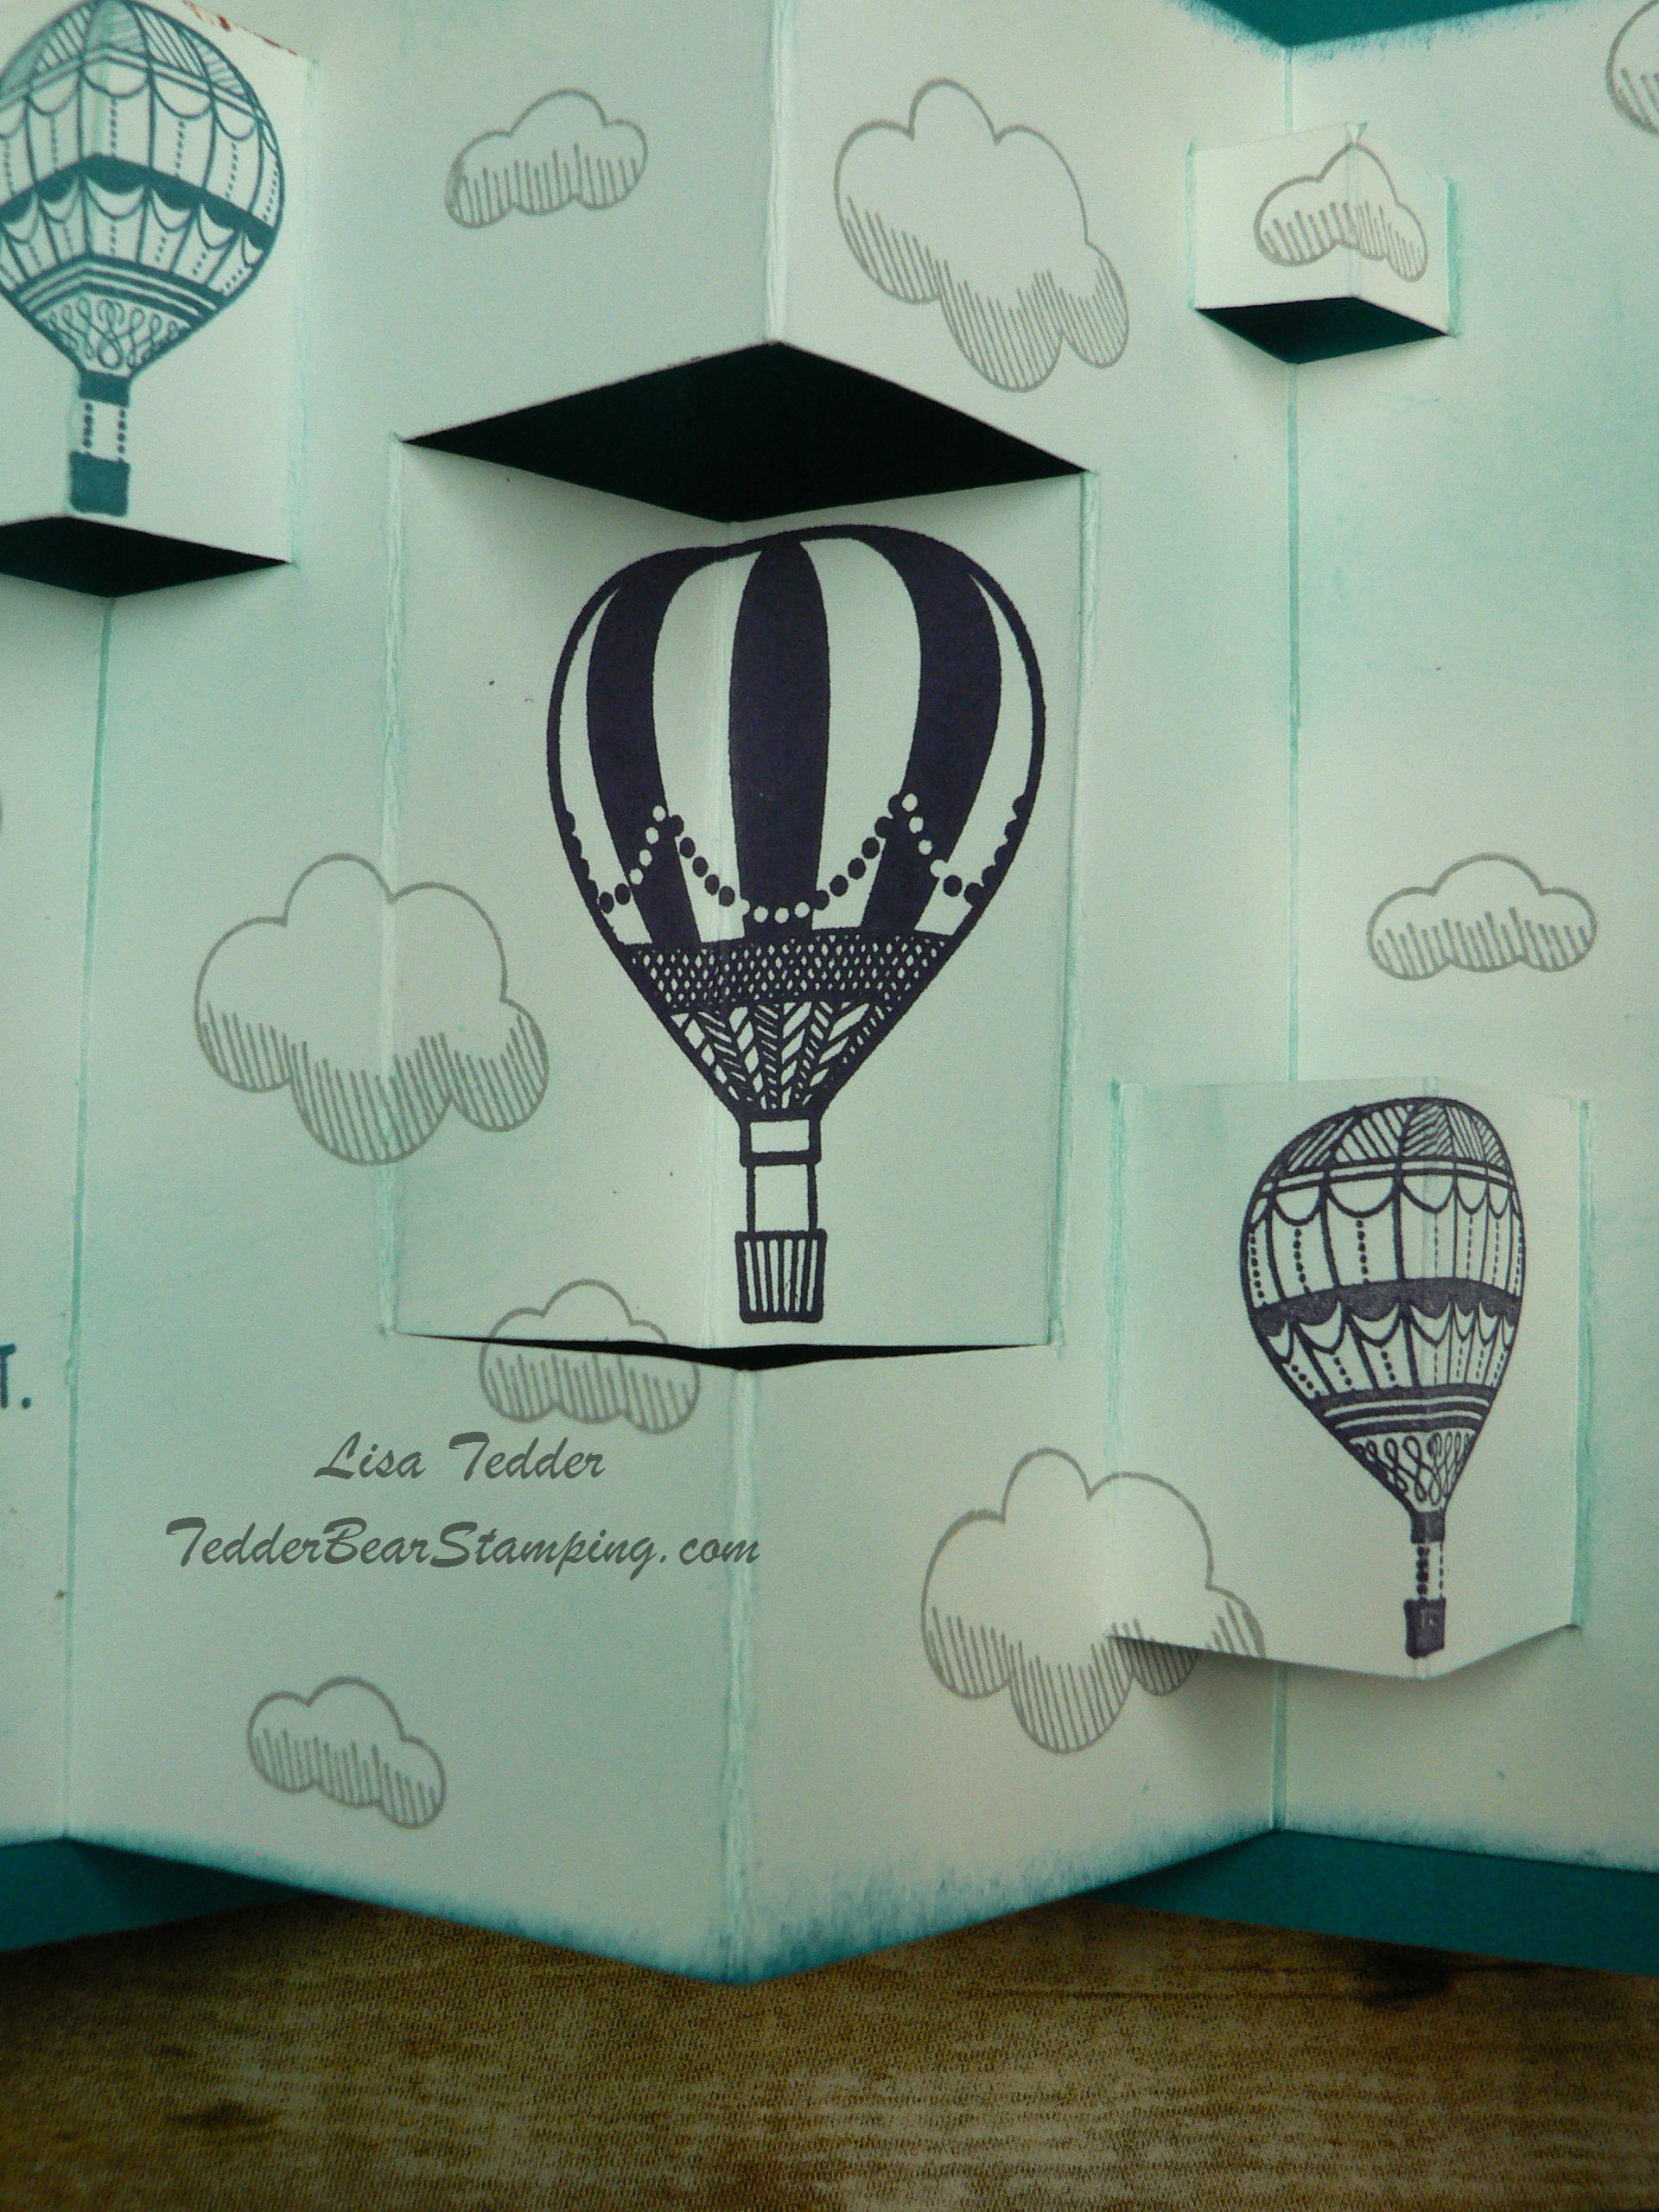
Here is a picture of the inside!

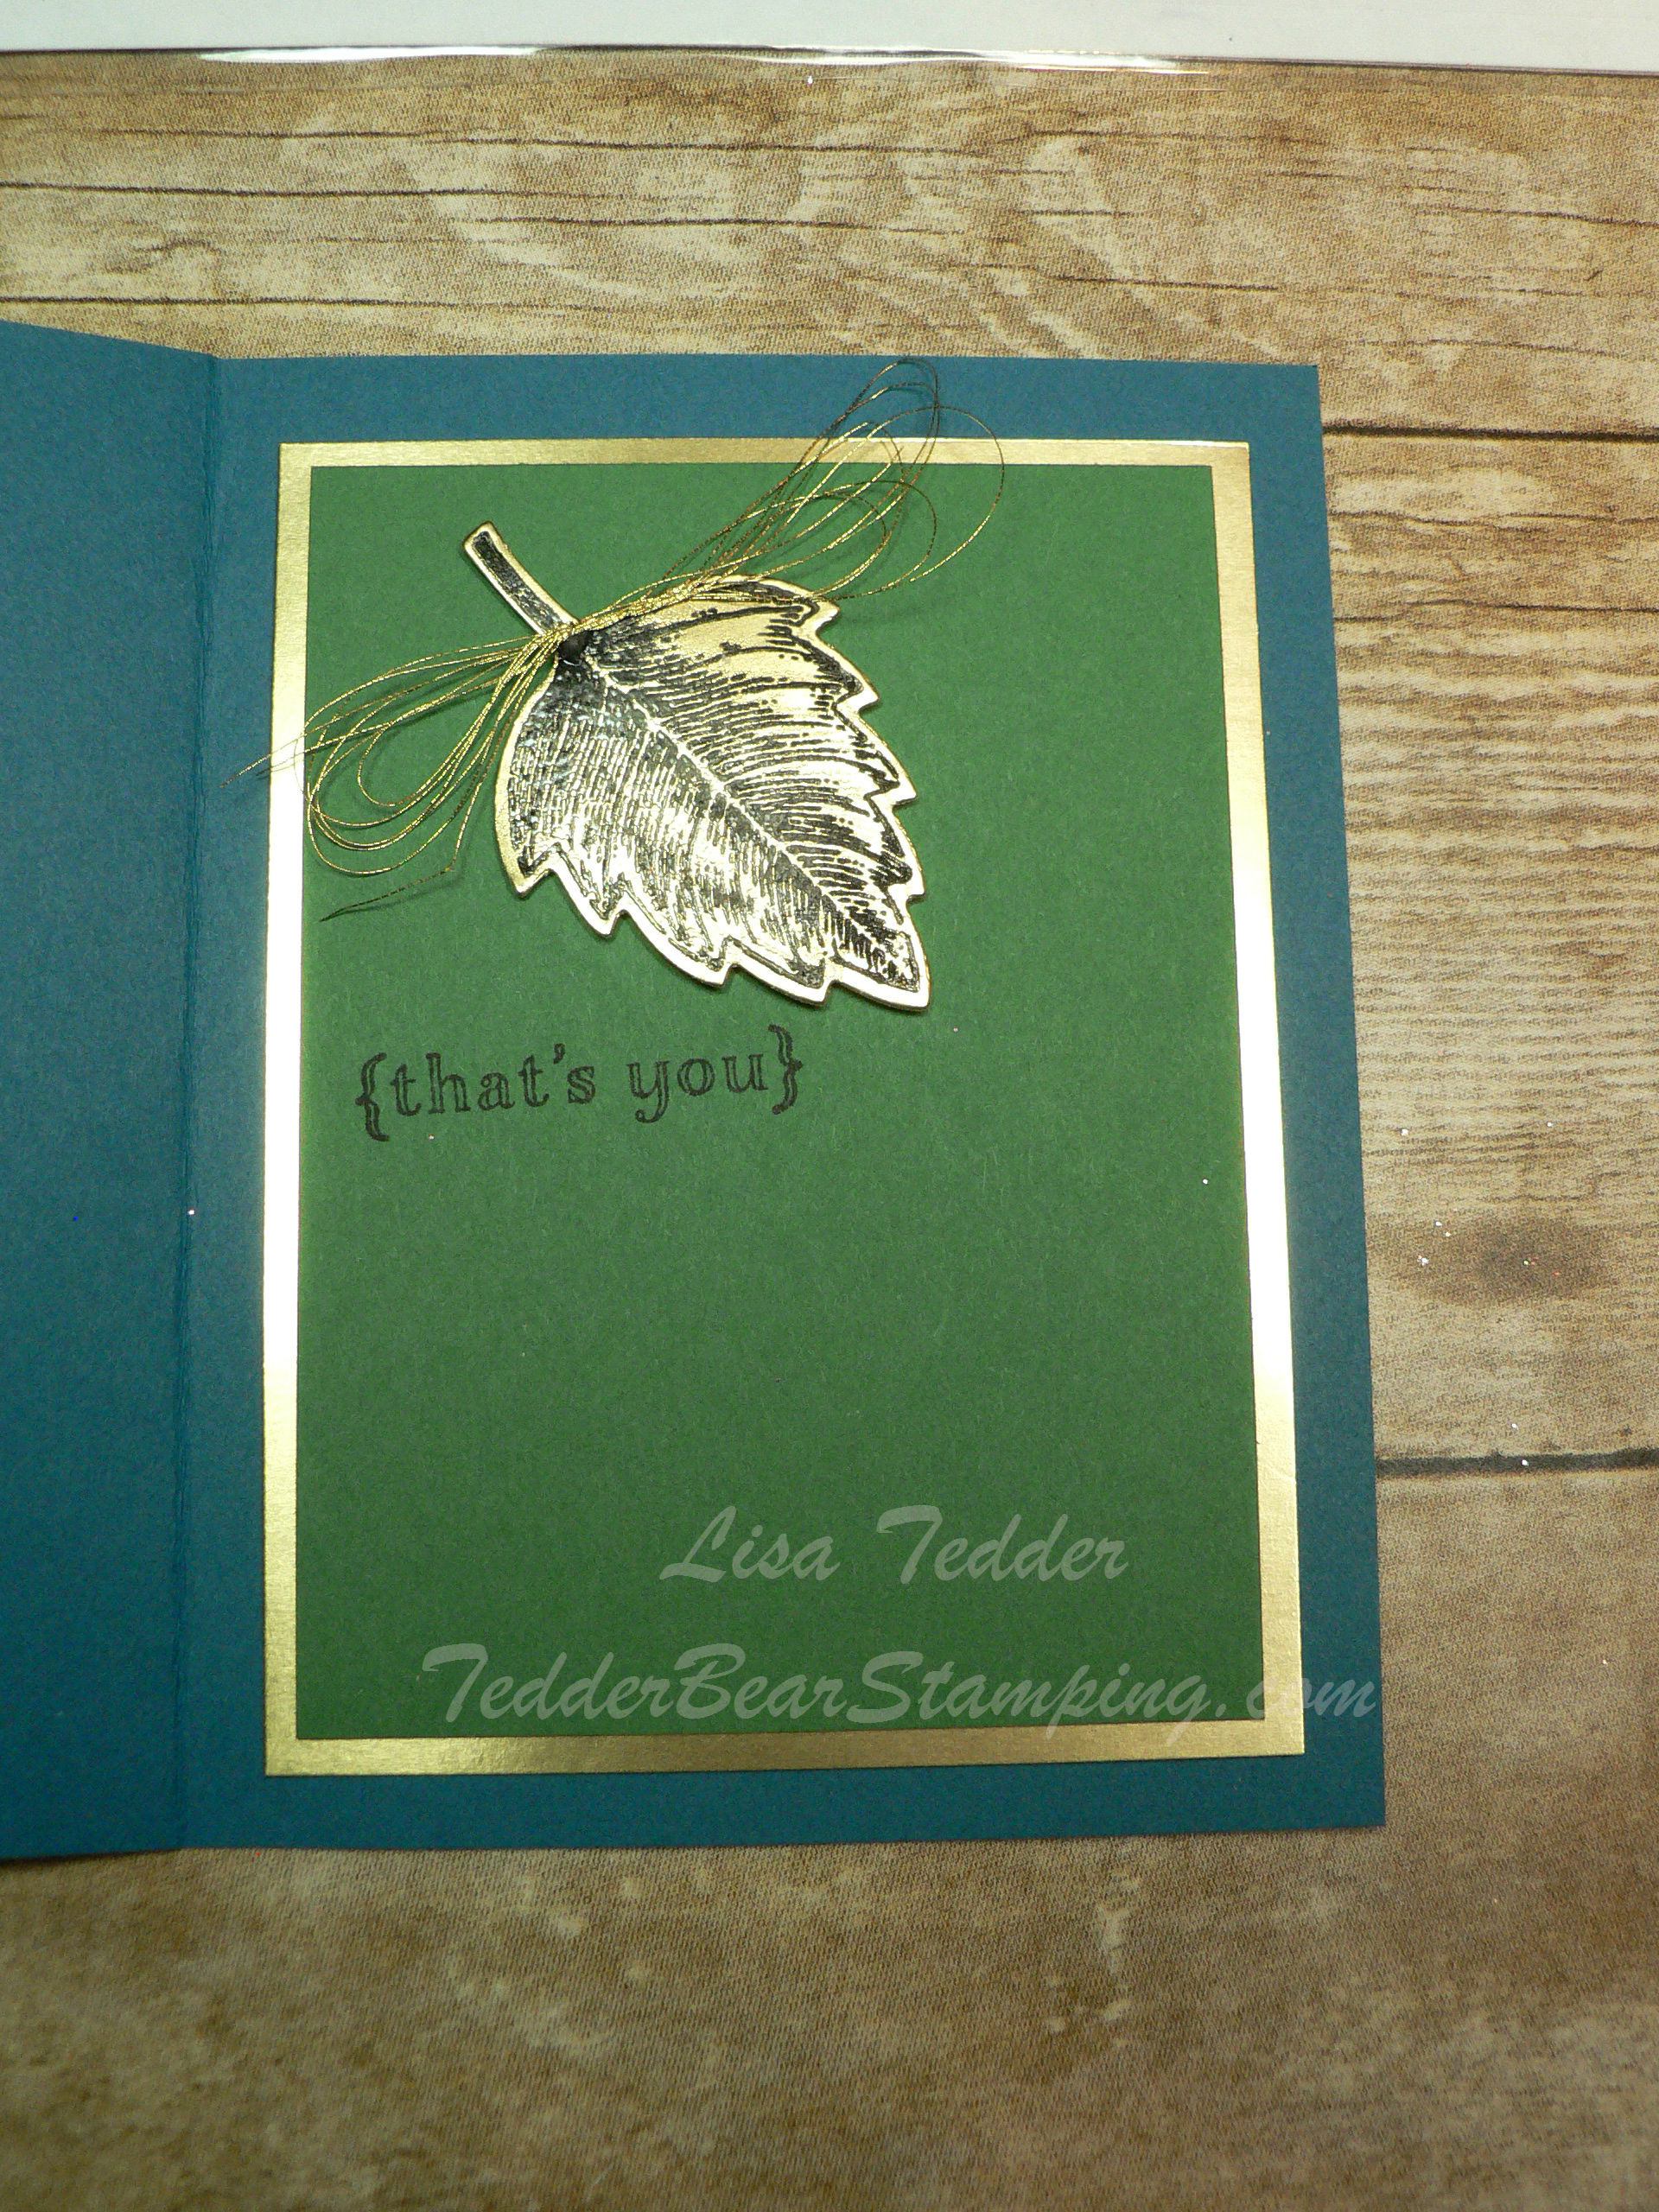
I think it has the perfect amount of space to write in, since I never have enough to say to fill it up!  Now, WHO do I send it to?!

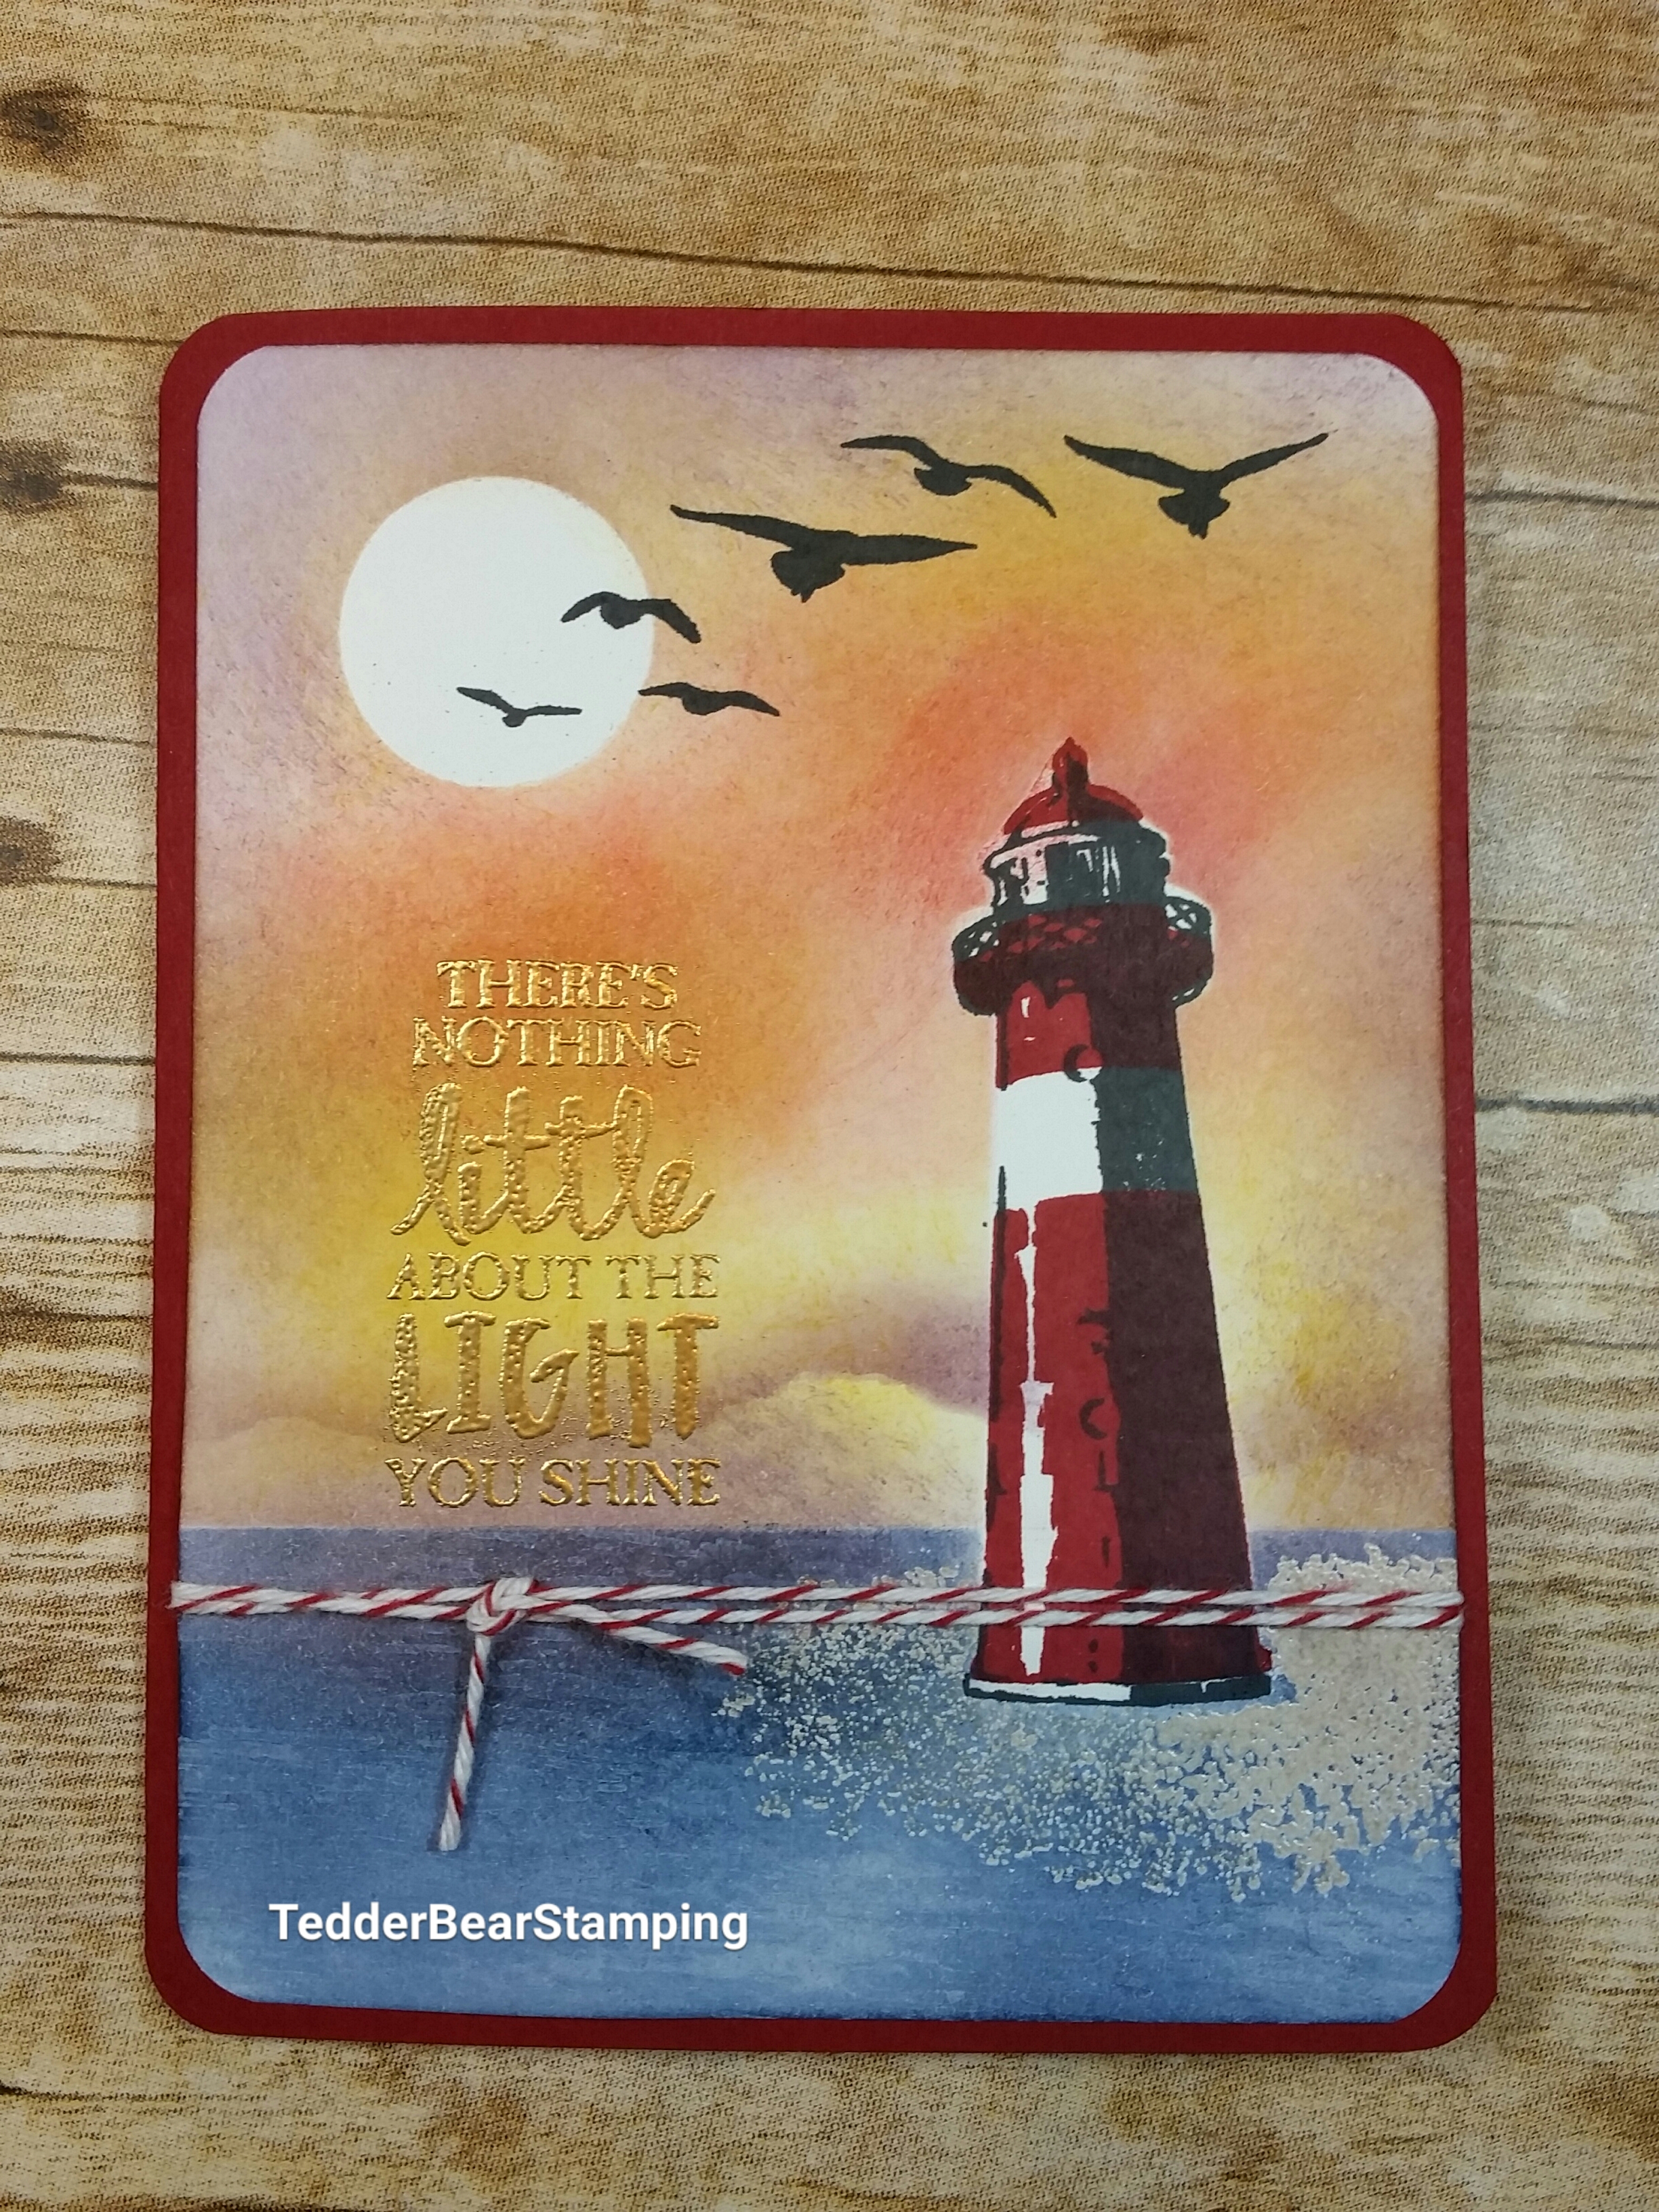
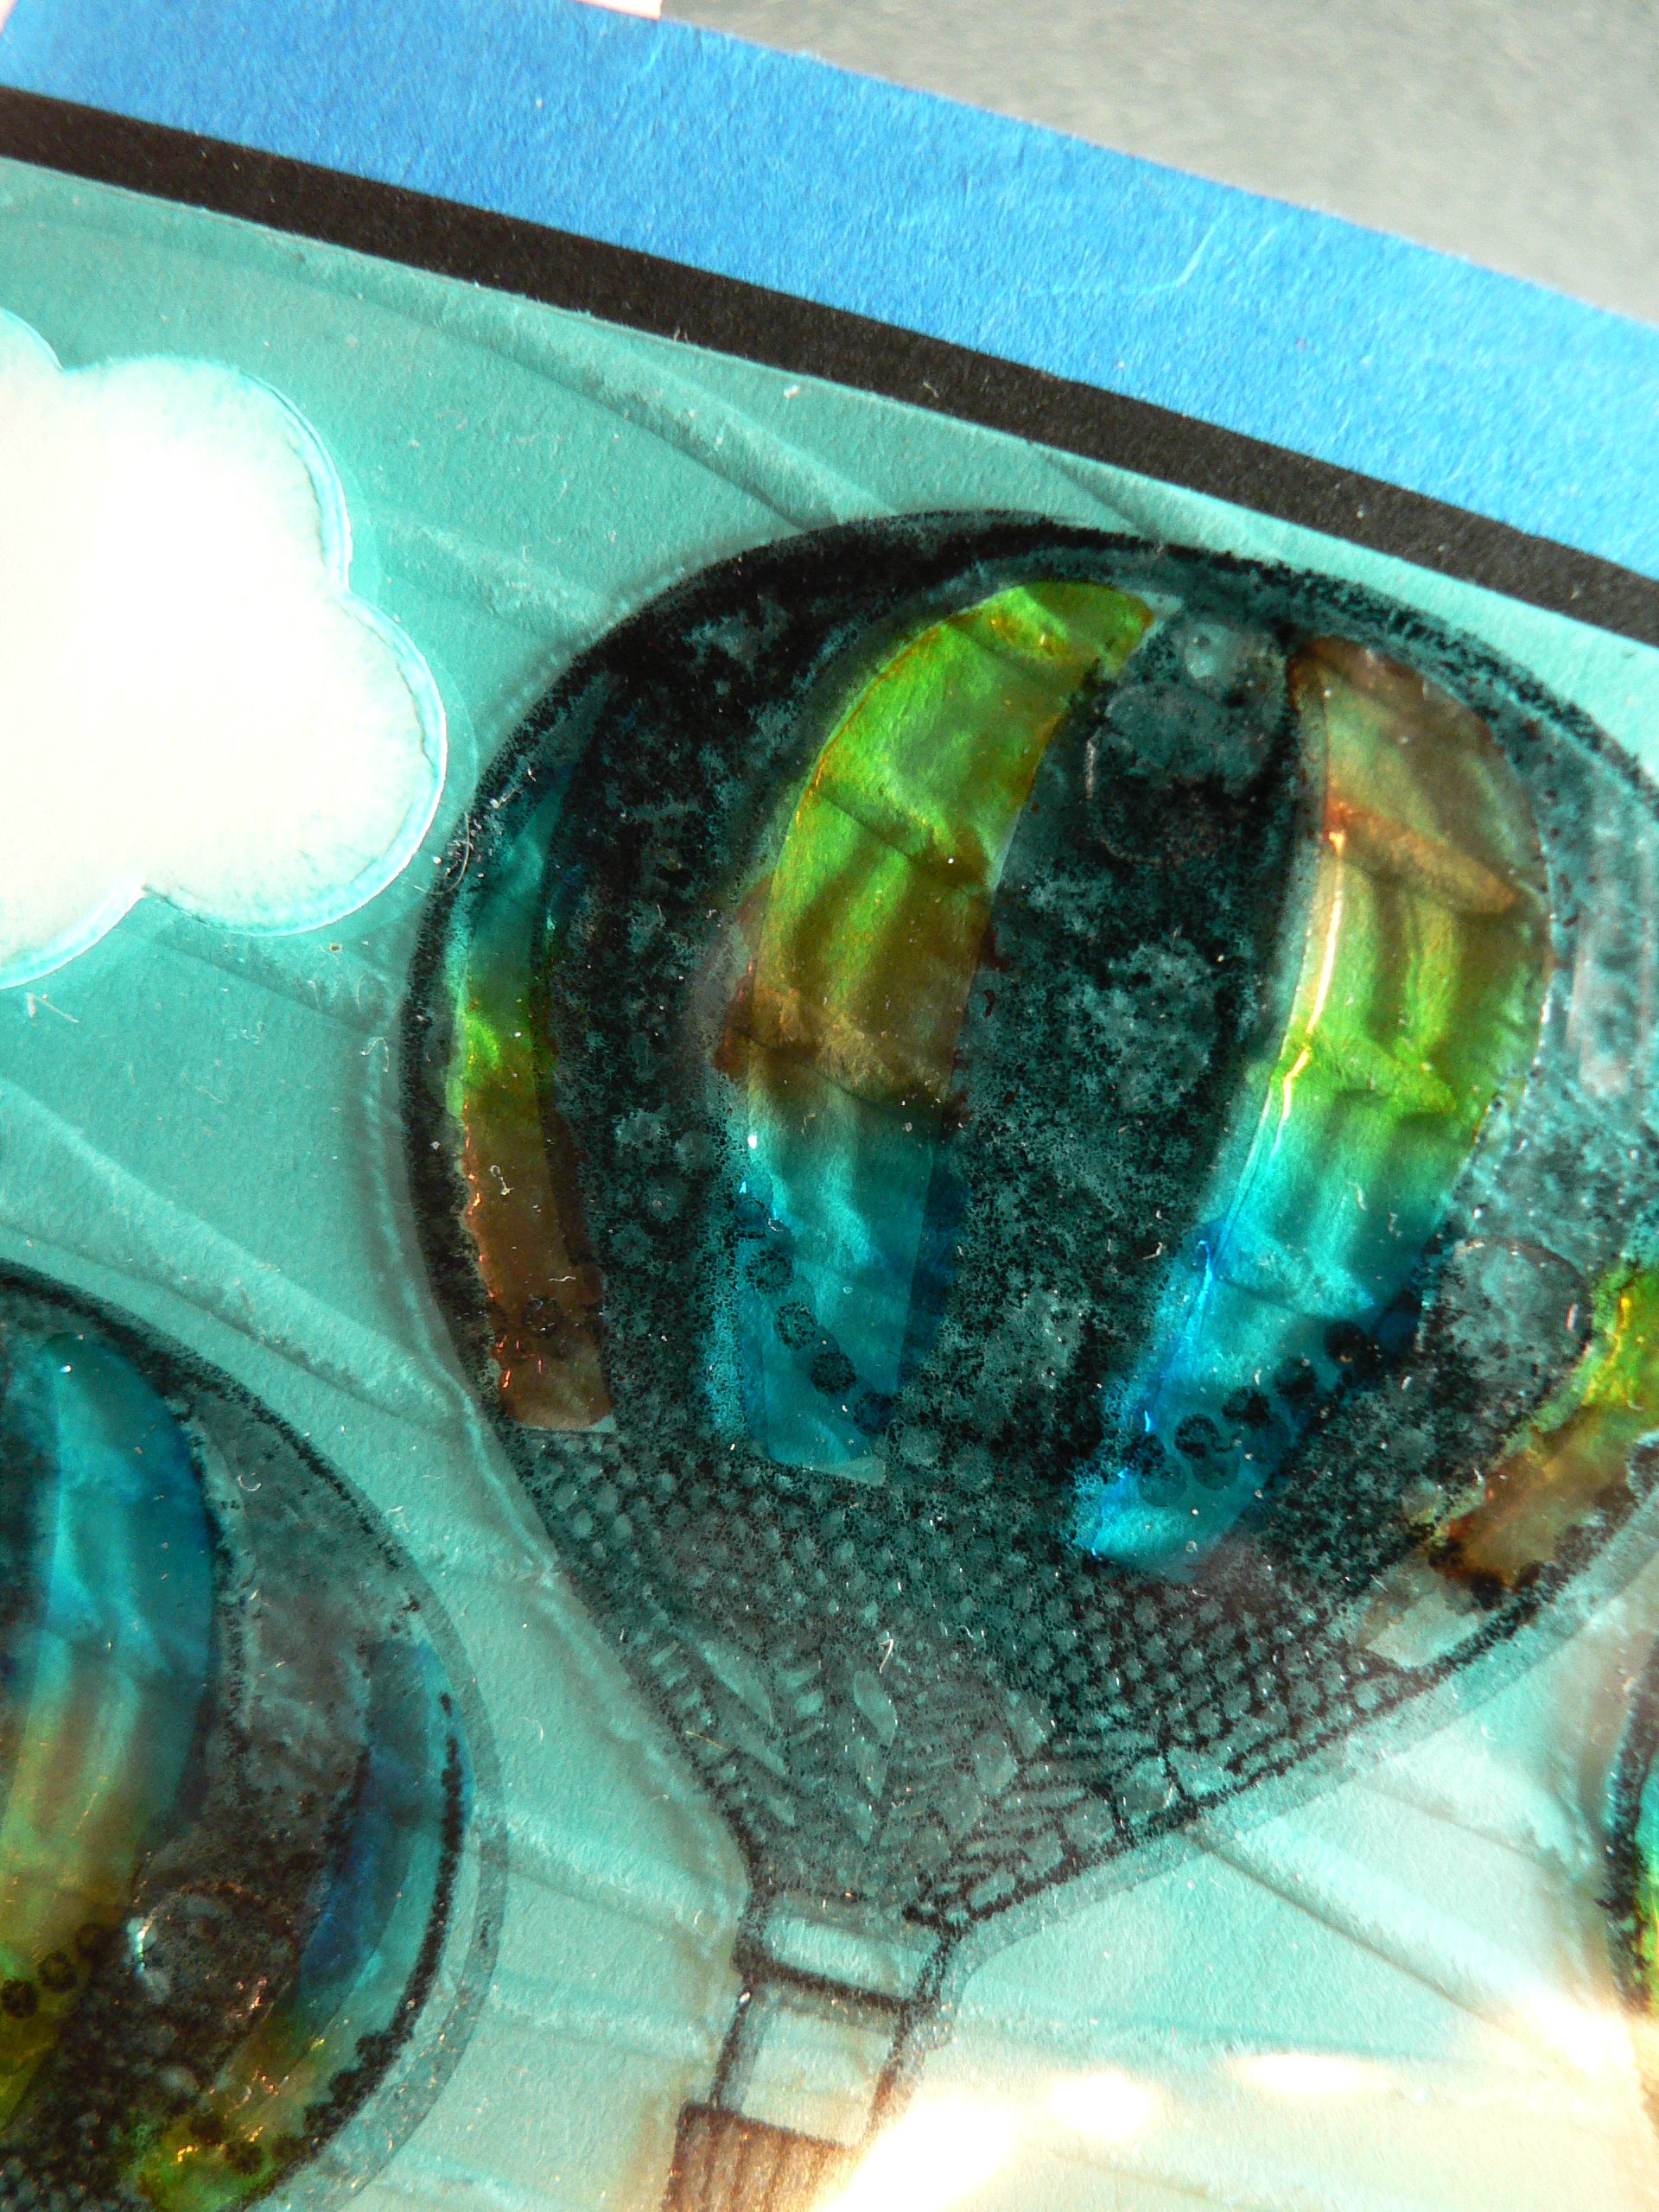
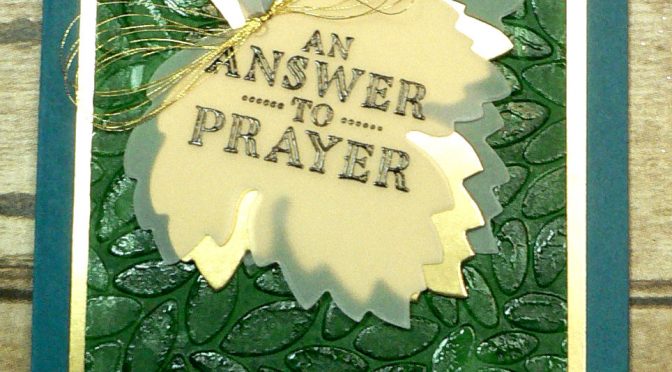
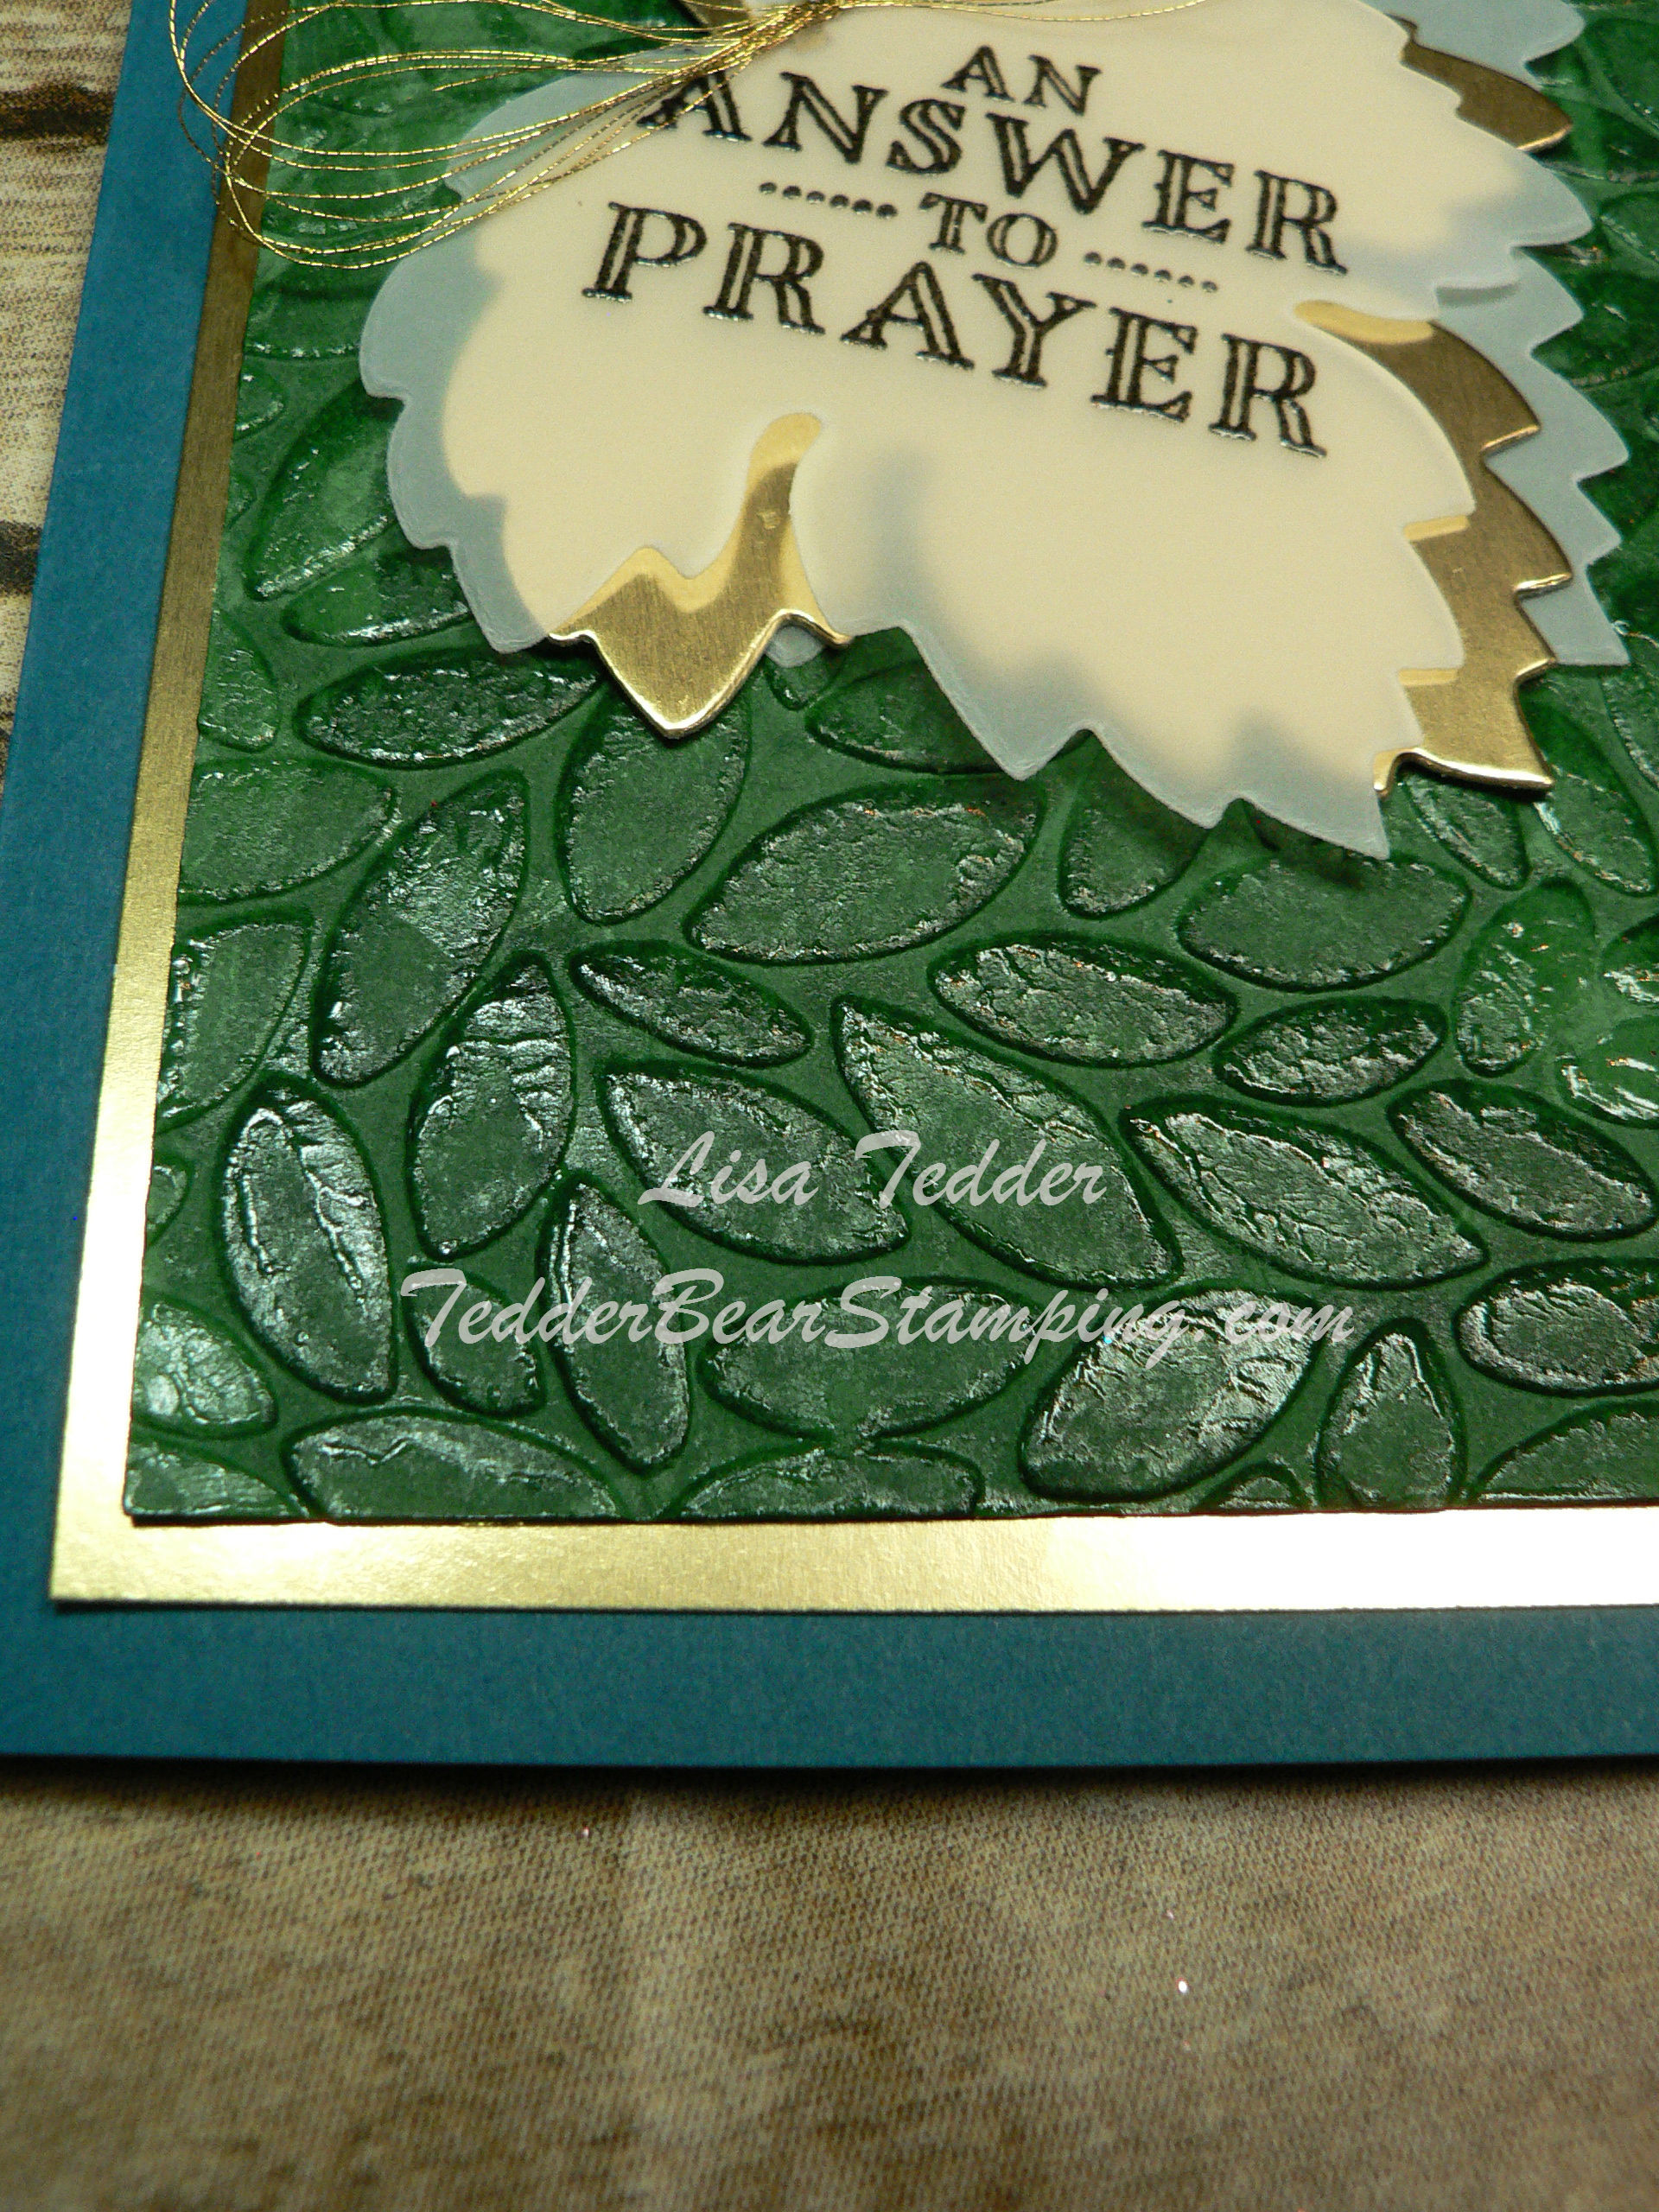
Here is a close-up of the leaves:

Don’t forget I have Blog Candy!  The drawing is coming up really fast!!  You can put in MULTIPLE comments for any of my posts AND you can go to my FaceBook Page and comment on there too!  So easy, and you get a great gift for FREE!!

This was a quick post today, hope you liked it!  I have a lot of classes coming up locally so send me a note if you want in on one of them! I finally have my subscription on my page fixed, so you can sign up to be notified when I post!  Hoping you will want to come back!

Lisa Tedder
TedderBearStamping
California girl living in North Carolina


Product List

<!——– TAMS End ——-

Press’n Seal your thinlits for a beautiful effect

Welcome to the NC Demo Blog Hop!! Happy Spring! I thought these cards looked like Spring has Sprung! Don’t you?

I have seen on other posts where people have taken a thinlit and they pop-up the pieces onto a card and the look is so pretty! The one I went to was Billie Moan and she said in her video that the effect is beautiful but the effort was intense!

I had an idea on how to do this same technique BUT make it much easier!! I made a video showing how to do this very thing! I am not into doing things the hard way and I wanted to figure out an easier way and then share it with you!

Here is the card I made for the YouTube video:

I used the smaller rose thinlit from the Stampin’ Up! thinlit set Rose Garden! I haven’t used that set in a while, but it worked perfectly for this card, don’t you think? I put clear Wink of Stella on the top of each petal and then lined the petals with Gold Wink of Stella. The background is the Petal Burst Embossing Folder, sponged over top with the Peekaboo Peach to make the leaves stand out. I also used the Gold ribbon with the Peekaboo Peach ribbon on top to set it off!

I used the Bigger rose for another card, it took up more room, but still quite stunning!


I put some clear Wink of Stella over the petals to really make them stand out! For the background I used the Embossing Folder Fluttering and sponged the top with Mint Macaron to help the butterflies fly! The glitter paper is from Sale-a-Bration, sorry it isn’t available anymore, but any glitter paper is great!

How did I make this simpler? I worked for HOURS trying to figure out a quick version on how to make this, so it will be easy for everyone!

Have you heard of Press’n Seal? This works miracles!! You cut out your thinlit using the Big Shot and before you take the paper away from the thinlit you put the Press’n Seal over the back (make sure that the sticky part is towards the paper. You can see what I mean when you go to my video on YouTube! It really is quite simple!

Once you have it pressed to the back peal away the parts you don’t want like the excess paper and the outline of the rose. THEN you will leave it on the Press’n Seal but place Dimensionals on the back, put glue on the smaller pieces then remove all the backing on the Dimensionals flip over and push onto your project! Easy Peasy! Here’s a picture before you flip it:

Want to see some more projects using this technique??? Once I started I couldn’t stop!

I moved on to the Butterfly thinlits and made a card using three colors!!

For this one I removed some of the colors, ran it through the Big Shot with another color and when piecing them together on the card, I just laid them on top of each other, you can see the video to get an idea how I did this!

And again, I wasn’t done! I wanted to use the Dragonfly thinlits! Here is what I made with those!

I hope you have enjoyed my cards! I had so much fun making them! You can continue on to the next blog.

Jo Anne Hewins
Michelle Irinyi
Tracie Evans Langley
Sharon Maranich
Laurie Meier
Sue Root
Lisa Tedder <————–You are Here!
Frances Wagner


Don’t forget I have blog candy for those who leave messages on any post on my blog OR on my FaceBook page! The drawing will be on April 4th!


Here is what you can win!

Thanks for stopping by! I would love to hear what you think of these cards!

Lisa Tedder
A California Girl living in North Carolina
Product List


Stair Step Card with Blog Candy!

Today I am showing you a really fun and surprisingly simple card!  I’m calling it a Stair Step Card, if you know of the ‘correct’ name,  would love to hear what it is!

I’m using the stamp sets from Stampin’ Up! called Lift Me Up and Beautiful You for the sentiment!  I have a video showing how to do this card, and you can see it HERE!  Please subscribe to my video’s I am having a ton of fun and like to show things that are a Step Up from ‘regular’ cards!

Paper Art is one of my favorite things to do!  Subscribe to my Newsletter that will come each month!

The measurements for the
Whisper White is:  5 1/4″ X 4″ (front), 5″ X 8″ (inside) Score at 2″, 4″ and 6″, or fold back as shown on video.
Island Indigo is: 5 1/2″ X 4 1/4″

Here is a picture of my card:


This is what the front looks like.  Pretty right?  Just vision yourself getting this card, it’s such a pretty card, and you go to open it AND…….


Wow!  It is Really fun and interactive inside!  The Balloons look like they are flying!  This card is super easy to make!  It doesn’t look like it does it?!   It took me all of 15 minutes to make!  That’s with cutting the cardstock too!  If you watch my Video, you can see how much fun it is!  You’ll want to get out any and all stamp sets that you can use this technique with!

Here is another view, close up!

And one more!!
This shows the side view.  Pretty cool right?  What will you be making using this technique!?  I would love it if you could add your links in my comments!  Or just send me a picture!  My email is:
TedderBearStamping@gmail.com

NOW, on to my Blog Candy!!  If you leave me a comment you will get your name put onto a list where I will do a random computer generator to pick who gets it!  I will be doing the drawing April 4th! You can comment as many times as you want!  AND, if you visit my FaceBook Page and make a comment there I will put your name on the list again!

This is a Wood set from quite a while ago, so if you are new to stamping and Stampin’ Up! you will want this set!  It’s so stinkin’ cute!!  Those little bugs can be colored for Easter, a new baby or pretty much any occasion you will want to tell someone you love and care for them!  AND it’s FREE!!  Can’t beat that!

Click on any product below my signature and you will be sent to my online store!
If you purchase from me, I will send you a handmade card or two!

Thank you for stopping by!!  Again, you can watch the video on how to make this card by clicking HERE!   The video isn’t long, I sped it up, but it’s so easy, you can easily pause it to keep up!

Product list below!

Lisa Tedder
A California girl living in North Carolina!

Product List

Making a Sunset

I LOVE sunsets, don’t you? I wanted to make one that was easy but still be stunning…….at least I think so, hopefully you do too!!

I have a video on YouTube walking you through this technique, I hope you check it out here. You can also shop for the products you see in this post and on my videos at my Online Store!

Making a Desert scene was my final one, I had to make FOUR cards with Sunsets! Just couldn’t help myself!

The first one is one I posted on my FaceBook page Let’s Stamp!

It features a lighthouse and this is where my Sunset journey started! I saw a video by Tina Zinck on making sunsets, so off I went!

This was so fun and easy (Thanks Tina!!) That I didn’t stop there! But first let me tell you what I used to make this card!

Stamps: High Tide #143006
Inks: Cherry Cobbler #126966, Watermelon Wonder #138323, Night of Navy #126970, Perfect Plum #126963, So Saffron #126957, Crushed Curry #131173, Crumb Cake #126975, Early Espresso #126974, Chocolate Chip #126979, Whisper White #101731, Momento Black #132708, Versamark #102283 and Sahara Sand #126976
Paper: Cherry Cobbler #119685 – 8 1/2″ X 5 1/2″, Whisper White #100730 – 4″ X 5 1/4″
Misc: Project Life Corner Rounder #135346, Cherry Cobbler Baker’s Twine #123125, 1″ circle punch #119868, Gold Embossing Powder #133457

Now, on to the next Sunset Card! This one uses the Lift Me Up Stamp set, but uses the same techniques as on my video.

I love how the Ocean/water came out on this one! This uses the same color palate as the card above. Here are the dimensions for the card stock, since everything else is the same:

Cherry Cobbler 8 1/2″ X 5 1/2″, Crushed Curry #131199 – 3 1/4″ X 4 3/4″, Cherry Cobbler- 3 1/8″ X 4 3/4″, Whisper White – 3″ X 4 3/4″ and 2″ X 1 1/2″ (for the sentiment).
I also used Dazzling Diamonds #133751, and Fine Tip Glue to make the Dazzling Diamonds stick #138309

What else can I make with this Sunset? I just HAD to make more!! So I pulled out my Trusty set of Lovely as a Tree!!! Love this set!
Again, I used the same colors, just used the Stamp set Sending Thoughts #142965 from the Occasions Catty 2017 and I also used the FREE with Sale-A-Bration ribbon Metallic Gold #143601!

Here are those dimensions:
Elegant Eggplant #105126 – 8 1/2″ X 5 1/2″, Whisper White 5 1/4″ X 4″
The Elegant Eggplant Ink # is 126969, Gold Embossing Powder #133457

And now for the Final Card, this is the one I made the video on!!

I had so much fun making this one!! Like I said at the Beginning, I LOVE sunsets, by this time you might just believe me! hahahaha

The supplies for this card are:

Stamps: Birthday Fiesta #141500, Thoughts and Prayers #127805, Here for You # 142164
Inks: Watermelon Wonder #138323, Night of Navy #126970, Crushed Curry #131173, Crumb Cake #126975, Early Espresso #126974, Chocolate Chip #126979, Momento Black #132708, Night of Navy #126970, Black Marker
Paper: Night of Navy #100867 – 5 1/2″ X 4 1/2″ , Watermelon Wonder #138334 – 5 1/4″ X 4″, Whisper White #100730 5″ X 3 3/4″
Misc: Sponges #141337, Big Shot #143263, Up & Away thinlits #142748

If you love these colors together, make sure and stock up on Watermelon Wonder!! It’s one of the In Colors that is retiring this year 🙁 This is a GREAT color to make your sunsets with! The other reds are either too red, or too dark. It’s doable, but this one just makes it easy!

I hope you enjoyed all my Sunsets, and that you will want to visit me again! I will be making more videos, I am really enjoying it! Make sure you sign up on my YouTube page to be notified when I have another one coming out!

Also!!! Click on my Newsletter button, you will receive monthly ideas and keep up to date with my schedule!

Now, click on each name to see the rest of the blog Hop from Demo’s from North Carolina!!

Lisa Tedder
CA girl living in NC!

Debra Ballance-Byrd

Tamra Davis

Jo Anne Hewins

Michelle Irinyi

Melissa Kerman

Tracie Evans Langley

Sharon Maranich

Laurie Meier

Lisa Tedder <———–You are Here!

Frances Wagner


Window Sheet Fine Tip Glue Watercolor

Today I am showing another Technique that I thought of.  NOT sure if it’s been done before, but I can honestly say that I didn’t see it anywhere!

I did a YouTube Video which you can find HERE!

I love having Window Sheets on my cards.  It adds a lot of shine and interest!  I stamped the balloon from Lift me Up, a stamp set by Stampin’ Up!, using Black archival ink.  I make sure that the pad is re-inked so when I stamp it stays wet longer.  I emboss the images (I stamped the balloon three times, making sure they weren’t even) using Clear Embossing Powder.  Make sure that you get all excess powder off the window sheet using your hands or a brush.

Once it is heat set, I came in with markers:  Pacific Point, Tangerine Tango and Crushed Curry.  I colored the areas, making sure that the balloons didn’t match each other.  Once all three colors were on , I went over each balloon with the Fine Tip Glue, make sure you stay within the lines, it will show on the front if you go over.

I embossed the Bermuda Bay cardstock under the Window Sheet using the Seaside folder from Stampin’ Up!  These colors really look good together, don’t you think?

Set aside to dry (it takes around 3 hours to dry, but I let mine dry overnight).  Once dry you can put the ‘green glue’ from SU! along the lines of the balloons, this works extremely well, don’t put a lot on, so when you lay it down  on the Bermuda Bay Embossed piece, it doesn’t bleed past the edges.

I used the Oval Framelits with the scalloped edge to simulate clouds, and sponged it with more Crushed Curry Ink to add dimension.

The clouds are in the Up and Away thinlits that go with this stampset!  I really love how this card shows so much dimension and interest!


Here are the dimensions for the card!

Pacific Point:  8 1/2″ X 5 1/2″
Basic Black:  5 1/8″ X  3  5/8″
Bermuda Bay/Window Sheet: 4 7/8″ X  3 3/8″
Scraps of White for Clouds
Scrap of Daffodil Delight for sentiment

Stamp sets:

Lift Me Up

Inks:

Bermuda Bay
Basic Black Archival
Markers:  Pacific Point, Tangerine Tango, Crushed Curry

Accessories:

Up and Away thinlits
Window Sheet
Big Shot
Seaside embossing folder
Fine Tip Glue
Sponges for clouds
Oval framelits for sentiment
Dimensionals for under sentiment and clouds
Mono liquid adhesive (green bottle)

I hope you try this technique out!  I really had fun making it!  The colors are really striking in person!!  And don’t forget to watch the video using the link here!

Lisa Tedder

A California Girl living in North Carolina!!


Unconventional uses for Stampin’ Up! Products!

I have finished my FIRST YouTube video in quite a while!  It’s been years!  I was doing two videos every Tuesday for 3 years!  They are over on Vimeo.  But you can check out my video for this card here.

There are THREE things that I used differently, I’ll put a number by the line where they are, just in case you don’t want to read everything!

I did quite a few things with several products, but switched up their USUAL purpose!  I LOVE coming up with new ideas, especially finding more than one way to use something!!  That just means more bang for our BUCK!

  1.  For this card I used the Hardwood stamp set as a ‘door’ for my keyhole to look authentic.    For the Keyhole, I put two framelits together.  The 2nd from the outside of the Lots of Labels and the snowman from Snow Friends.


BUT for a keyhole I turned it upside down!  Plus, on the card, I put the sentiment over the bottom of the keyhole to ‘hide’ the snowman!  I hope you can see the keyhole and NOT the snowman!!

Then I cut out out the middle of the white cardstock so you can ‘peek’ inside!  For that I used the 3rd framelit from outside in the Lots of Labels so the ‘keyhole’ can stack flat and still be adhered to the front.

2. For the screws on the front of the door around the keyhole I used the screws from the Urban Underground Embellishments (in the Occasions mini), BUT I colored them with the Gold Wink of Stella and immediately embossed with clear, since the color would just wipe off otherwise.  This way I am all coordinating!! I also used the gold embossing powder to emboss the key so you (hopefully) will figure out that it’s a key hole!!  Here is close up of the screws being all gold:

The sentiment is from Balloon Adventure and it says:  Open Me Already!  hahahaha  I got such a kick out of making this card!  Can you tell?
I attached (after fussy cutting the key) the gold sequin ribbon to the key and popped it up on the front of the card!!

3. To make the Gold line under the Sentiment I used the Tear & Tape under, made sure it was stuck down well, then tore off top, poured Gold Embossing Powder on it, and heat it!  And it embossed!  Didn’t know that would happen!  Just thought I would try it.  LOVE it, so glad I tried!

Ok, for the inside, I stamped the girl from Beautiful You, lining her up so she would peek through in the front.  I stamped her with Early Espresso, then embossed with Clear EP (I tend to do that with SU! ink) because it stays wet long enough so I can do it!  And it adds so much texture to your card!

For her dress I stamped it with versamark, then poured Heat & Stick onto the Versamark, heat it only until it gets shiny NO LONGER, or it will loose it’s stickiness!  Once that is done, I poured Gold Glitter onto the Heat & Stick, shook off excess, then heat it ONLY FOR A FEW SECONDS!  This way it really adheres to it!  Watch the video you will see how I rub on it and it stays!!  I don’t use Heat & Stick very often, but I really love how great it works, think I’ll use it more often now!  Here is the inside of the card:

I ran some of the Tear & Tape along bottom and put some more Gold Embossing Powder on it and heat it!  Love how it really adds some shine to the card!  Stamped my two inside sentiments ‘It’s your Birthday’ at the top and ‘Let’s celebrate!’ at the bottom, both in Early Espresso and embossed with clear!

She is so pretty in the gold dress!!  I hope you liked my Unconventional ways of using  product!  Please leave me some feedback on what you think!

And just in case you didn’t get a good picture of the card, here it is again:

I really enjoyed doing this card, I saw the framelits put together like this on Pinterest, but she was making a Snowman Shaker Card.  I saw it, and immediately saw the keyhole and not the snowman!  That’s so weird.  I guess my mind works in mysterious ways!!  LOL

I hope to be making more blog posts and videos, so subscribe and hopefully you’ll catch them!

Lisa Tedder
Kernersville NC

A California Girl living in NC!


NC Demo Blog Hop – Progressing Christmas Page

If you just came from Pam’s page, welcome to my page! If you started at mine, click on the names below to see what others have done for the Holidays!  Enjoy!

Today I am showing you how I go about doing a Scrapbook Page by showing that you can make ANY size page depending what you like.  I started off making a 6 X 6 page:

6x6page

The red block is for putting your picture in.  I LOVE handmade scrapbook pages!  And the Stamp set from Stampin’ Up! called Christmas Magic is one of my FAVES!  It’s so pretty and versatile!  I made tags too with the sets I used for this page, check it out at the end of this post!

For the next part of the page I made an 8 1/2″ x 11″ page and placed the 6 x 6 on that one.

middlepage

The White under the Santa and next to the snowman is where You put the picture on this part!  I used the Santa from the Stamp set Cookie Cutter Christmas.  This was so much fun to do! I stamped it on Vellum using Black ink and embossed it with clear.  I then turned it over and colored the back, making sure I shadowed it.  I put it on my Stampin’ Pierce Mat and with my embossing tool from the Simply Scored Scoring Tool upside down (embossed side down) and rubbed the embossing tool over all the white pieces.  This raises the vellum and makes it white.  REALLY WHITE!  It is so much fun to do this technique and looks great on sails and other stamped images that need to be white and fluffy.

santainside

This is what it looks like before you turn it over.

santafinal

Once you turn it over you can really see the white is white!  I did NOT use ANY ink on the white parts, that is all because the vellum changes to white when you press on it with the embossing tool.

Now, here is the finished page on 12 x 12 :

beckypagedone

I die cut the ‘Merry’ from the Christmas Greetings Thinlits.  I also stamped the bells from the Christmas Magic stamp set and embossed it with Silver Embossing Powder, then using my blender pen colored in Smoky Slate to ‘look like’ silver.  But first I stamped the Swirl from Star of Light and ‘hung’ my bells from that.

If you notice under the snowman, I have three bells on white bakers twine, this is so they won’t fall off (my daughter is going to frame this with her Christmas pictures on the wall), and I wanted to make sure that no matter what they wouldn’t fall off.  I made the white twine go through the paper and I tied a  knot in the back.

This page, in person, is so pretty!!  Have you ever made something and are impressed with how much better it came out than you thought it would when you started?!!   That’s how I feel, I hope you like it too!!

Now, here are the tags that I made to go along with this gift:

p1120035

I love the simple yet elegant feel of these!  Which is perfect for something that you will want to make a lot of!  I used the Scallop Tag Topper for all of these, the middle one is just a little bit shorter than the other two.

Here is the details that you might want to know!

Stamp sets:
Christmas Magic #142119
Star of Light # 142110
Merriest Wishes # 142066

Inks:
Versamark
Real Red
Basic Black
Old Olive

Cardstock:
Whisper White 8 1/2″ x 11″, 4″ x 6″, 6″ x 6″, 1 1/2″ x 2 1/2, scrap for ‘merry’  and the bells and 2″ x 5″ for tags
Real Red 12″ x 12″, 3″ x 5 3/4″, 8 1/4″ x 10 3/4
Dapper Denim 2″ x 4 1/4″ for tag

Accessories:
White embossing powder #109132
Silver Embossing powder #109131
Scalloped Tag Topper Punch #133324
Classic Label punch #141491
Mini Jingle Bells #142002
Simply Scored Scoring Tool #122334
3/8″ Ruched Ribbon – Dapper Denim #141424
3/8″ Stitched Satin Ribbon – Real Red #141693
Dazzling Diamonds #133751
Blender Pens #102845
Dazzling Diamonds Glimmer Paper #135315
Christmas Greetings Thinlits #139659

So?  That is what I am presenting  for you on this blog hop!  I hope you love them as much as I do!  I would love to hear from you!!

Jo Anne Hewins
Michelle Irinyi

Tracie Evans Langley

Laurie Meier
Sue Root
Pam Staples
Lisa Tedder
Frances Wagner

Lisa Tedder

TedderBearStamping

12642618_10208338697962909_6250260198526436679_n


NC Demo Blog Hop – Stuck Santa

You just came from Laurie Meier’s blog, she’s great isn’t she?  I am Thankful for Melissa Kerman for giving me inspiration!

I got this idea from her at our NC Demo Quarterly (see below for details).  We had a tag swap, which stupidly I didn’t join.  :-/  Live and learn, right?  Well, she made this awesome tag with Santa’s legs coming out of the chimney.  Here is a picture of it:p1120027


I wanted to make a card from the tag, and this is what I came up with:

santachimney2

I used the Heart punch (which I didn’t know Melissa used, until I really looked at the boots, and was AMAZED!) and she free cut the pants, so I did that too. The Chimney I changed up some, I added some roof so I could put ‘snow’ on the edges.  I used the Dazzling Diamonds Glitter Paper and cut thin wavy strips to give the snow effect.  I stamped the background with the Snowflake stamp from the Stampin’ Up! set called Snow Place.  The Jolly is a framelit from Christmas Greetings.  LOVE how I used a white gel pen to put ‘snow’ on the word, then sprinkled some Dazzling Diamonds on top.  In person this card looks so sparkly and pretty!!

The ribbon is the Whisper White Mini PomPom Trim!  Even though this is all Christmas I got everything out of the current SU! catalog!

This is a list of everything I used:

Stamp sets: Snow Place #139738

Inks:

Whisper White #101731

Paper:

Night of Navy 5″ X 3 3/4″
Real Red 5 1/4″ X  4″ and scraps
Whisper White  8 1/2″ X 5 1/2″
Basic Gray 3 3/4″ X 5″  (I ran this through the Embossing Folder and got 2 chimneys out of one piece of paper, you have to go from each side seperately)
Basic Black Scraps

Accessories:

1 1/4″ circle punch
Whisper White Mini PomPom Trim
Dazzling Diamonds
Dazzling Diamond Glitter Paper
Heart Punch
Brick Wall Embossing folder
Christmas Greetings thinlits
Sponges
Big Shot
Precision Base Plate

NC Demos is a group in North Carolina that gets together all over the state and we have ‘meetings’.  Really it’s a great get together where ideas are shared and we stamp ALL DAY!!  We learn a lot from each other and go home energized to play/work!
It’s great to meet other stampers, especially close to home!
If you live in North Carolina you can be a member too, as long as you are a Stampin’ Up! Demonstrator!  If you have any more questions, please feel free to ask! We really are a GREAT group!!

I hope you like my Blog Hop Post!  For some reason, my blog hop button isn’t working, so click on the next name below!!

Lisa Tedder at Tedder Bear Stamping!

Jo Anne Hewins
Michelle Irinyl
Melissa Kerman
Tracie Evans Langley
Laurie Meier
Lisa Tedder
Frances Wagner


Ultimate Pink Blog Hop

ultimatepinkheader


Welcome to the first ever Ultimate Pink Blog Hop – a collection of ideas from Stampin’ UP! demonstrators all over the globe featuring shades of pink in honor Breast Cancer Awareness Month

I am participating in this Blog Hop because I have quite a few people in my life who has been touched with Breast Cancer.

My sister and my very good friend are the most recent to be hit by this disease.  My hope is that we can bring more awareness and that more people will participate in helping this cause.

My design today is a handmade Christmas card, seems I have Christmas on my mind! The Stampin’ Up! set is called Embellished Ornaments, and I also used the Thinlits Delicate Ornaments. I’m having two separate classes making Christmas cards and they are so pretty!

I used for the colors Melon Mambo, Pink Pirouette, Whisper White and for the ornament I used the Glimmer paper Blushing Bride!  I wish this was a real ornament so I could hang it on my tree this year!

p1120017

I am in the process of doing more on my blog, I’m changing the name to:

TedderBearStamping.com

Check back for more pictures!

I live in Kernersville NC

Lisa Tedder

Click on box below to see blog hop list


NC Demo Blog Hop – Tree Bark Technique

It’s time for the NC Demo Blog Hop again!  If you didn’t attend last month, you won’t want to miss this month!

I LOVE doing techniques!  Today I have made two cards that use the Tree Bark technique!

I have made a Periscope, if you want to see how I made it, I think if you look me up on Twitter it will show you where to find it on Katch.me!  But for those who don’t have Periscope I will try and explain it with words!

You start off with either Soft Suede CS (2nd card) or with Sahara Sand (1st card).  You then stamp the Hardwood stamp using the color of your cardstock, I want it to be subtle so it looks more realistic.  I then rub direct to paper the Chocolate Chip ink pad VERY softly, using only the corner of the pad and only in a few places, I want that also to be subtle.

Then you will tear towards you an uneven amount of strips, 1st card has 5 and my 2nd has 3.  Make sure you tear TOWARDS yourself, so you have an uneven edge and it is able to be sponged and manipulated.  Then you will sponge the rough edges with the Chocolate Chip ink and then go over it again, with the same ink/sponge and sponge up, so the edge curls up.

You will do this to all your pieces…….this will make the edges stand up from the card.  Once you have that done, you will adhere your pieces so they match up with the edges standing up.  You can see this on both of my cards.

Once it is all adhered, you will want to LIGHTLY go over the raised edges with Versamark, then Gold Embossing Powder.  Heat it, and you will have this really pretty edge to each torn piece!

I used an In Color for the 1st card: Mint Macaron for the leaves and base, then embossed the flowers gold. The stamp set is: Number of Years.

The 2nd card uses Pool Party and the Stamp set: Pedal Pusher.  BOTH cards utilizes the Gold Foil Sheets since I wanted to bring out the Gold EP.

Bark-Technique1

Bark-Technique2

I really loved making these cards, and I would love to see if you make any using this technique!  Just share with me so everyone can see your pretty Tree Bark Cards!

Thanks for visiting!  You will now go onto the next Blog, just click on the picture below!


Shavon Borders
Regina Campbell
Tamra Davis
Kitty Helton
Jo Anne Hewins
Amy Ingram
Michelle Irinyi
Melissa Kerman
Tracie Langley
Sharon Maranich
Laurie Meier
Mary Robinette
Sue Root
Pam Staples
Lisa Tedder
Frances Wagner

Lisa Tedder

CreatingWithLisa.com


Lisa Tedder

CA girl living in NC!!