Tag Archives: winter

Seamless Blending of colors that draw your eye

Hey Guys!

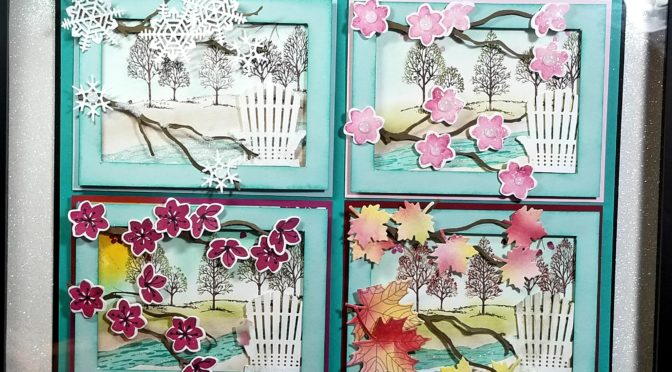
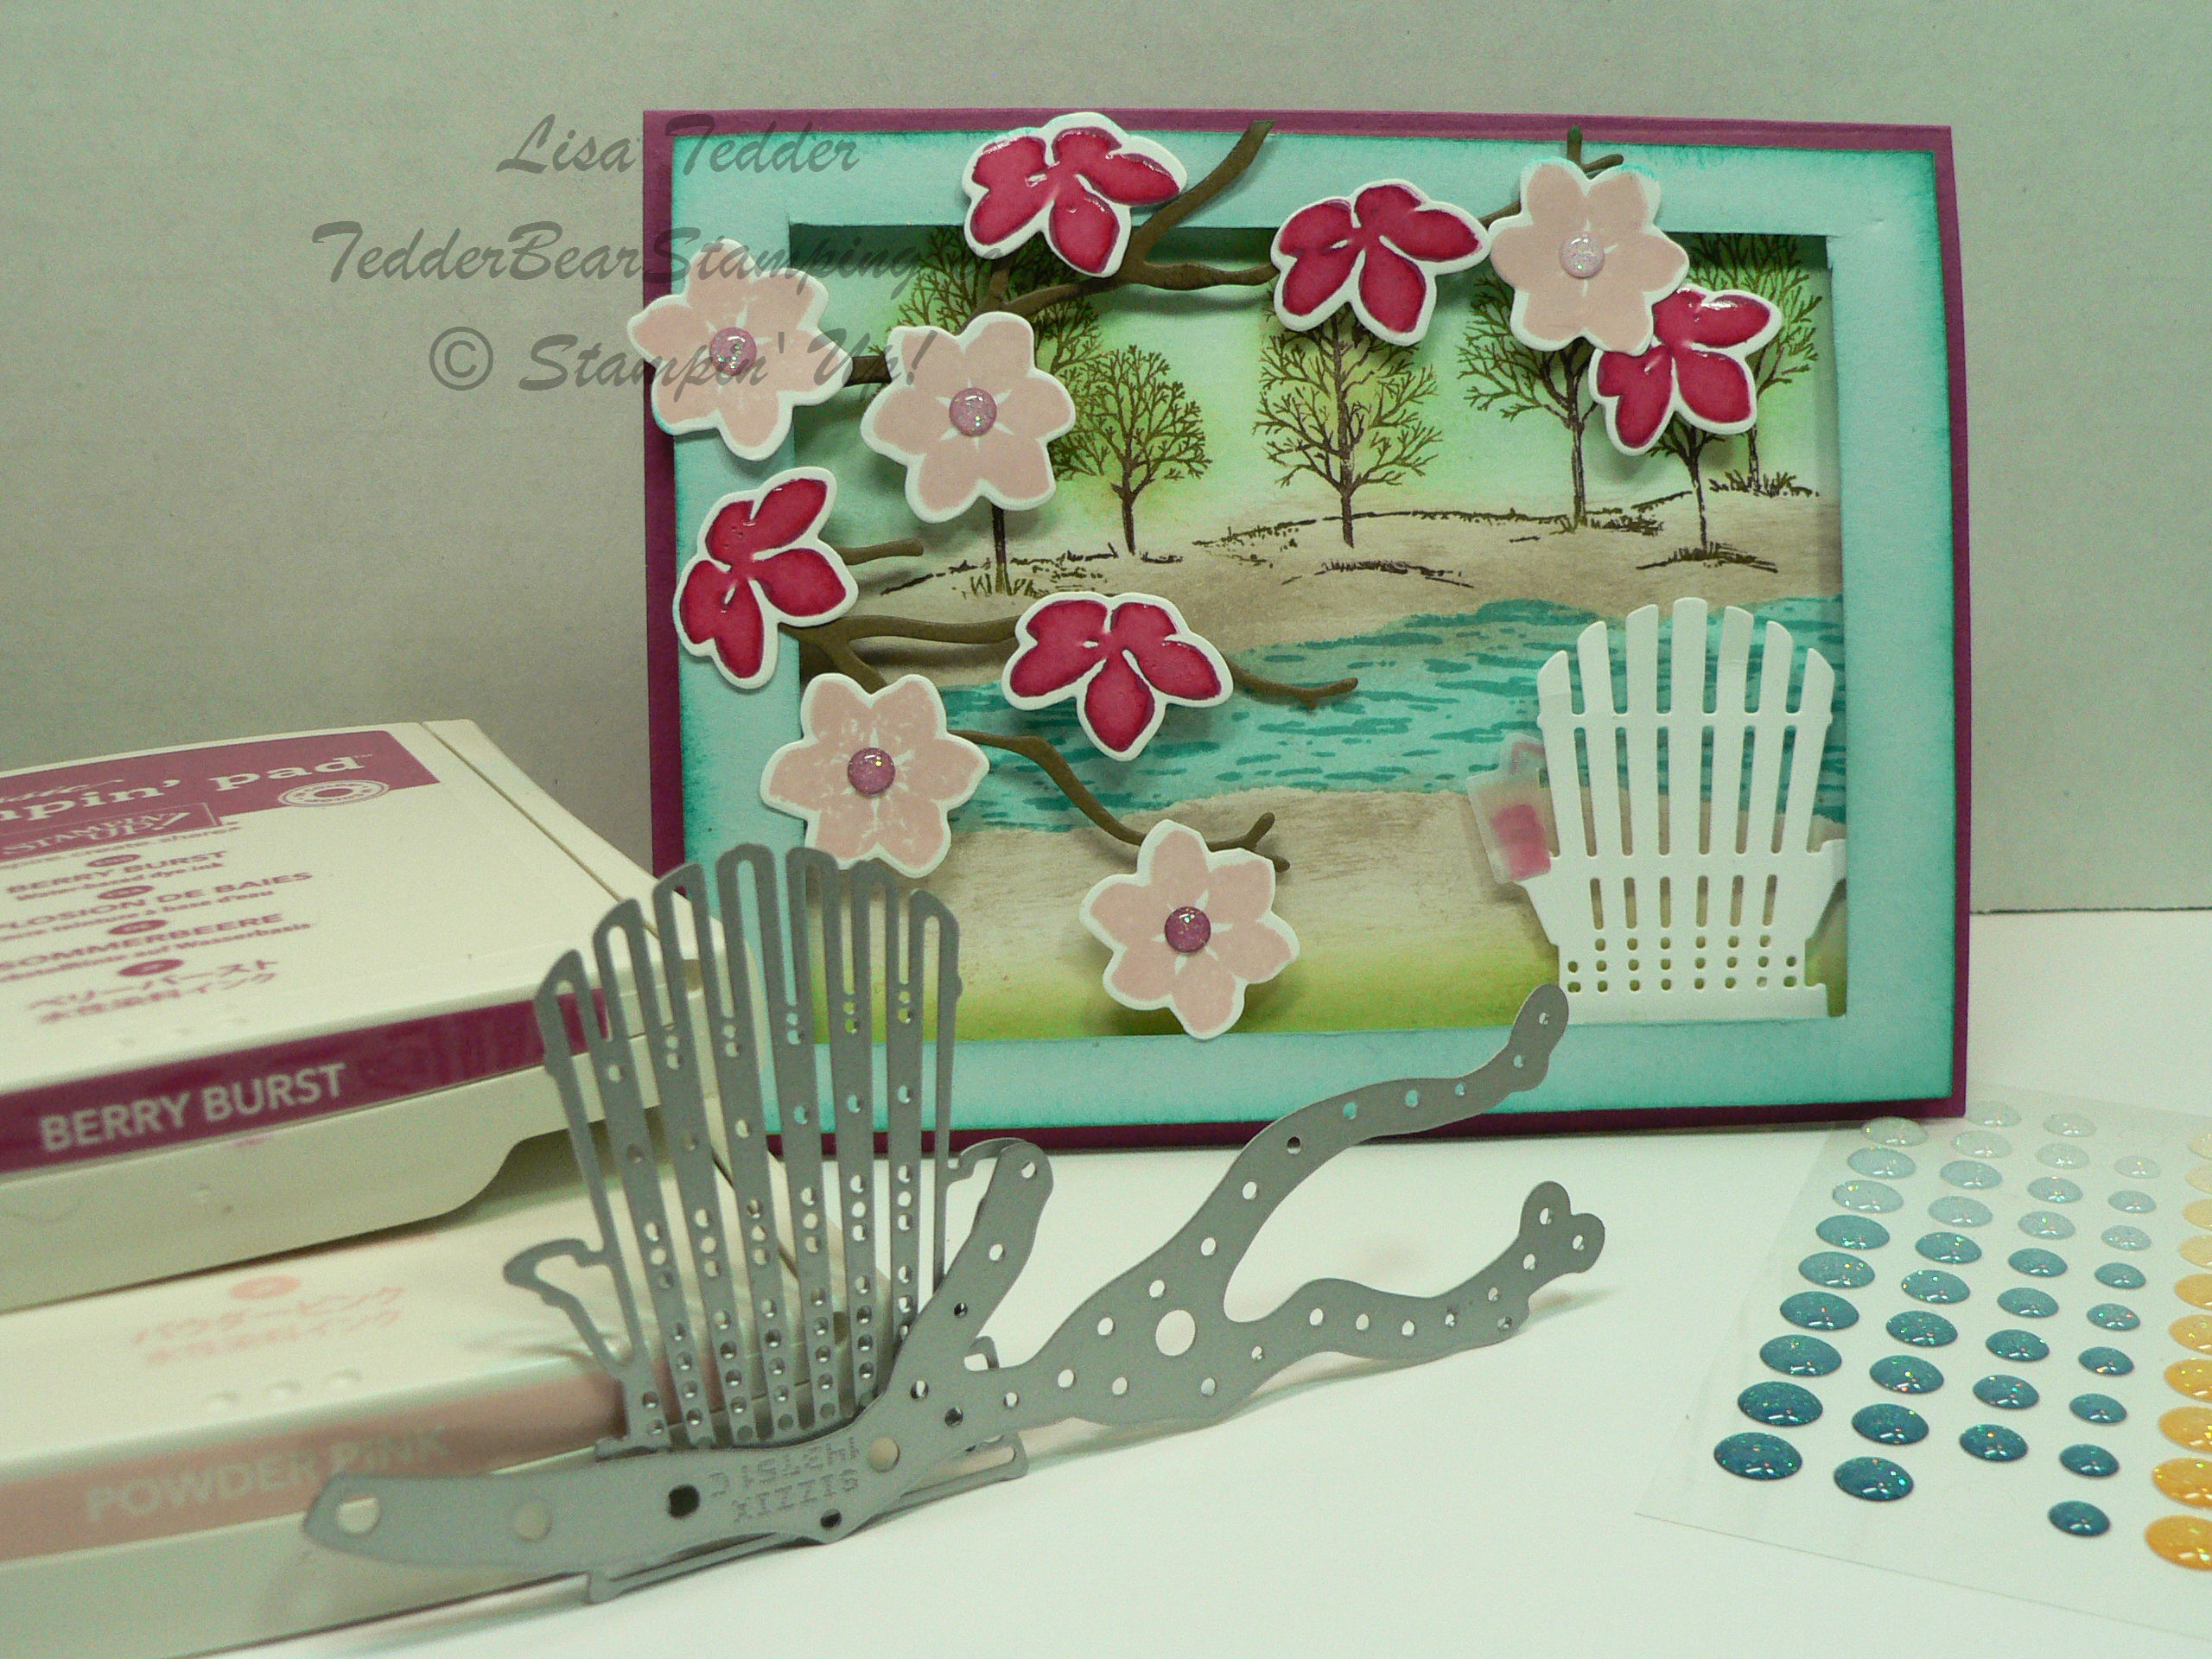
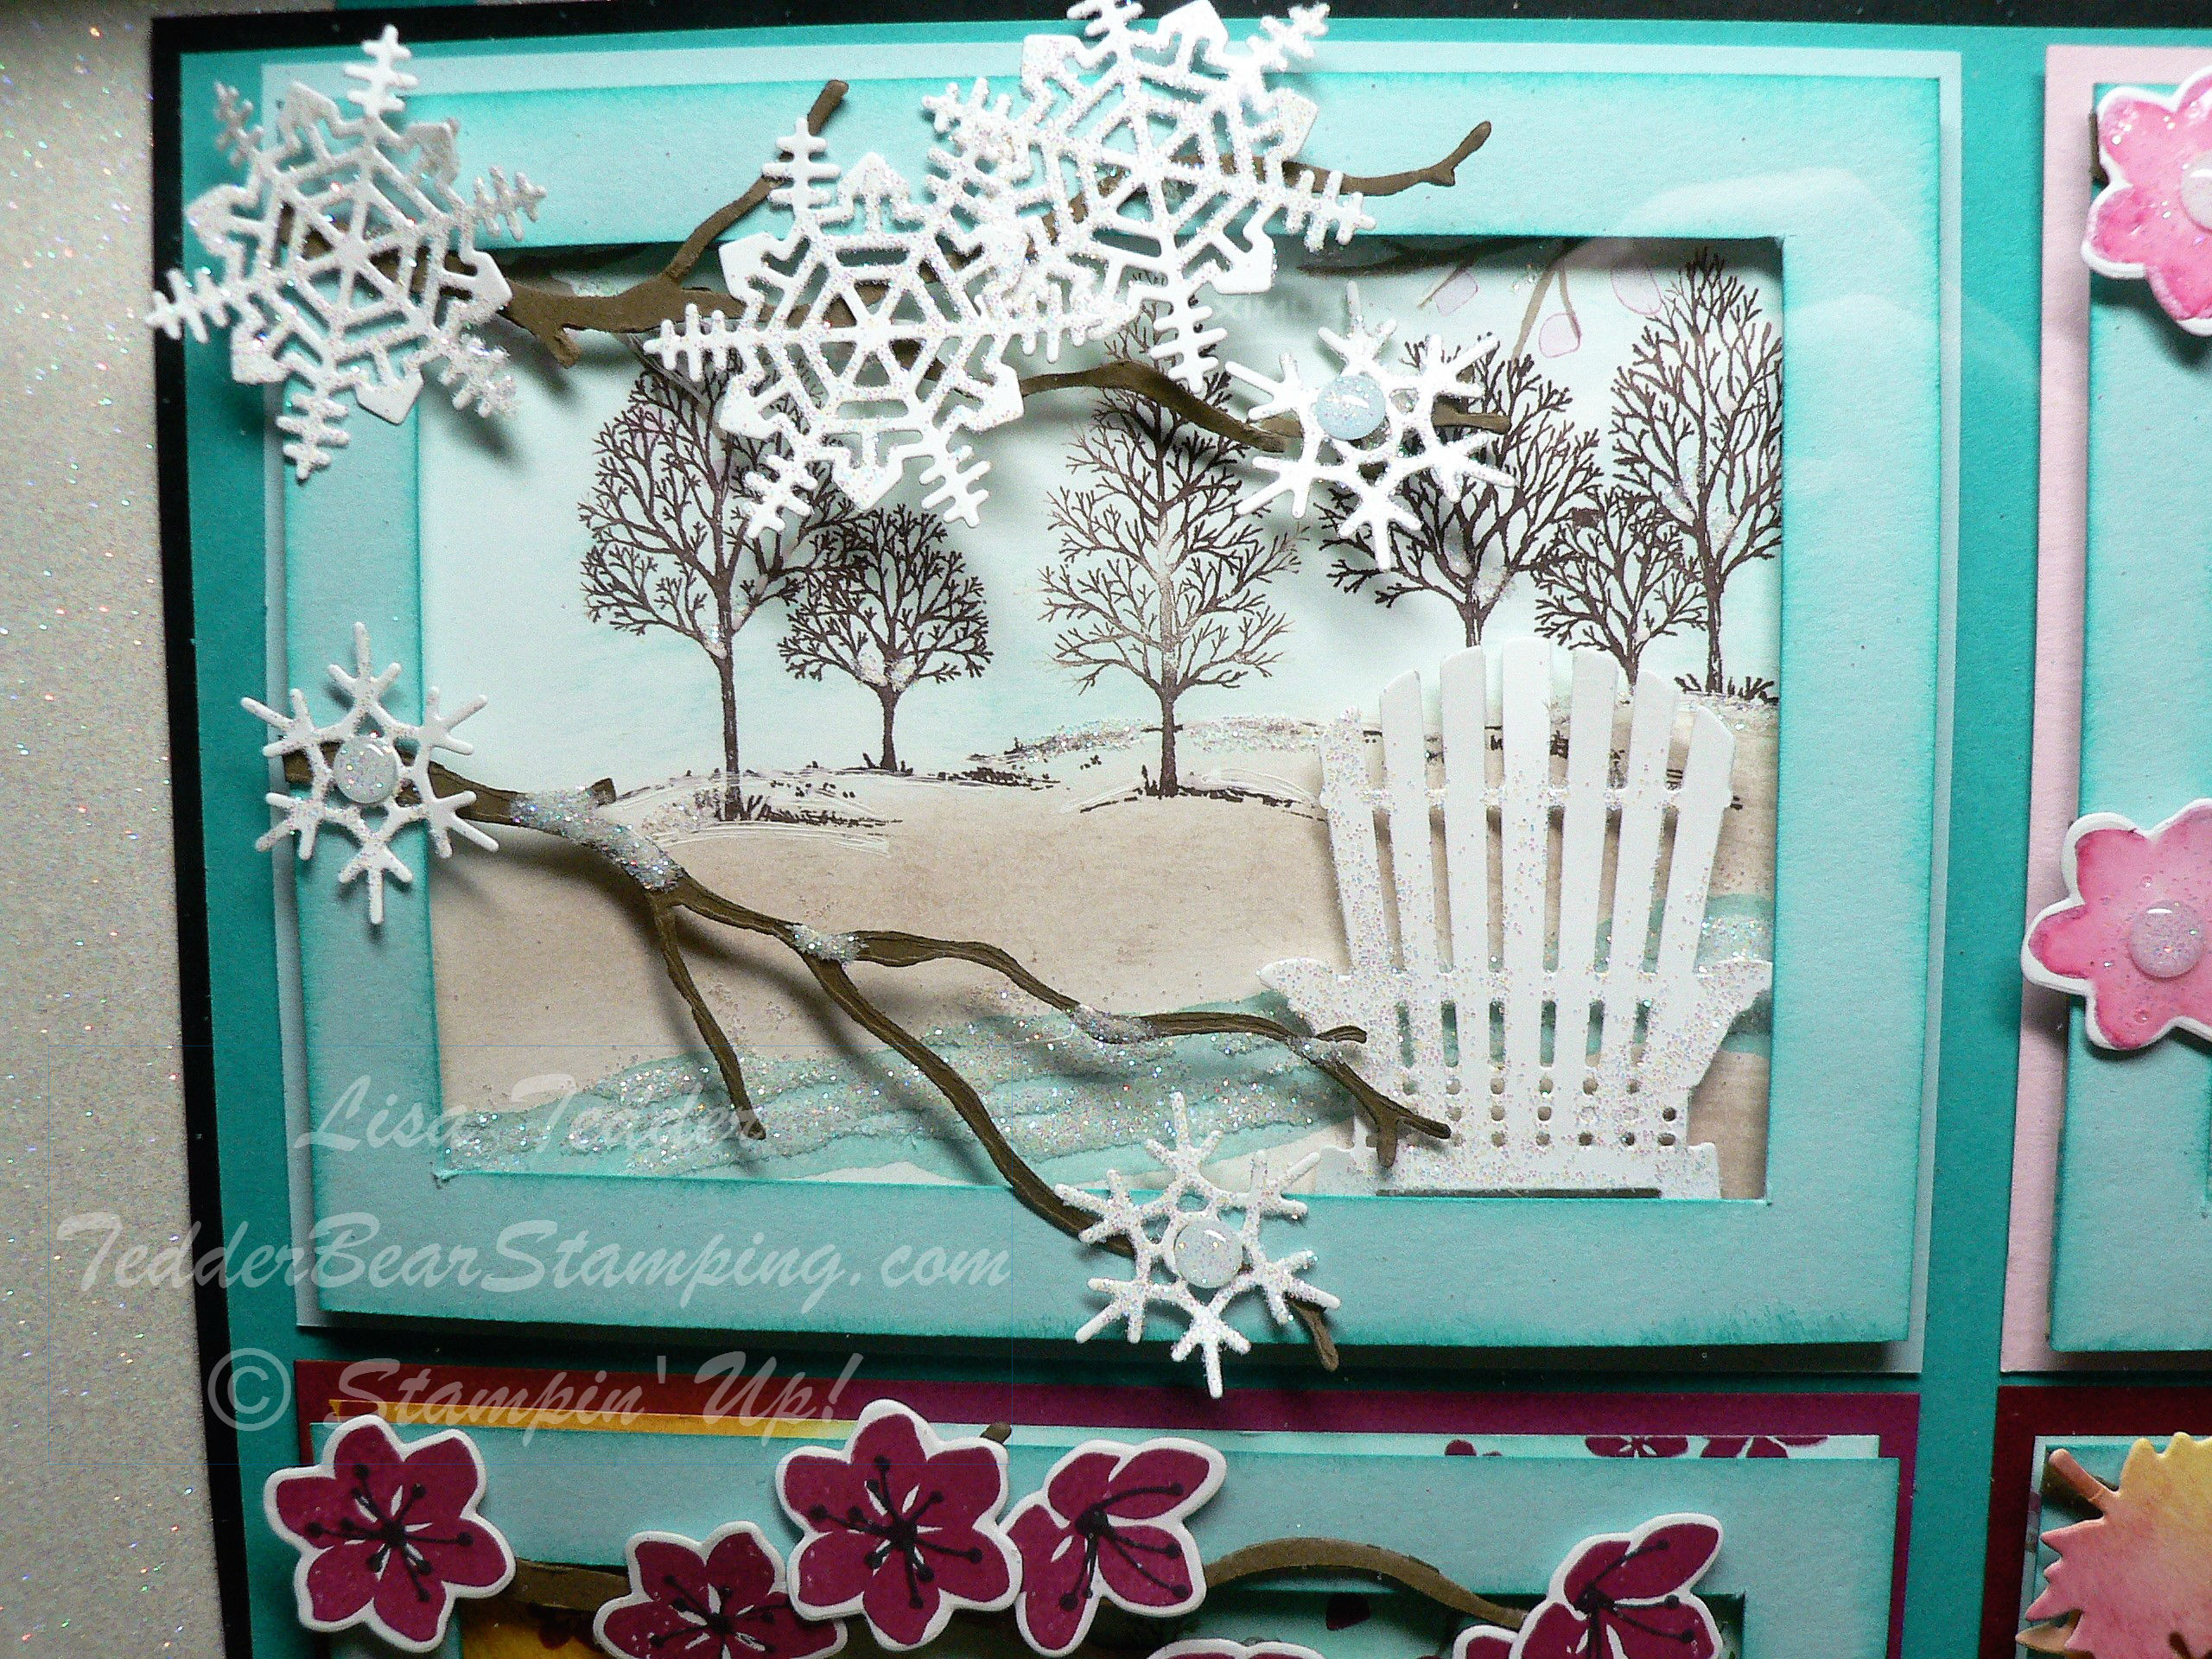
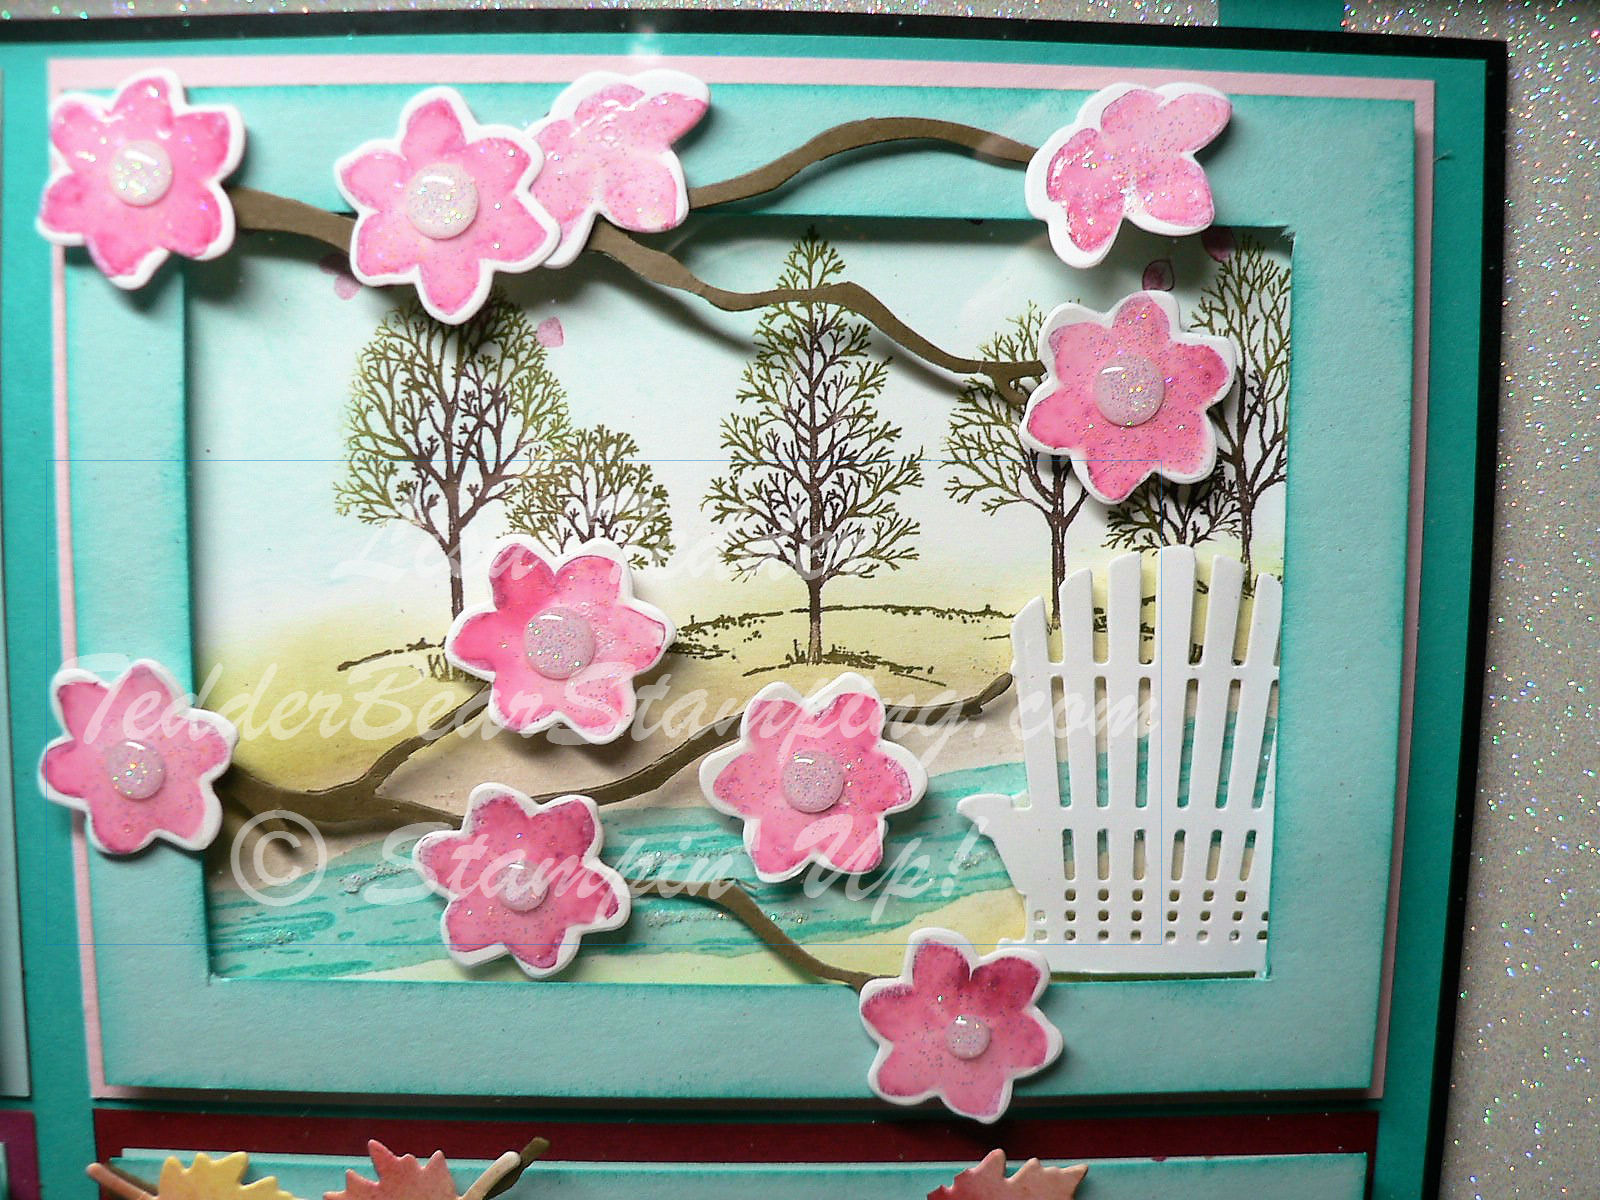
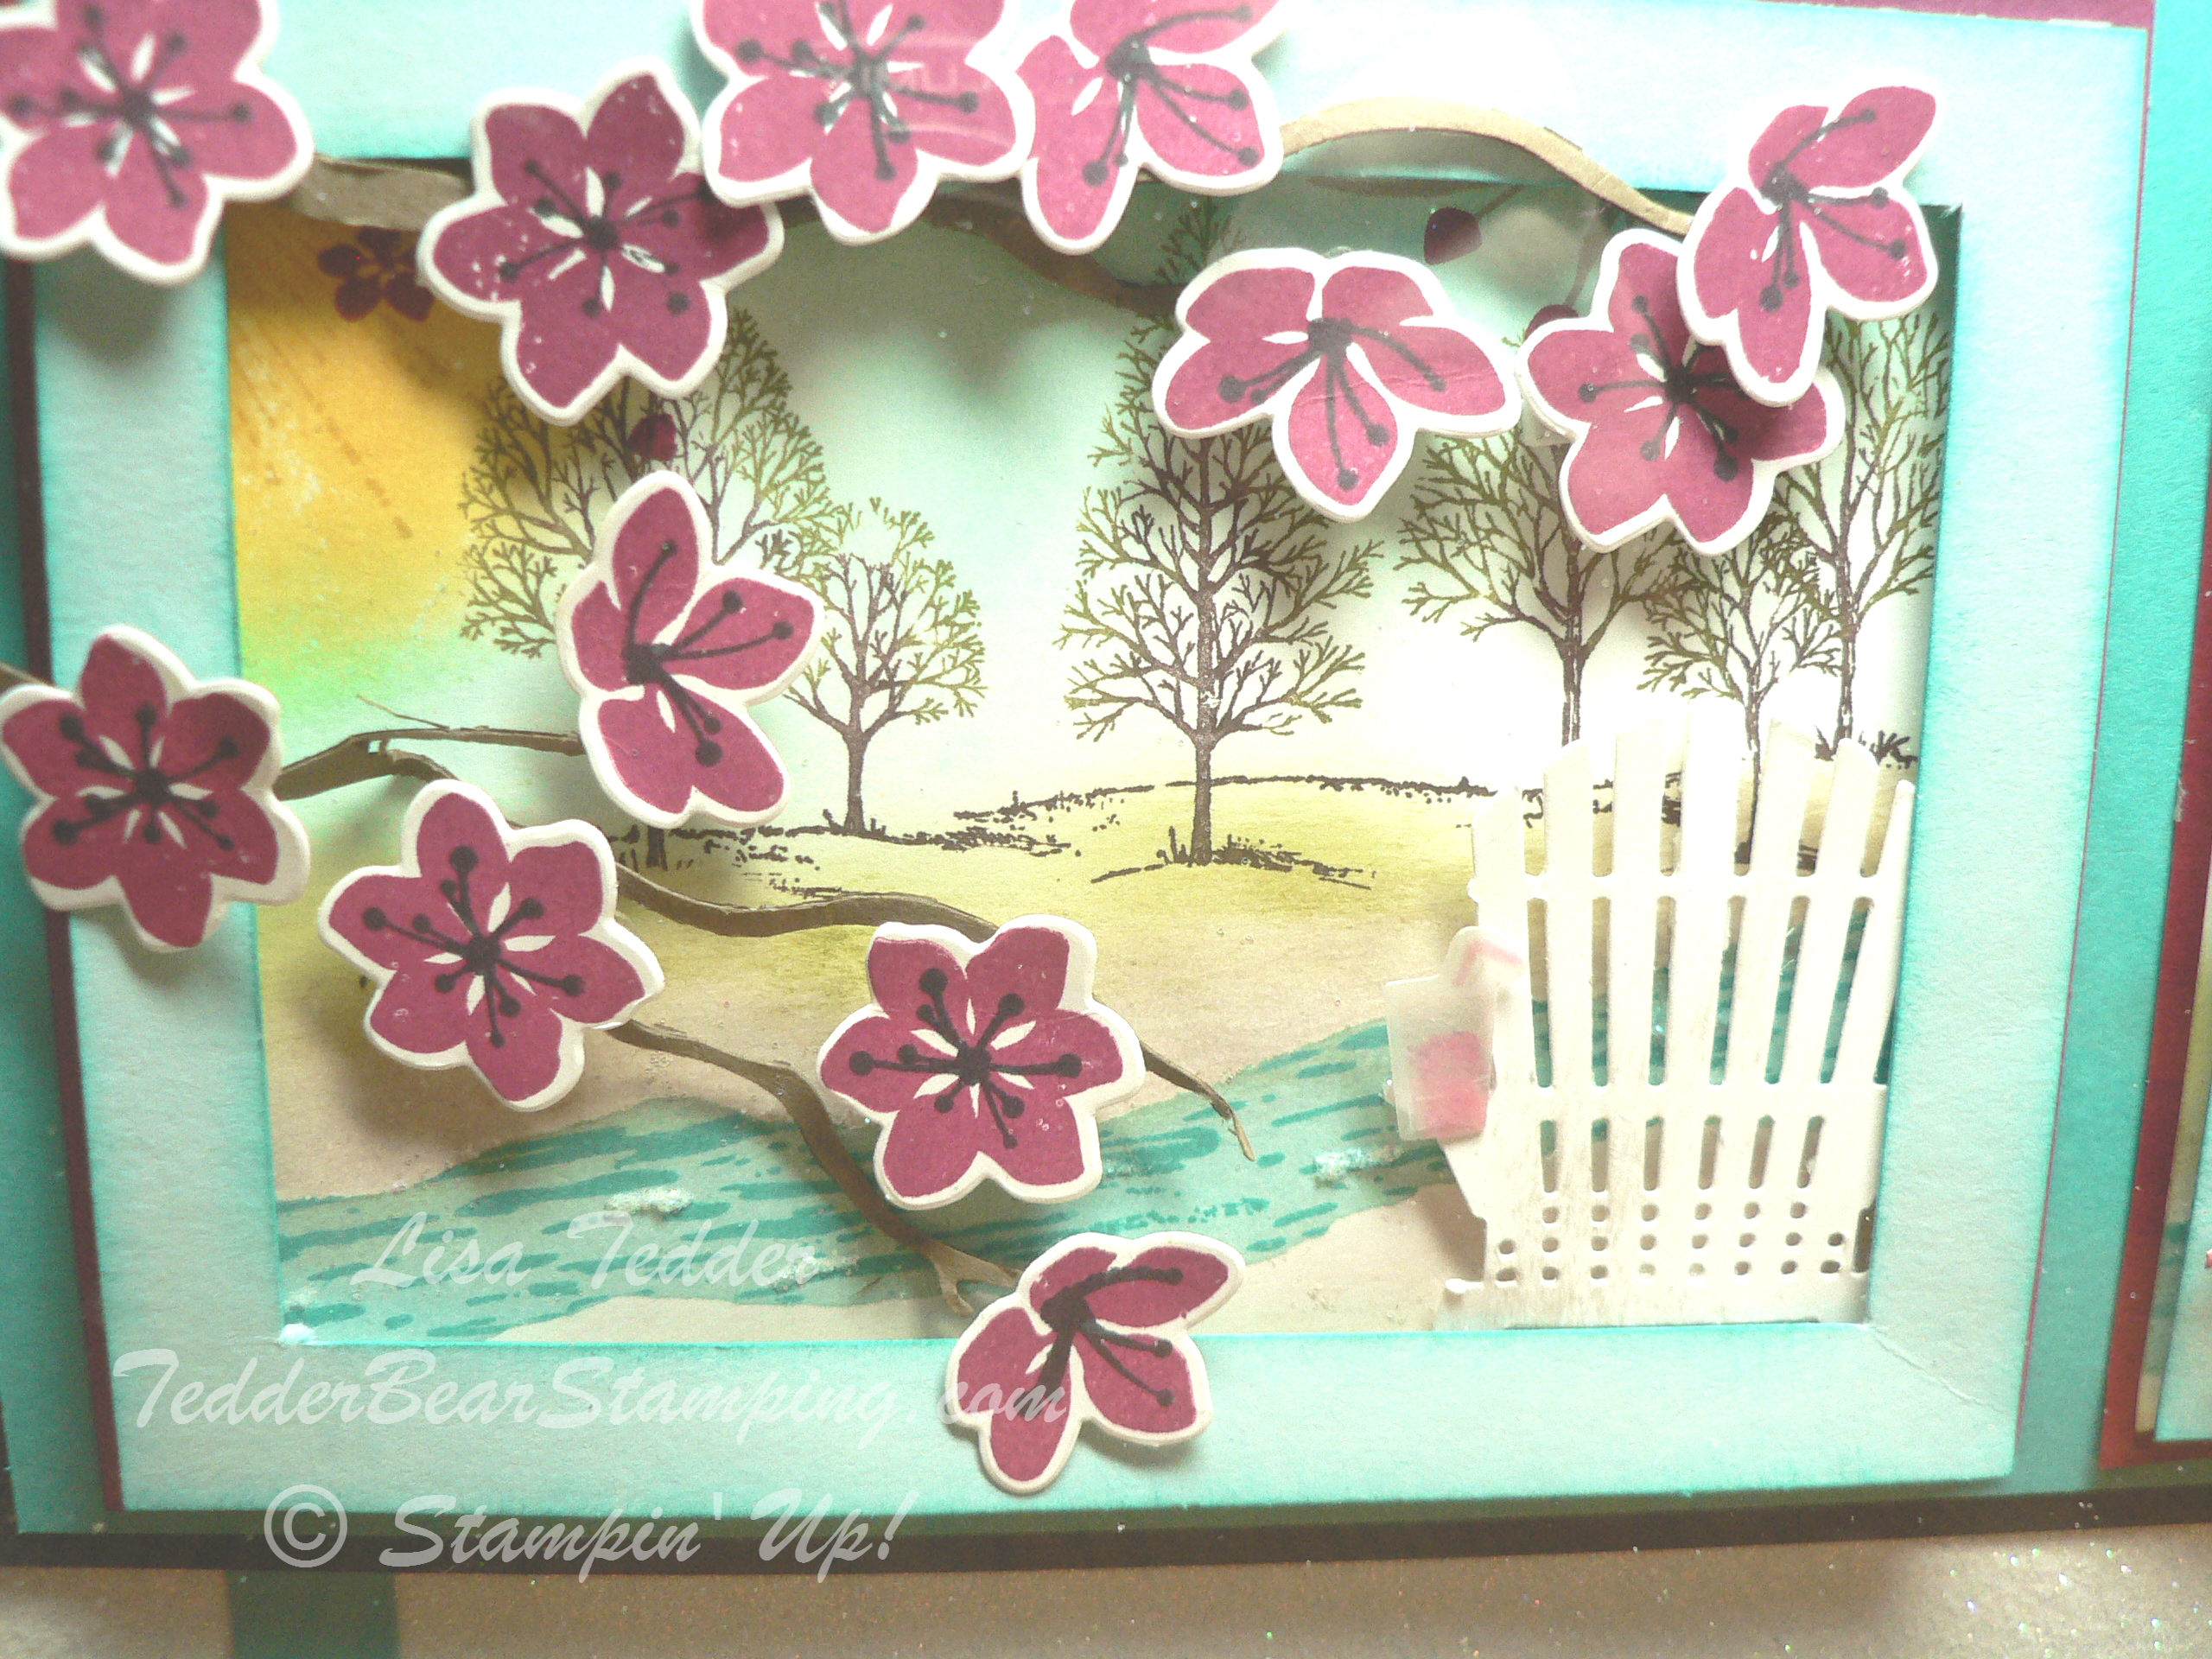
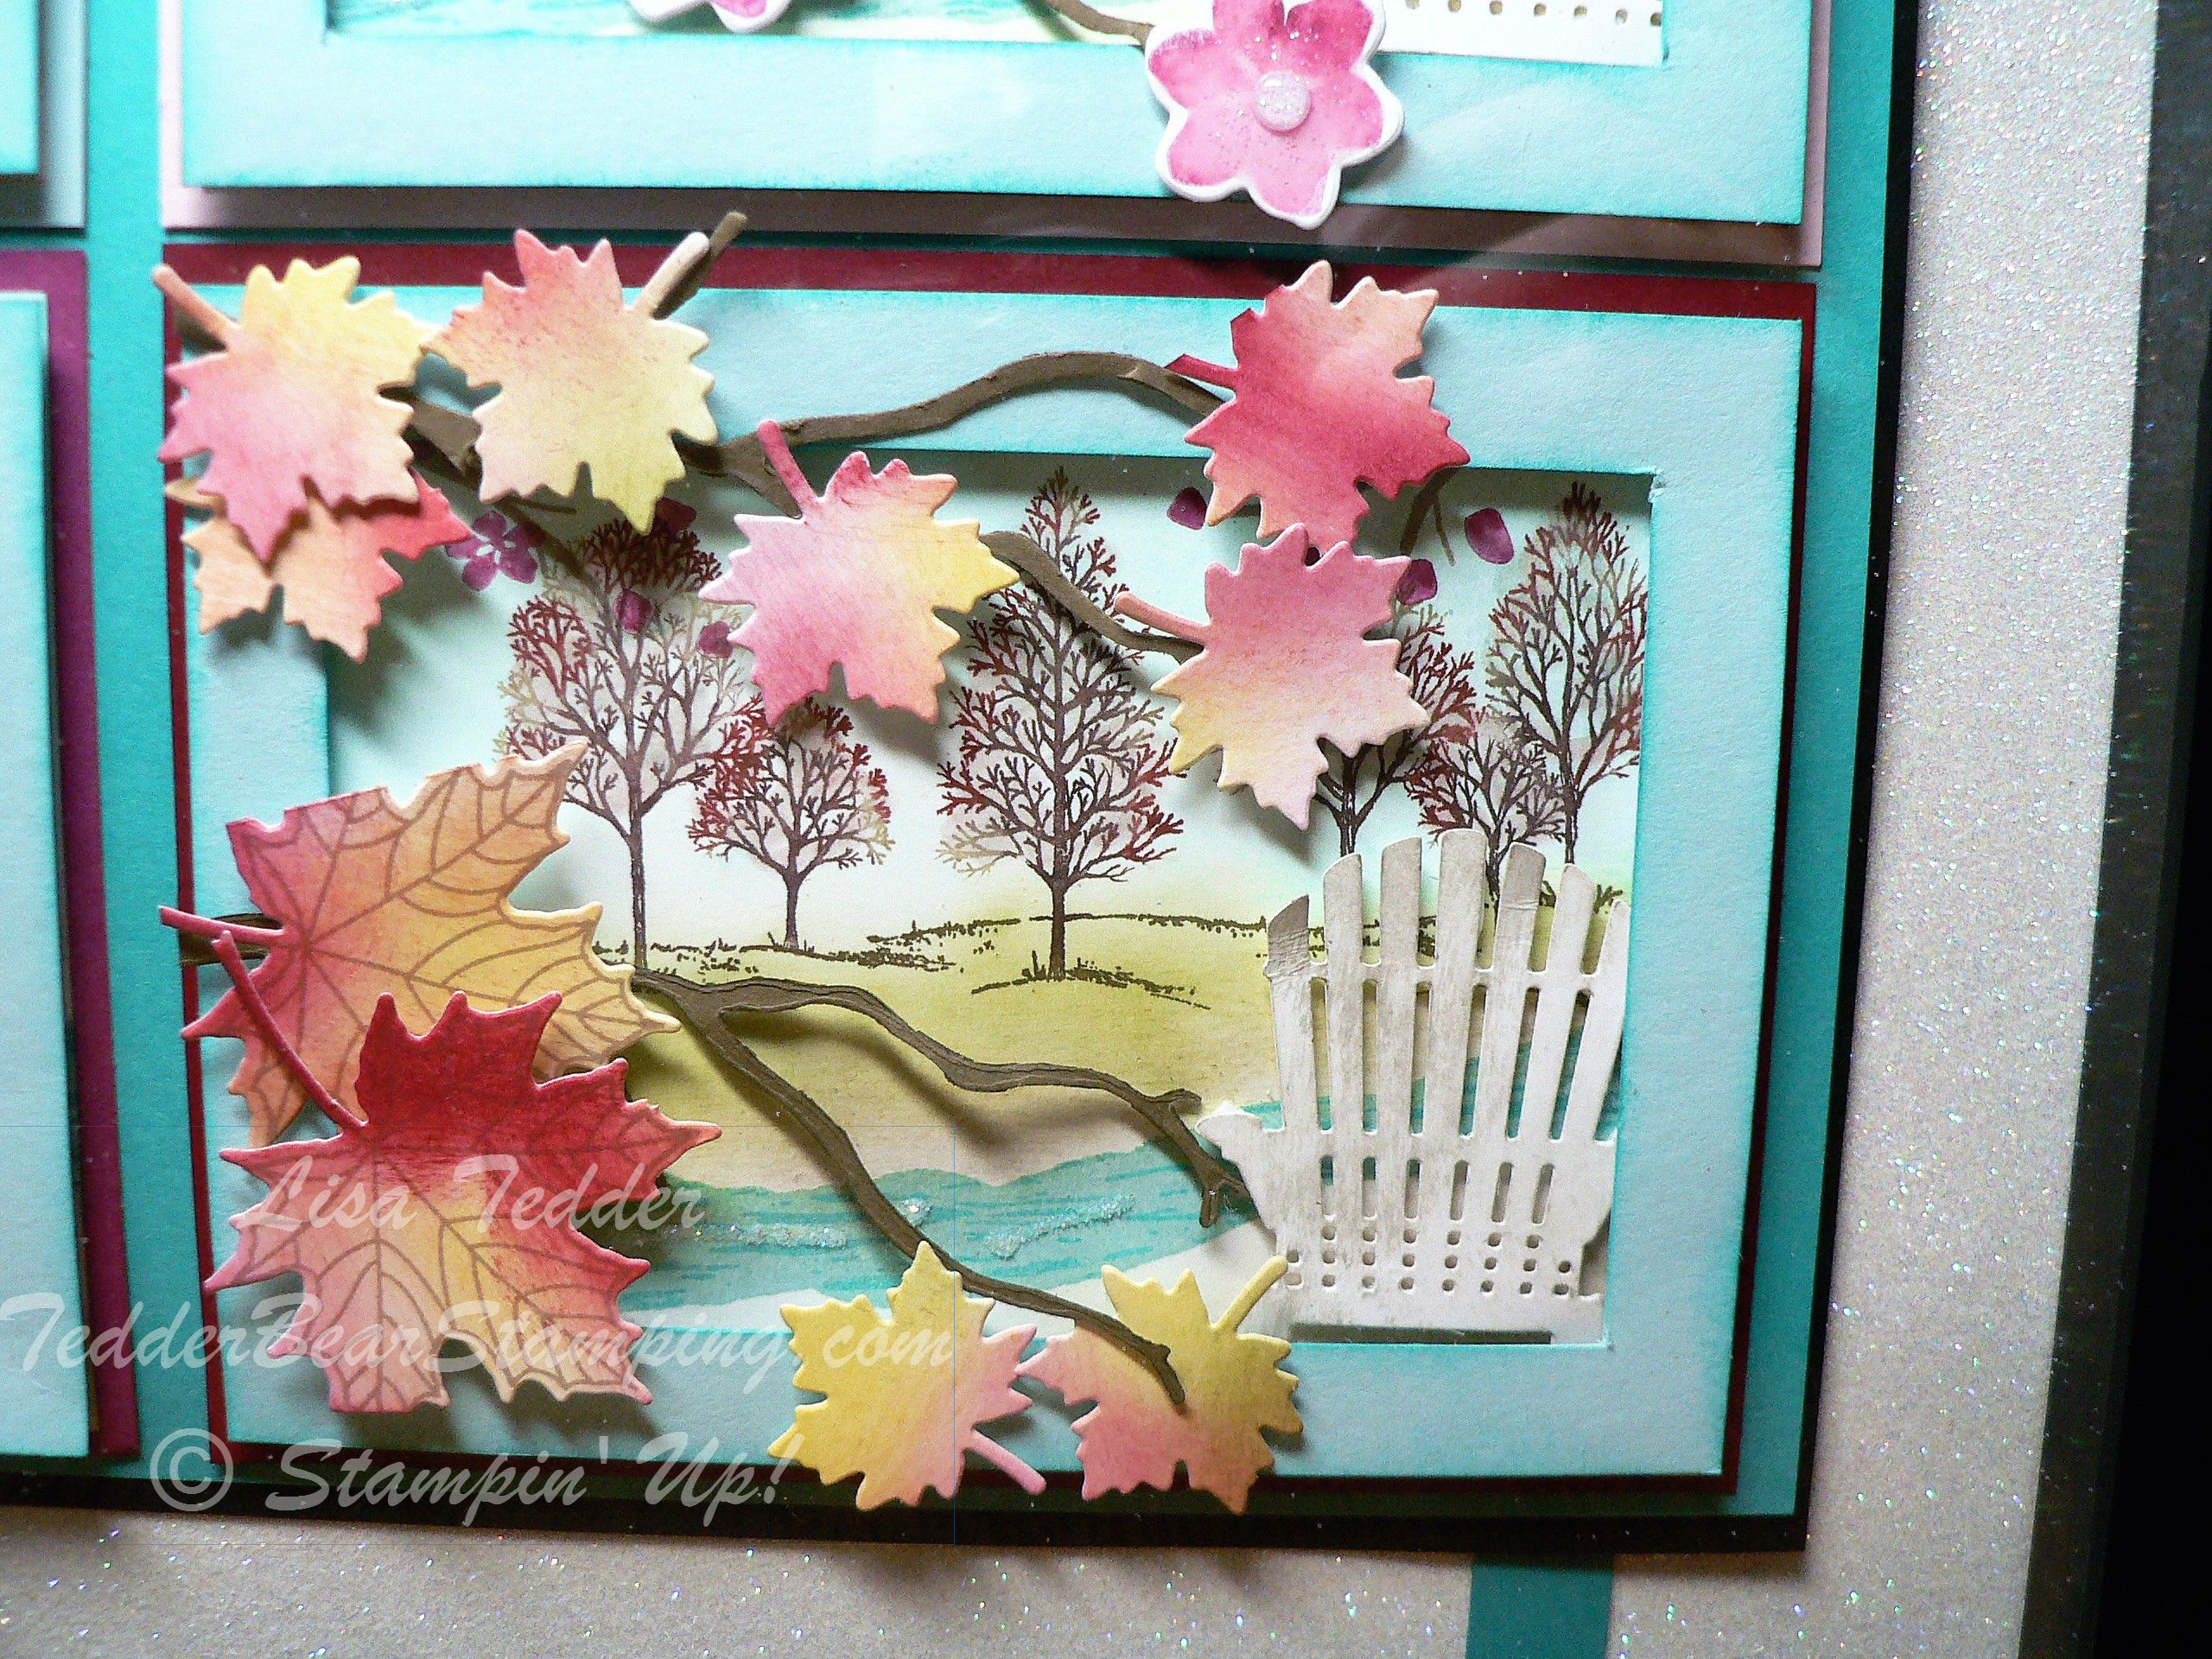
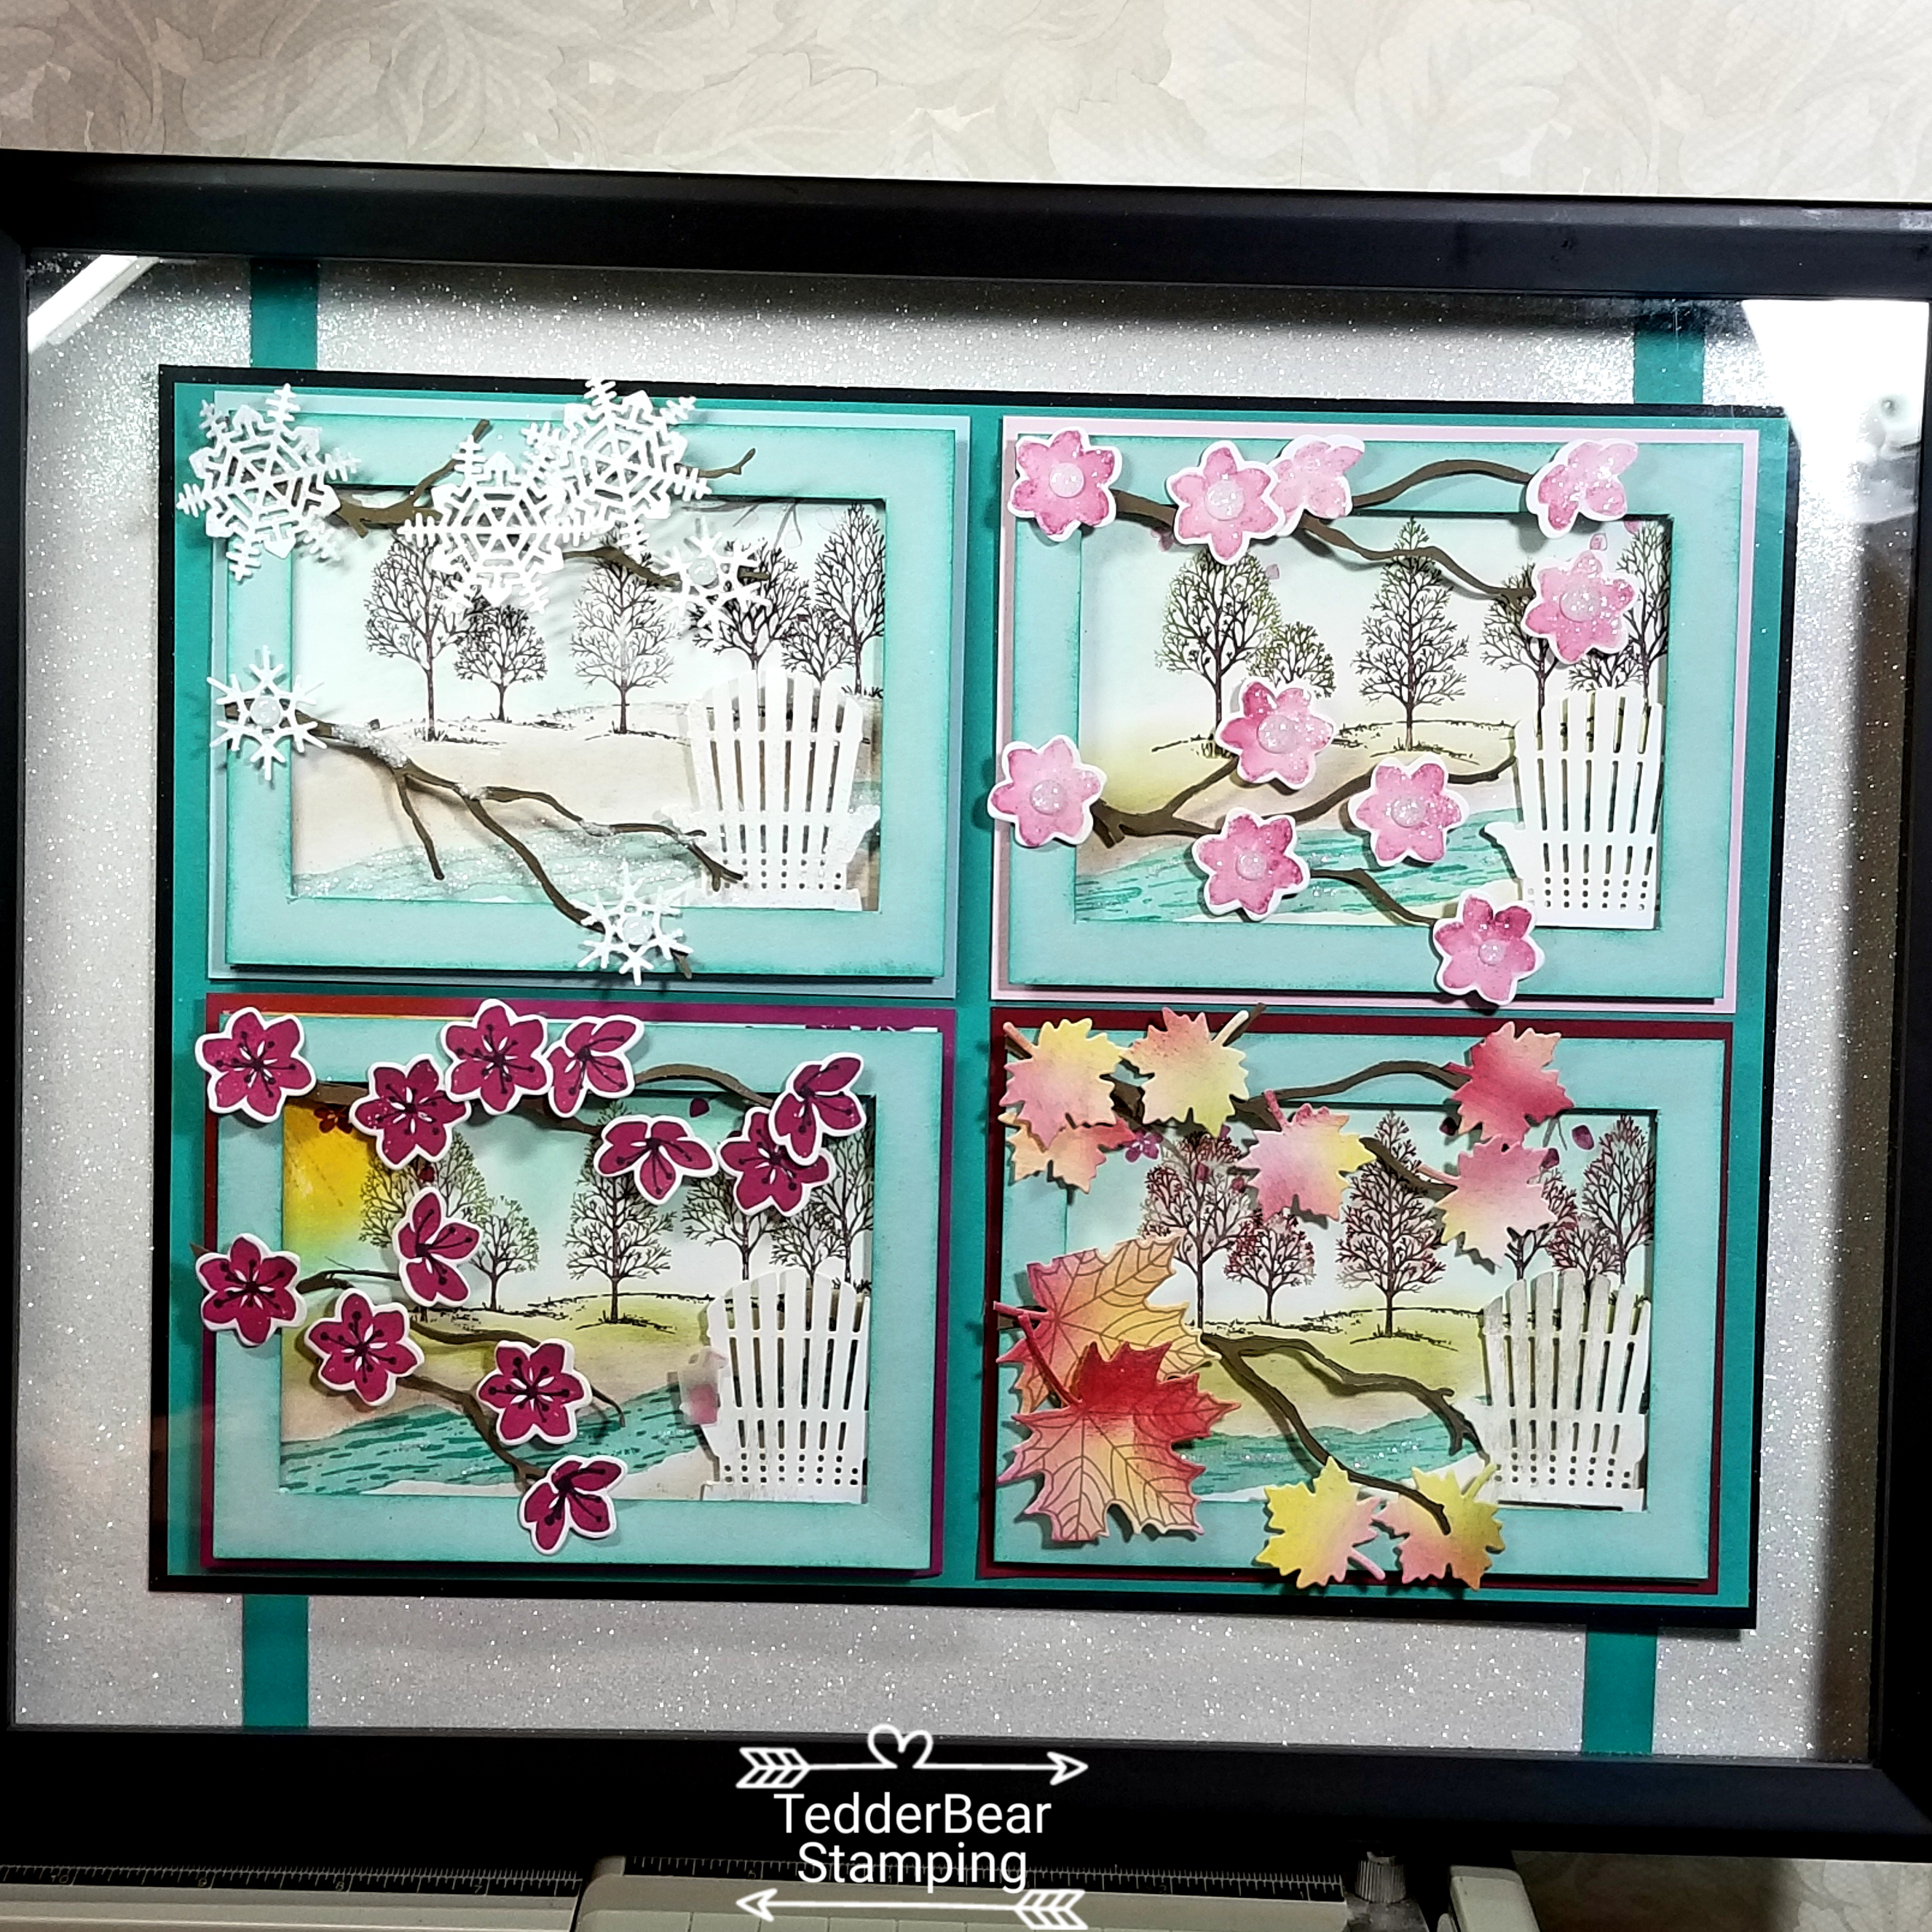
Oh my Gosh you guys I LOVE how this card came out! Especially since I sent them out to my direct Team members, they loved them and wanted me to make a video so they could learn how to make it! Namely, how to Seamlessly blend the colors to draw your eye to the center. Subsequently you can find the video here. As you will see in the video it’s pretty simple if you follow one rule: Start OFF your paper first! It also helps if you rub either your sponge or brush, a little after inking up on a scratch paper before touching your project. First off, take a look at my card, can you see that I have 2 different ink colors PLUS the color of the cardstock?

See how you can blend colors to create a scene that draws your eye to the subject, seamlessly!?

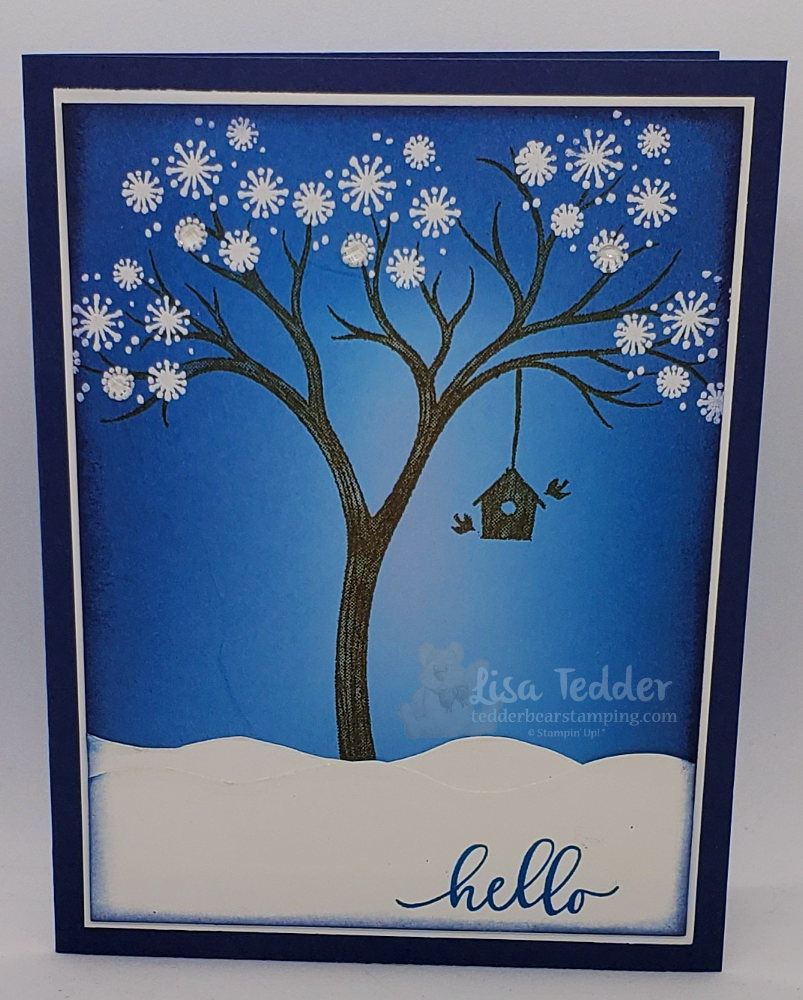
To start with I began with a piece of Seaside Spray cardstock, I then sponged with a make-up brush Pacific Point around the edges leaving the middle un-inked. Second, I came in on top of the Pacific Point and went over the cardstock with Night of Navy, not quite going as far as I did with the Pacific Point. Thirdly, I stamped the tree from Life Is Beautiful in the center using Soft Suede ink. Lastly I sponged the sides with Night of Navy to make it really dark on the edges and fade to the light color in the middle. Can you see how seamless the blending is and how it really draws your eye in towards the tree in the center? Now, I DID emboss the snowflakes before I sponged the edges but it doesn’t matter if you do the sponging first.

As always here are the specifics for my card:

  • Stamps: Life is Beautiful
  • Inks: Night of Navy, Pacific Point, Soft Suede, Versamark
  • Paper: Night of Navy 8 1/2″ x 5 1/2″ (scored @ 4 1/4″), Whisper White 5 1/8″ x 3 7/8″ (x2) & 2″ x 3 3/4″, Seaside Spray 5″ x 3 3/8″
  • Misc: Elegant Faceted Gems, Paper Trimmer, Take your Pick tool, stamping sponges & make-up brushes

For the most part EVERYTHING listed above, excluding the make-up brushes, can be found on my OnLine Store. As a result of you ordering $35 or more from my Store you will receive from me SIXTEEN project designs with step by step instructions WITH pictures, in a pdf! Finally, you can click on any of the supplies in picture form below to be taken to my site so you can Shop with me!

Incidentally, I have another sponged scene that I did in the past, but for that one I only used sponges, you can see it here. Therefore, sponging doesn’t HAVE to be done using the make-up brushes, it makes it easier, but sponging can get the same result.

Lastly, I hope you know how much you mean to me! Just the fact that you come here and read what I wrote and watch my video means a lot to me. In brief, please come back again, and leave comments even if it’s to say you enjoyed my post.

Lisa Tedder
A California girl living in North Carolina

Product List

Christmas card #3 Winter Woods Snowy Tree

Hey Guys!

The Christmas card I’m sharing with you today was CASE’d from Sharon Armstrong.   Since I have so many Christmas card classes it is great when I come across a card that’s so pretty I don’t have to do a lot of designing.  Here is the card:

Isn’t this pretty?!  My class is going to love this!  I spritzed the Tree with White Shimmer Paint mixed with Alcohol, using the SU! Spritzer.  It really looks shimmery in person!

Here are the specifics:

Supplies
Stamp Sets:
Winter Woods Bundle, Timeless Tidings
Cardstock: Real Red 8 ½” x 5 ½”, Whisper White 5 ¼” x 4”, 2 ¾” x 5 ¼” (you will get two out of one sheet, share please), 3 ¾” x 5 ¼” (you can cut out both pieces of the tree with this one sheet), 1  ¼” x 4 ¼”, Silver Foil 5 ¼” x 4”
Inks: Versamark, Real Red
Misc: Red Rhinestones, Softly Falling Embossing Folder, Real Red 3/8” Cotton ribbon, Frost White Shimmer Paint, Stampin’ Spritzer, rubbing alcohol, Dimensionals, glue dots

The pictures below will take you to my OnLIne Store!  If you are looking for a Demo here in the US, I would LOVE to be that person!

I’m getting ready for Hurricane Florence so I need to let you go.  Hope you enjoyed this post!

Check back in to see the other Christmas Cards for my classes!

Lisa Tedder
A California girl living in North Carolina
Product List

Catalog Launch Prize Give-away using Colorful Seasons, now to make one for me!

Last Friday, I had my Catalog Launch Party and I had two Prizes that those who attended could win!

The first one uses the Birthday Delivery bundle!  LOVE this bundle, it is so much fun to play with!  Did you know that the thinlits not only fit the STAMPED images, but also fits the images on the Designer Series Paper (aka DSP)?!  It’s so versatile and you KNOW I love to get more from my stamping dollars!

I LOVE how the Chef has his can that will spray out the words “It’s your big day!”   Isn’t that so cute!  The balloons are fun to add, I had to ‘fussy cut’ the bear but it was super simple.  I’m sorry to say that I gave this away BEFORE I measured it!  I ‘think’ it was 8″ x 10″.   I made it on Thursday and I had a winner for it on Friday!  For the grass I sponged using Old Olive with a mask giving it that great wavy look!

For my other Prize I did a take on a card I made in another post:

I loved how this came out, and decided to see how it would look framed with all the seasons!  I have to admit I was soooooo excited when I was done, and a little disappointed that I had to GIVE IT AWAY!  LOL  I used Dazzling Diamonds to make the water sparkle, especially on the winter one to make the water look icy!  Here is a closer look at each Season:

The water is icy and the chair is sparkly with Dazzling Diamonds!

The trees are just budding with leaves and the Chair is in Pristine condition!

Summer time!  The sun is shining! The blooms are out!  The chair is a ‘little’ dirty, but we have that iced drink so we don’t care!!

Fall is here!  The leaves are changing!  The chair is almost ready to be cleaned for the end of the season!

Here is the full view!  Notice the Dazzling Diamonds background paper?  The measurements for this beauty is 11″ x 14″………..which is why I had to add the strips of Bermuda Bay.  Can’t have a place that has a seam!  There’s only ONE seam, but for symmetry I put two strips in!

For this Colorful Seasons framed art, I took off with the given name of the set……..Colorful SEASONS!  I chose to make four scenes but having the scene stay the same but change it up to see the Seasons!  I had a blast making this!  I used Lovely as a Tree to be my backdrop, and the best thing is that you can make this stamp set look different just by using markers!

Dimensions:

Dazzling Diamonds Glimmer Paper #135315, 12″ x 11″ and 12″ x 2″
Bermuda Bay ( Brights Cardstock pack) #145409, 1/2″ x 11″ x’s 2
Basic Black #124267, 12″ x 9″
Bermuda Bay (see # above), 11 3/4″ x 8 3/4″
Seasons:
Pool Party (Winter) 4 1/4″ x 5 1/2″
Pink Pirouette (Spring) 4 1/4″ x 5 1/2″
Berry Burst (Summer) 4 1/4″ x 5 1/2″
Cherry Cobbler (Fall) 4 1/4″ x 5 1/2″

All Seasons are on Whisper White cardstock 4″ x 5 1/4″, ‘frame’ is Pool Party 5 1/4″ x 4″ with a 1/2″ cut out on inside all around.

Water is Soft Sky and Bermuda Bay for all seasons except winter which is Soft Sky and Whisper White.

Trees are colored with markers:  Tree trunk is all Early Espresso, Leaves are Old Olive (spring and summer), Fall is Cajun Craze and Crushed Curry.

For the water I used the Fine Tip Glue Pen to make the water sparkle with Dazzling Diamonds on top.

For the winter tree branch thinlit I used the White Gel pen (retired) to make snow on the top, with Dazzling Diamonds over it to make the branches be snowy!

That’s it for the Dimensions!

I hope you like this post!  This took me a couple days to create but only because I had to think it up!  Once started, it took a couple of hours.

I will be making one for myself as soon as I am able!  I will probably take this to the winner on Monday so will have to make one before then, just in case I need a life size reference!!

I have my Blog Candy to give away TOMORROW!!  Wow, that went fast!  You can get in on the drawing by posting comments here on this blog (any post! or multiple posts!) or on my Facebook page and I will put your name down each and every time you comment!

Here is a reminder of what you can win:


These are soooooo pretty!!  Good luck!

I’m off to make some cards for my upcoming classes!  I’m sure I will be sharing them with you as time allows!

Below my name is pictures of what I used to make this project…..you can click on any picture and you will be taken to my online store!  If you place an order with me, I will send you a handmade card and a small token of my appreciation! Please use this Hostess Code for you order:  C62FFAR3

Lisa Tedder
TedderBearStamping
A California girl living in North Carolina!
Product List