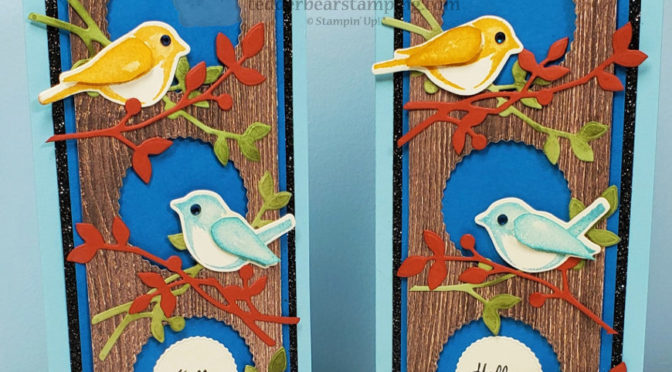
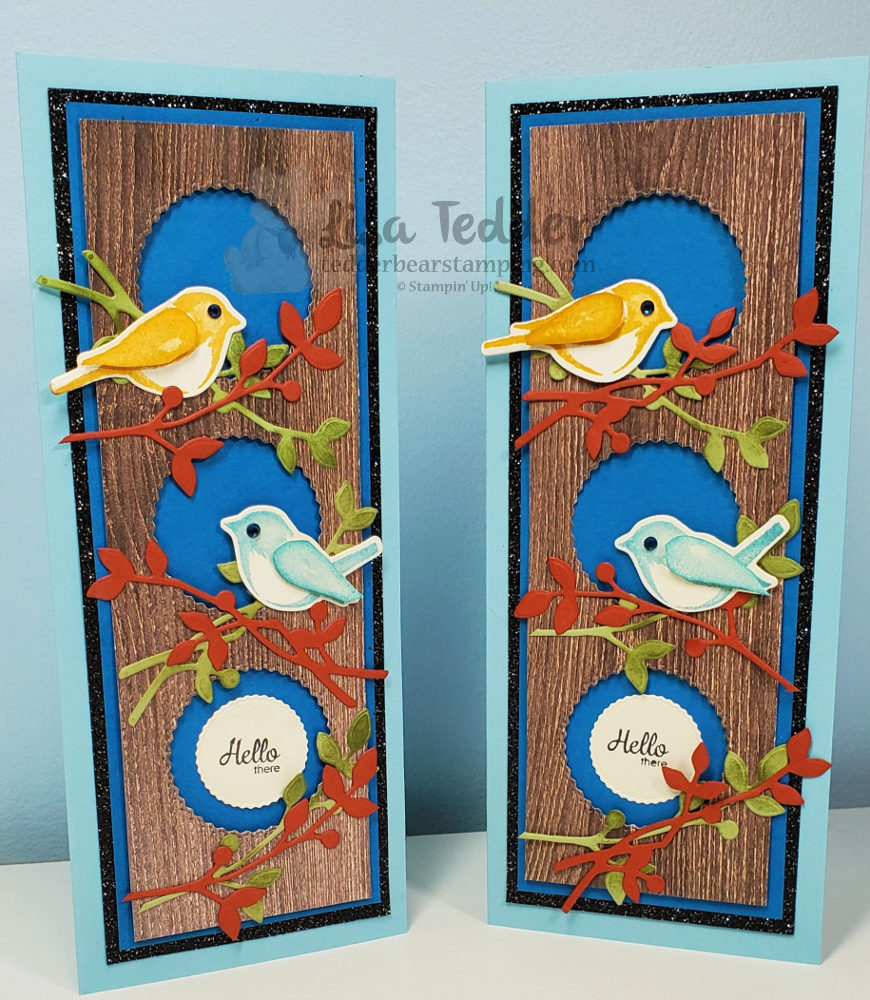
Today, I am sharing with you a Slim Line card I made using the Birds & Branches bundle! Oh my goodness, why haven’t I done one of these before!? First off, go see my video, I’m super proud of how this card came out!
Before we go further, let’s take a look:
My first slim line card!
Of course, I had to make if look like Fall so the leaves have both green and Cajun Craze. In addition, I used the Black Glitter paper from the Holiday mini, and wow that sure adds to the beauty of this slim line card! So, how did I do with my FIRST Slim Line Card using the Birds & Branches bundle?!
As always here are the specifics for this card:
Stamps:
Birds & Branches Bundle
Here’s a Card
Inks:
Bumble Bee
Balmy Blue
Memento black
Garden Green
Cajun Craze
Paper:
Balmy Blue 8 1/2″ x 7″ scored @ 3 1/2″
Basic Black 8″ x 3″
Black Glitter paper 8″ x 3″
Pacific Point 7 3/4″ x 2 3/4″ (x2)
Very Vanilla 7 1/2″ x 2 1/2″, scraps for birds and sentiment
In Good Taste DSP 7 1/2″ x 2 1/2″
Cajun Craze scrap for stem
Pear Pizzazz scrap for stem
Misc:
Dimensionals
Stampin’ Seal +
MultiPurpose Liquid Glue
Tasteful Labels Dies
Stampin’ Cut & Emboss Machine
Magnetic Plate
In addition to telling you about all the supplies, I also want to share with you that I am doing YouTube Lives every Thursday at 4:00 pm Eastern time! Of course, I want you to come and support me! Consequently, for every order that is $35 or above you will receive from me the ‘fixin’s’ for that weeks Live! PLUS, you’ll get the PDF of 16 other projects with pictures and step by step instructions……ALL for your ONE $35 purchase! Here is a sneak peek of what you’ll get in the PDF:
Sneak Peek for any order of $35
In conclusion, I want to thank you so much for supporting me by coming here! I appreciate you! Please come back next week and see what I have for you! Also, be sure to catch my YouTube Live tomorrow at 4:00 eastern!
Lisa Tedder A California girl living in North Carolina
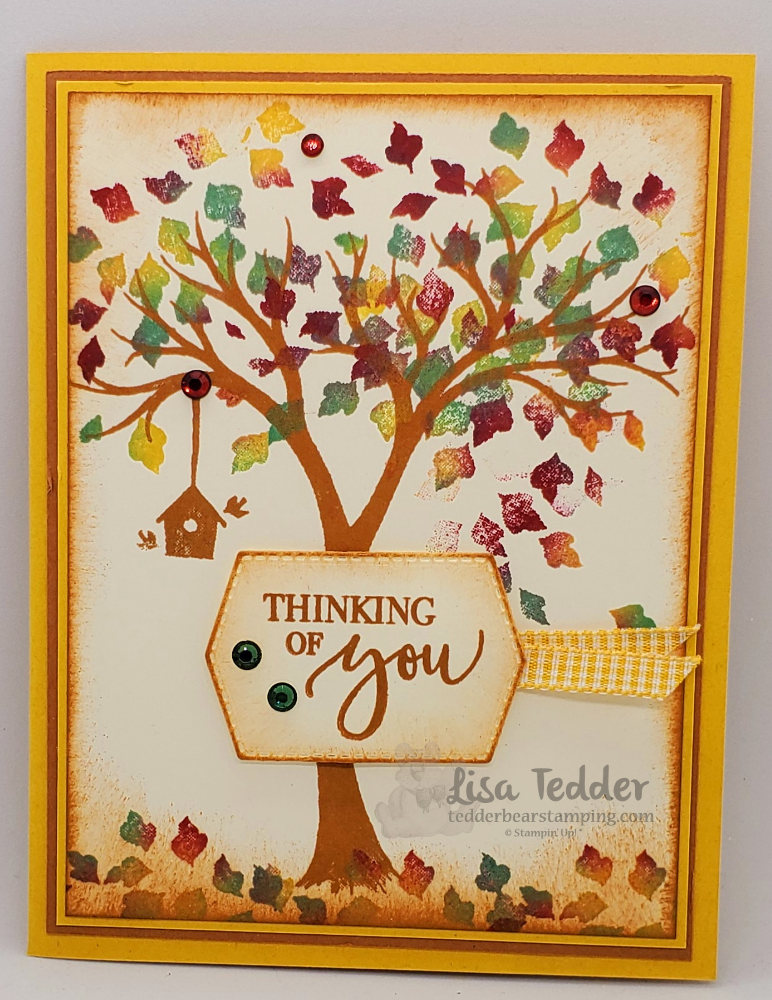
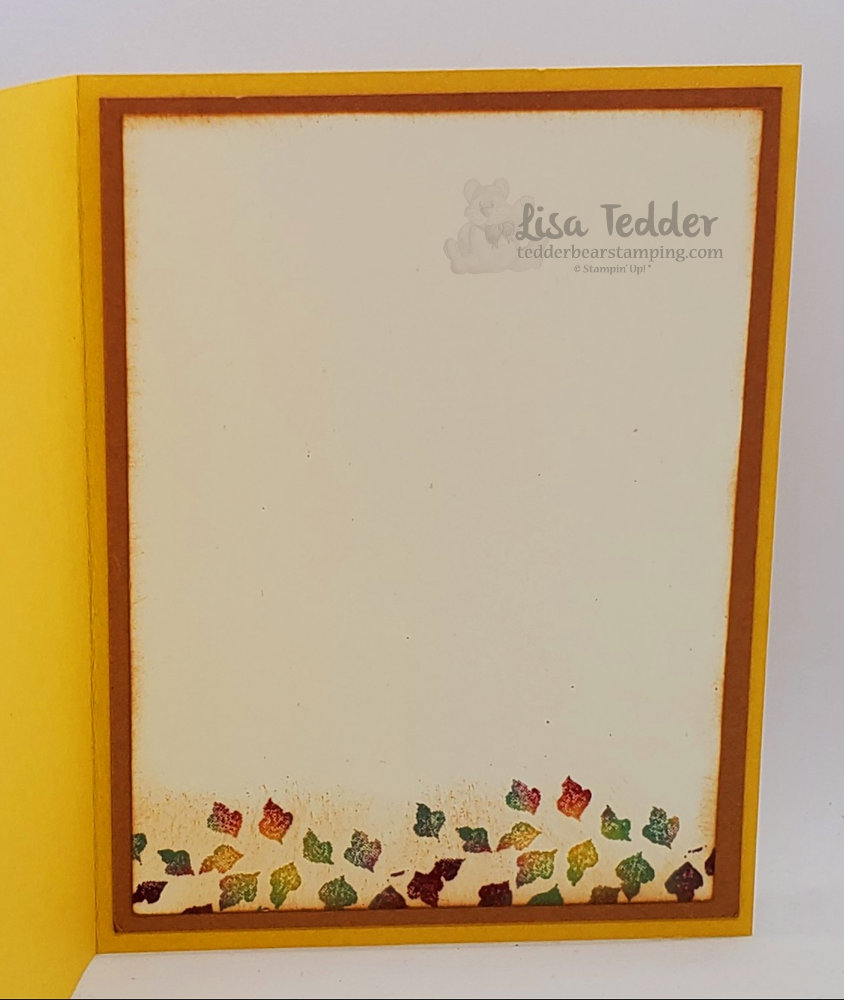
Today I am going to show you how I made my own Fall ink pad so that leaves on my tree look natural, when I am done you’ll be able to also!! Of course, I made a video you can go here if you would like to SEE how I made it! Naturally, I tend to look at pictures and if I have questions a video helps me out a lot. As an example, here is a picture of my card:
See how the leaves are THREE different colors! That’s my own Fall ink pad!My own Fall ink pad was used for the inside too!
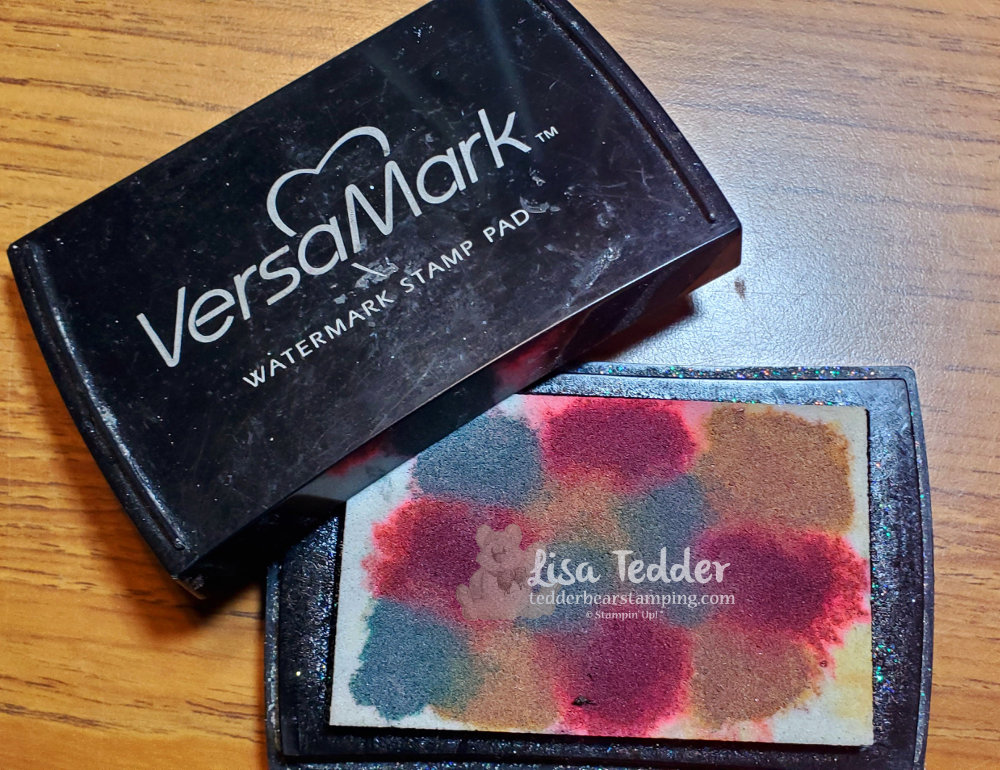
So, how did I make my fall ink pad? To begin with I had a dirty, yucky Versamark pad that I never used and thought of chucking it in the trash……but no, I could make my own Fall ink pad so my tree will look gorgeous AND match the colors I was using for this card!
My own Fall ink pad made from an OLD Versamark pad!
Since I wanted the colors to match my card I used Bumble Bee, Cherry Cobbler and for the green I went with Just Jade. Already I knew that I wanted to use the Holiday Rhinestones and those used Cherry Cobbler for the red, and a yellow that looked a lot like Bumble Bee but the green was Shaded Spruce so I went with a lighter shade of color and used Just Jade instead. It’s funny how I go about figuring out which colors I use in my crafting, this time it was all about the Rhinestones……gotta have that BLING!
For a different fall project that I made a few years ago, click here!
As always here are the specifics for this card: Stamps: Life is Beautiful Inks: Bumble Bee Cinnamon Cider Cherry Cobbler re-inker Just Jade re-inker Bumble Bee re-inker OLD Versamark pad (you can use new!) Paper: Bumble Bee 8 1/2″ x 5 1/2″ (scored at 4 1/4″), 3 7/8″ x 5 1/8″ Cinnamon Cider 5 1/4″ x 4″ (x2) Very Vanilla 5″ x 3 3/4″ (x2), scrap for sentiment Misc: Holiday Rhinestones Stamping Sponges Dimensionals Tasteful Labels Dies Bumble Bee Gingham ribbon
As you know, all the supplies will be listed below in picture form. Consequently if you click on any of them you will be taken to my OnLine Store, for every purchase at or above $35 you will get from me 16 projects in a pdf with pictures and step by step instructions!
Sneak Peek for projects you will get in your pdf!
To summarize, I am a ‘give the facts and be done’ kind of girl, so I will let you go for now, check back in next week for a new card/video! If you want to know when I post, subscribe and you can also receive a Newsletter from me by subscribing to that too! Thanks for stopping by and supporting me!
Lisa Tedder A California girl living in North Carolina
Last Friday, I had my Catalog Launch Party and I had two Prizes that those who attended could win!
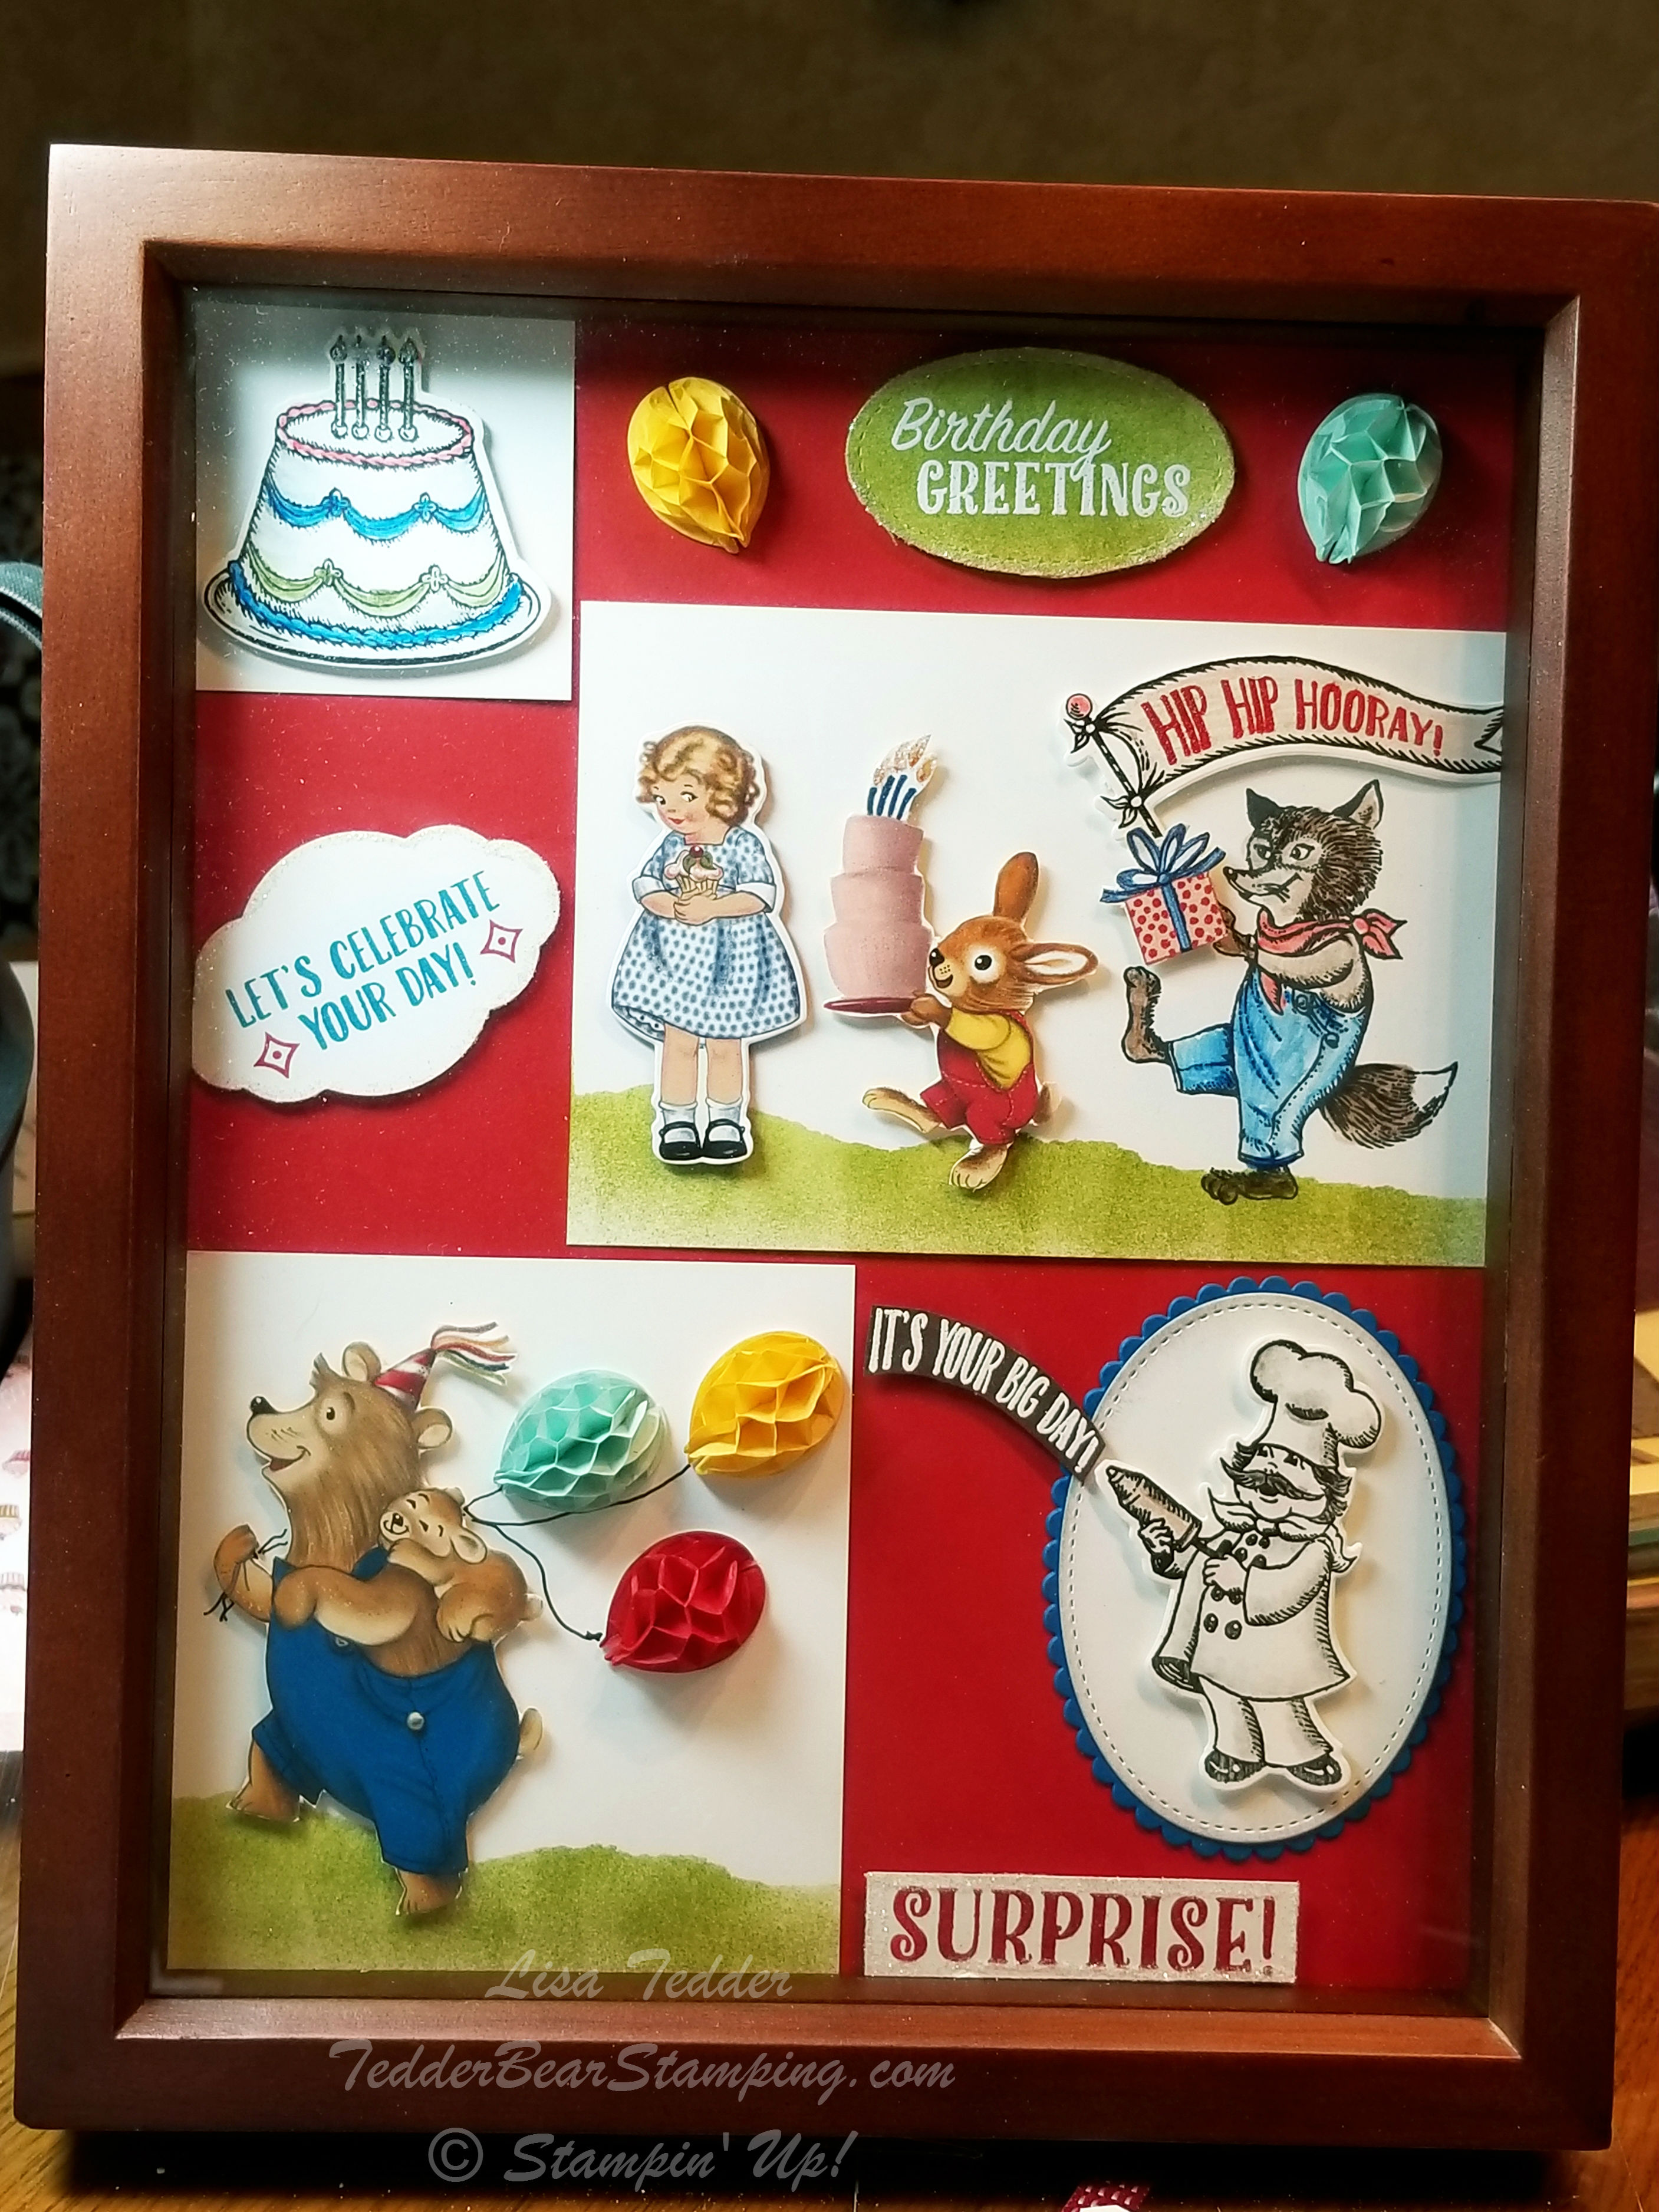
The first one uses the Birthday Delivery bundle! LOVE this bundle, it is so much fun to play with! Did you know that the thinlits not only fit the STAMPED images, but also fits the images on the Designer Series Paper (aka DSP)?! It’s so versatile and you KNOW I love to get more from my stamping dollars!
I LOVE how the Chef has his can that will spray out the words “It’s your big day!” Isn’t that so cute! The balloons are fun to add, I had to ‘fussy cut’ the bear but it was super simple. I’m sorry to say that I gave this away BEFORE I measured it! I ‘think’ it was 8″ x 10″. I made it on Thursday and I had a winner for it on Friday! For the grass I sponged using Old Olive with a mask giving it that great wavy look!
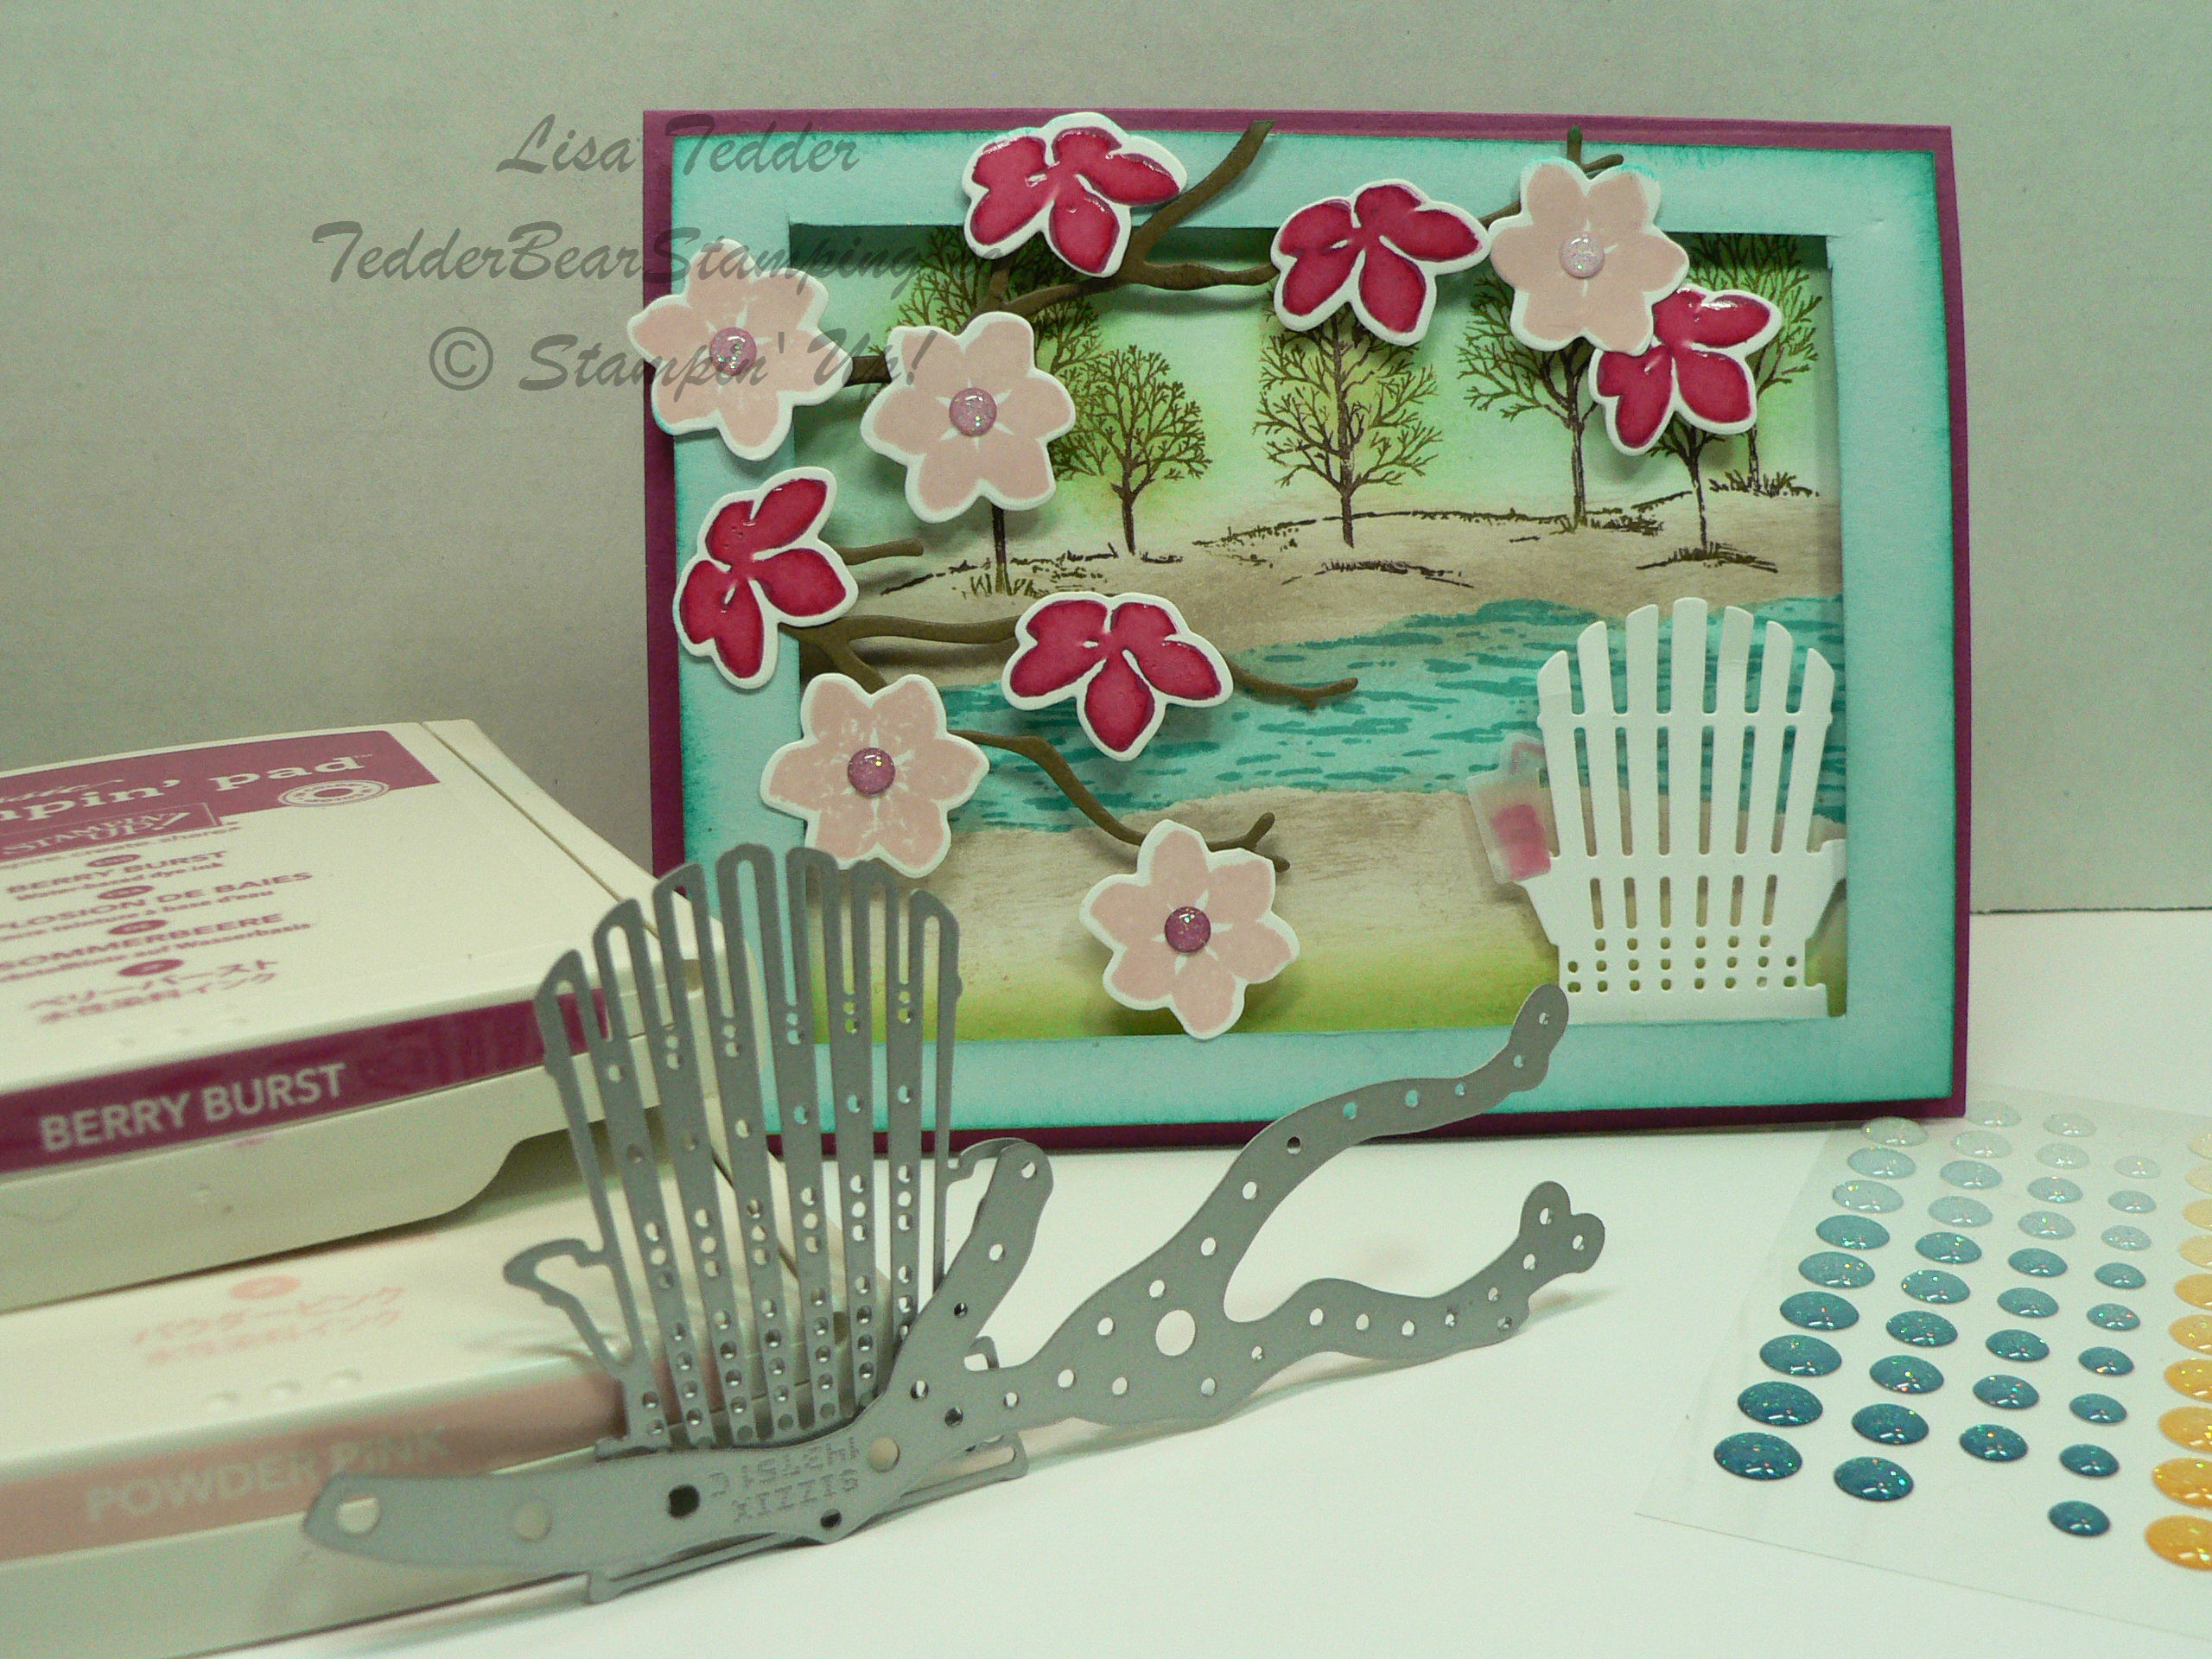
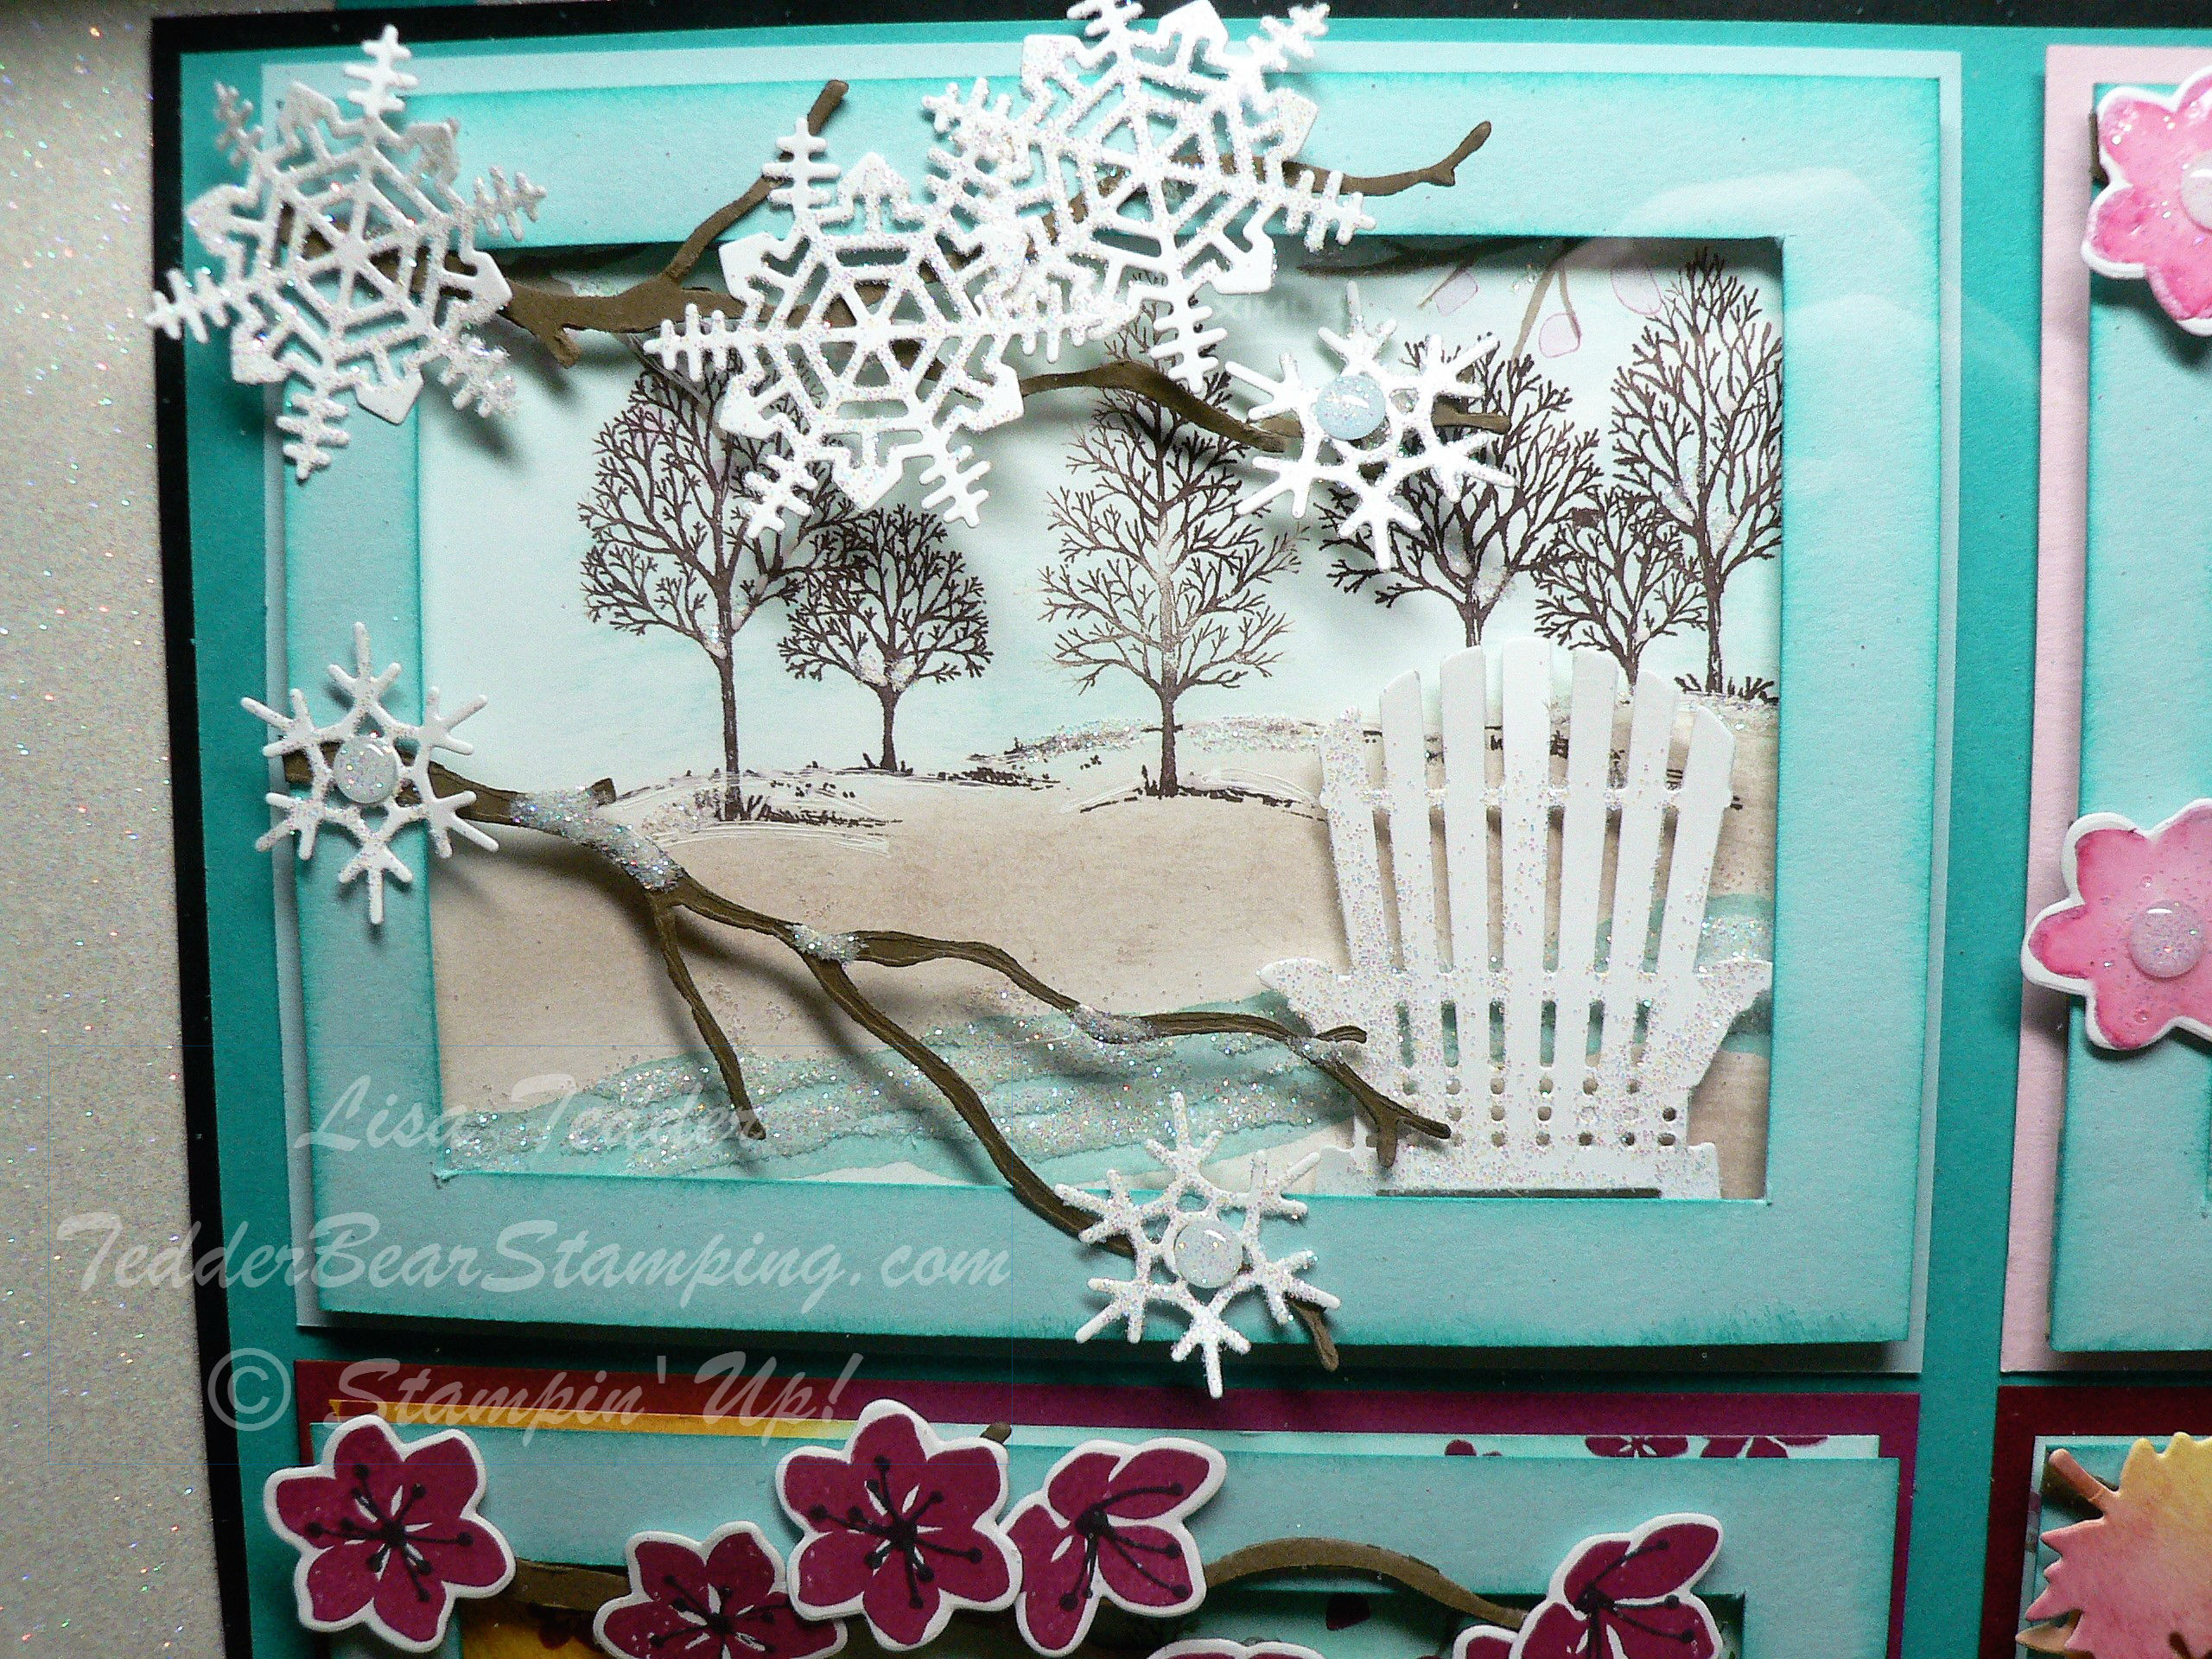
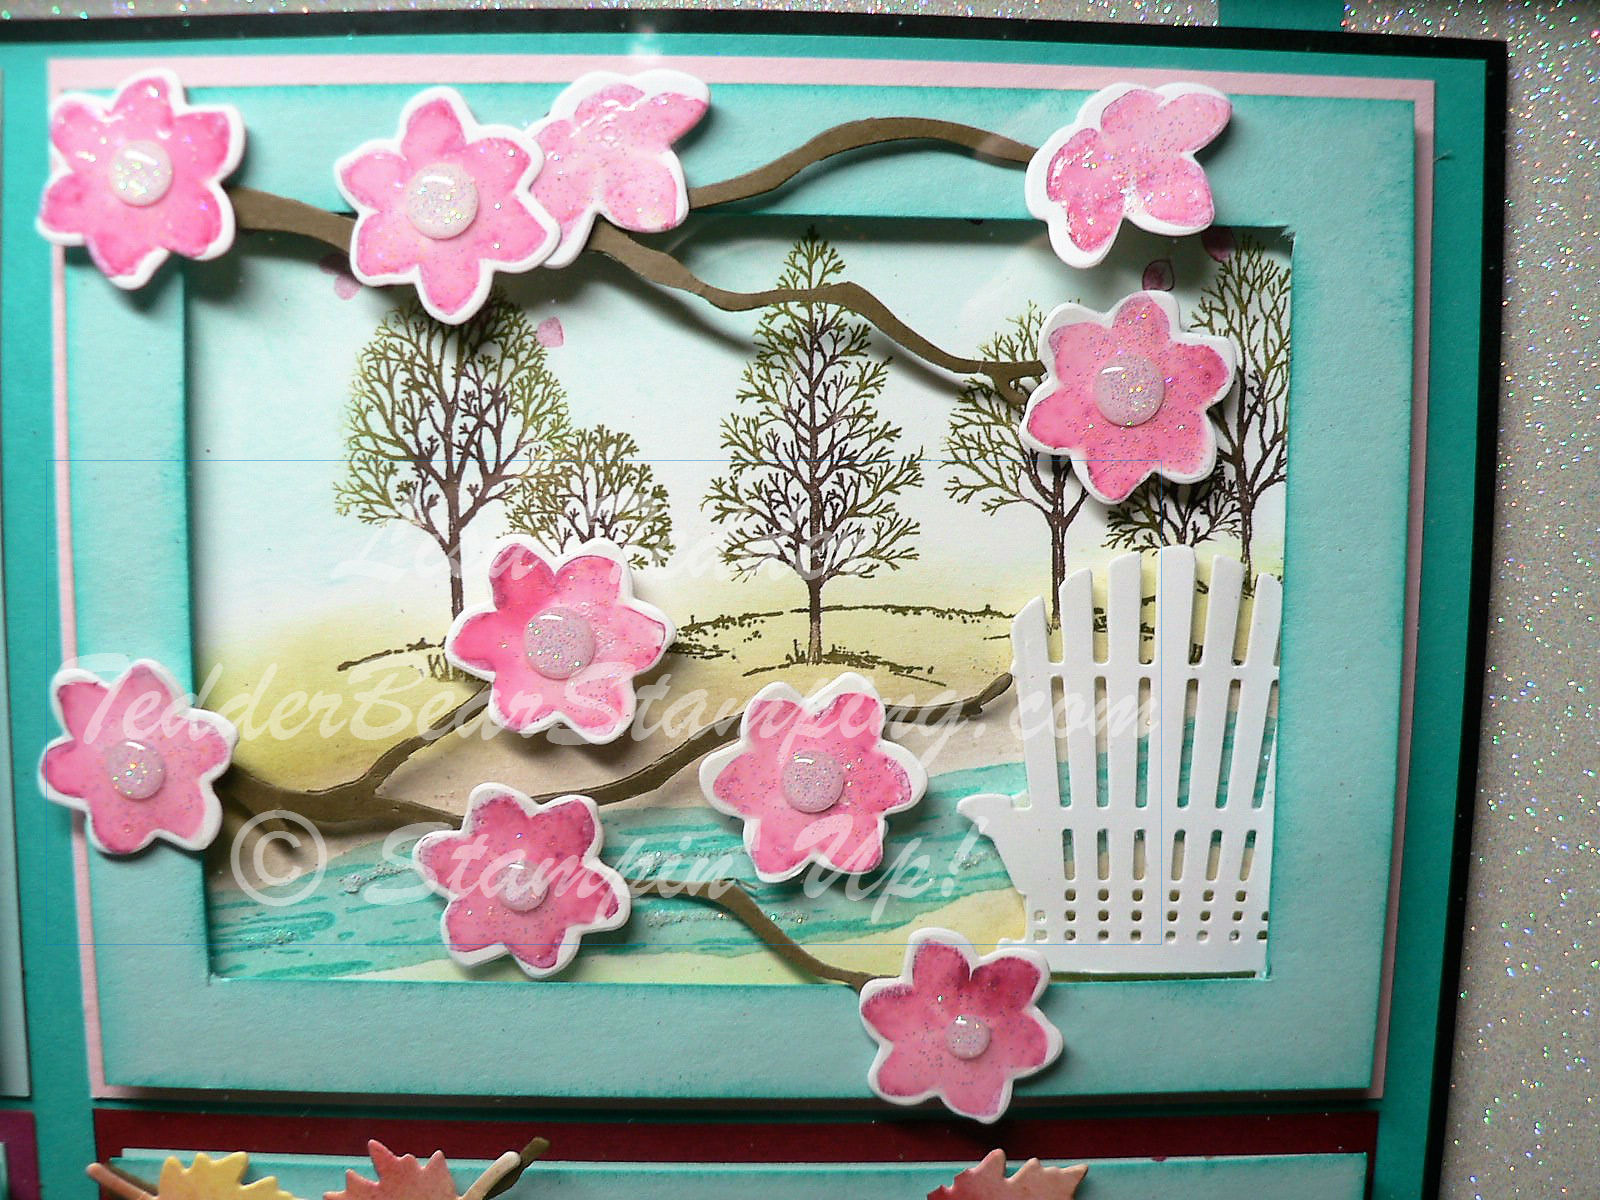
For my other Prize I did a take on a card I made in another post:
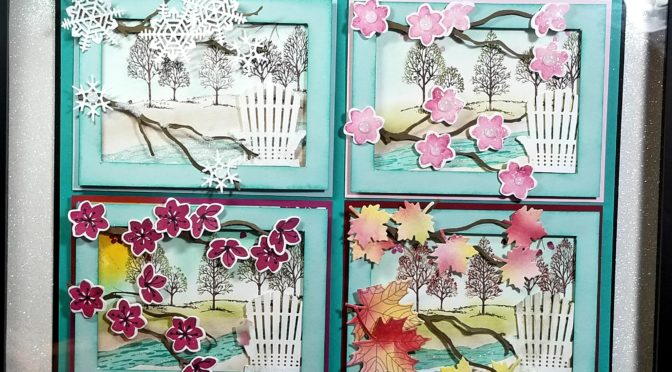
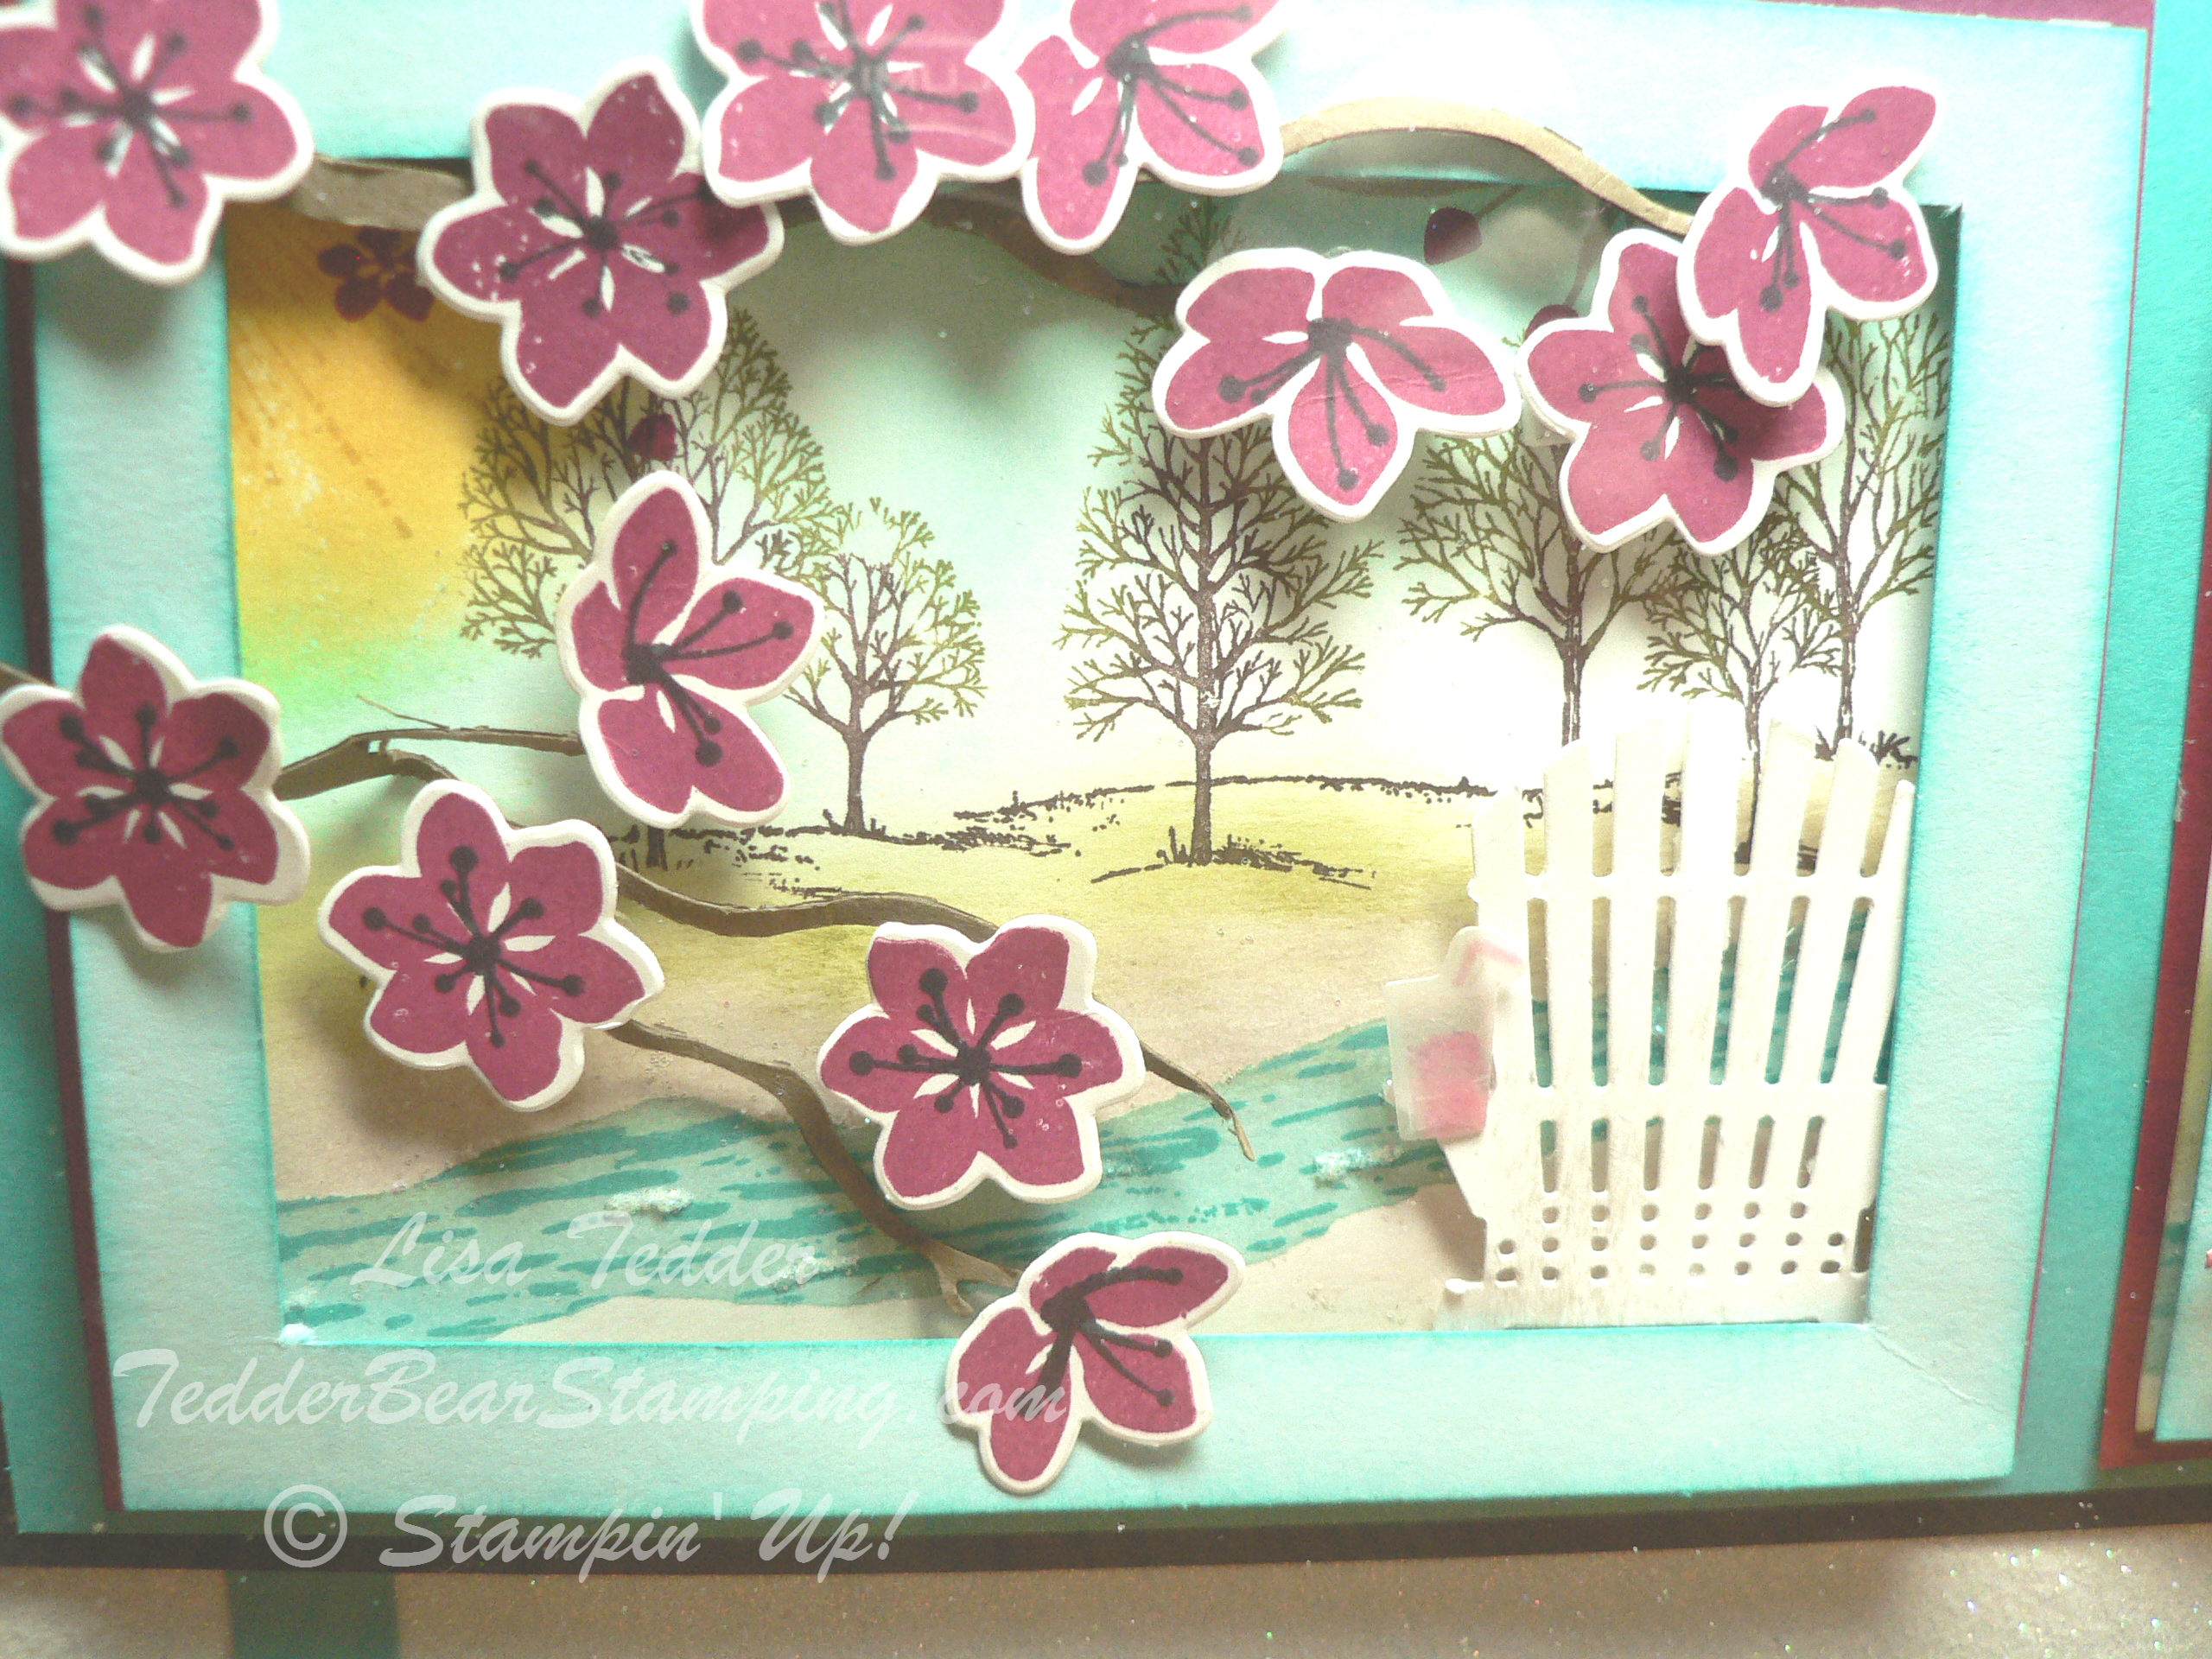
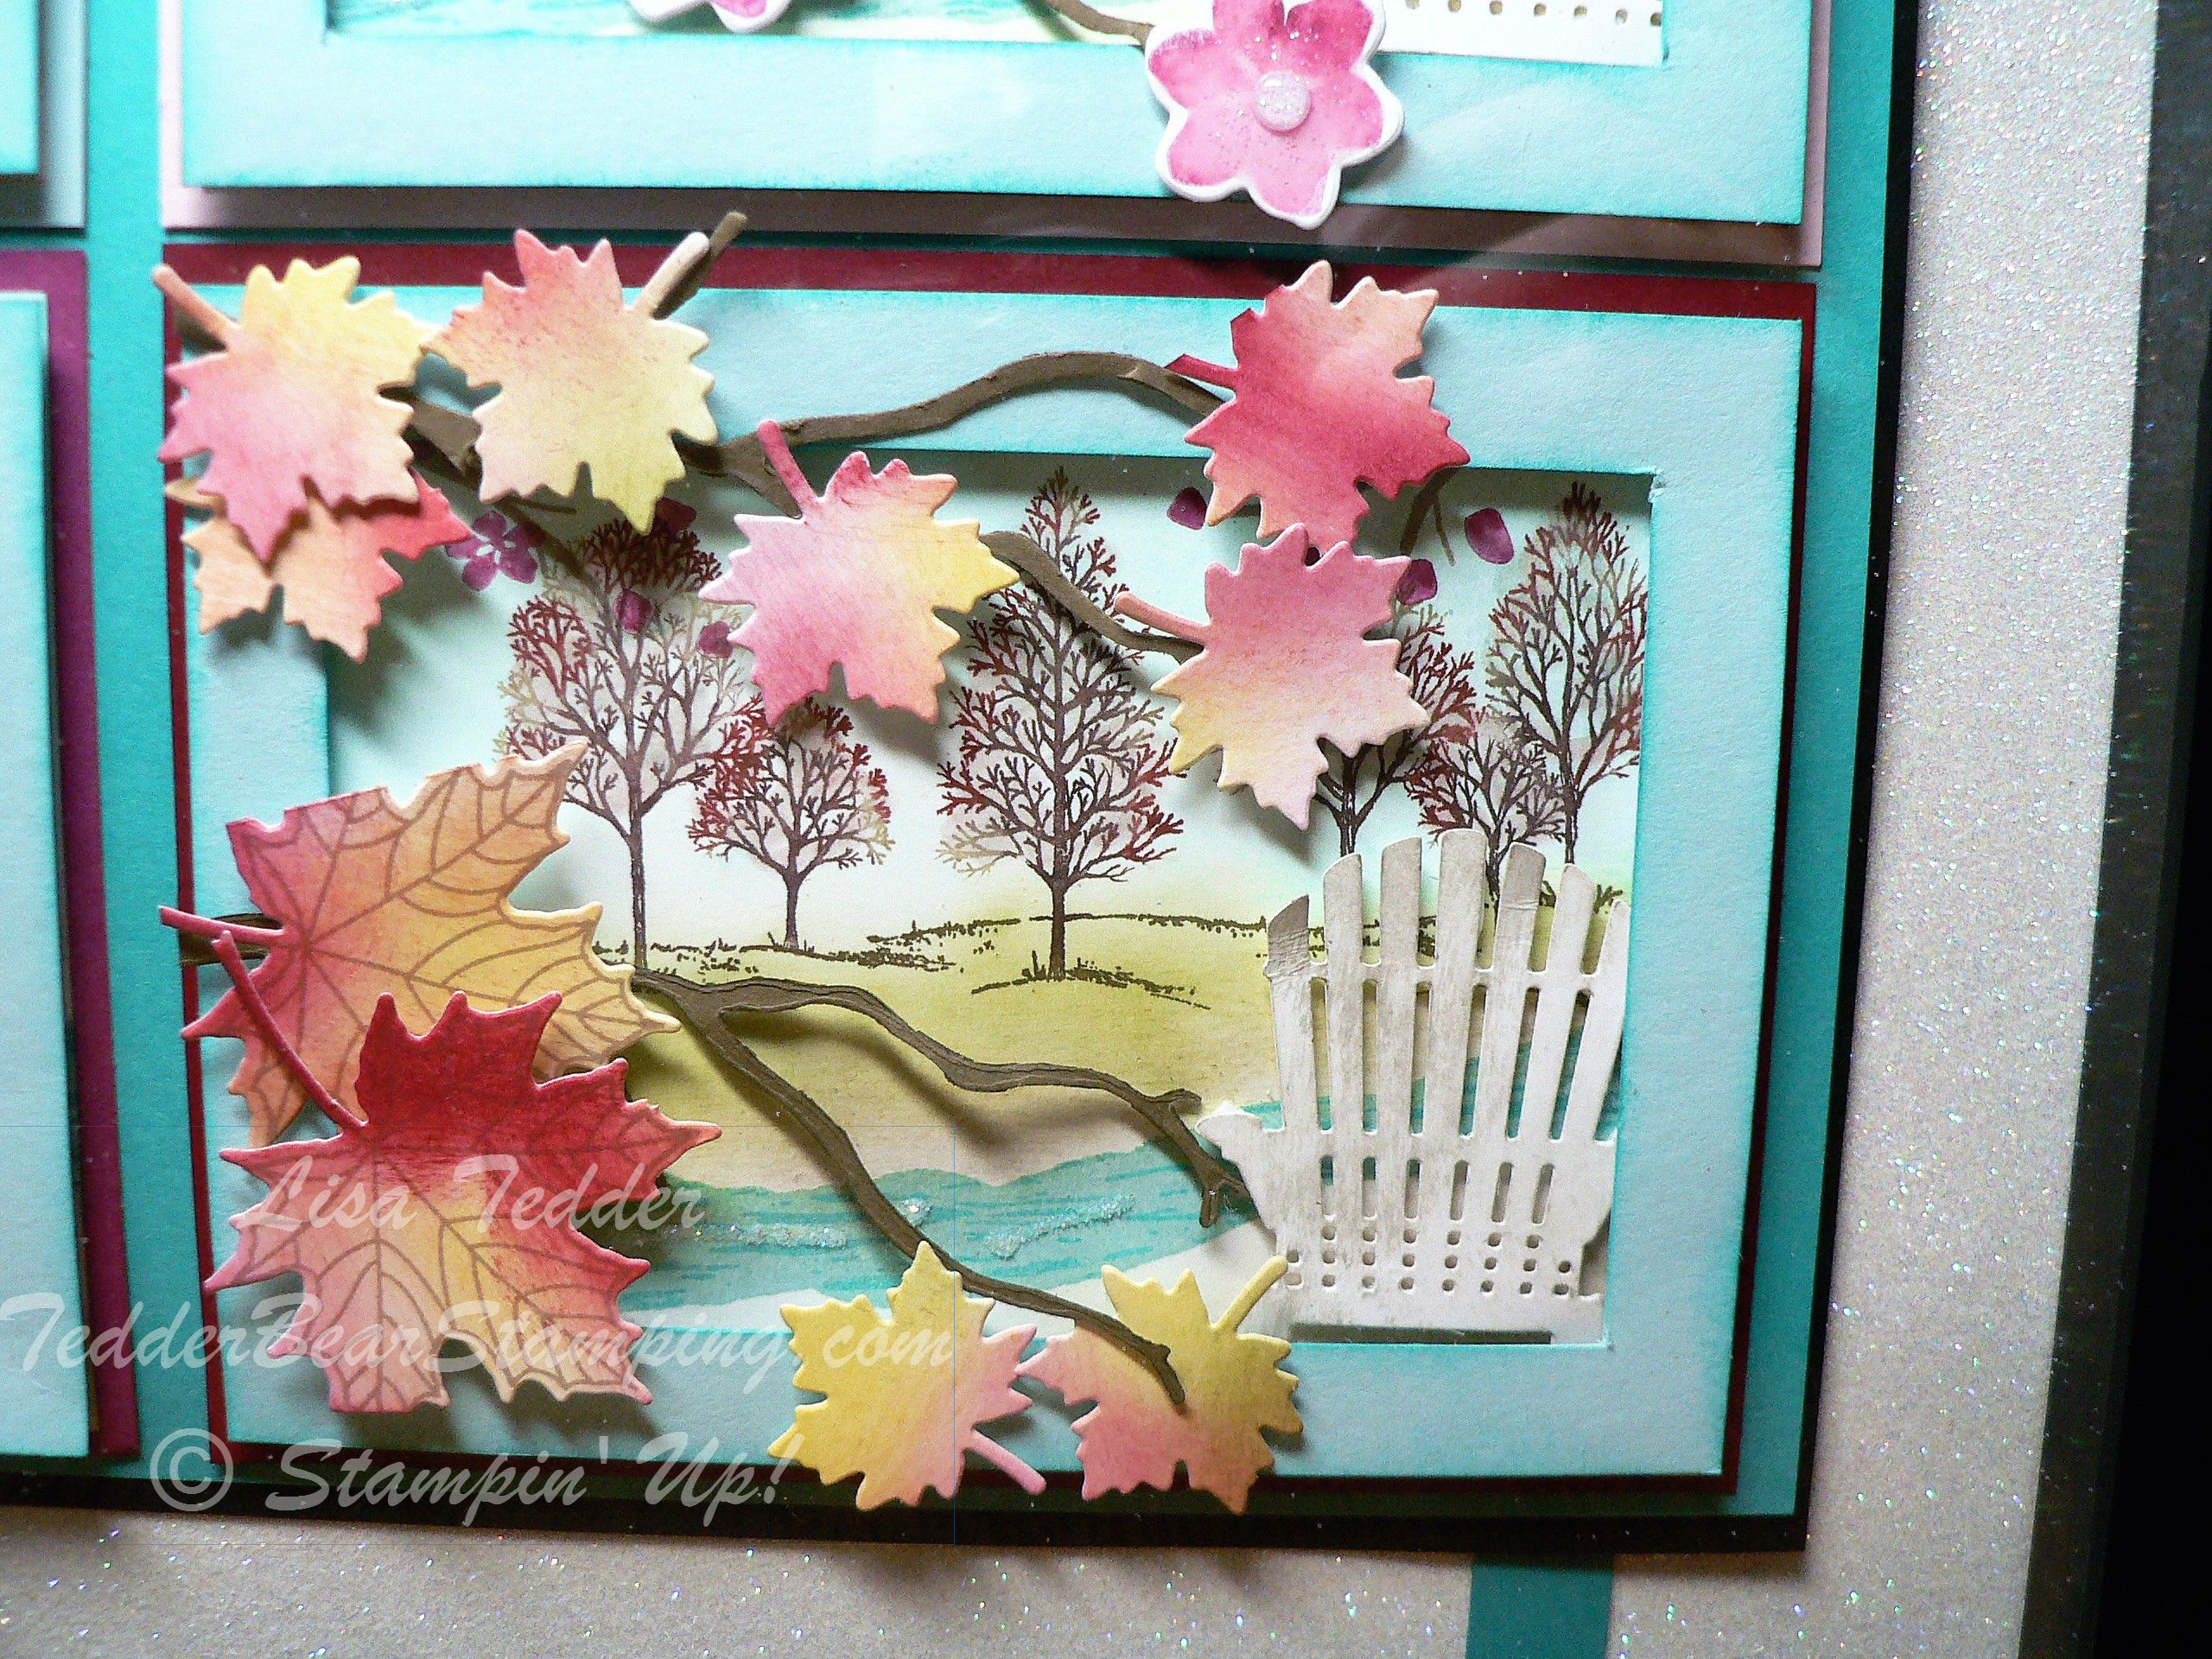
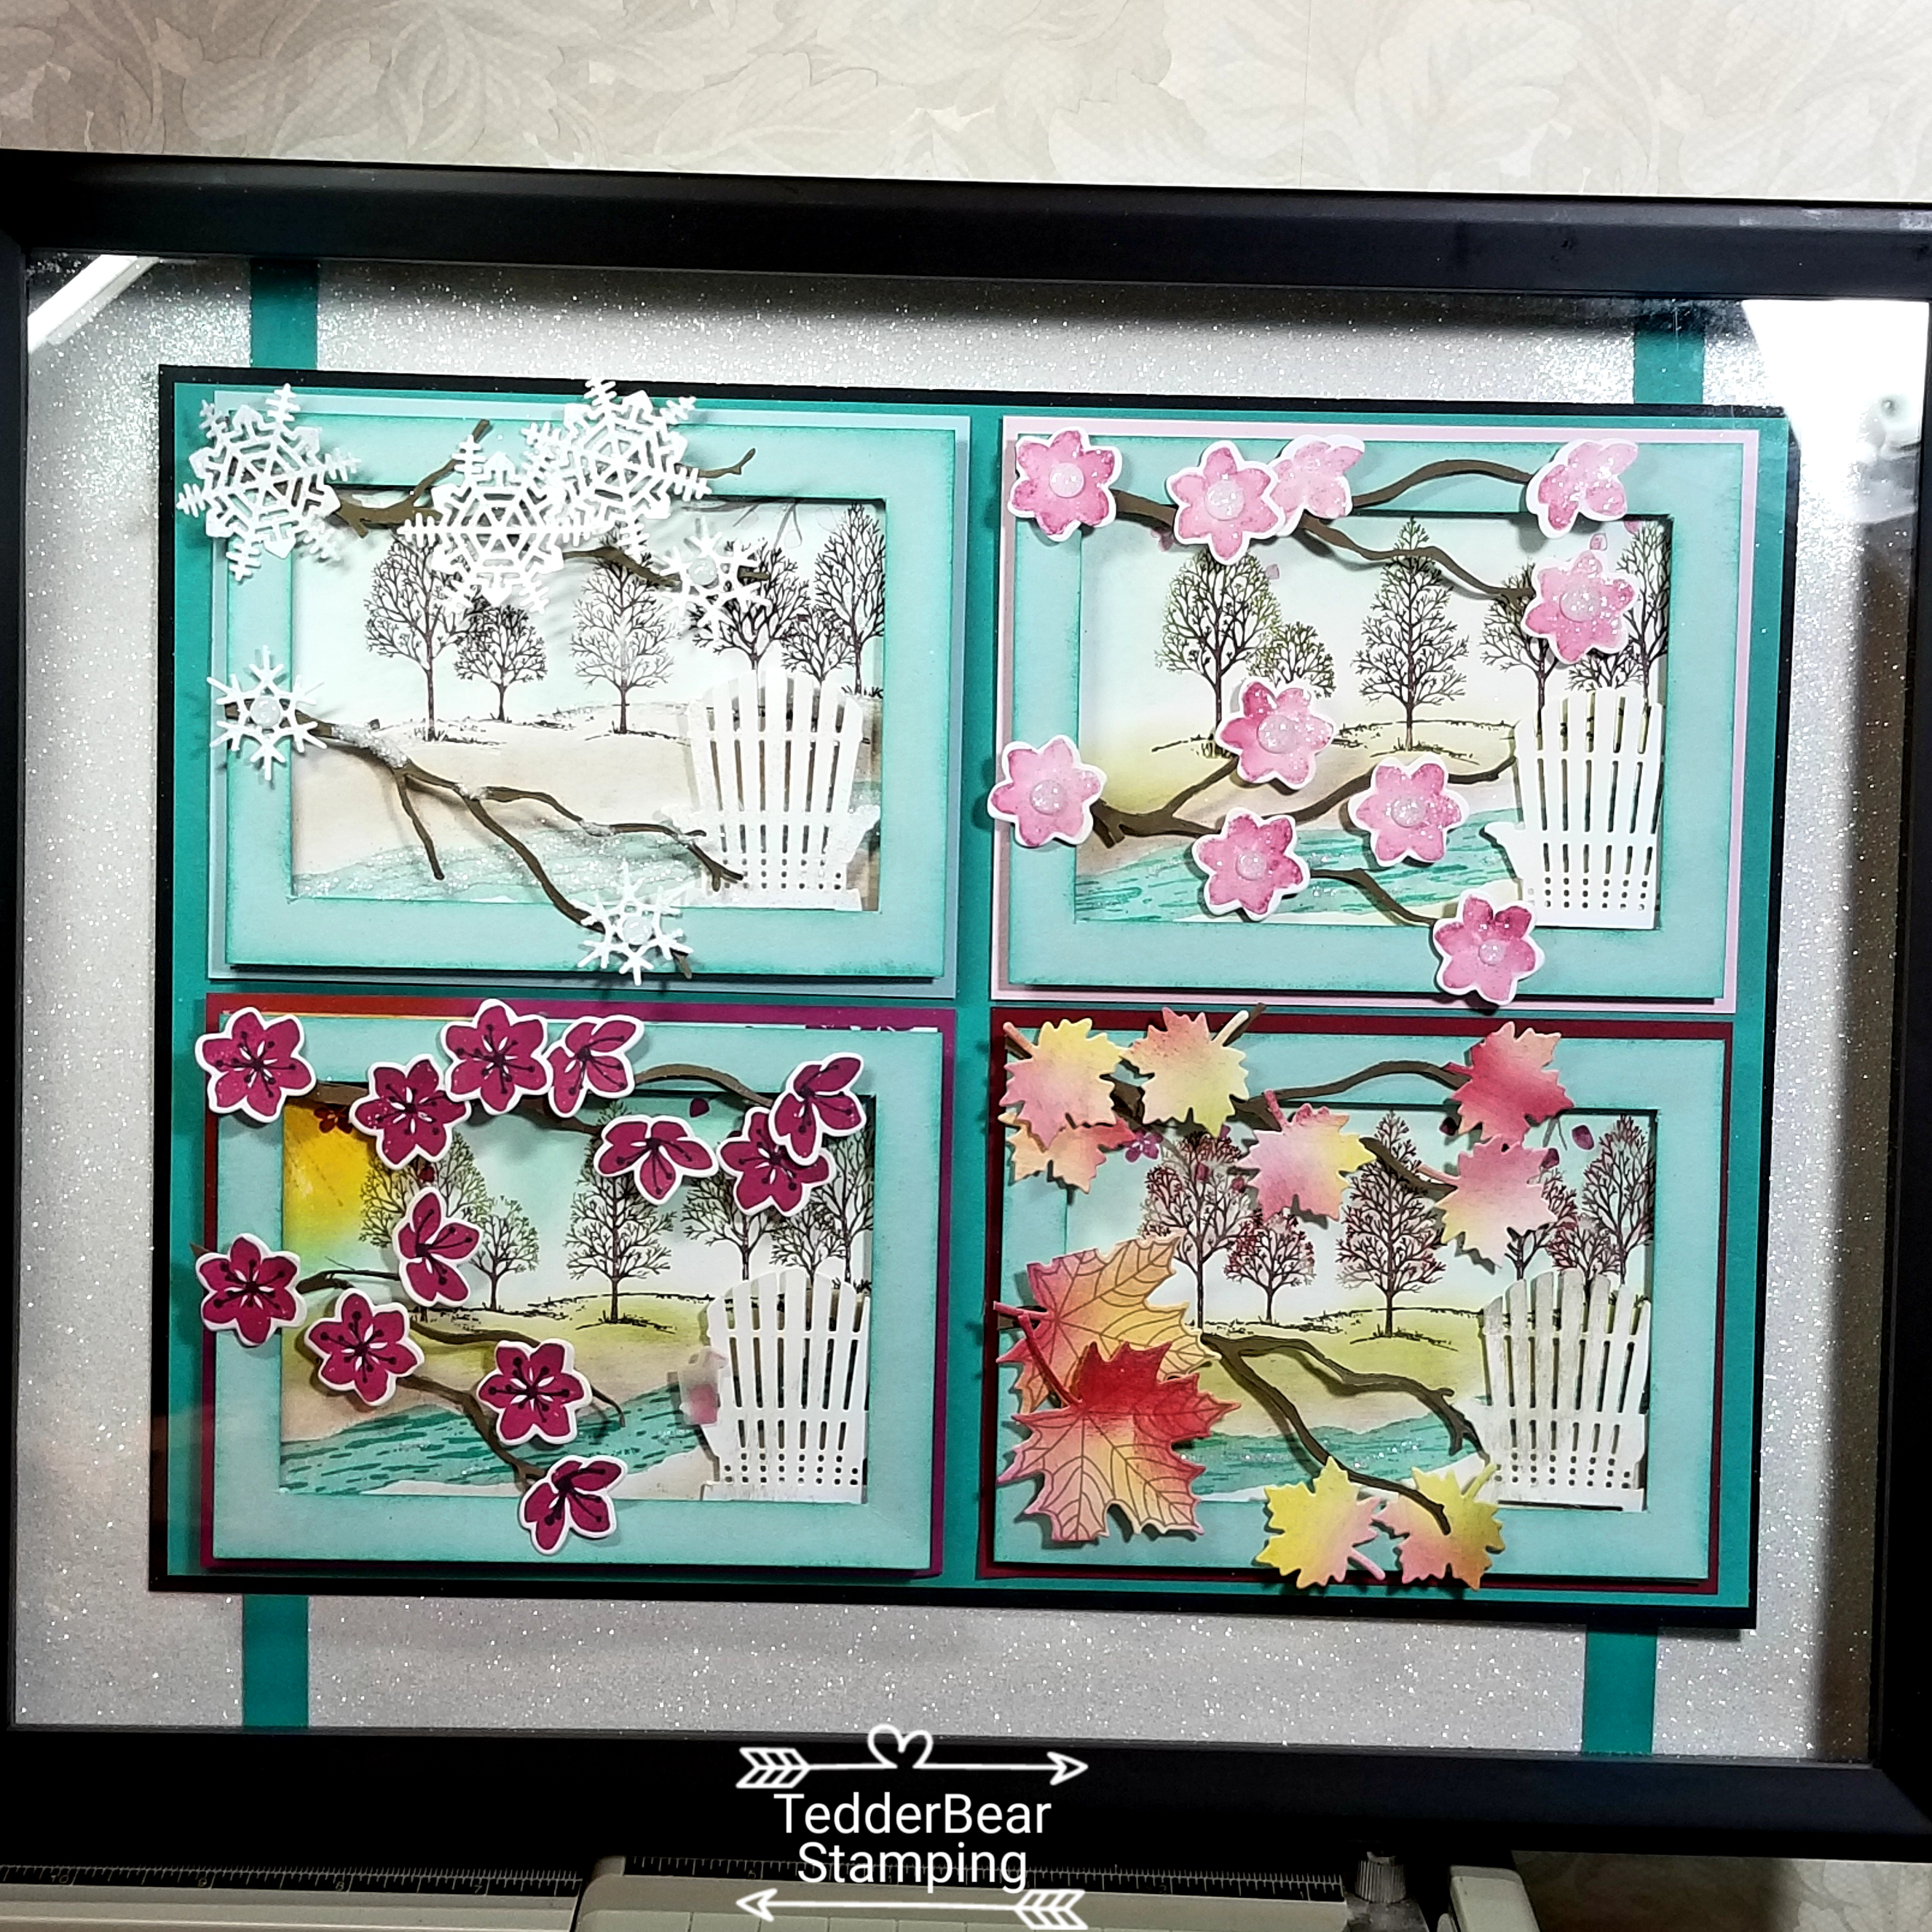
I loved how this came out, and decided to see how it would look framed with all the seasons! I have to admit I was soooooo excited when I was done, and a little disappointed that I had to GIVE IT AWAY! LOL I used Dazzling Diamonds to make the water sparkle, especially on the winter one to make the water look icy! Here is a closer look at each Season:
The water is icy and the chair is sparkly with Dazzling Diamonds!
The trees are just budding with leaves and the Chair is in Pristine condition!
Summer time! The sun is shining! The blooms are out! The chair is a ‘little’ dirty, but we have that iced drink so we don’t care!!
Fall is here! The leaves are changing! The chair is almost ready to be cleaned for the end of the season!
Here is the full view! Notice the Dazzling Diamonds background paper? The measurements for this beauty is 11″ x 14″………..which is why I had to add the strips of Bermuda Bay. Can’t have a place that has a seam! There’s only ONE seam, but for symmetry I put two strips in!
For this Colorful Seasons framed art, I took off with the given name of the set……..Colorful SEASONS! I chose to make four scenes but having the scene stay the same but change it up to see the Seasons! I had a blast making this! I used Lovely as a Tree to be my backdrop, and the best thing is that you can make this stamp set look different just by using markers!
Dimensions:
Dazzling Diamonds Glimmer Paper #135315, 12″ x 11″ and 12″ x 2″
Bermuda Bay ( Brights Cardstock pack) #145409, 1/2″ x 11″ x’s 2
Basic Black #124267, 12″ x 9″
Bermuda Bay (see # above), 11 3/4″ x 8 3/4″
Seasons:
Pool Party (Winter) 4 1/4″ x 5 1/2″
Pink Pirouette (Spring) 4 1/4″ x 5 1/2″
Berry Burst (Summer) 4 1/4″ x 5 1/2″
Cherry Cobbler (Fall) 4 1/4″ x 5 1/2″
All Seasons are on Whisper White cardstock 4″ x 5 1/4″, ‘frame’ is Pool Party 5 1/4″ x 4″ with a 1/2″ cut out on inside all around.
Water is Soft Sky and Bermuda Bay for all seasons except winter which is Soft Sky and Whisper White.
Trees are colored with markers: Tree trunk is all Early Espresso, Leaves are Old Olive (spring and summer), Fall is Cajun Craze and Crushed Curry.
For the water I used the Fine Tip Glue Pen to make the water sparkle with Dazzling Diamonds on top.
For the winter tree branch thinlit I used the White Gel pen (retired) to make snow on the top, with Dazzling Diamonds over it to make the branches be snowy!
That’s it for the Dimensions!
I hope you like this post! This took me a couple days to create but only because I had to think it up! Once started, it took a couple of hours.
I will be making one for myself as soon as I am able! I will probably take this to the winner on Monday so will have to make one before then, just in case I need a life size reference!!
I have my Blog Candy to give away TOMORROW!! Wow, that went fast! You can get in on the drawing by posting comments here on this blog (any post! or multiple posts!) or on my Facebook page and I will put your name down each and every time you comment!
Here is a reminder of what you can win:
These are soooooo pretty!! Good luck!
I’m off to make some cards for my upcoming classes! I’m sure I will be sharing them with you as time allows!
Below my name is pictures of what I used to make this project…..you can click on any picture and you will be taken to my online store! If you place an order with me, I will send you a handmade card and a small token of my appreciation! Please use this Hostess Code for you order: C62FFAR3
Lisa Tedder
TedderBearStamping
A California girl living in North Carolina! Product List