Tag Archives: Sneak Peek

Another Stained Glass Card with At Home With You

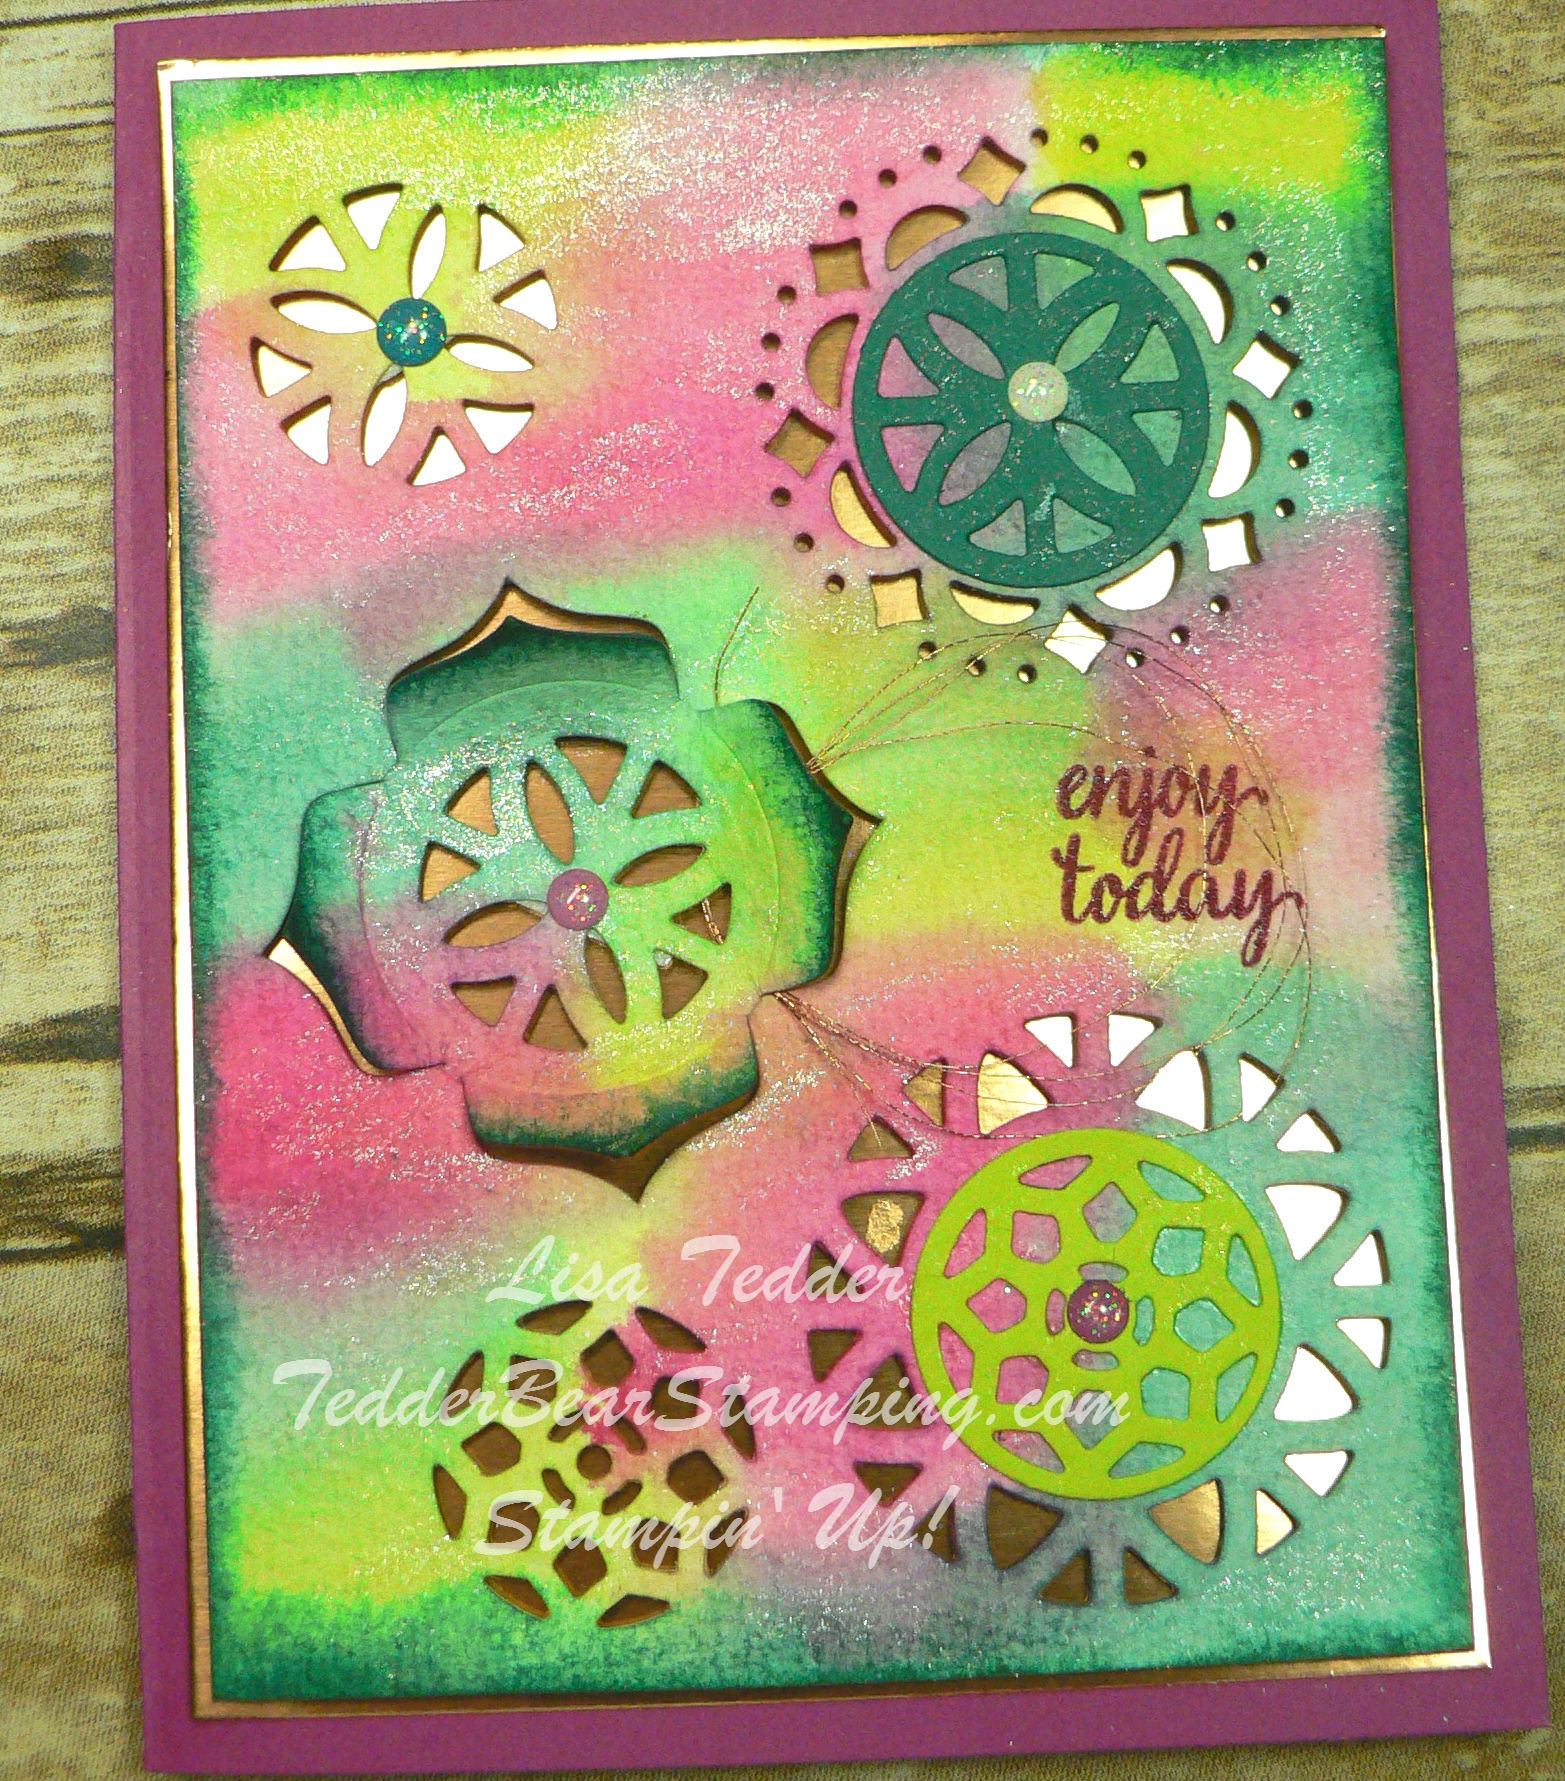
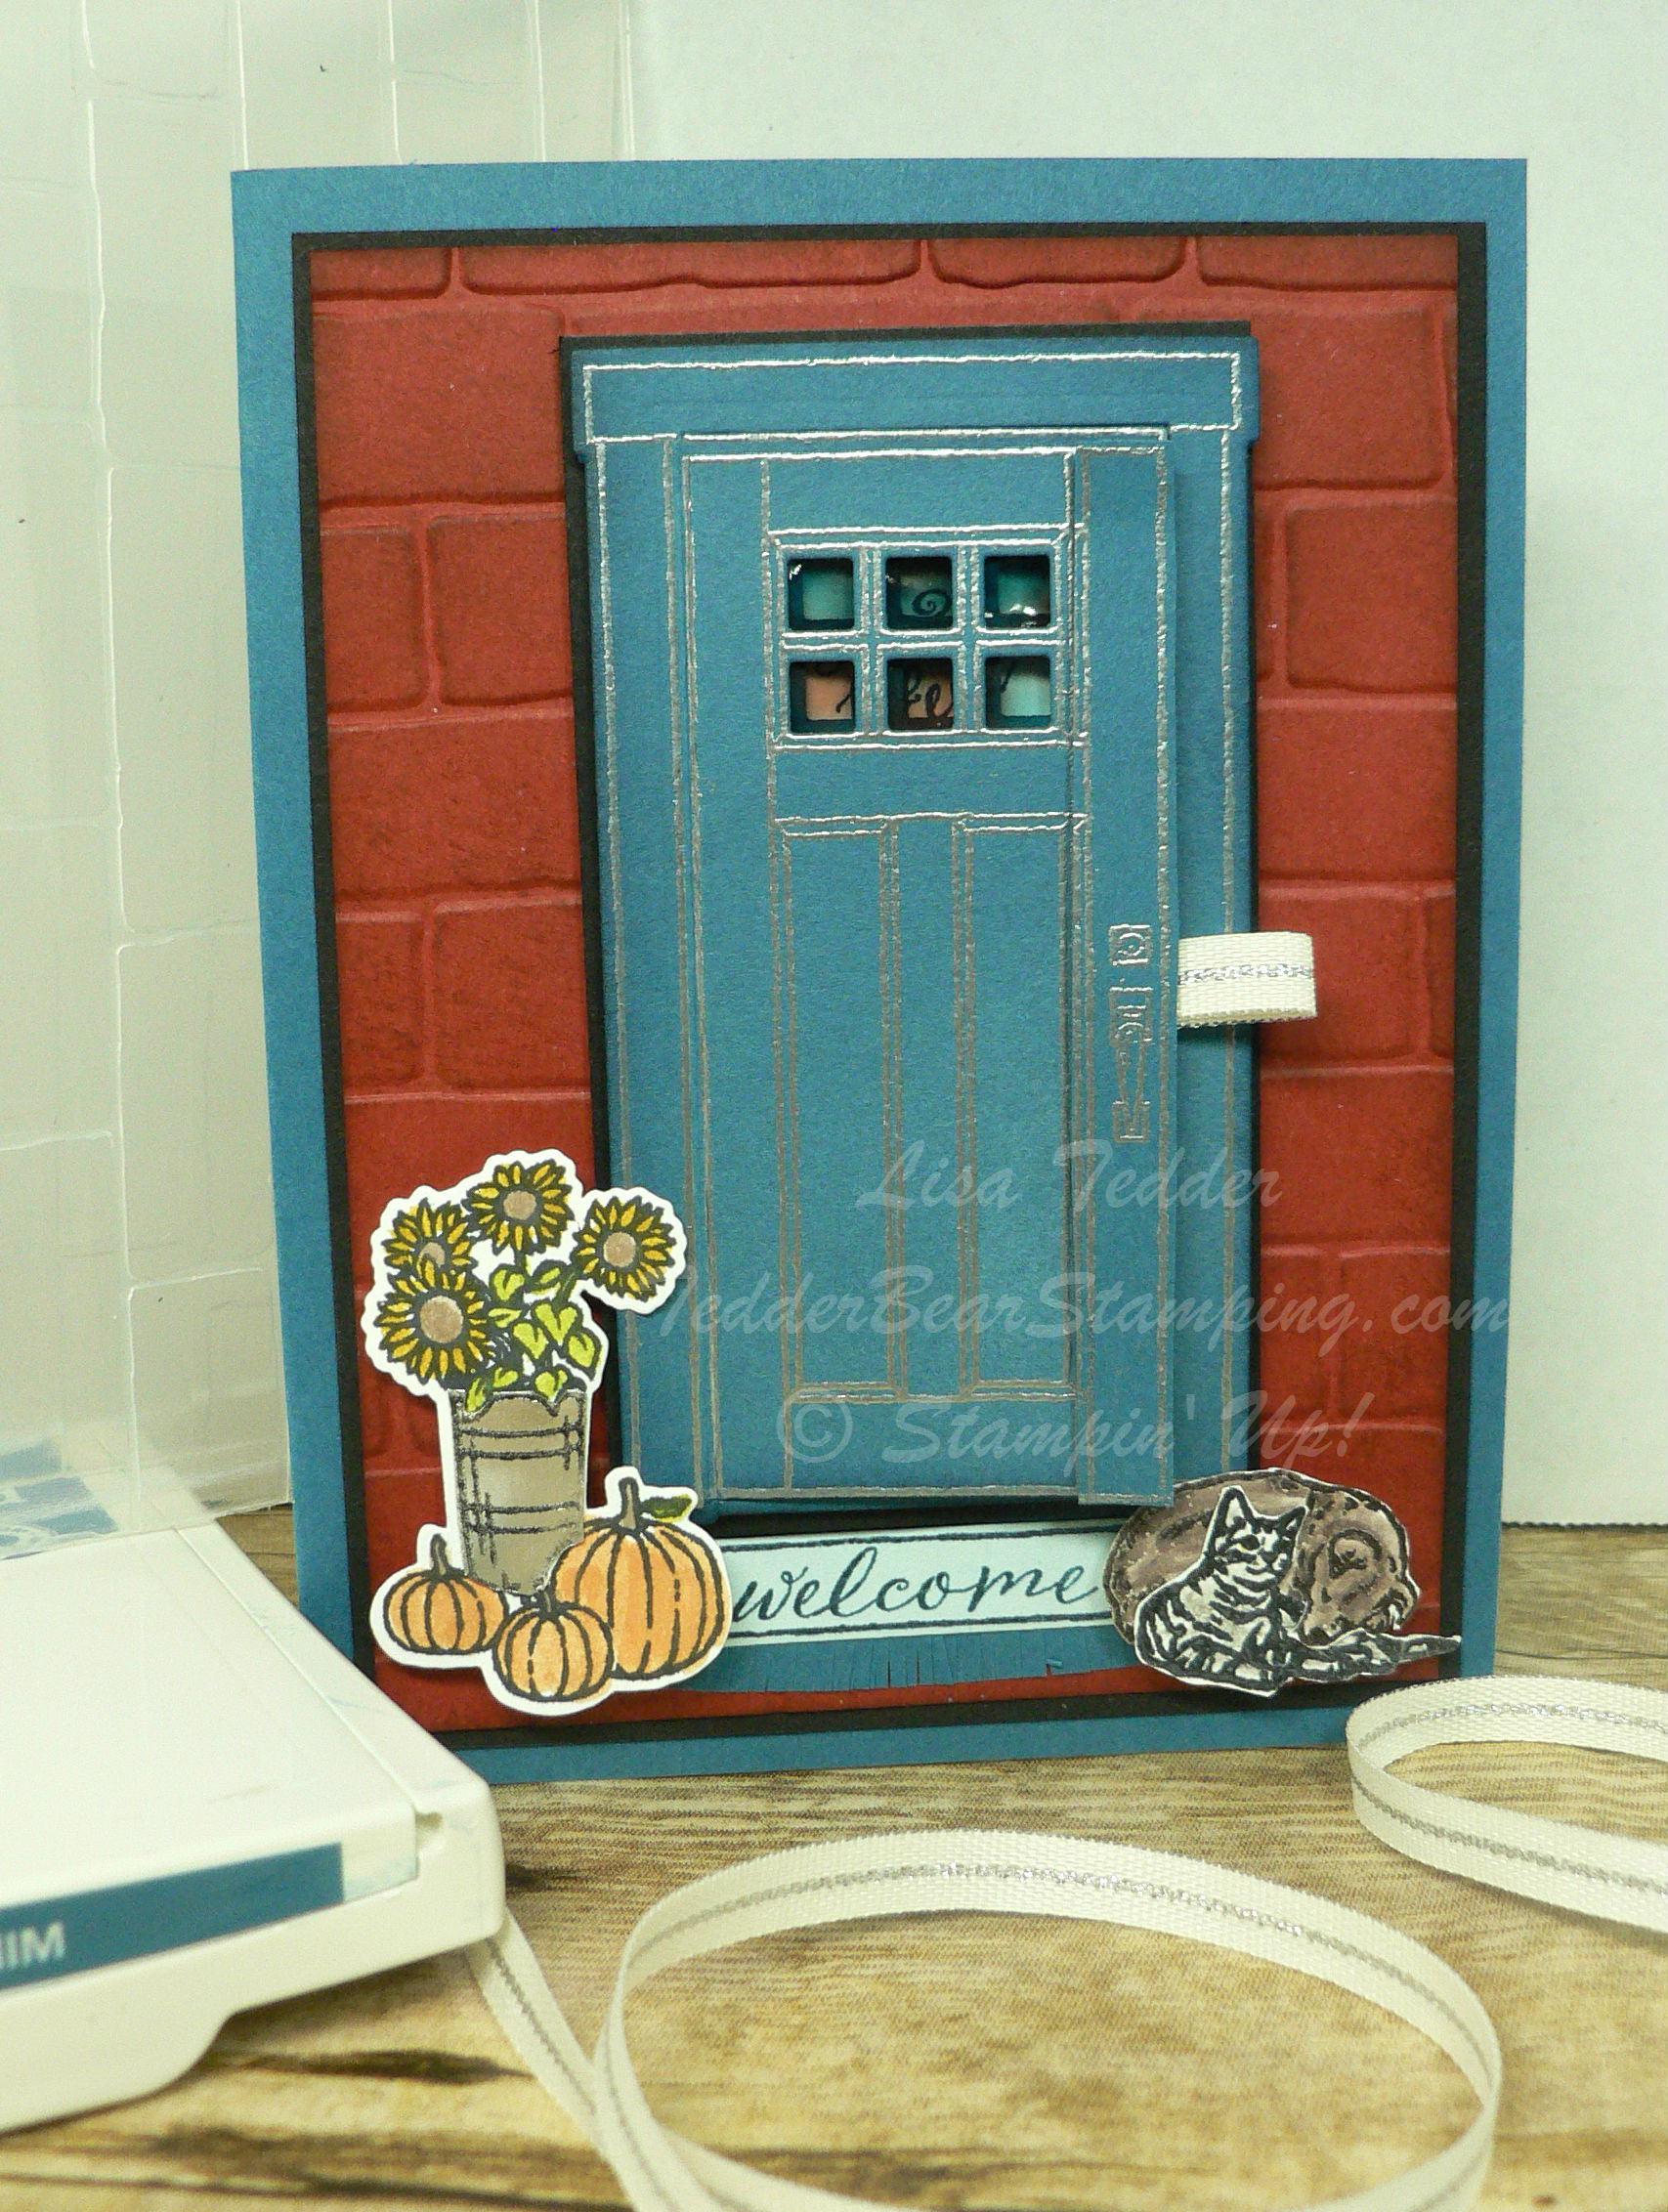
I posted earlier that I was going to use this stamp set from Stampin’ Up! for Kylie’s International Blog Hop, but I changed my mind!  I didn’t think, when I was finished with it, that it yelled MASCULINE. So I am sharing it with you now!

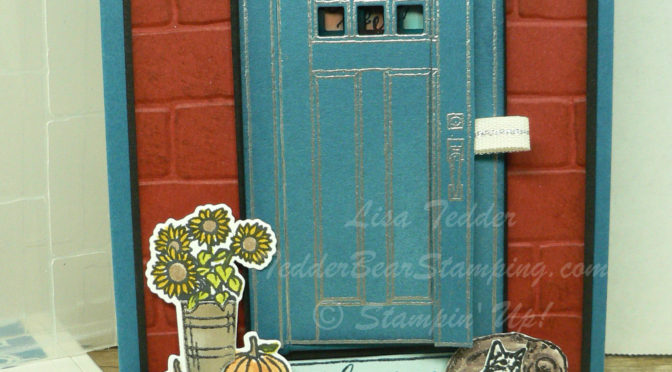
Yes! This is the one that I told you about with the stained glass that came out even better than how I did it in the past!  I touched the one that was drying before it was ready so I had to start all over.  I don’t want to pray for Patience because I really don’t want to practice it a lot!  🙂  I’m not very good at it!

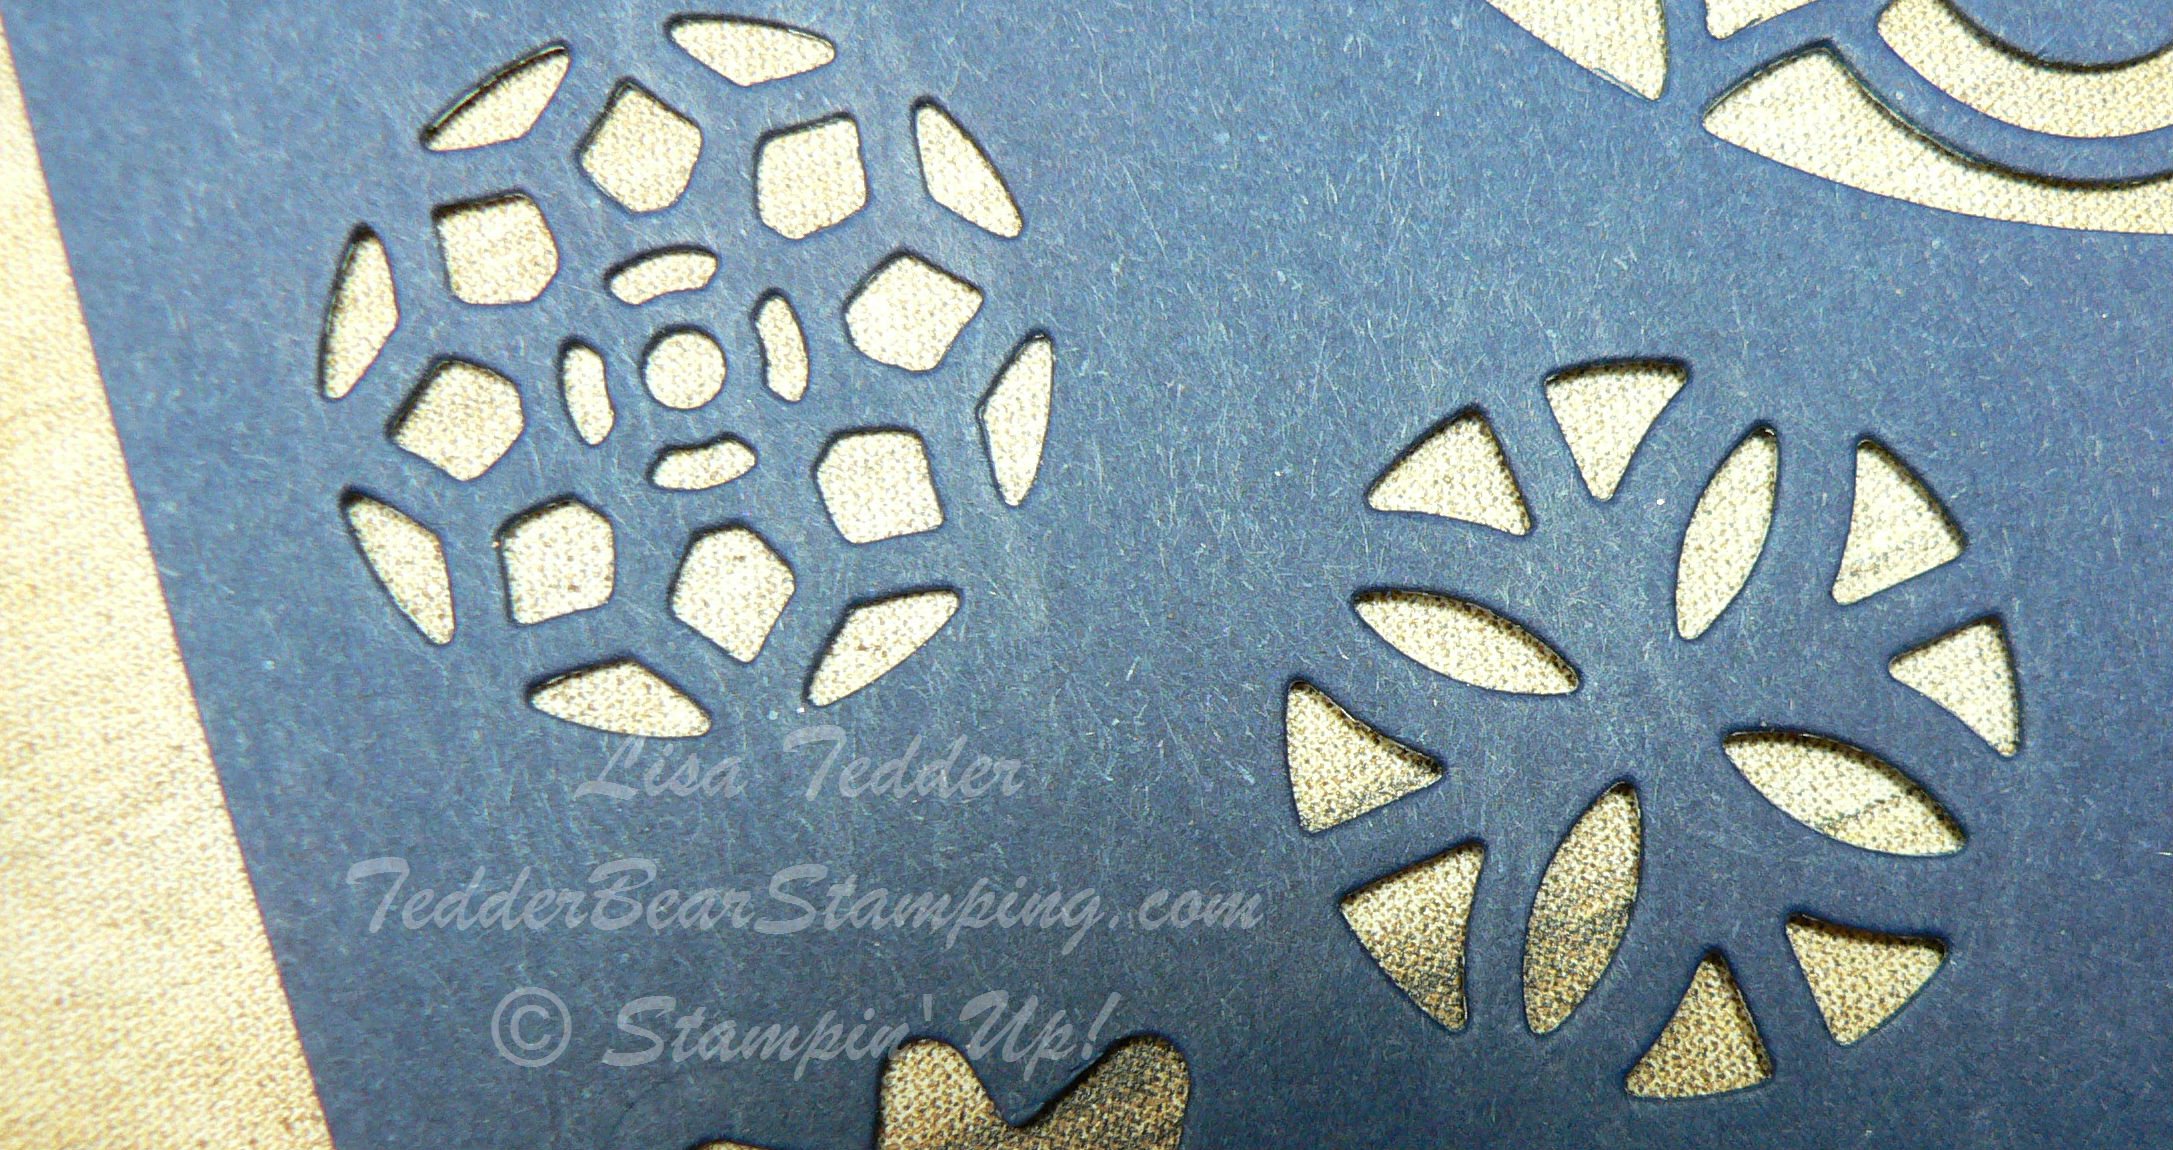
To start off, I scribbled on a piece of Window Sheet with some of SU!’s markers.  I then placed little circles of the Fine Tip Glue Pen over the scribbles and the colors bled and create a really cool pattern!

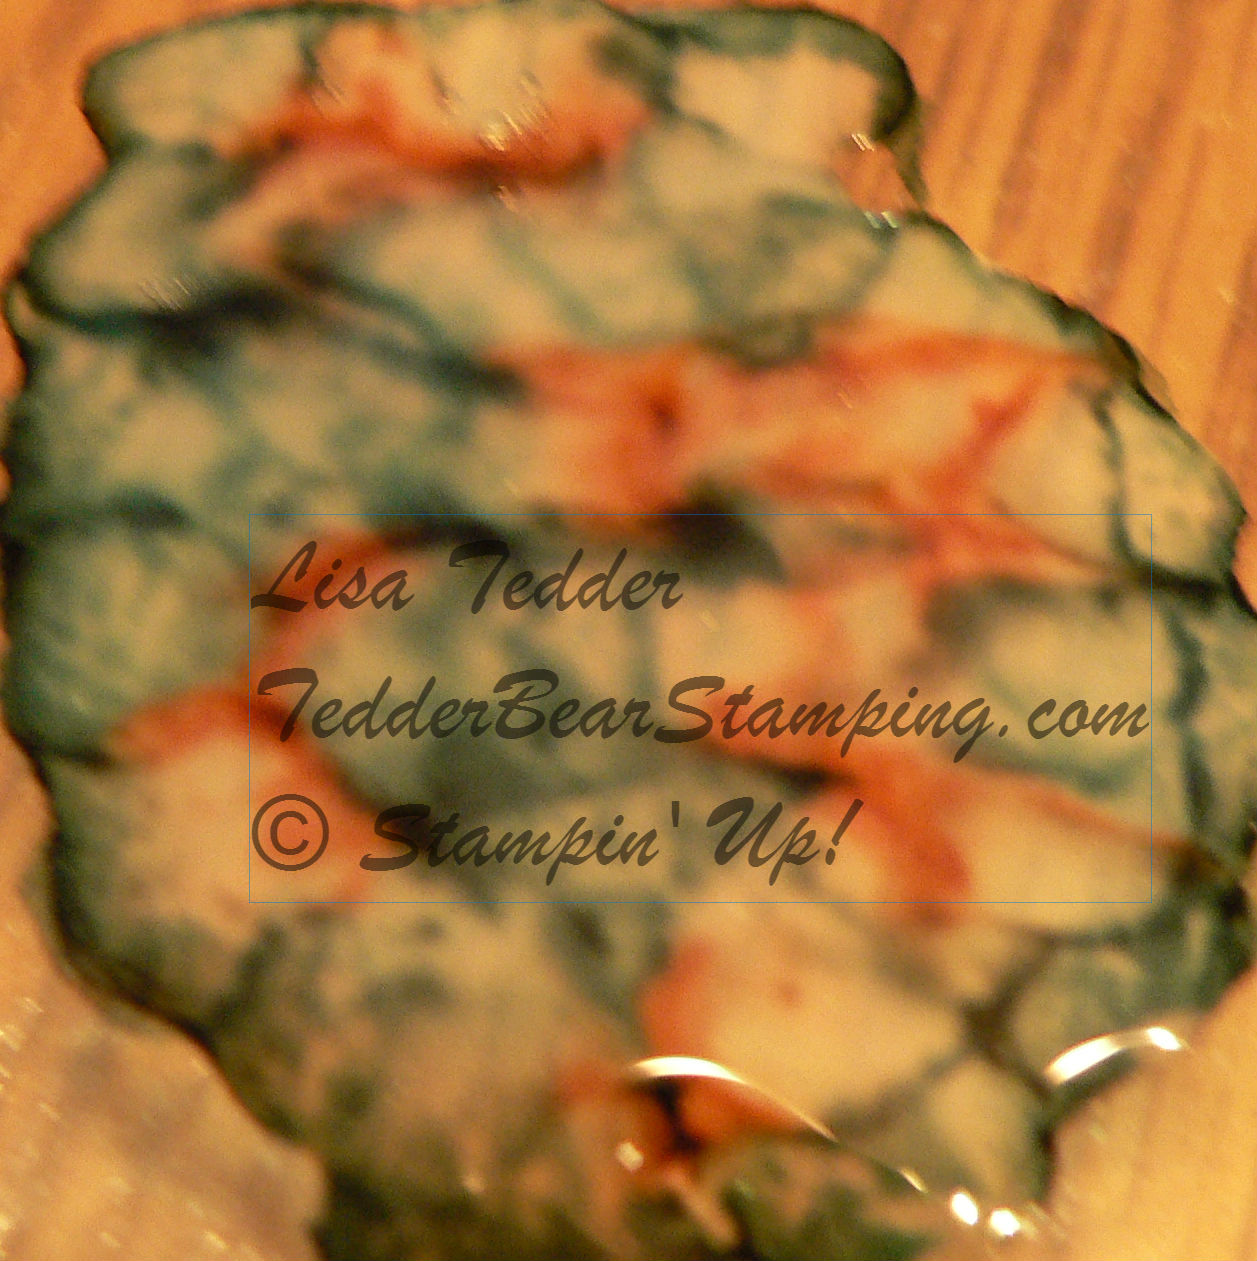
I used Cajun Craze and Dapper Denim.  See how it marbles?!!  Once dry it is see through with the colors showing through what looks like an antique stained glass!!

Once it’s dry………..it takes  time, it’s probably a good idea to leave it overnight so you don’t mess with it!  Trust me!

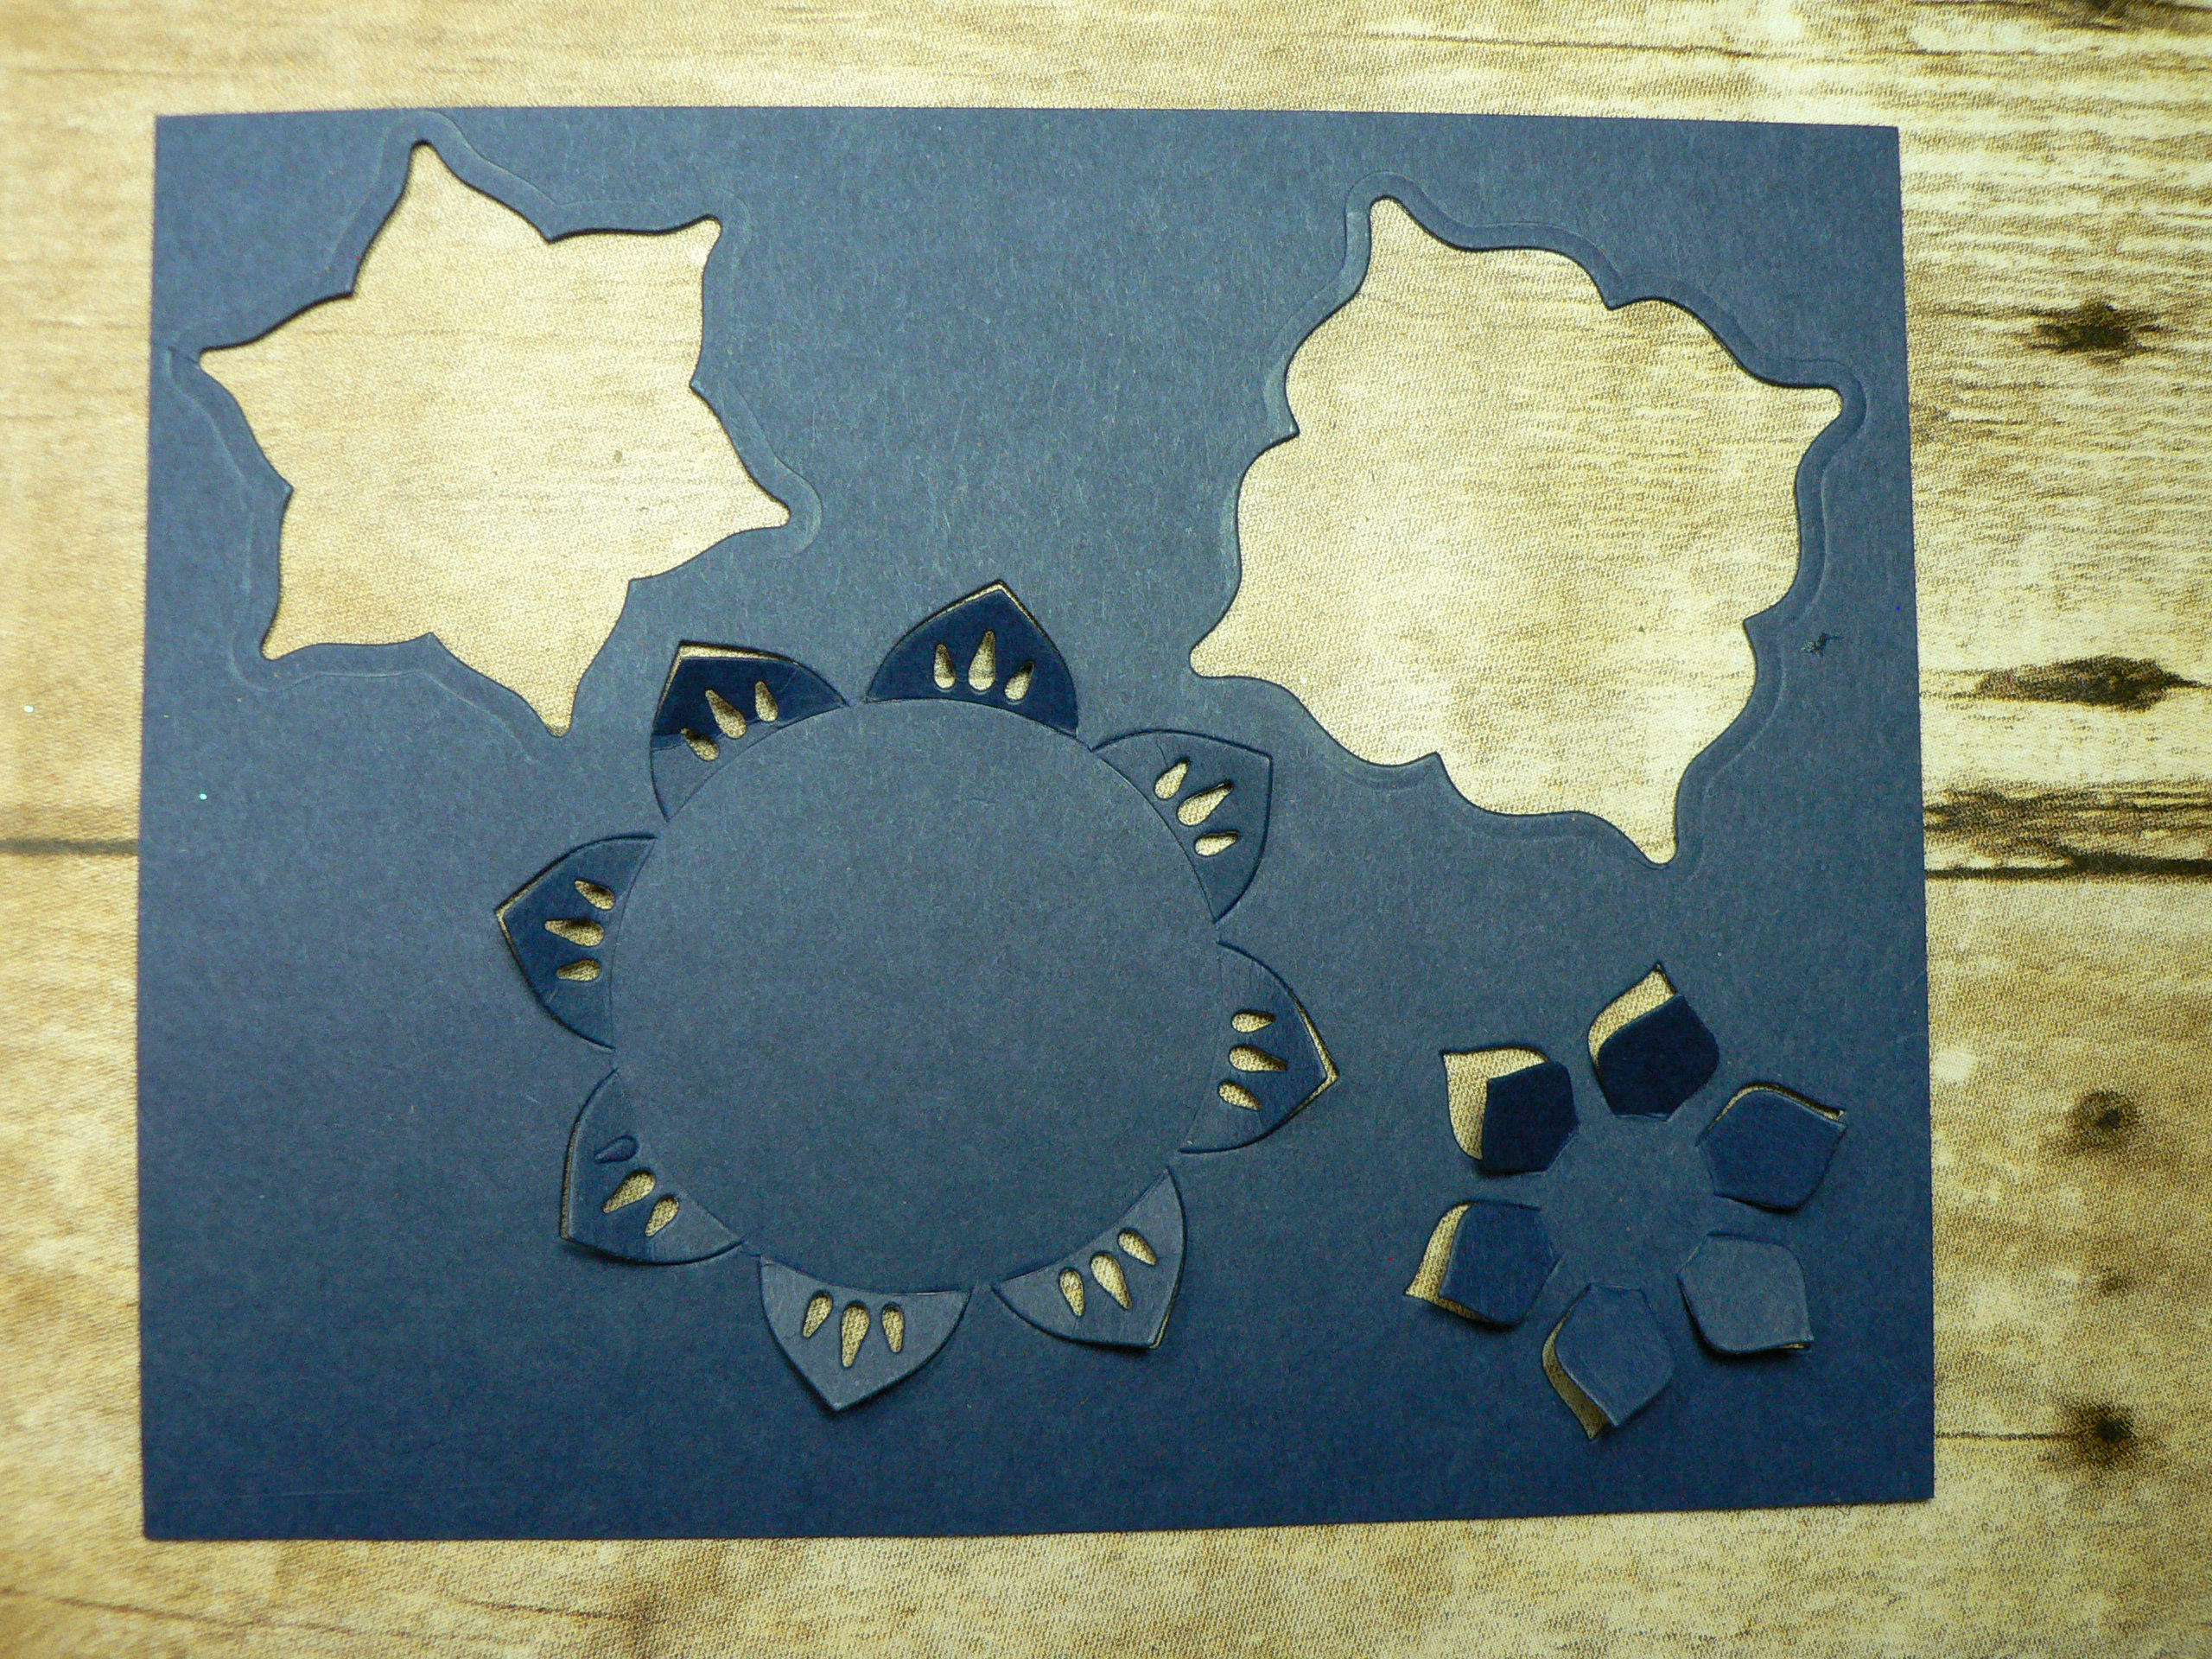
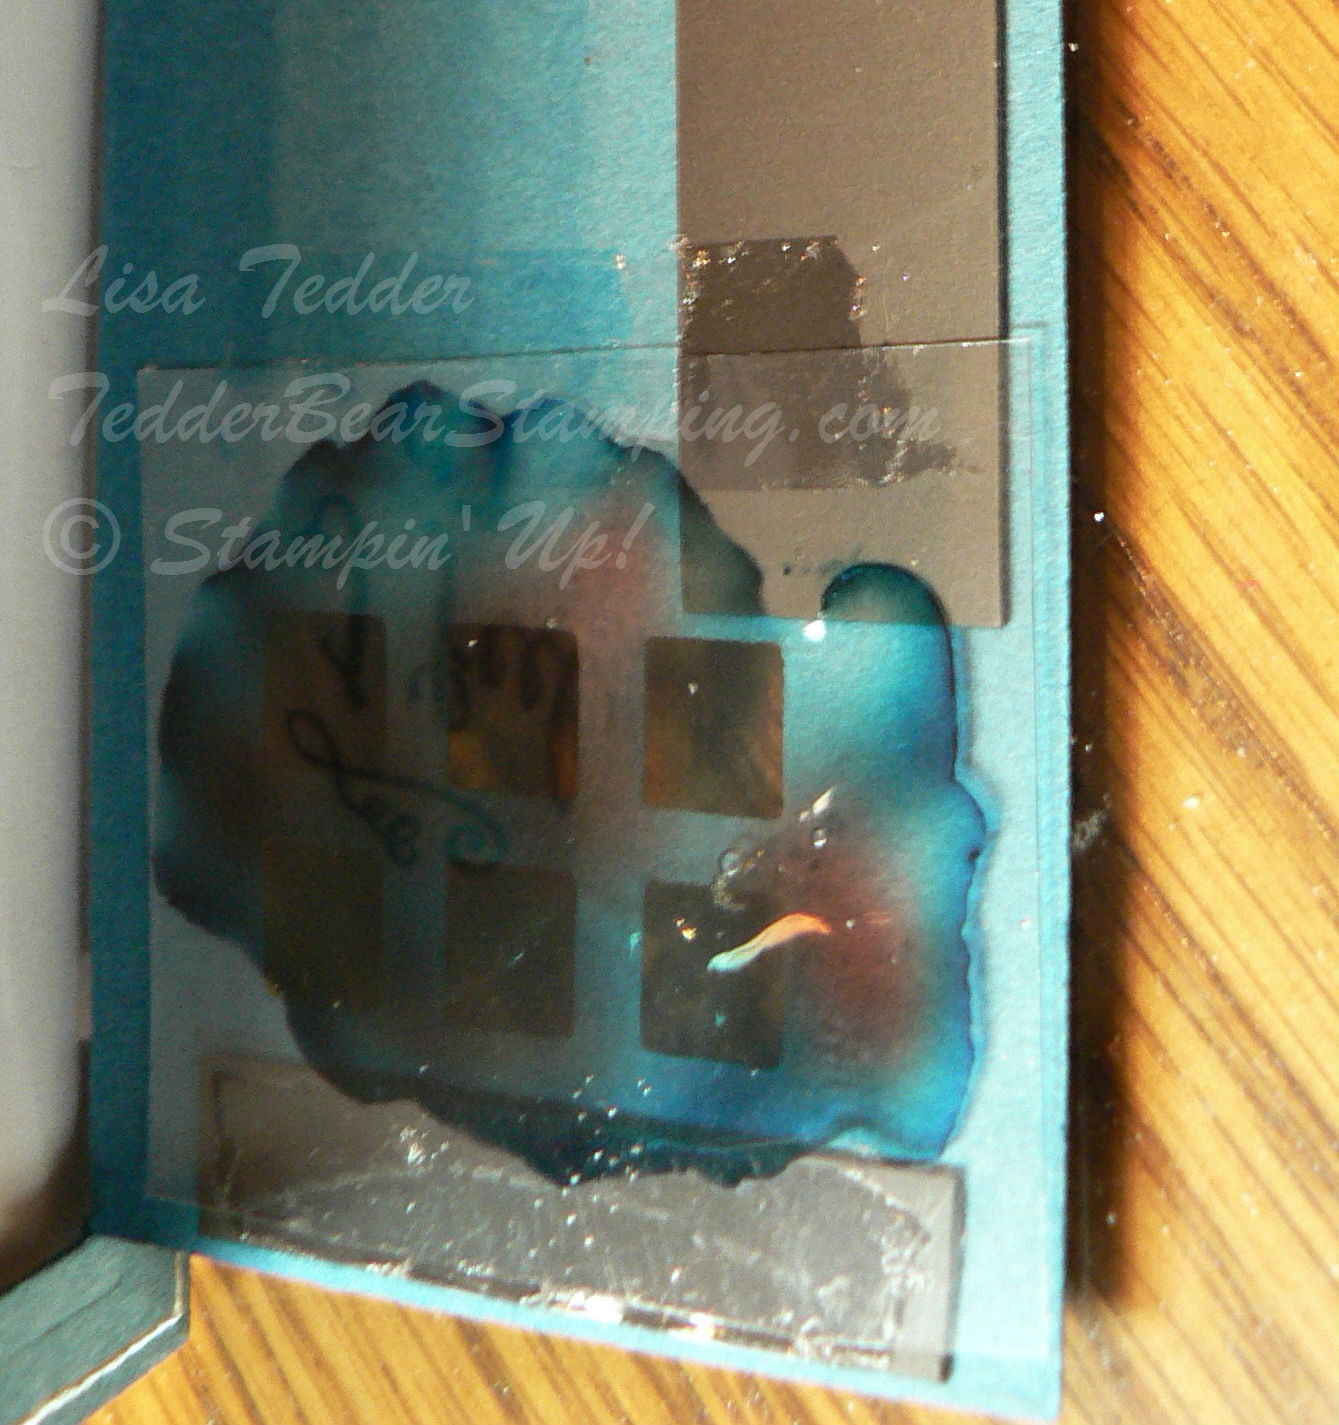
Once the door is cut out with the thinlit, place the Window Sheet down on the back side (the side that opens).

NOT sure why I took this picture of the door UPSIDE down other than to get a better picture!  Can you see the two colors?!!

I have magnet strips on the door between this layer and the next which will sandwich the Window Sheet so you won’t see it.  I placed magnets under the inside of the door (under the saying too), so when the card is standing the door won’t flap open. It makes it snap together.
Here is a picture of the other side of the door attached so the Window Sheet is between them:

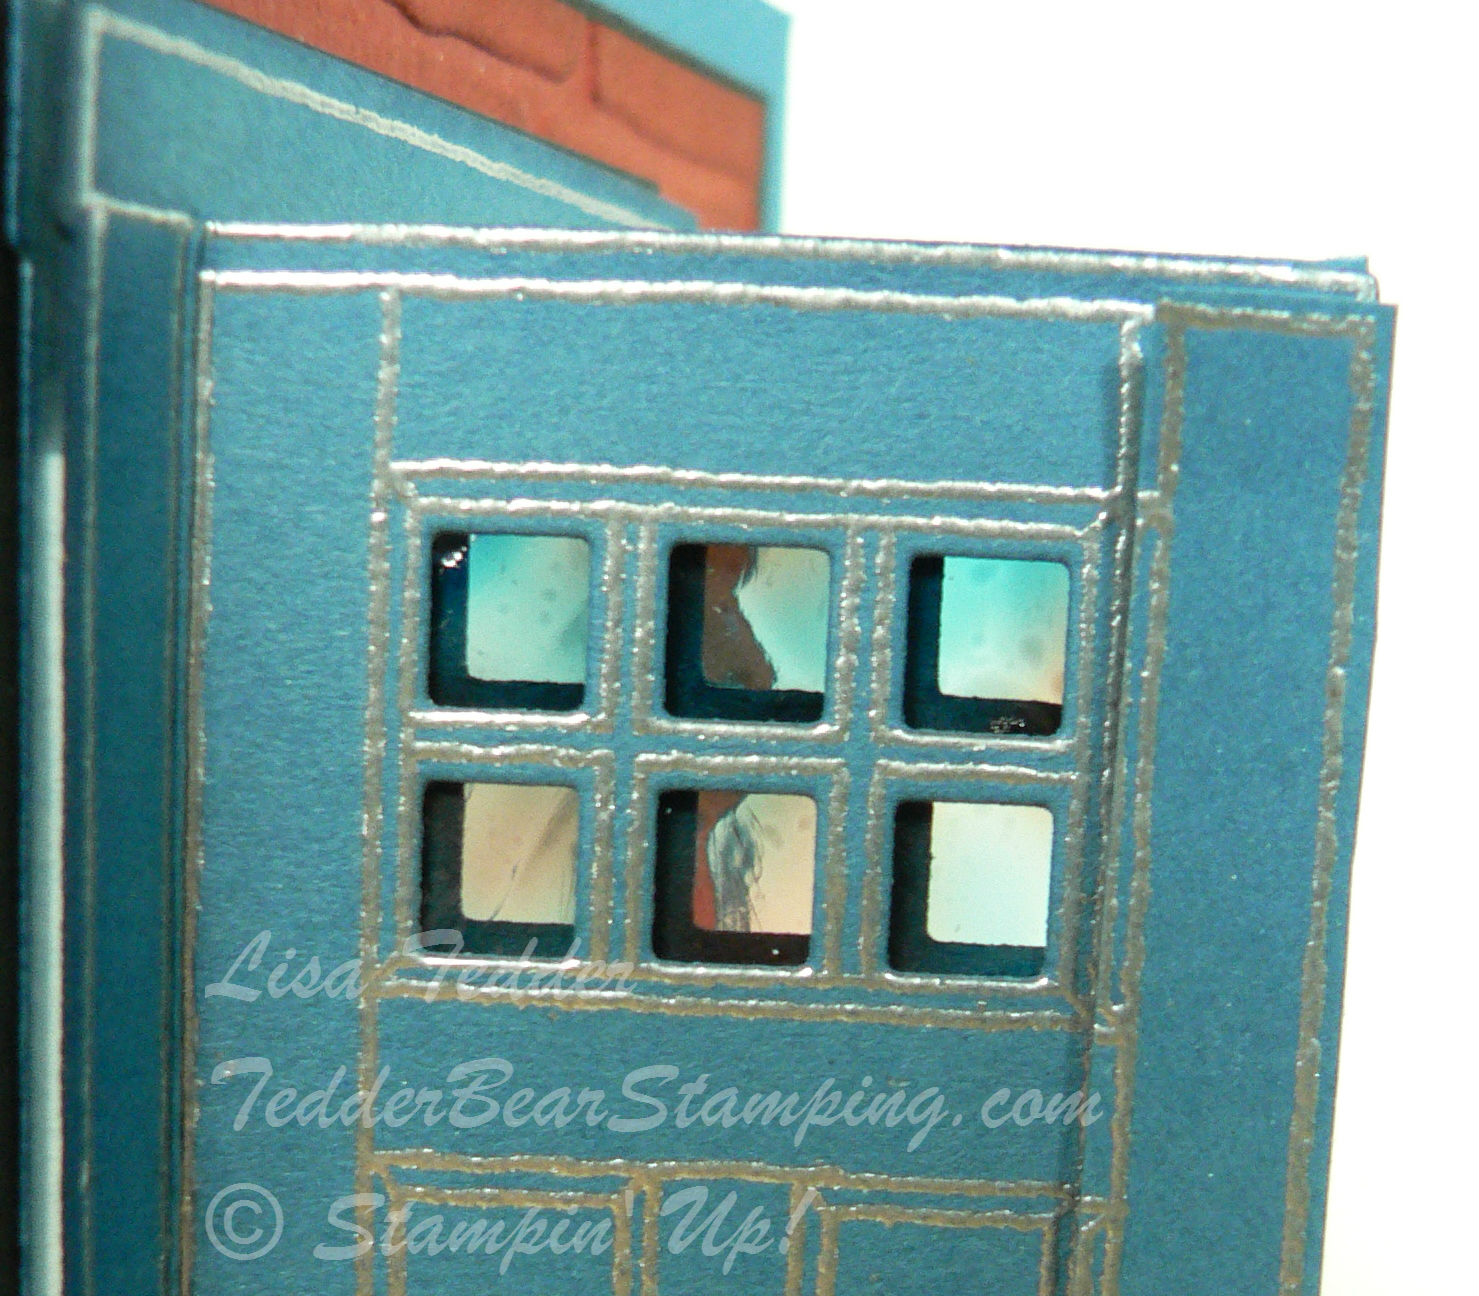
It REALLY looks like Antique glass, right?

Here is a pic of the card:

Can you see the dog and the cat cuddling together?!  I put a piece of ribbon between the door and the ‘sandwich’ so it can’t be seen other than the part I want to help open the door.

Here is the door open:

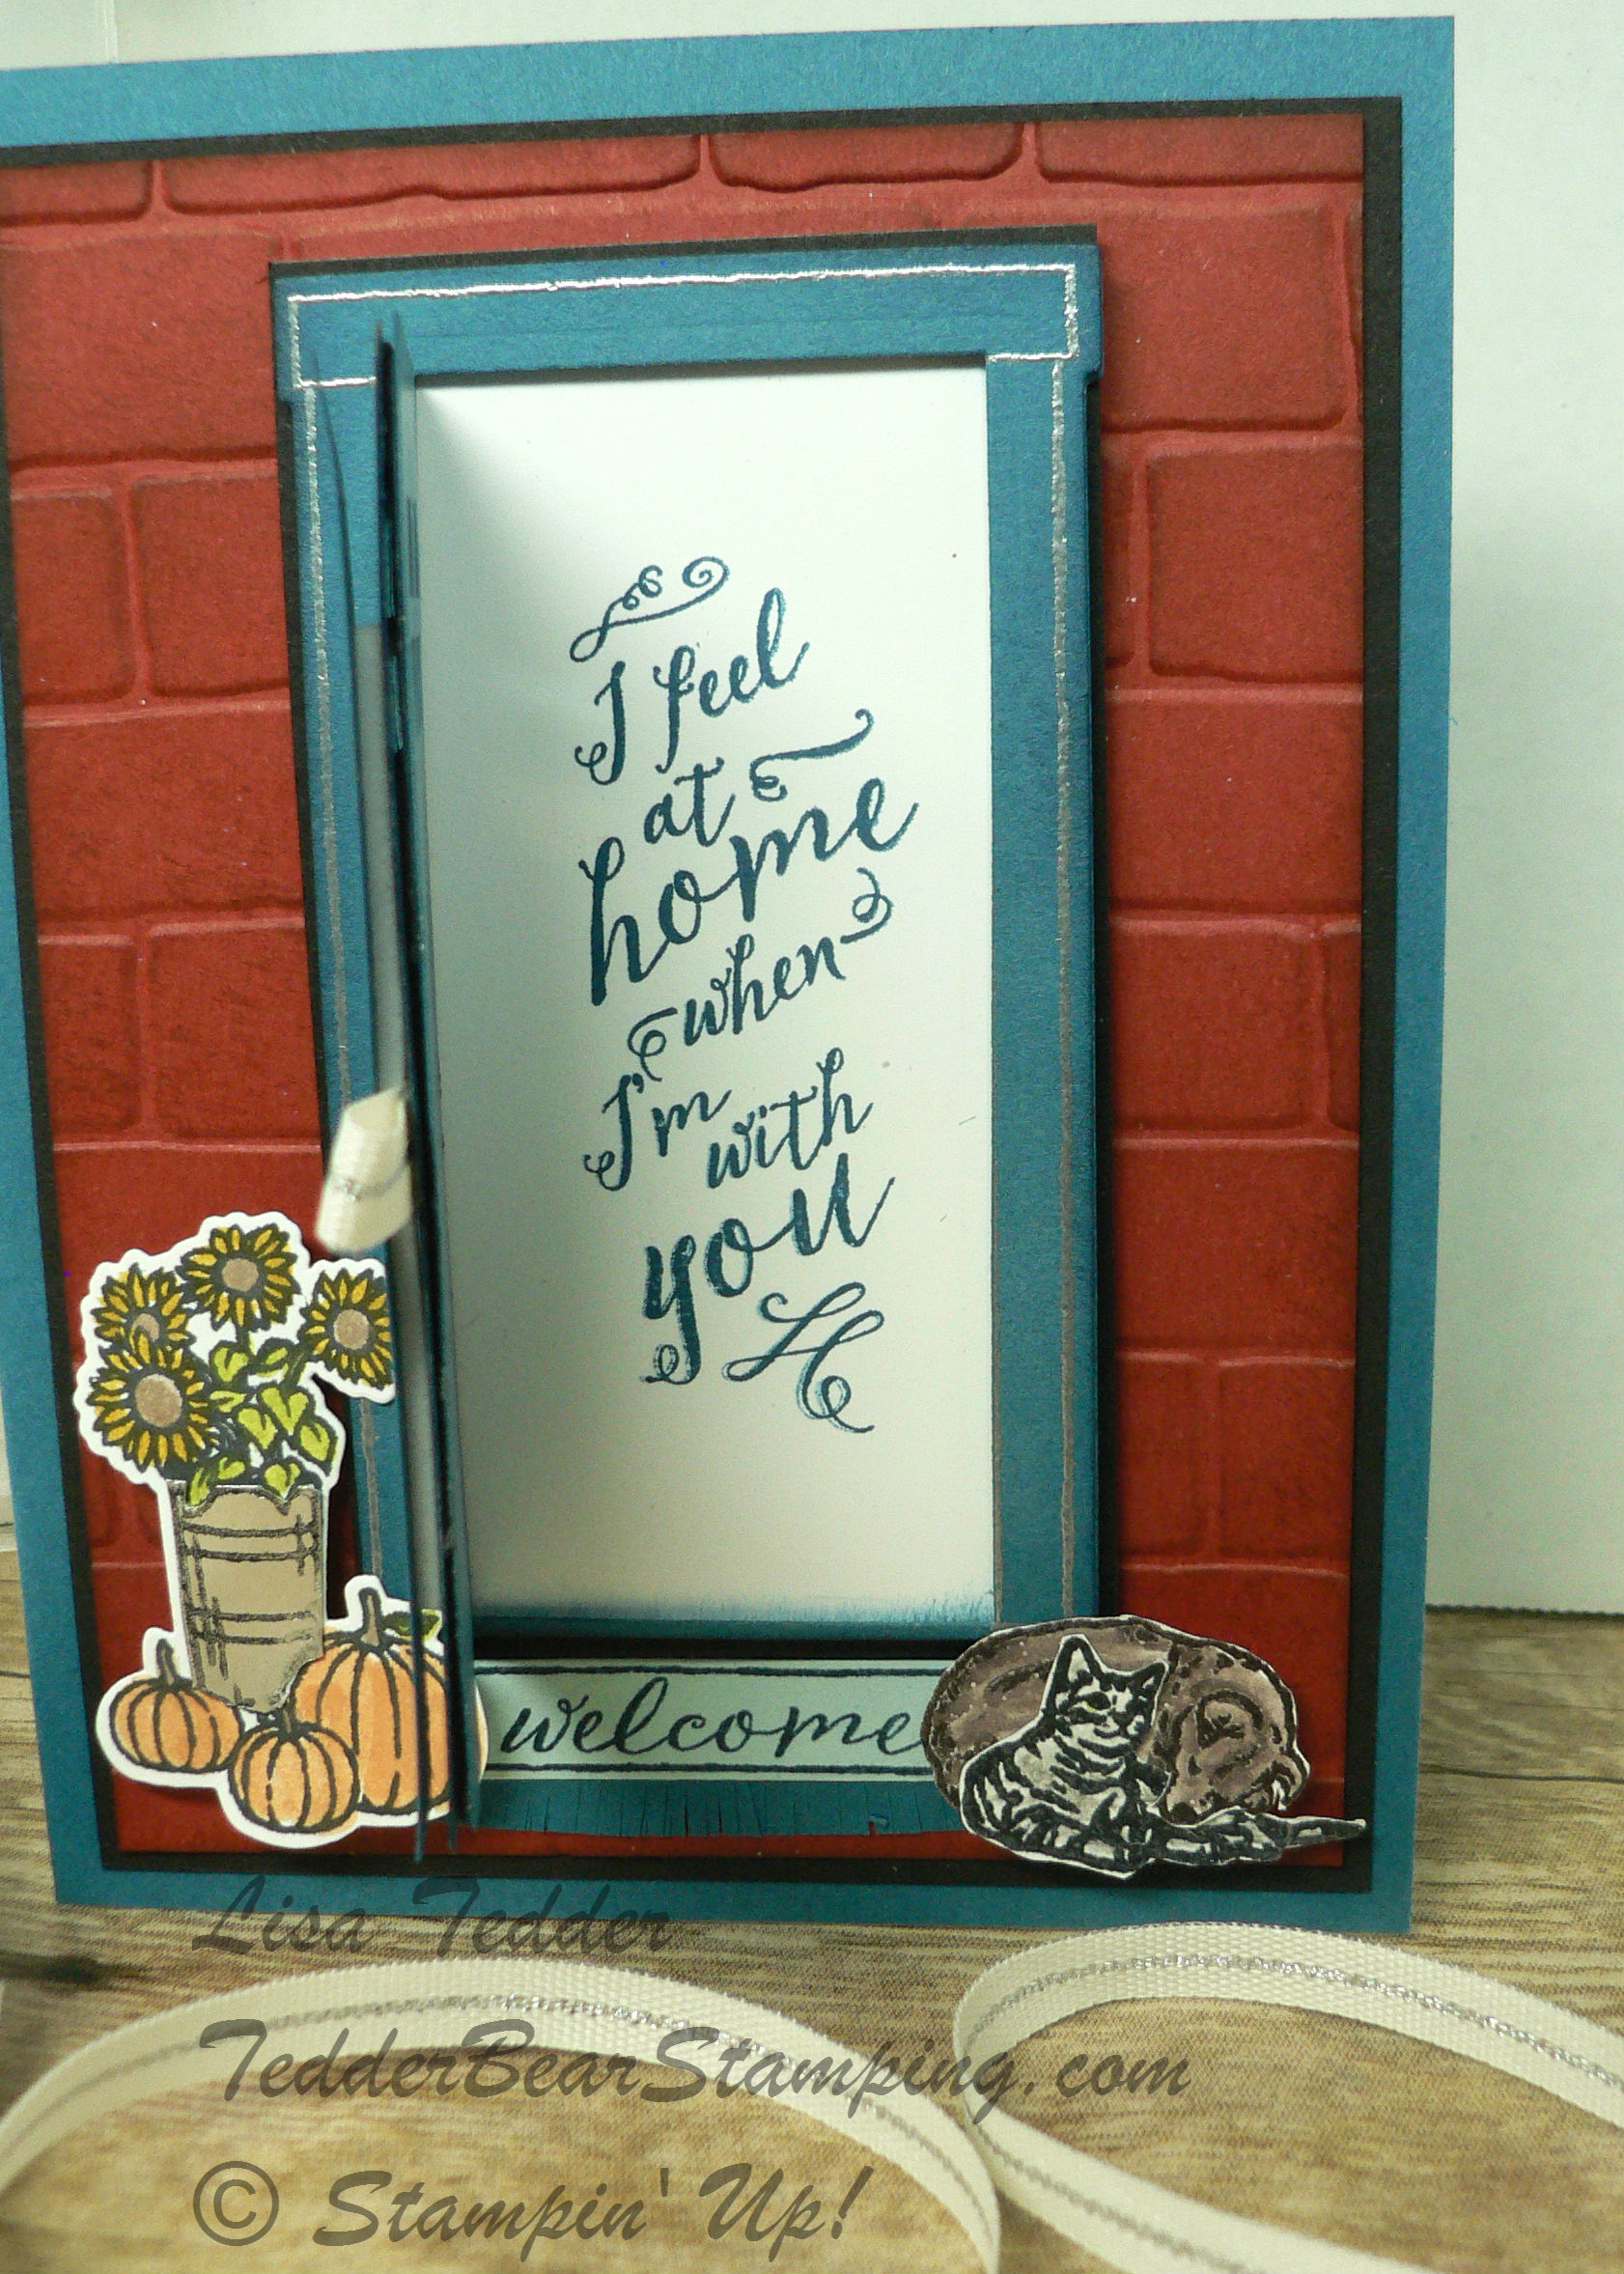
The welcome mat is stamped and then I cut fringes in the layer under it so it looks like a mat!

I would love to hear what you think!  Too much?
Here is a picture of the inside:

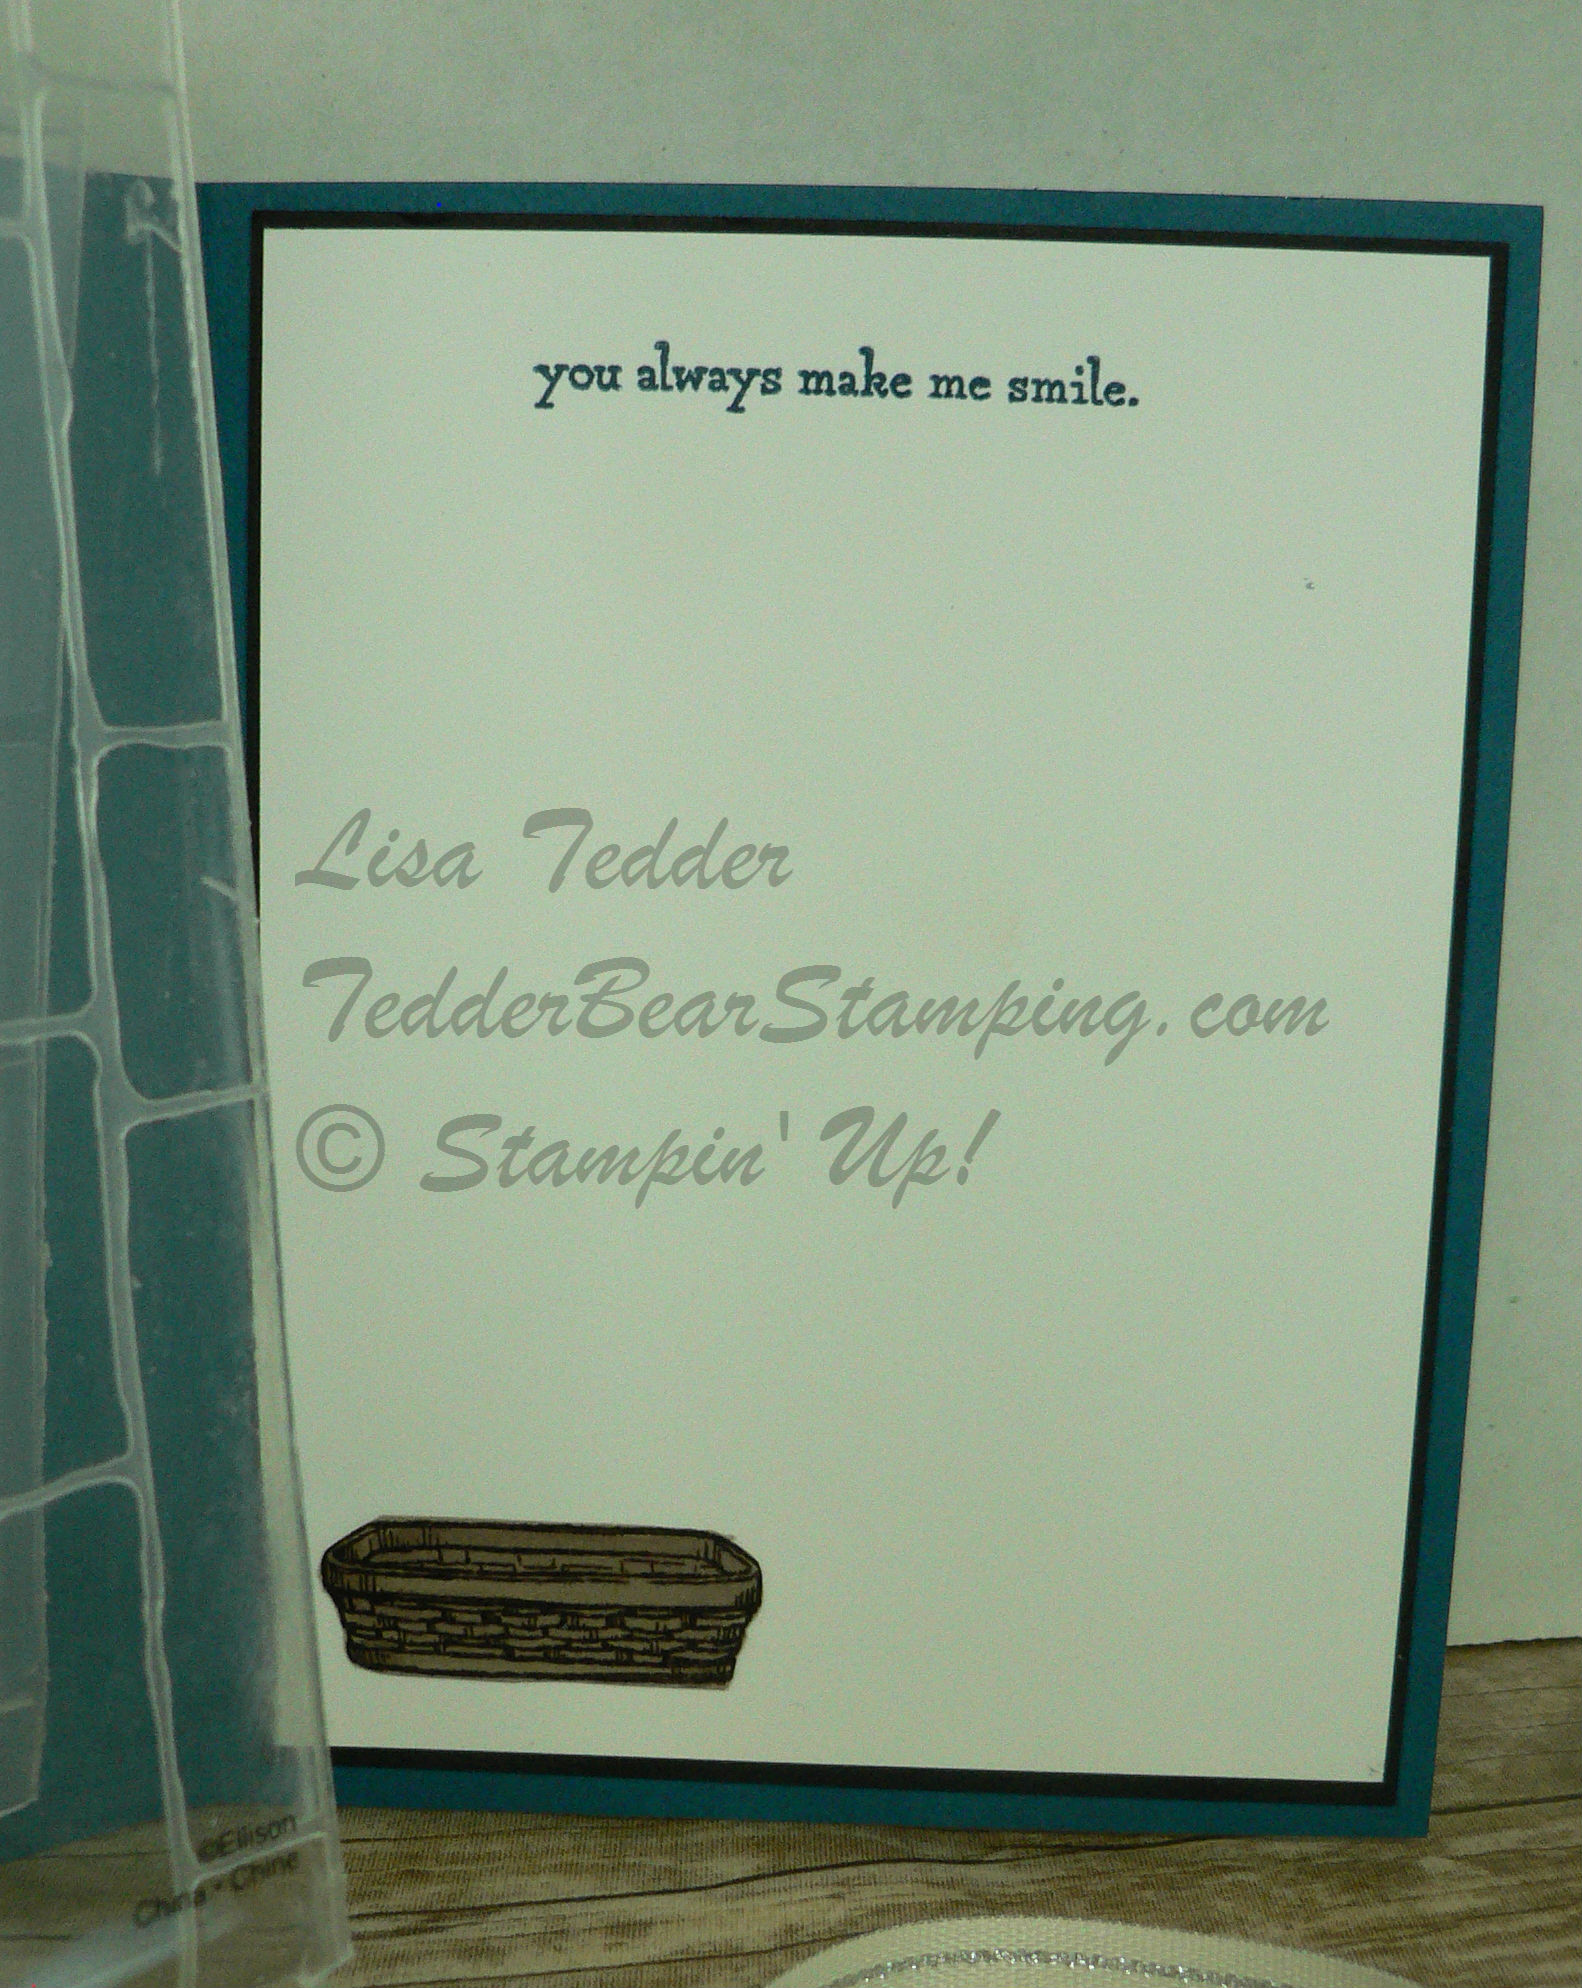
I love the dog basket!!

That’s it for today!!  Hope you liked it!  Subscribe to my blog so you don’t miss anything!!

Don’t forget that I have Blog Candy!!  Here is what you can win:

Just leave a comment here or on my Facebook Page TedderBearStamping, I am doing the drawing on the 15th of May!  Only 3 days left!  Each and Every comment you leave (on any post!) will be counted!  Good Luck!!

Lisa Tedder
TedderBearStamping
A California Girl living in North Carolina

Sneak Peek Eastern Palace Suite and New In Colors

Being a Stampin’ Up! demonstrator is so fulfilling!  I get to meet so many great people, learn new techniques AND I get to pre-order product from the NEW Catalog!  It’s so much fun to be able to not only SEE new product, but I get to buy it and YES play with it before a lot of people!

THAT is worth the price of admission!   LOL  I know that is a saying, but to me it is so exciting!!

Not sure I told you this, but it wasn’t until I was introduced to SU! that I found out that I am creative!  What?!  You could have knocked me over with a feather, to find that out!  But, it’s now something that I don’t ever want to live without!

So, now that I have bored you with my reasoning on why I am a Demonstrator with the best company, I will share with you the card I made with the New stamp set Eastern Beauty:

It’s hard to see in this picture but I used the Sparkle Embossing Folder on the Black Cardstock, it matches the Designer Series Paper Eastern Palace perfectly!  Stampin’ Up! thinks of everything!

The Designer Paper is that beautiful new In Color Lemon Lime Twist, and did you know that Fresh Fig ink goes great with Lemon Lime Twist AND Eggplant Envy!  I also used the Glitter Enamel Dots that go with these colors great!

Here is the inside of the card:

Love, Love, Love this set!  You also can’t see in the picture, but the small flowers on the bottom have a Glue Dot inside the center and then I pushed Dazzling Diamonds into it, they make the perfect circular accent, AND they are Cheap!  lol  And because the Dazzling Diamonds are on them, they aren’t sticky anymore on top!

Again, don’t forget about the Blog Candy that I am offering!

May 15 is the date that I will have the drawing where you may be able to get it for FREE!  I love embossing folders, them give you the best texture and it just makes you want to touch the card!  You get into the drawing, just by commenting on any post here on my blog or on my Facebook Page between now and the 15th!  And there isn’t any limit on how many times you want to comment!  Go back as far as you want on this blog, and comment away!  🙂

I hope, once again, that you have enjoyed my post!  Subscribe to my blog to not miss out on any posts!

Lisa Tedder
TedderBearStamping
A California Girl living in North Carolina!

Product List

Sneak Peek of Stampin’ Up! NEW stamps!

Today I am sharing a NEW stamp set due out in June from SU!, called Colorful Seasons!  I also used the Seasonal Layers Thinlits with it!

Here is what I made:

I want to be sitting in that chair drinking some tea and watching the water go by!  Don’t you?   To make this card look like it was in a frame, I made my own frame out of Soft Sky cardstock from Stampin’ Up!

I also used the stamp set Lovely as a Tree to give the scene some dimension!  I had this card in my head since Friday and I just HAD to try and see if I could get it to come out of my head onto card stock and look just as pretty!  I think I did, what do you think?

Here is a closeup of the flowers in the tree:

I cut out the stamped images using the Thinlit and then with the Berry Blast inked flower I added some of SU!’s Fine Tip Glue so it would make it look puffy and shiny!  Love these new Colors! For the light pink I used the NEW In Color Powder Pink!

Here is a side view of the card so you can see how I made it look framed:

All of the flowers and the branches come off the framed Soft Sky piece of card stock!  I DID add pieces of the Foam Adhesive Strips onto the back of not only the Soft Sky but also each flower, so they wouldn’t get squished down with mailing.  I wanted more space than what the Dimensionals would give me so that’s why I used it.

That adirondack (spelling?) chair is so stinkin’ cute!  Right?  Do you see the glass of ‘tea’ I have sitting there?

Here’s the inside of the card:

I hope to have more ideas for you in the near future, so be sure and subscribe to my blog to not miss out!

I’ve got some NEW Blog Candy to give away!!

It’s the Happy Heart Embossing Folder by SU!   I absolutely love embossing folders, hope you do too!  I will be holding the drawing on May 15th!  How do you get this for FREE!?  You either place a comment here (no limit to how many times) on my blog, or on my Facebook Page (no limit there either!),  That’s it!  How else can you get a Stamp set for FREE!?

Hope you enjoyed my post today and my Sneak Peek!!

Lisa Tedder
TedderBearStamping.com
A California Girl living in North Carolina

Product List

Sneak Peek of NEW Stampin’ Up! stamp sets Eastern Beauty, Eastern Madallions and Colorful Seasons

Today I TRIED to do a Facebook Live, and it came out ok, but I REALLY need to practice more!  hahahaha

I wanted to share with you today TWO/Three NEW sets from SU! that is coming out in June!  The reason I say Two/Three is because I am showcasing a set that has a Thinlit that works with it.  Not sure you would say they are separate sets, but they could be used apart.

The one I am sooooo excited about it Eastern Beauty and Eastern Medallions!  This set is so Versatile!  You can use the stamp set to make ALL kinds of great designs!  I have to still work on seeing what it does, so for now I will be sharing the card I made using the Eastern Medallion thinlits and a few of the stamps!!

Here is the card:

VERY pretty colors, right?  This is made with a lot of the framelits.  The cool thing is that you can mix and match them!  The one on the card that has the popped up part, is usually solid in the middle.  I used one of the other thinlits and placed it in the middle and made it so you can see through it!  Here is a sheet showing the one still attached to the cardstock and the other framelits in the set:


If you want to cut out an image to either put in the center. or cut out a center, you can see this piece leaves just the cutouts that you see:

OR if you want to cut out the image, use the smallest circle from the Layering Circles #141705 and t cuts it out perfectly!

Doesn’t Stampin’ Up! think of everything!  🙂

I started with a 3 3/4″ x 5″ piece of Watercolor Paper and placed a lot of the Thinlits on the Watercolor paper, then added to them, to get the look I wanted.   I then got my Aqua Painter and colored some of the new pretty In Colors on the top of the Water Color Paper, making it as bright and pretty as I could!

I used Wink of Stella to make the paper sparkle and then popped up the piece in the center left by making the edges pull up (the piece doesn’t pop out all the way, just the petal edges).  I placed Dimensionals on the bottom of the entire Piece of Paper and then placed it on  5 1/8″ x 3 7/8″ piece of Copper Foil.  It looks so pretty in person, with the copper peeking out!

I stamped the saying from Eastern Beauty “enjoy today” on the right center and then used clear Embossing powder on it to make it more textural (I LOVE that our inks are wet enough to do this!!)

I used the brand new Glitter Enamel Dots that I got from attending OnStage in Savannah GA!!  If you are a demonstrator one of the MANY perks is that you get to see product before anyone else!  AND if you attend OnStage (which is all over the world!) you can pre-buy certain product before other demos that didn’t attend!  Of course I HAVE to go, so I can see/touch and order new goodies……as I’ve said MULTIPLE times, I am NOT  a patient person!  LOL

For the added touch before putting it onto the Berry Burst Cardstock I wrapped some Copper Thread so it peeks out of the side of the lifted petal and goes around the sentiment!

Here is the inside of the card!

Again, I used the stamps from the Eastern Beauty to adorn the inside!  Well?  Do you like it?

On my Facebook Live Video  New Sneak Peek Stamp sets I also showed another card.  I showed how this one was made, so I will show you the picture and if you want to see it made, go see the video…..just ignore how silly I look/sound/act……..this is what happens when you are not super experienced at it!  HAHAHAHA

I won’t show you the one I tried to make better on the video, because in the long run, I liked this one better!

Here is the inside:

I really love the Copper on the Designer Series Paper (DSP), don’t you?!  And the leaf in Copper looks so pretty on the inside!

If you live in the USA, I would LOVE to have you be a part of my Team!  You can sign up under me, get a discount, get to attend SU! functions, order product early and get to meet the BEST people!  What can be better than getting paid to do what you love to do!?

Check back in with me, I’ll be posting more retiring ideas AND new product!  Subscribe both to my blog and to my Newsletter and you won’t miss anything!

Lisa Tedder
TedderBearStamping
A California Girl living in North Carolina