Tag Archives: Granny Apple Green 8-1/2″ X 11″ Cardstock

More Free Cards if you purchase Painted Poppies

Hey Guys!

Here I am again! Are you ready to see a card I made using the Stampin’ Up! stamp set Painted Poppies? First, let me tell you that I have been challenged by SU! to sell a certain number of Painted Poppies. Second, I am really not thinking this is much of a Challenge since this set is STINKIN’ CUTE!

But, since this IS a challenge I thought I would add some incentives to purchase from me! So, I am offering 3 cards if you just buy the set AND 5 cards if you purchase the bundle. The class is FREE! You’ve already seen ONE of the cards, and I am here today to share with you a second card. Stay tuned throughout this week and next to see the others!

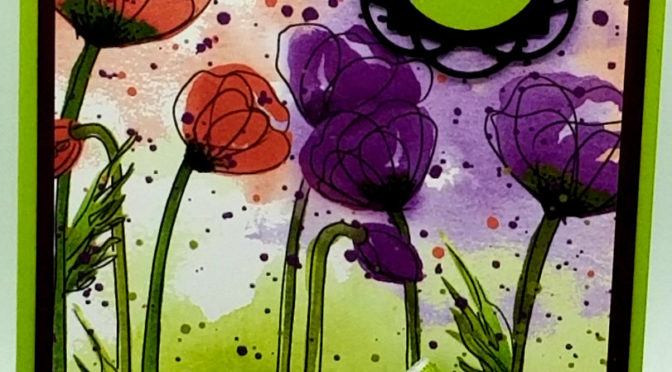
Here is my favorite that we are doing:

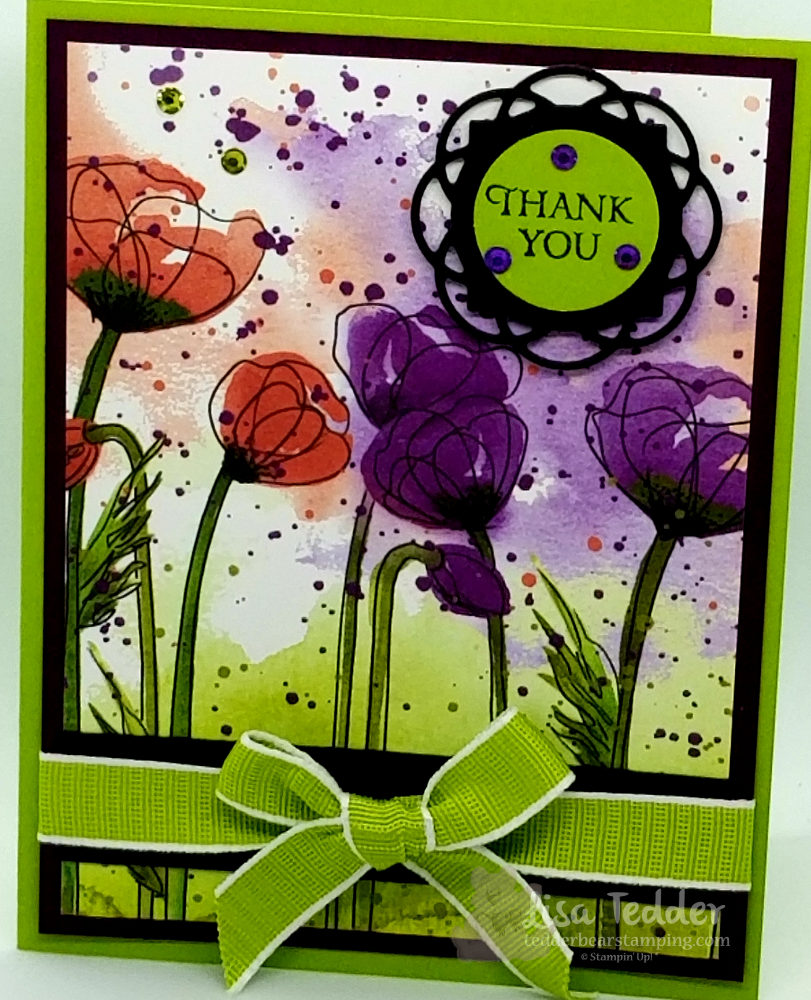
Isn’t this stunning?! It is a very simple card, but boy, does it pack a punch! I used one of the dies from the set, to make the swirly circle-ish image for the sentiment to sit on. Are you like me? Do you LOVE seeing things like this! I hope so, because my card for tomorrow has even more fabulousness! Is that a word, or did I just make it up!? Since the DSP has Granny Apple Green in it, this was perfect for my Granny Apple Green Ribbon. I also added the same color green for my Rhinestones, plus some Highland Heather Rhinestones. It’s like SU! made this paper just for the sparkly add ons!

Knowing that you like to have the specifics for the cards I post, here it is!

Stamps:
Painted Poppies
Honey Bee
So Sentimental (for inside)

Inks:
Memento Black
Granny Apple Green & Highland Heather Markers

Paper:
Granny Apple Green 8 1/2″ x 5 1/2″, 1″ circle
Blackberry Bliss 5 1/4″ x 4″, 1/2″ x 3 3/4 (for inside)
Peaceful Poppies DSP 5″ x 3 3/4″, 1/4″ x 3 3/4″ (for inside)
Basic Black scrap for swirly cut out for sentiment (die), 3 3/4″ x 3/4″ (for under ribbon)
Whisper white 5″ x 3 /4″

Misc:
Granny Apple Green ribbon
Noble Peacock Rhinestones
Dimensionals

Here is a picture of the inside:

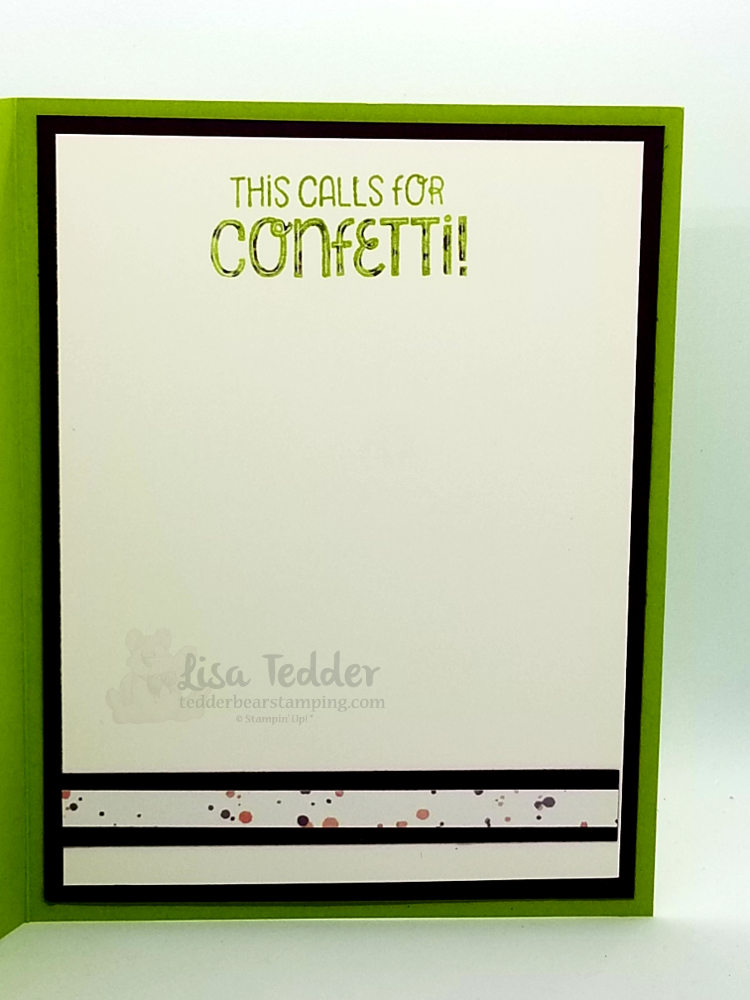
Since I love the sentiment so much, here is a close up of it!:

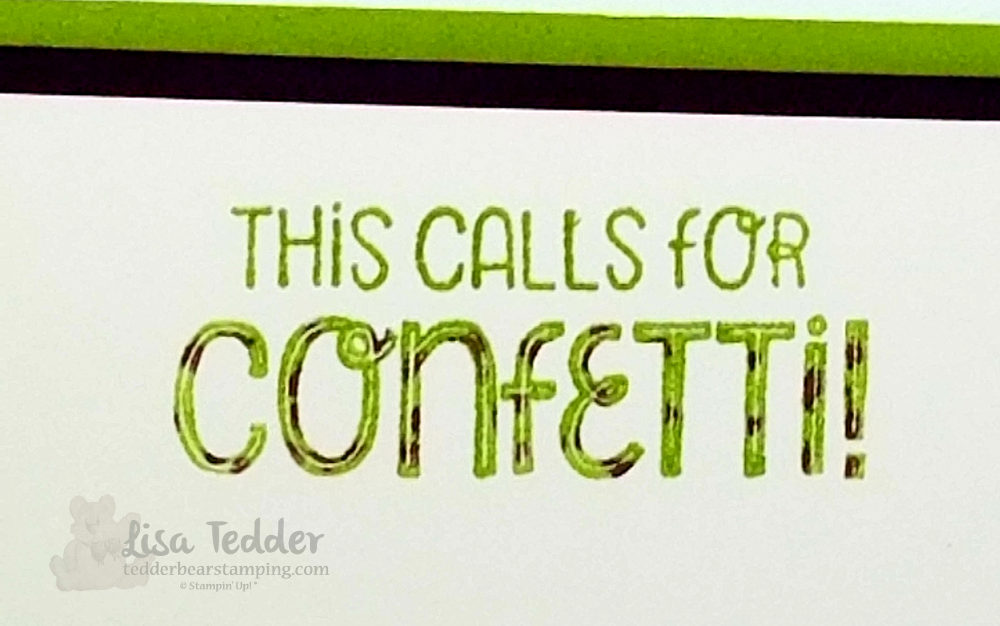
To do this, I inked up the stamp with Granny Apple Green. Then I dotted the last word with a Blackberry Bliss Marker, huffed on it, since it dries a little when coloring and stamped it. Didn’t it turn out so cute! I was so tickled that I made ‘confetti’ on my stamp! I’m such a goober! 🙂

The strip at the bottom is a piece of the DSP mounted on a black strip. Perfect touch if you ask me!

Hope you have enjoyed today’s post! If you are interested in getting this class in the mail, or in person let me know! I live in the US and if you are looking for a Demonstrator I would love to help you find your creativity!

Below you will see, in picture form all the supplies needed for this card. Click on any of them and you will be taken to my OnLine Store. Any purchase you make from me, you will receive 40 +/- tutorials! Each month I have new tutorials, so feel free in continuing to purchase from me, you will love the tutorials!

Lisa Tedder
A California Girl living in North Carolina

Product List

Simple any occasion no stamp card

Hey Guys!

Today I thought I would share with you a card that is elegant and no stamping was used.  What?!  I know, what in the world am I doing NOT having stamps?  It just happened that way and I didn’t really notice until I was done.

I used the Delightfully Detailed Laser Cut Paper.  I really didn’t have any ideas on how to use it, but fell in love with it!  Here is my card:

The Leaf pattern going down the side is normally white, but I sponged it Granny Apple Green so it would pop on the card and show up on the White frame.

Here are the specifics for this card:

Paper
Blackberry Bliss 8 1/2″ x 5 1/2″, 5 1/8″ x 3 7/8″
3 7/8″ x 2 7/8″
Whisper White 4 1/8″ x 5 3/8″, 3 7/8″ x 2 7/8″, 5 1/4″ x 4
Granny Apple Green 4 3/8″ x 3 3/8″
Copper Foil 3″ x 4″
Inks
Versamark
Granny Apple Green
Accessories
Delightfully Detailed cut outs
Leaves Trinkets
Wink of Stella
Layered Leaves Folder
sponge Brayer/Dimensionals/Glue dots

You can’t see it on the card, but I went over the Laser cut outs with Wink of Stella, it adds to the elegance of the card.

All the supplies are listed below, click on any picture to be taken to my OnLine Store!  All OnLine orders receive a gift from me!

If you are in need of a Stampin’ Up! Demonstrator, I would love it if you would choose me!  Or if you are thinking of joining SU!, please consider joining my Team!

Thank you for stopping by!  Hope you stop by again soon!

Lisa Tedder
A California girl living in North Carolina

Product List

My Favorite ‘Holiday’ Halloween!

Hey Guys!

I say I love Halloween, but what do I love about it?  I love making scrapbook pages!  That’s it!  Well, I love the candy too.  heehee

Instead of making a page (I’ll do that too, I’m sure), I decided to make a card.  This was so much fun!!  If you want to watch me make it, go here to see my video!

I’m so happy that SU! has Blends (Alcohol Markers) in black now!  It sure makes coloring things easier.   This little witch is so cute, of course she is a good one!  Her kitty is too cute, love the expression.

I wanted to have a card the opens a little differently.  I die cut the sentiment tags using a die from Still Night stamp set.  The one in Gorgeous Grape is the size of the die.  I put the die through twice for the Granny Apple Green and Whisper White, to make it smaller. If you put the die over the long one, line it up so the middle is along the lines of the die, you can cut it as small as you want.  It gives it a very nice edge.  Underneath the Sentiment attaching to the other side is a small piece of Dual Lock.  It works like Velcro, but MUCH better for paper since it won’t pull too hard, it snaps into place.  Check out my video to see how it works!

The inside is super clean:

Don’t these colors go well together?  I hope you like my Halloween card!  I had a blast making it!

Below are pictures of all the supplies used for this project.  Click on any picture to be taken to my OnLine Store.

Thanks for stopping by!

Lisa Tedder
A California girl living in North Carolina
Product List