Welcome to the North Carolina Blog Hop! Or as we call it: NCDemos! If you ever want to be a part of the best group, join Stampin’ Up! and live in North Carolina! We get together Quarterly and have the best time!!
Today I am sharing with you The Stamp set from Stampin’ Up! called You Move Me! This set at first glance isn’t all that exciting, BUT when you see the card in action, you can’t help but get excited!!
I am sharing with you a video that shows the card in action!
Isn’t that fun!!?
I used the Mini Treat Bag thinlit with the New Powder Pink cardstock! Berry Blast was used as an accent color! I also used the Pick a Pattern Washi Tape at the top of the Whisper White insert
(5 1/4″ x 3 1/2″). This card is super easy once you cut out the Mini Treat Bag, just cut out the shutter part before you put it together! Then stamp the Hummingbird image using two colors of inks ( I used Fresh Fig) full strength on the bigger image, and then used Fresh Fig on the smaller image (line up head and tail!) but stamped off so I got a lighter color! I thought it would be MUCH harder to do! It’s always great when things are easier than they look!
I also used the Fresh Fig Ribbon at the top to help in the pulling up of the inside!
Blog Candy is available if you comment here on my blog (anywhere as many times as you want!), FaceBook, Twitter or Instagram! That’s all you have to do to be in the drawing (held July 4th), that’s a pretty easy way to earn free goodies!!
This is what you will be in the drawing for:
You can’t beat FREE!!
Below are pictures of all the product that was used for this project, just click on any image and you will be taken to my Online Store! When you purchase from me you will be sent a handmade card and a small thank you gift!
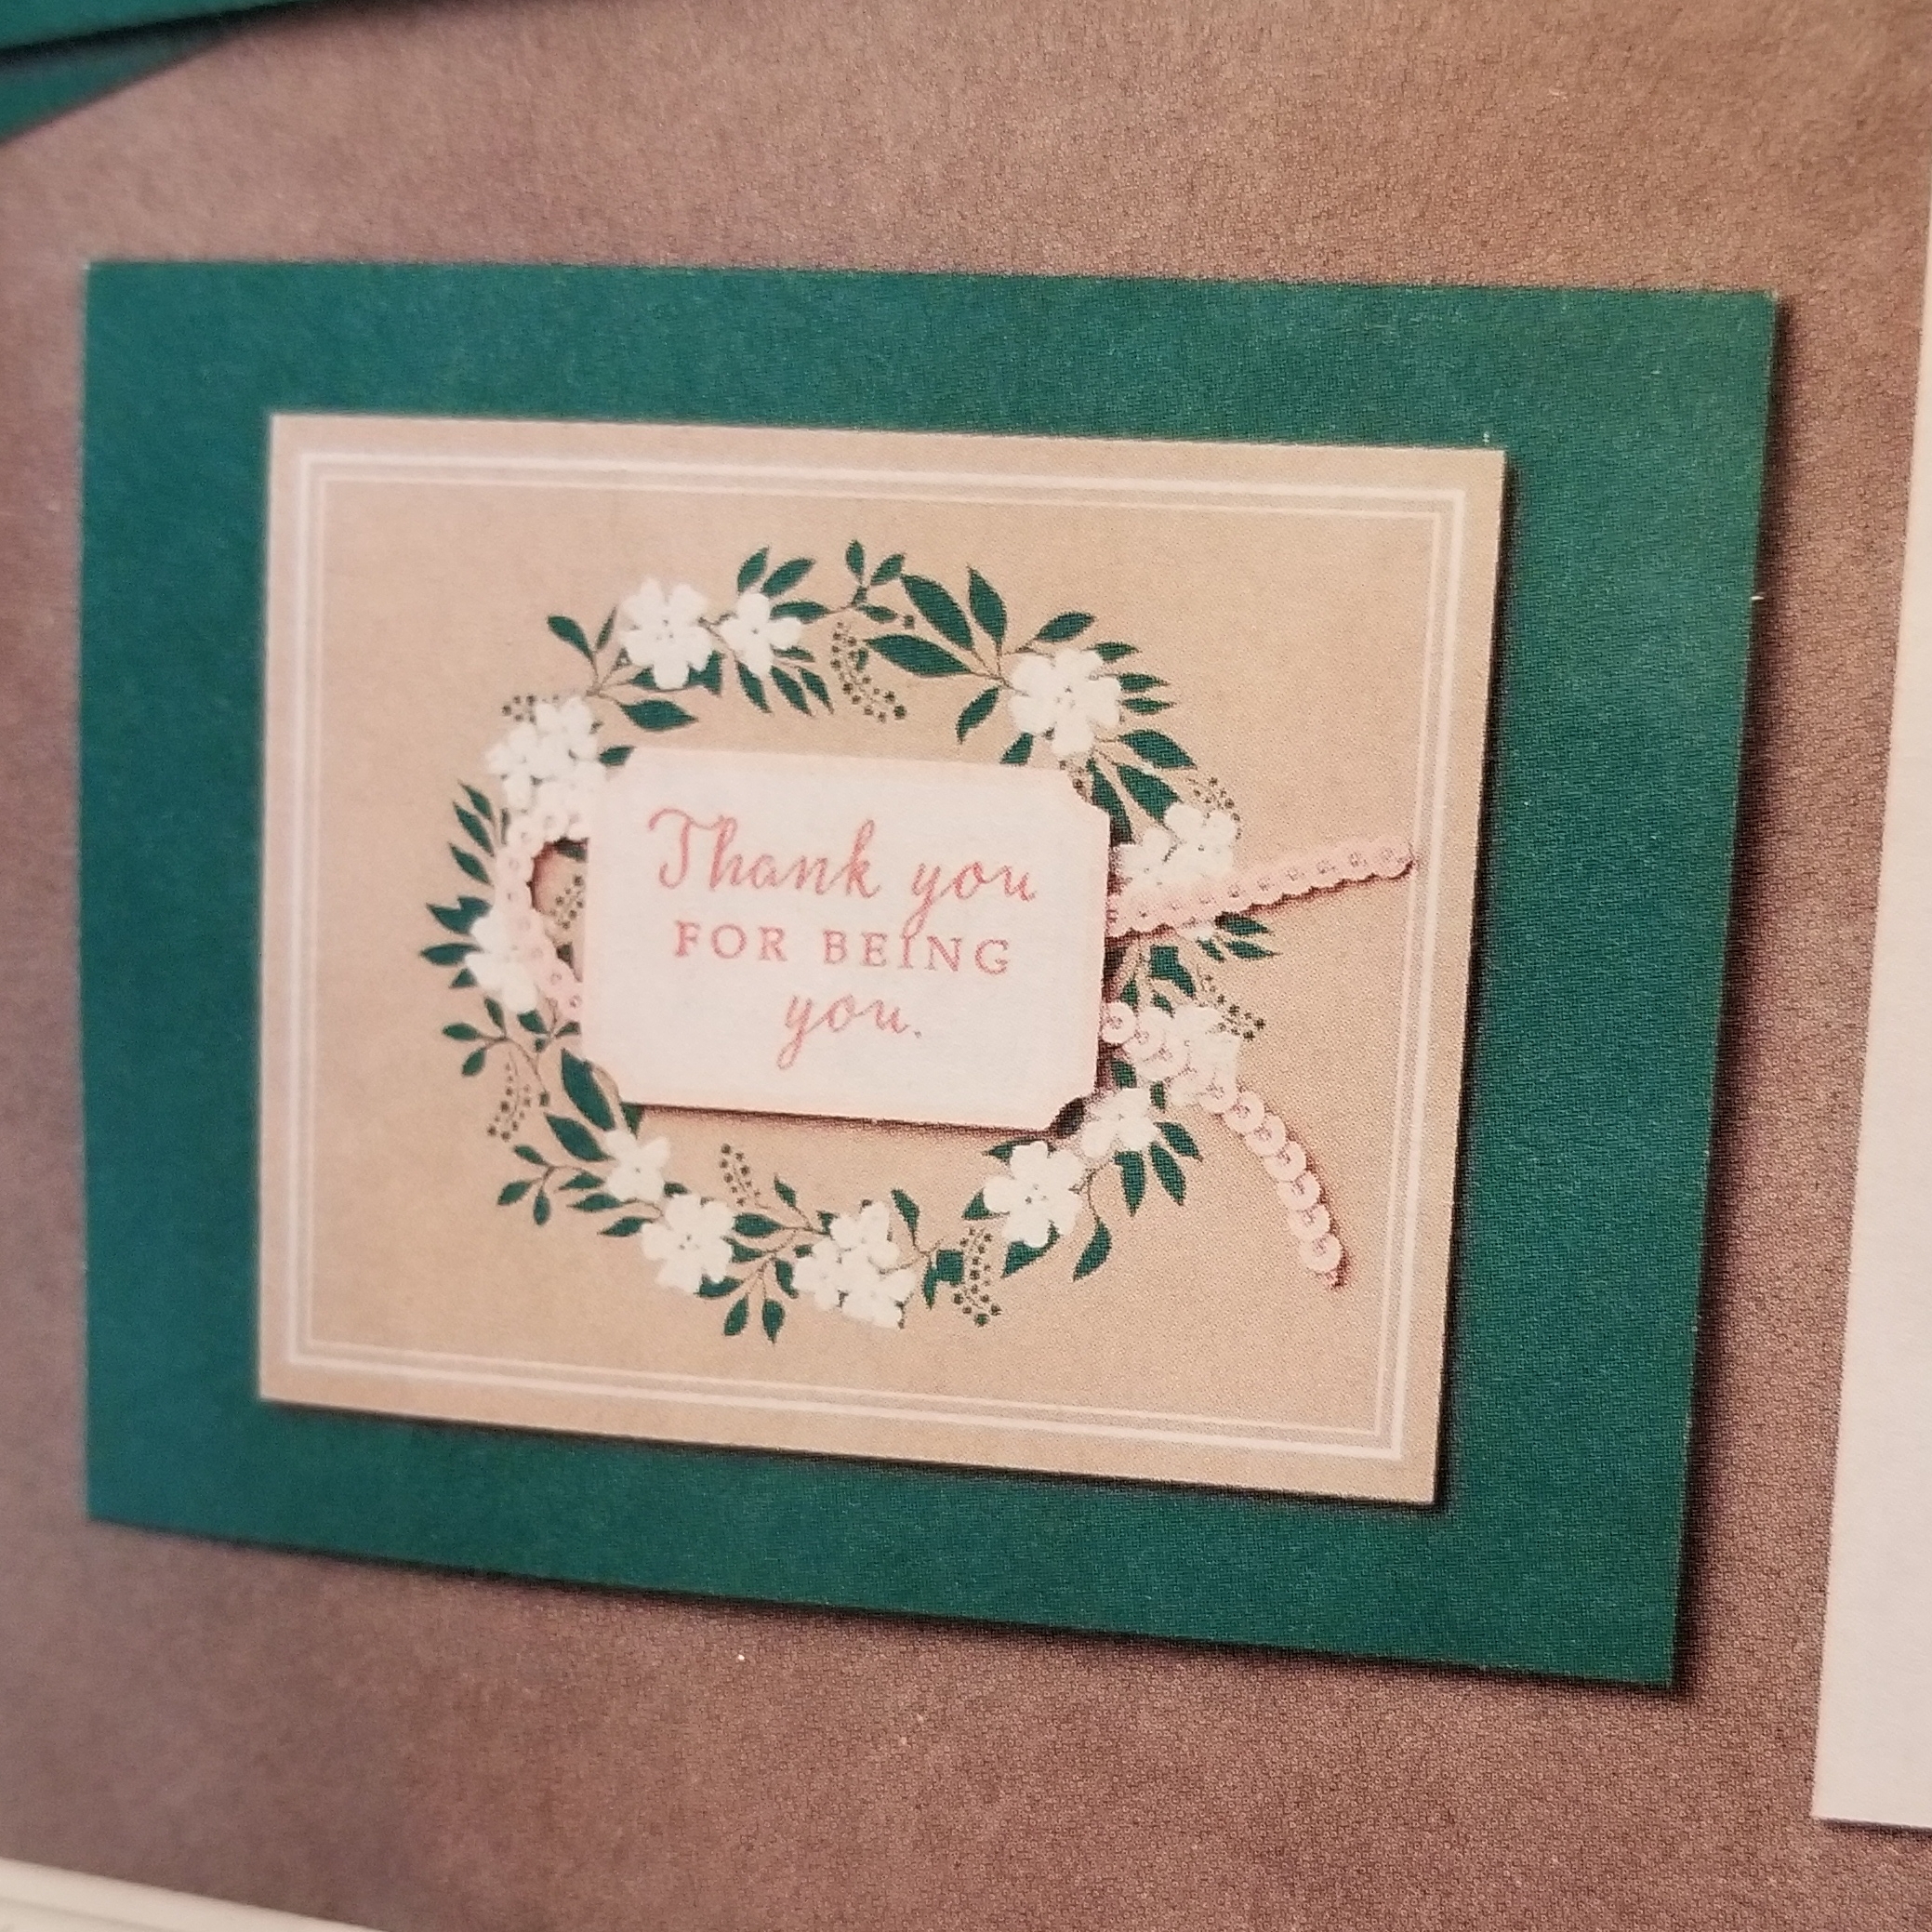
The card I am sharing with you today is from the stamp set Hello Friend! I shared this card with you last time:
I, once again, looked in the Catalog for Inspiration! This is the image that struck me as something I wanted to try:
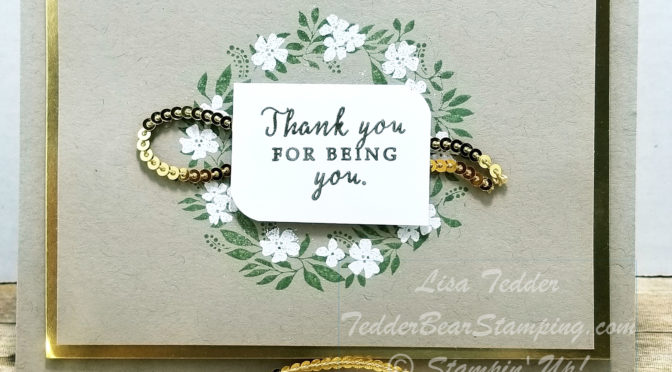
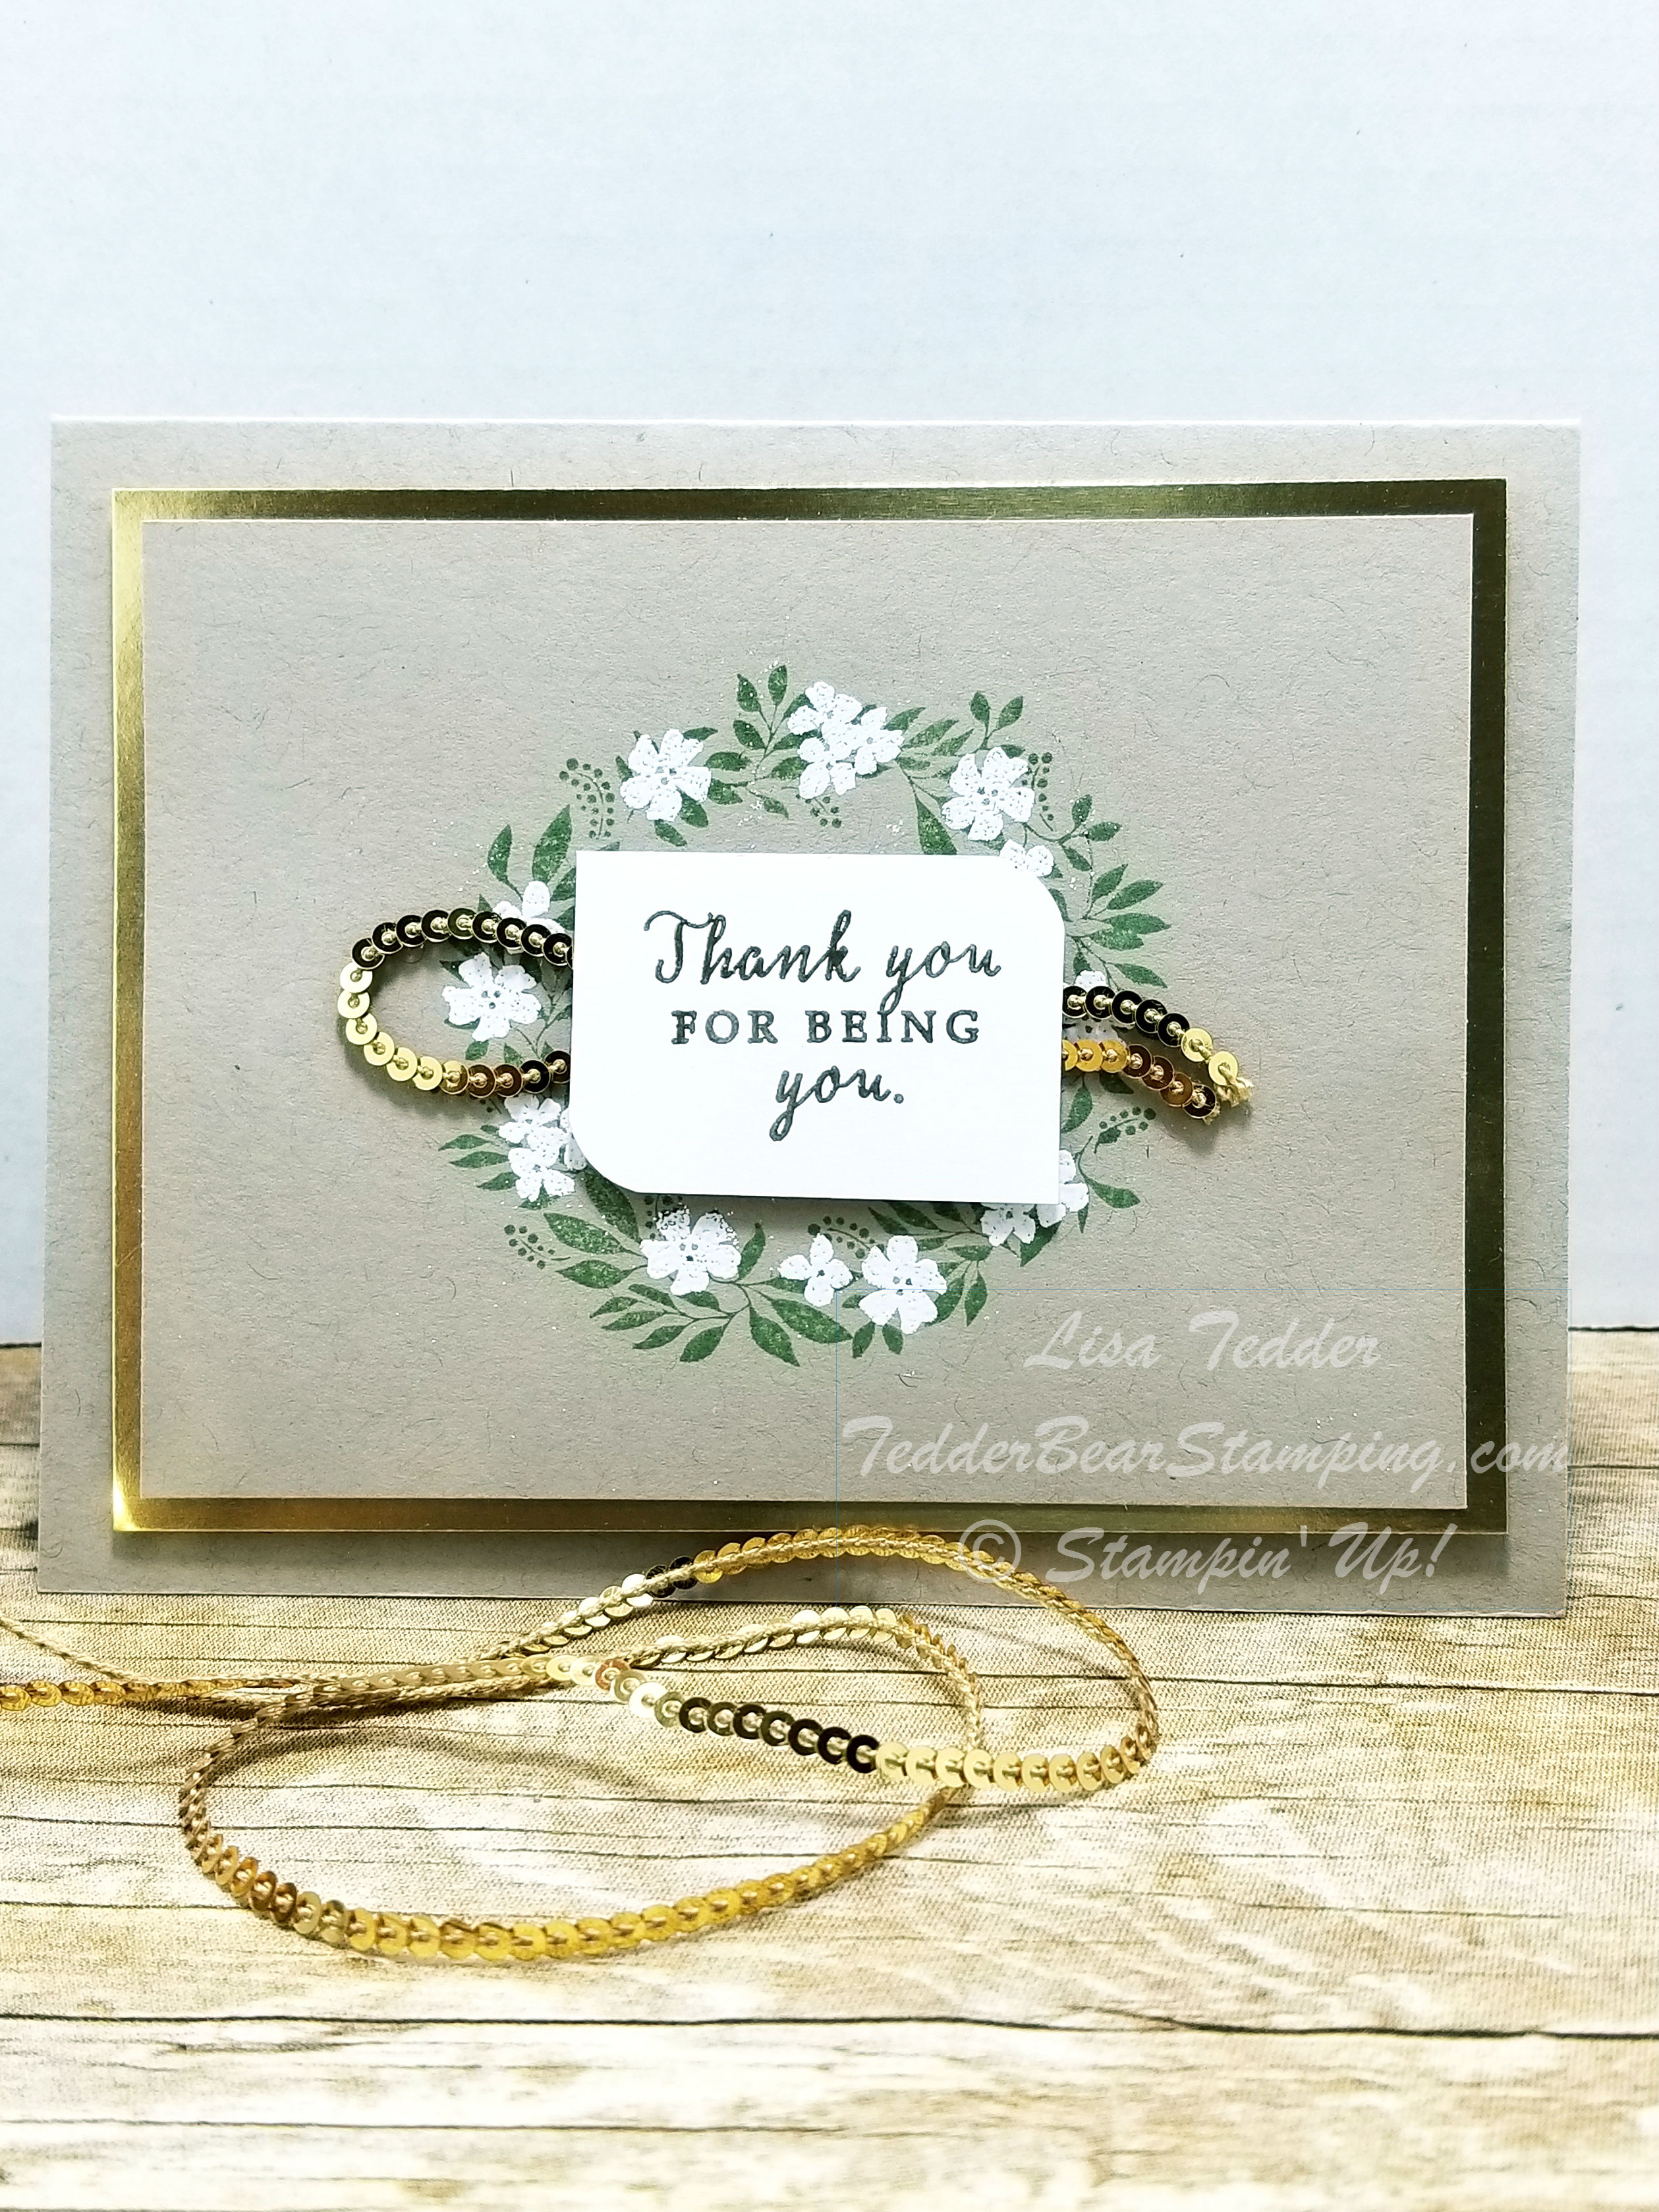
This is using the kit on page 16 & 17: Hello Friend Heat Embossing Project Kit. I don’t have the kit……….yet, but have the stamp set and wanted to give this a try. I DID have the Gold mini sequins! Those are just too stinkin’ cute!! I was giggling when I got them! It doesn’t take much (in the card making world) to make me happy!
I didn’t have the kit, but I loved the way the wreath looked on Crumb Cake, so I was using that. I wanted a lighter green (than pictured) so I used Wild Wasabi as my green. LOVE how the flowers are so white so I wanted to use Versamark and White Embossing Powder. Here is what my card looks like:
Isn’t it pretty? And not too many steps, sometimes simplicity is the best way to go!!
The sentiment is on Whisper White 1 3/4″ x 1 1/4″, then I used the Envelope Punch Board to round two opposite corners, to give a really pretty look! I popped this up with dimensions after putting some adhesive on the card in the middle of the Wreath and laid down the Gold Mini sequin ribbon. The ribbon is free to move on both ends, only the middle is stuck down.
The Gold Foil Paper is 5″ x 3 3/4″, but I cut around the inside edges to make a frame since you can’t see it and I didn’t want to waste any of it!! The top Crumb cake is 4 3/4″ x 3 1/2″.
Easy but definitely stunning! In person, it’s even better!!
I have blog candy that I’m giving away too! Here is what you can win:
To be in on the drawing on July 4th all you need to do is comment here on my blog, any post! Or comment on my Facebook page, Instagram, or Twitter! I will put all the names into a Random Name Generator and I will announce the winner! Who doesn’t want something free for just posting nice things?!!
Once again, I hope you have enjoyed this post as much as I enjoyed making it! Please subscribe to my blog so you won’t miss out on my posts in the future!
The pictures of the products used will be below, just click on any picture and you will be taken to my Online Store! If you purchase from me, you will receive a handmade card from me plus a little than you gift!
Until next time,
Lisa Tedder
TedderBearStamping.com
A California Girl living in North Carolina
I bought the new stamp set from Stampin’ Up! called Hello Friend because it looked like it would be a fun stamp set to use! I was NOT disappointed!
I went out on Pinterest to see what others have done with this set, and you know what? NOTHING was out there! So, what is a girl to do? I checked out the SU! catalog, that’s what I did! And you know what, they had the BEST idea in there! Here’s what they have:
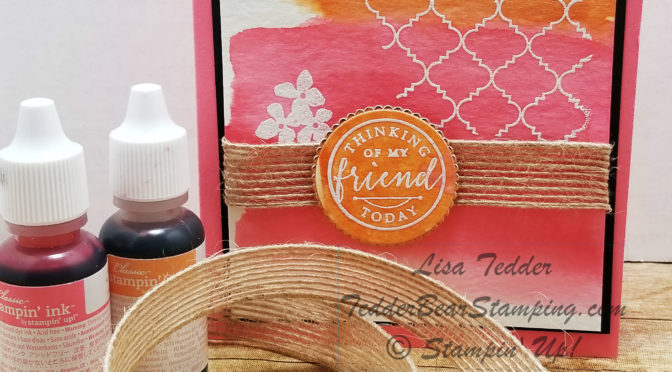
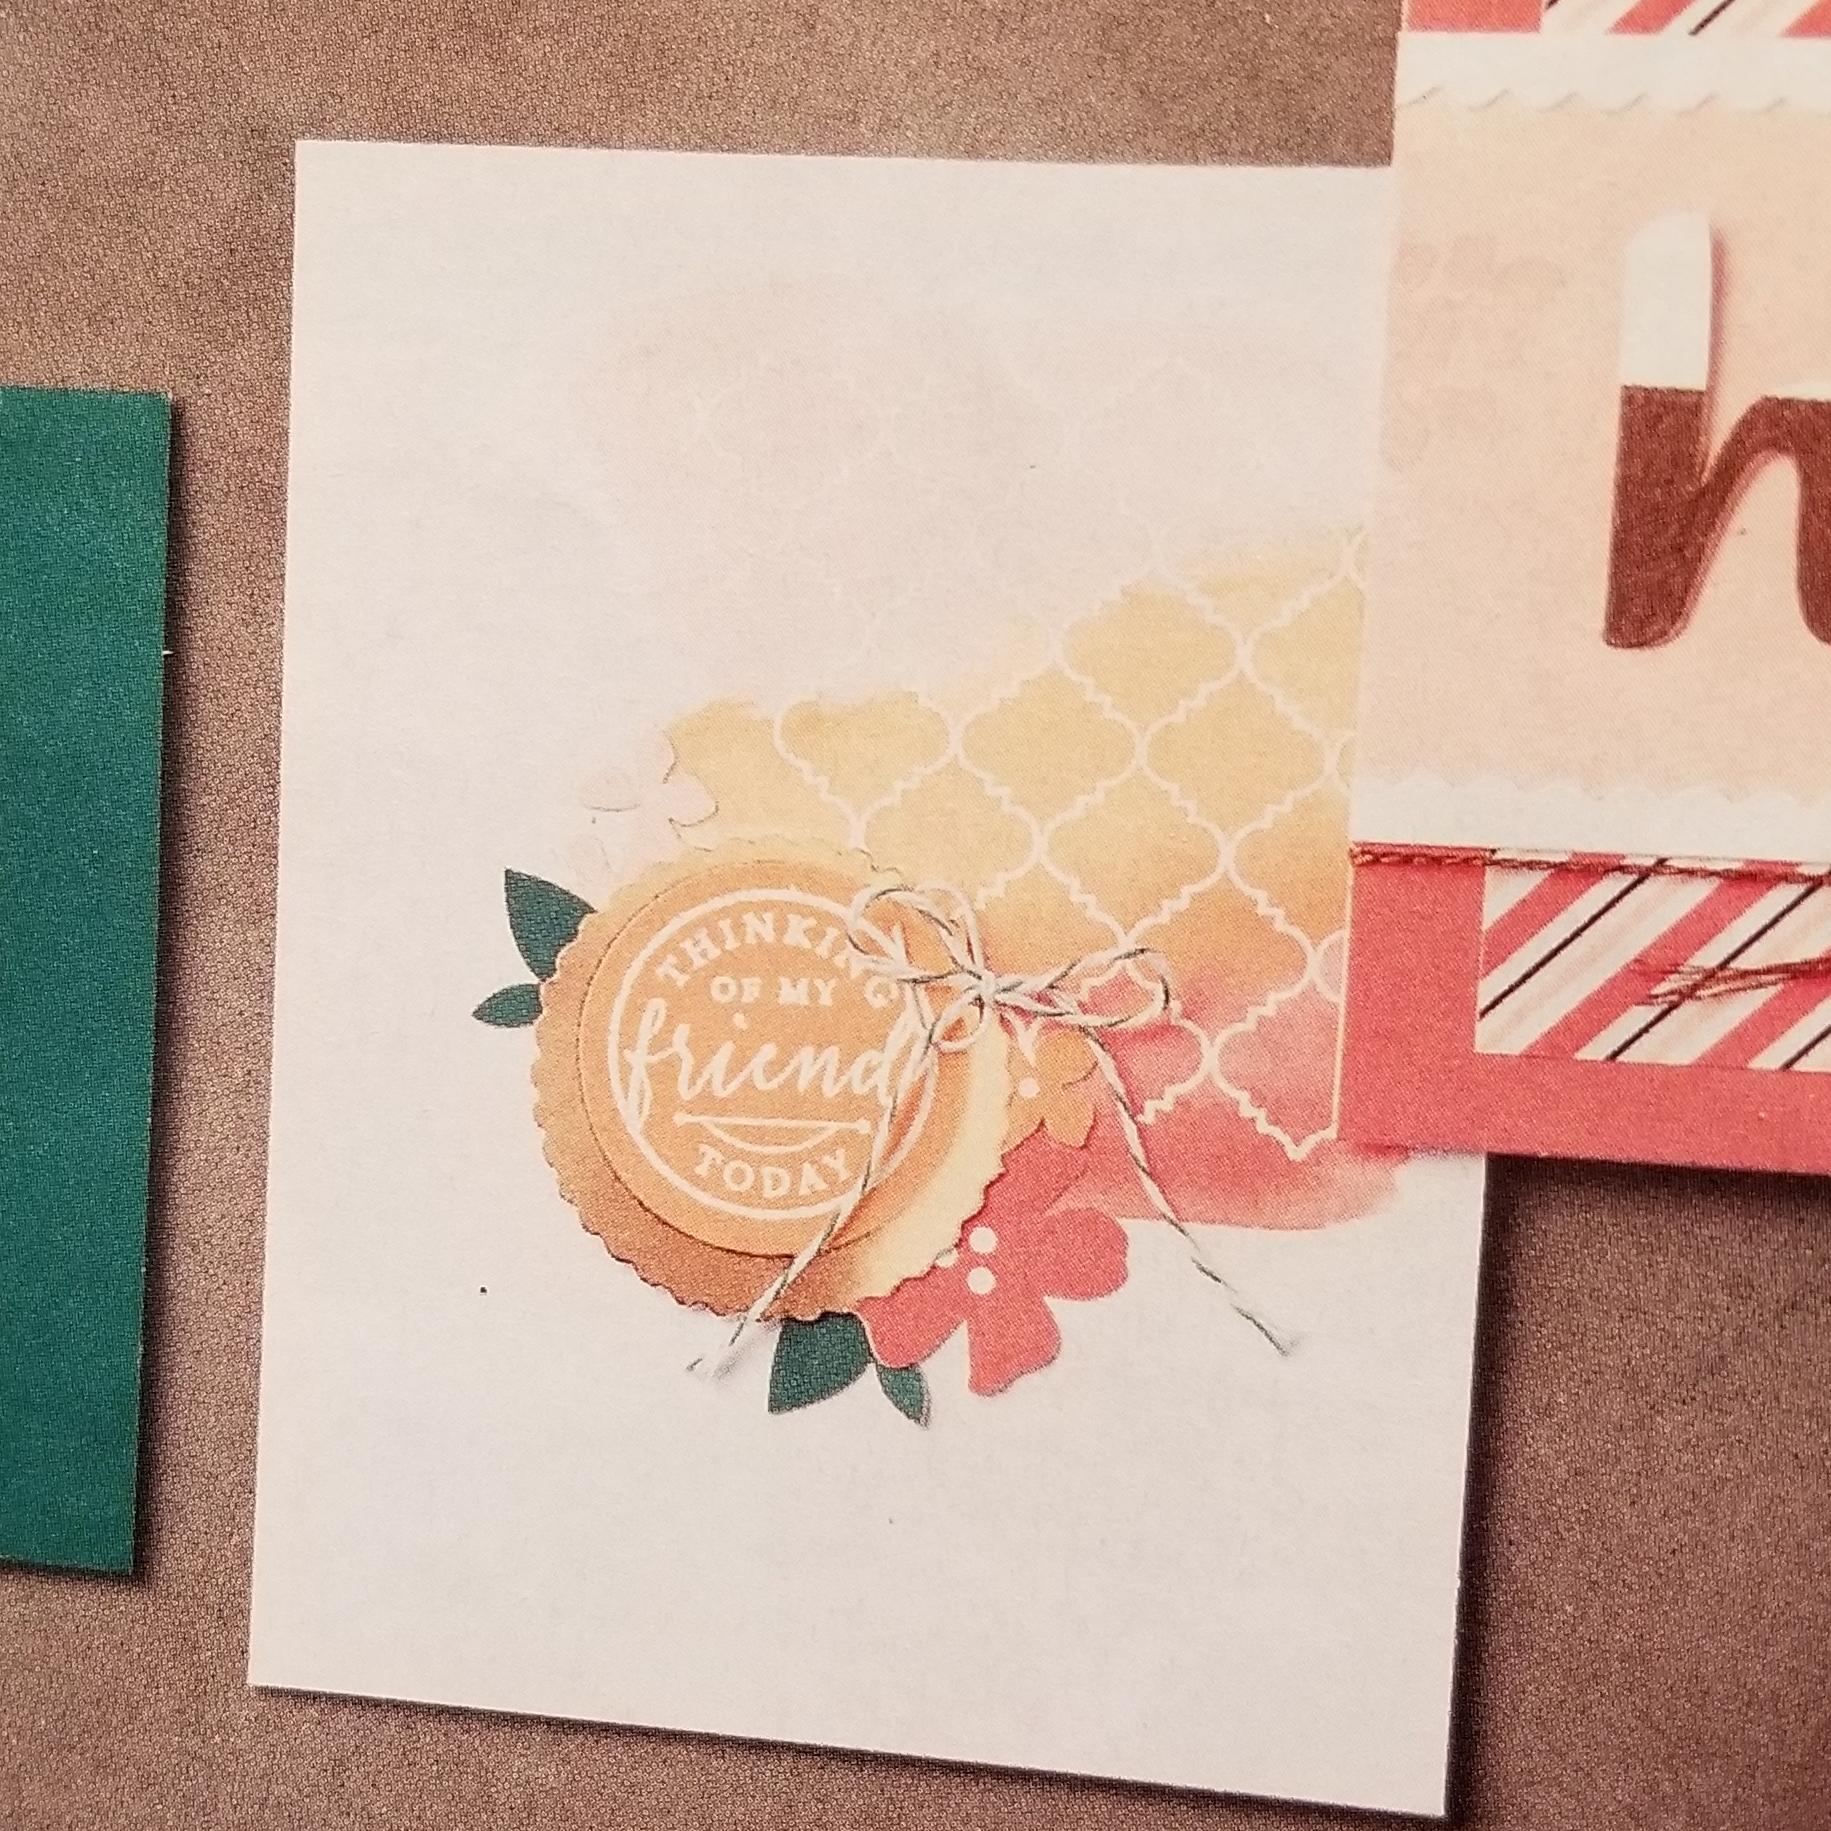
This is using the Hello Friend Heat Embossing Project kit on page 17. I loved it, but of course had to make it my own. Plus, I don’t have the kit…….yet! You really should go take a look, you will love how easy and beautiful this kit is!
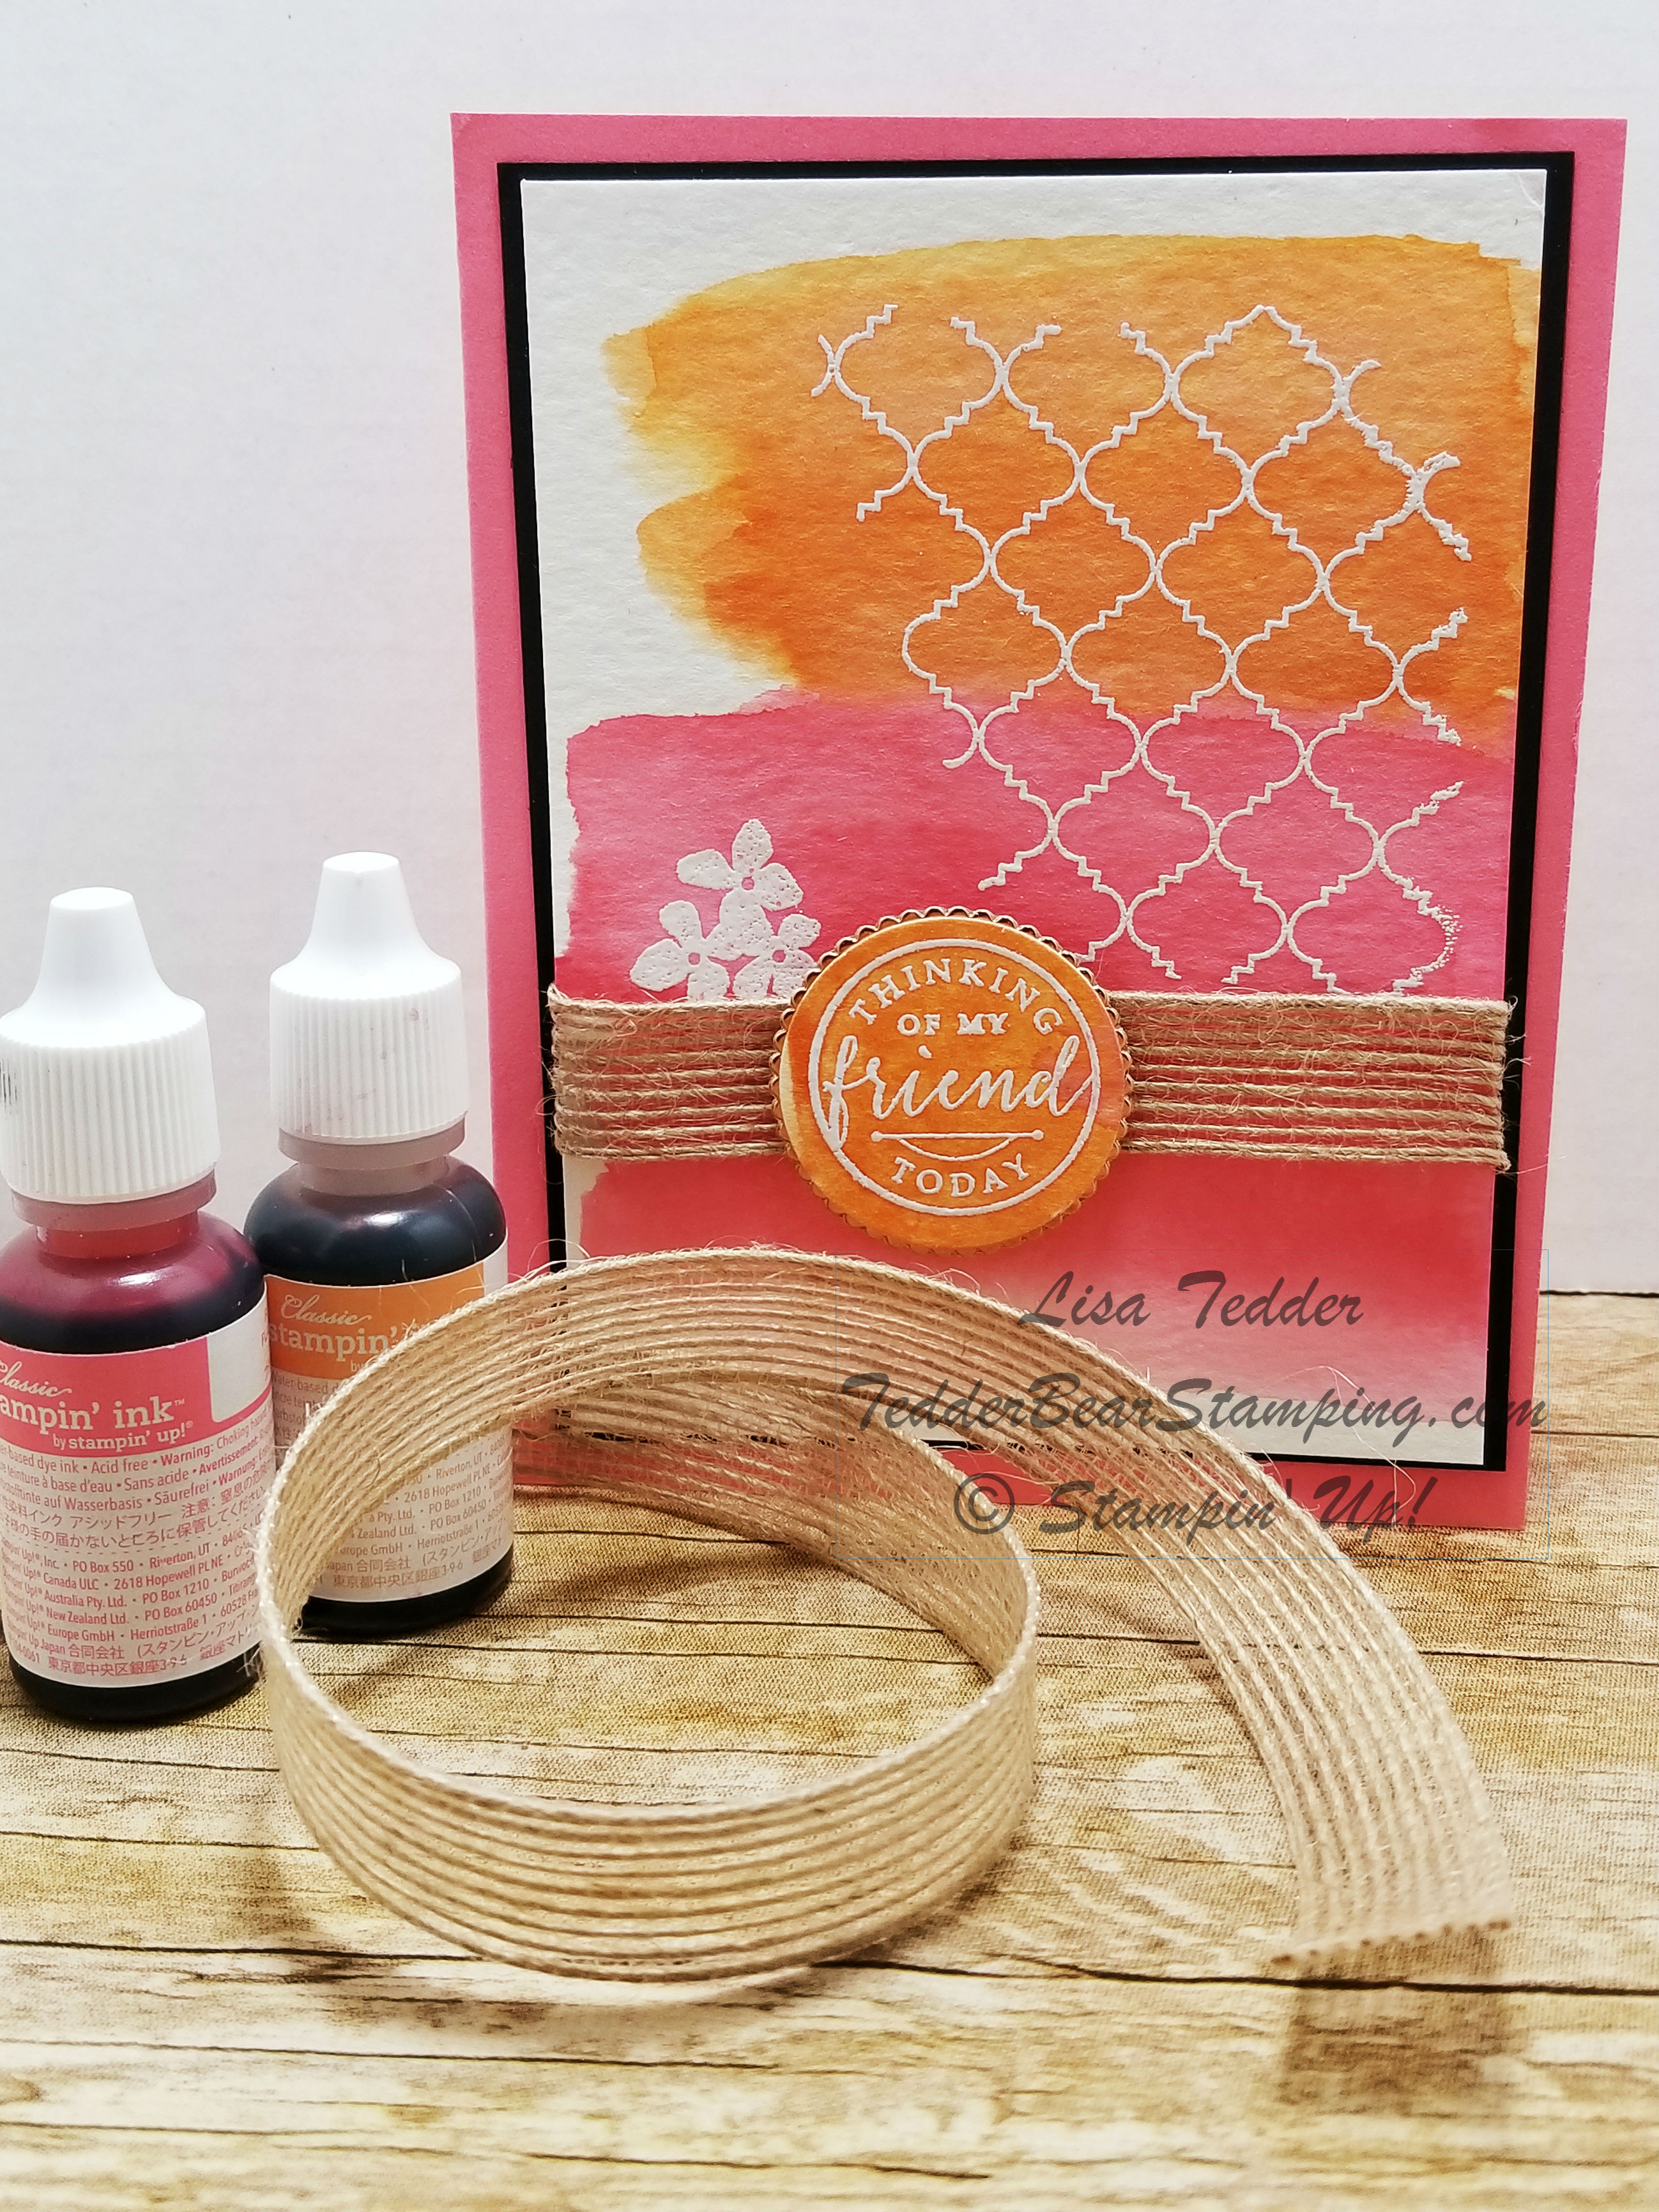
Here is mine:
Isn’t it beautiful!! And the idea came right out of the catalog!
Dimensions:
Flirty Flamingo 5 1/2″ x 4 1/4″
Black 3 7/8″ x 5 1/8″
Watercolor Paper 5″ x 3 3/4″
I used Aqua Painters and the re-inkers for Flirty Flamingo and Peekaboo Peach.
I will have the items I used below, just click on the picture and it will take you straight to my Online Store!
I also have Blog Candy! The drawing is on July 4th! You just need to comment on any of my social media posts! Facebook, Instagram, Twitter or here on my blog, anywhere! EVERY comment counts!
Here is what you can win this time!
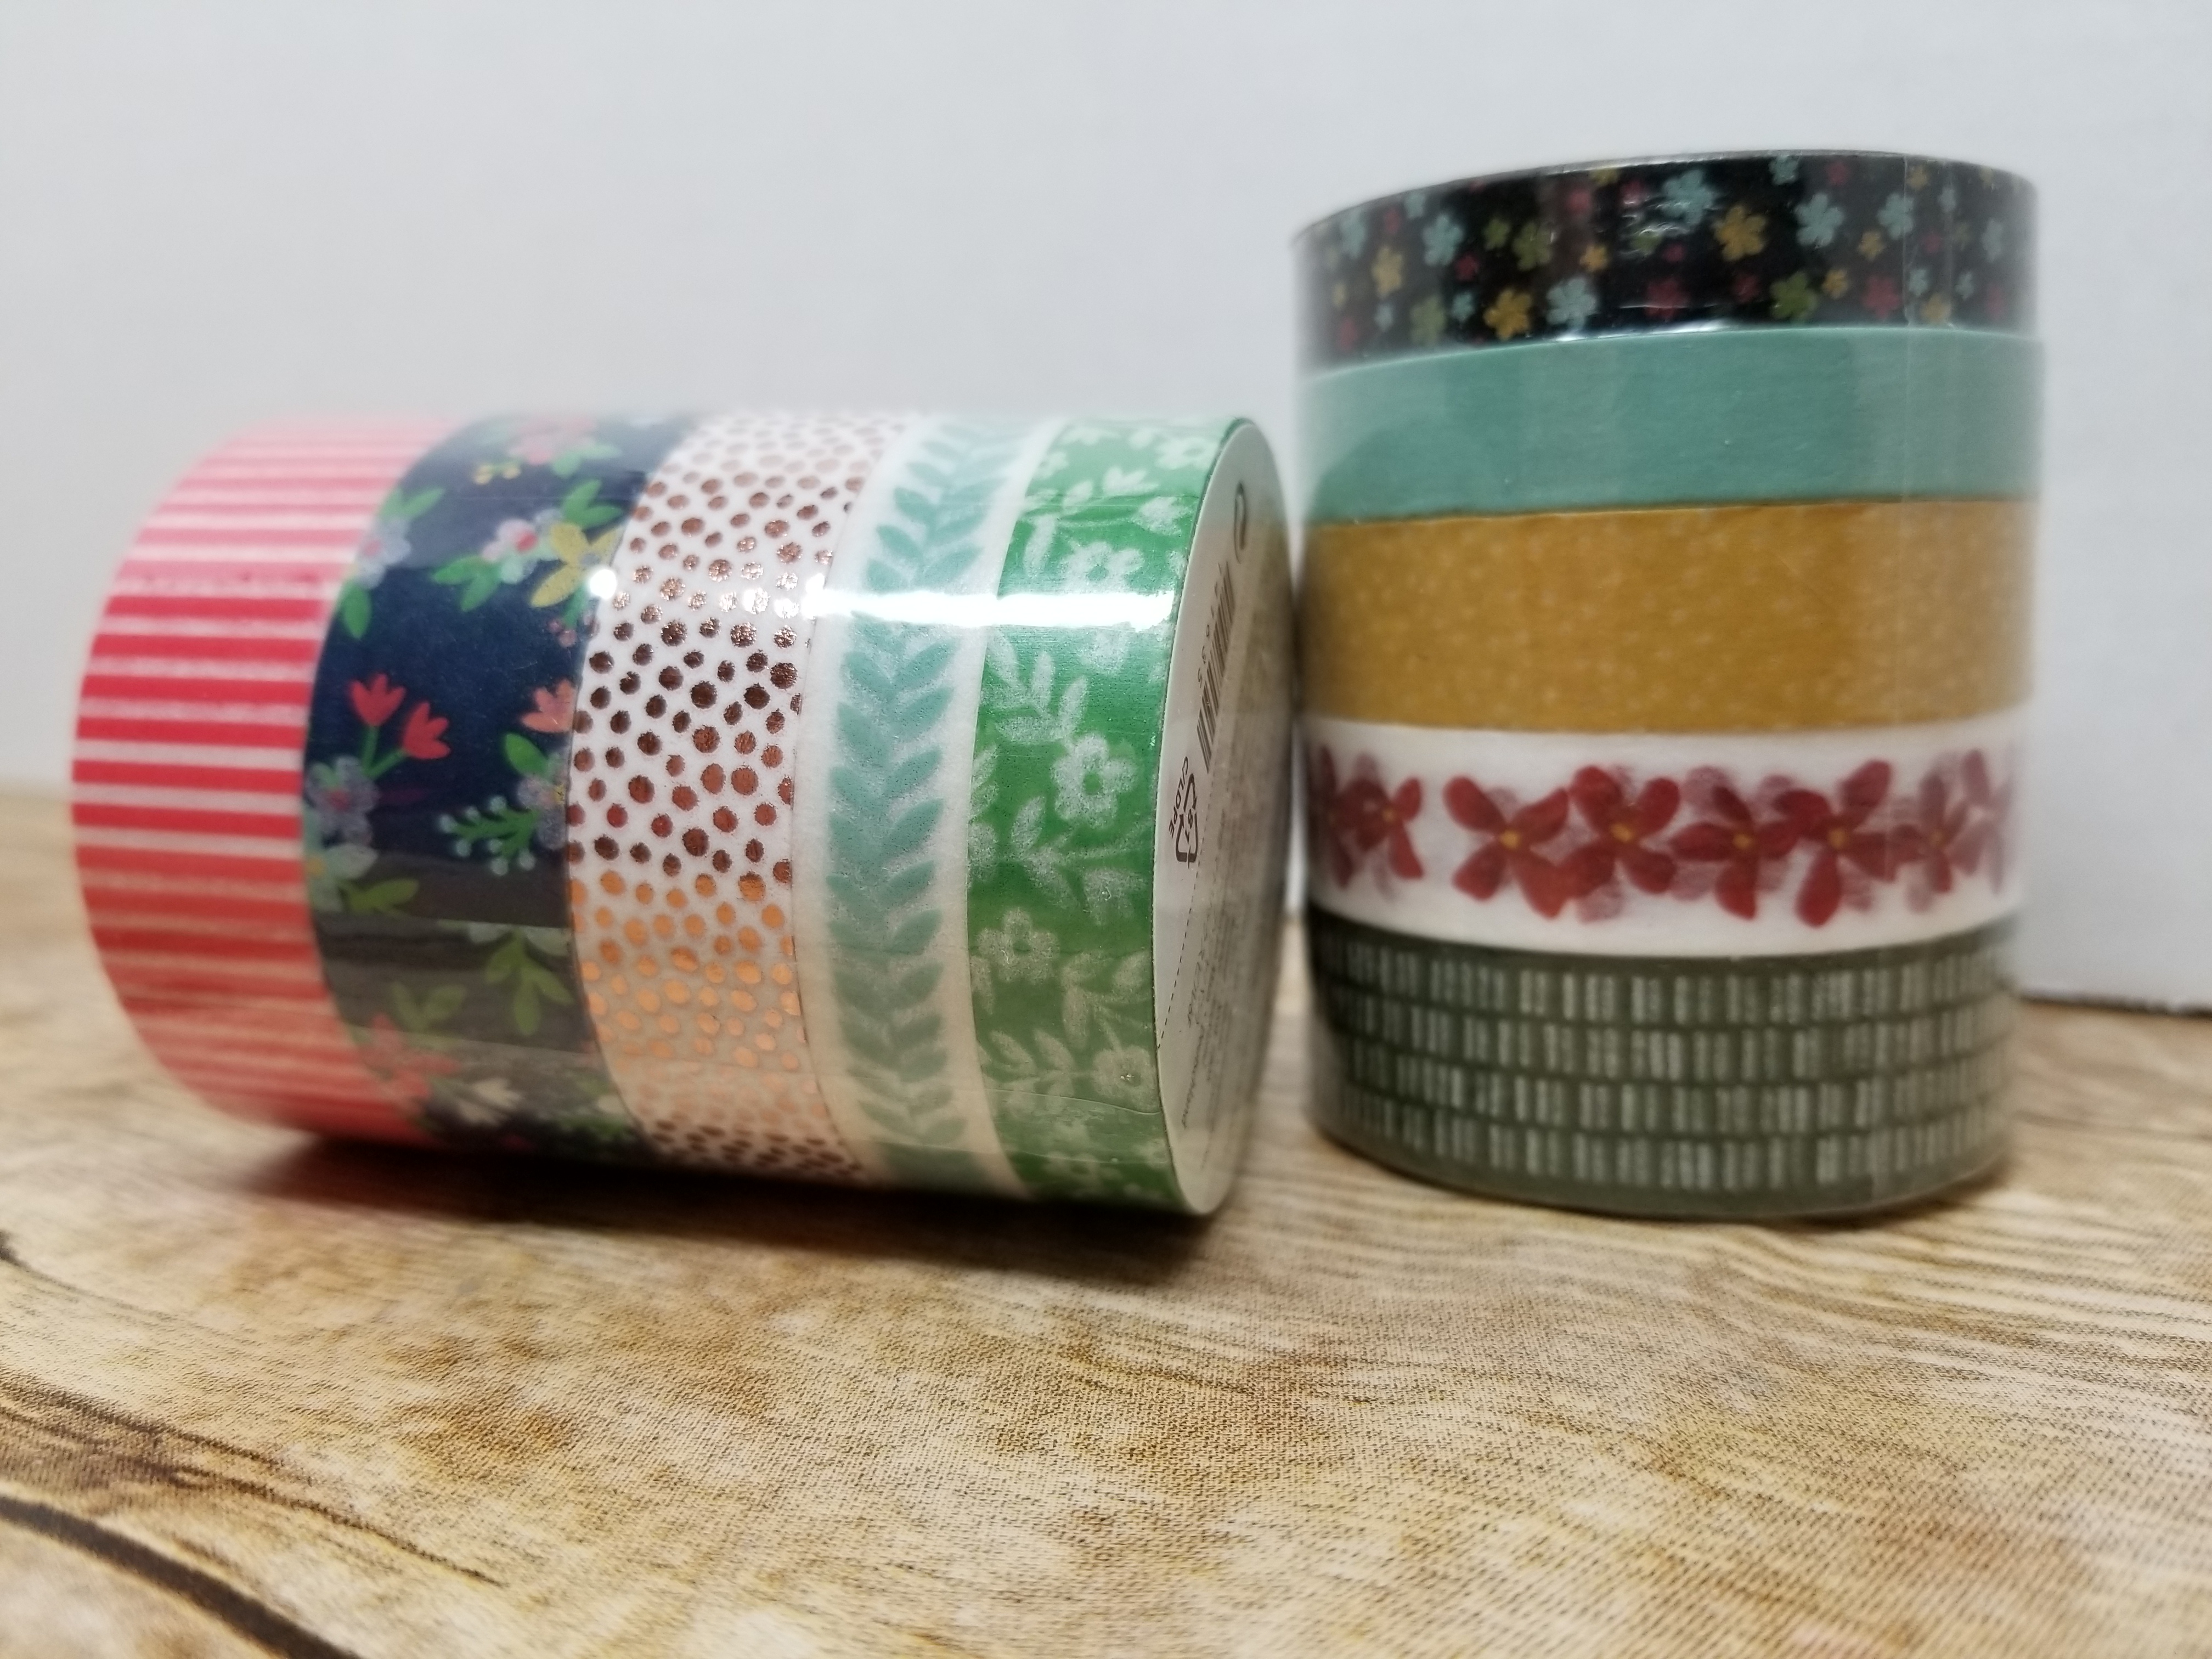
I LOVE Washi Tape!
I loved this card today, I hope you love it too! When you can’t come up with an idea, just look in the catalog! If you need a catalog, just let me know! I would be happy to send you one!
Lisa Tedder
TedderBearStamping
A California Girl living in North Carolina
Yes, my title says it all! I’m starting to design my Christmas Cards! I’m sure there will be more when the Holiday Mini comes out, but I figure I need to start now and so do my girls!!
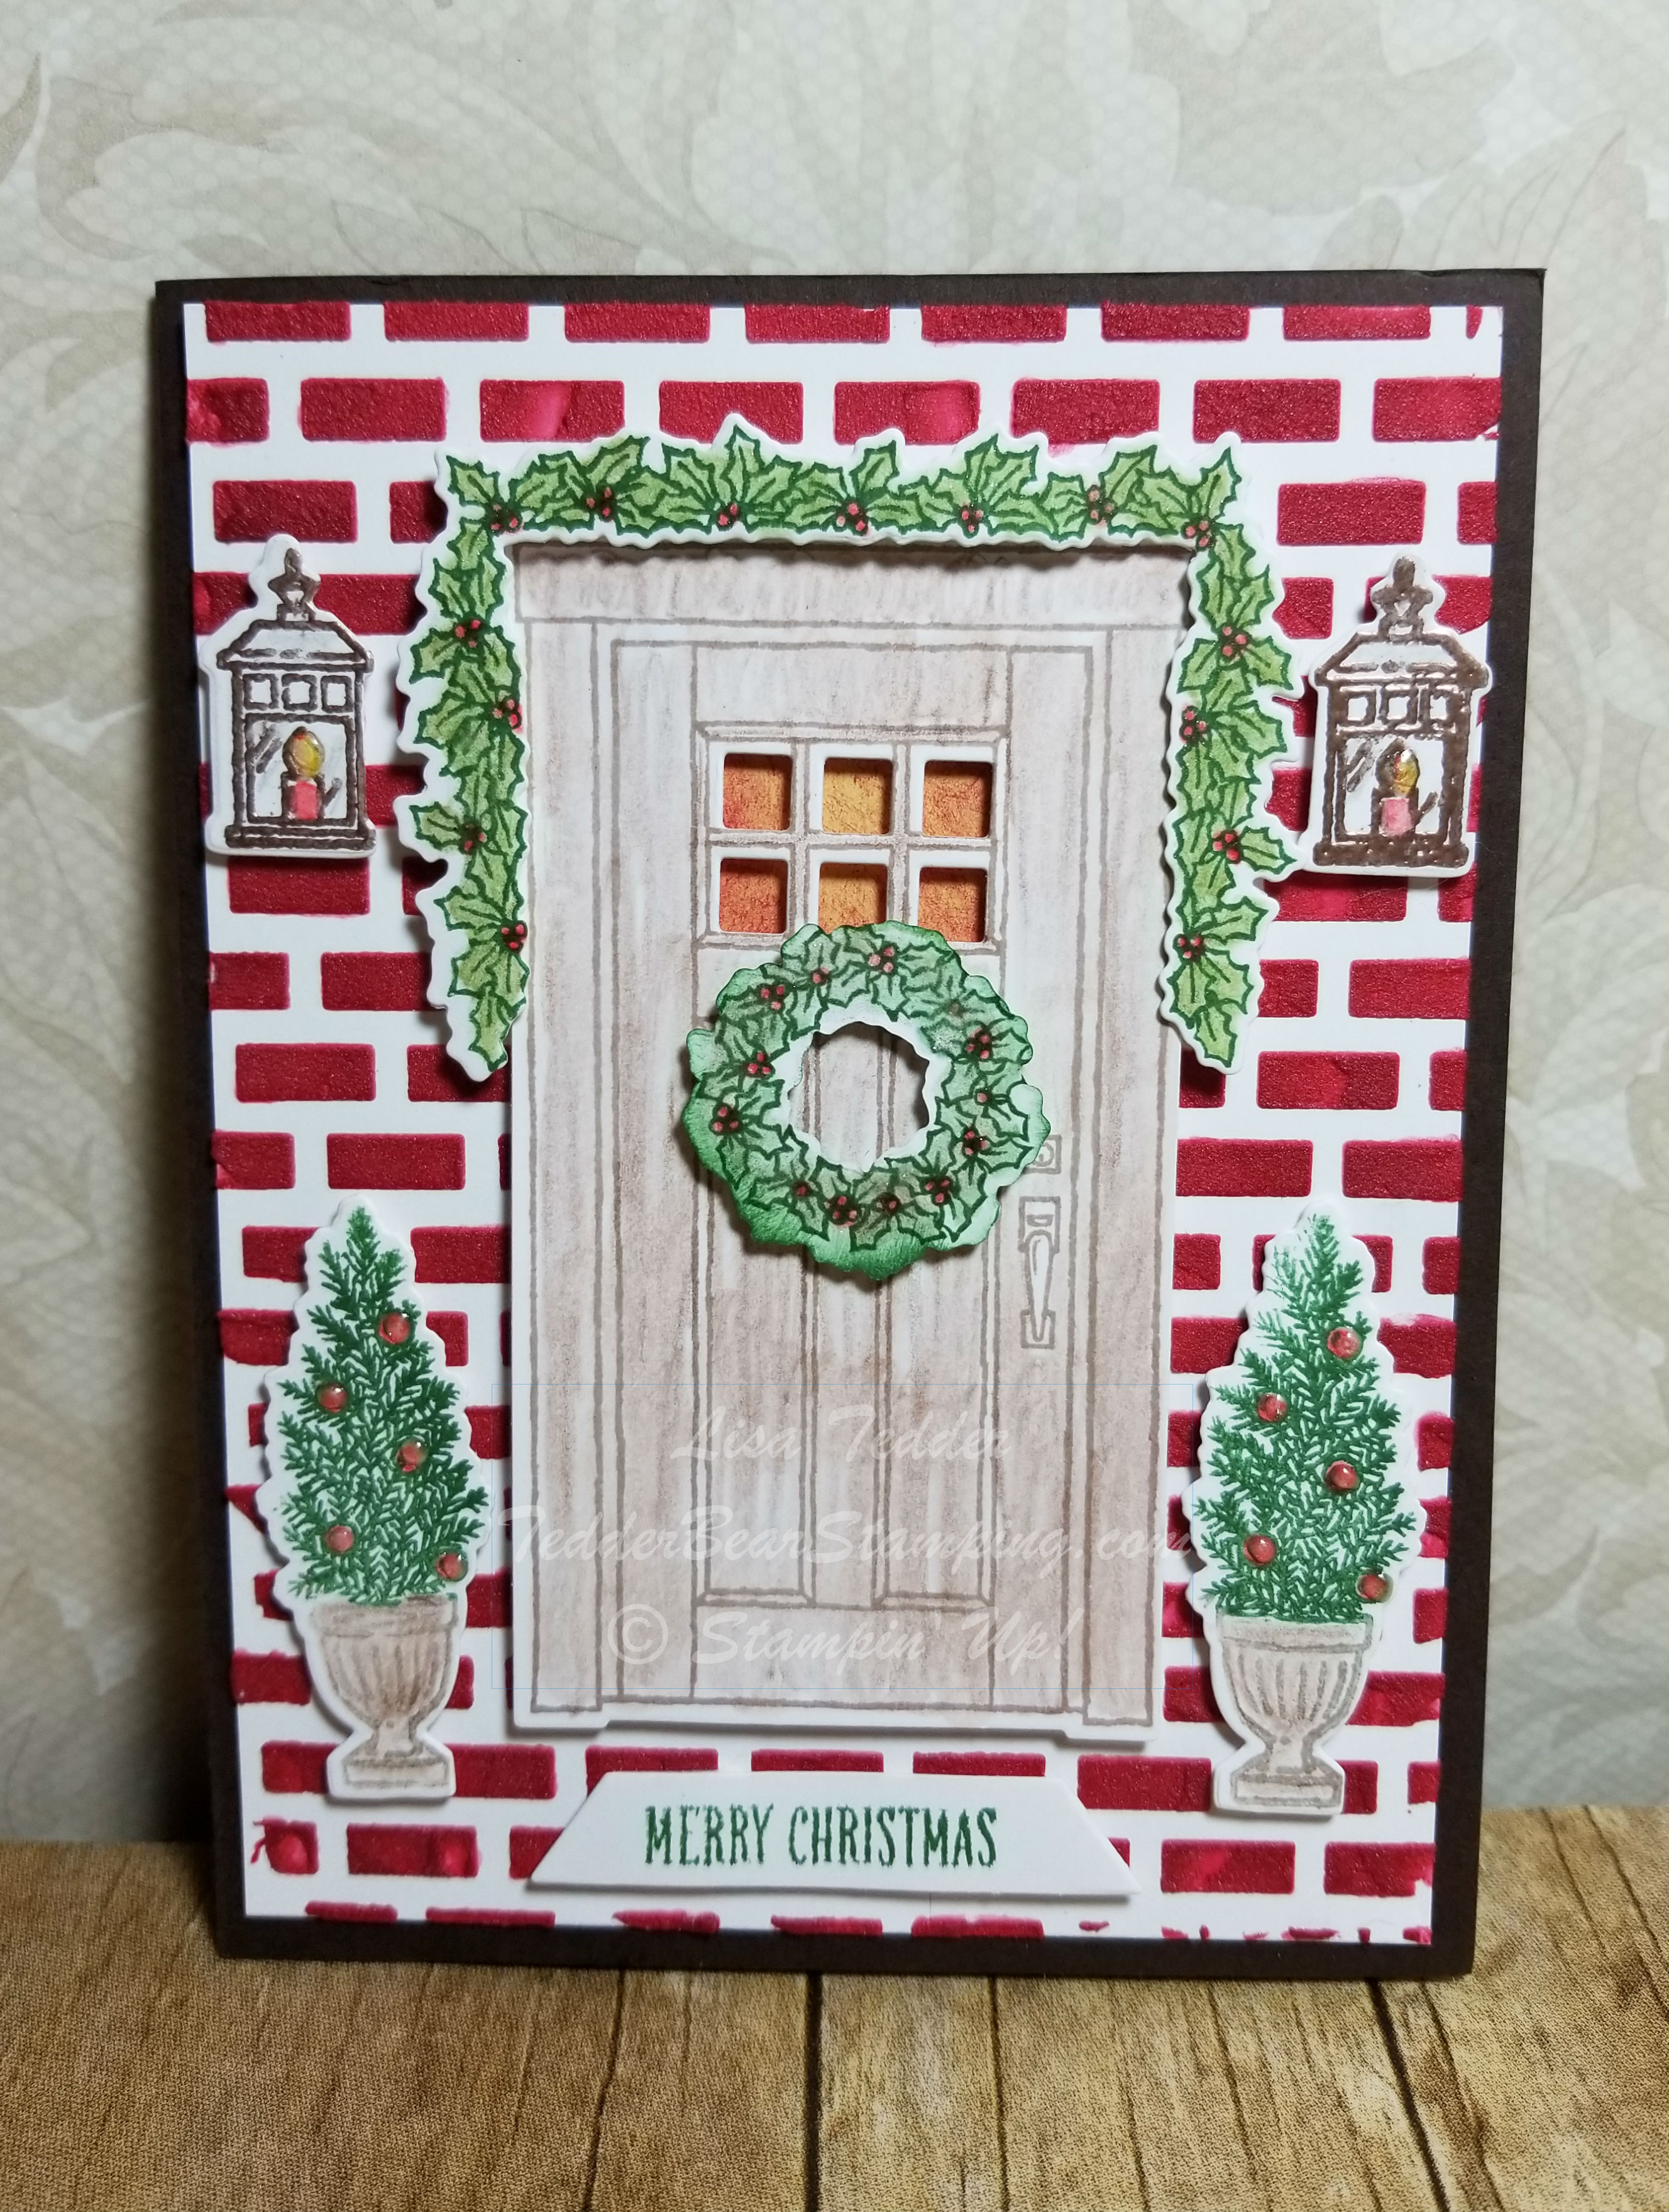
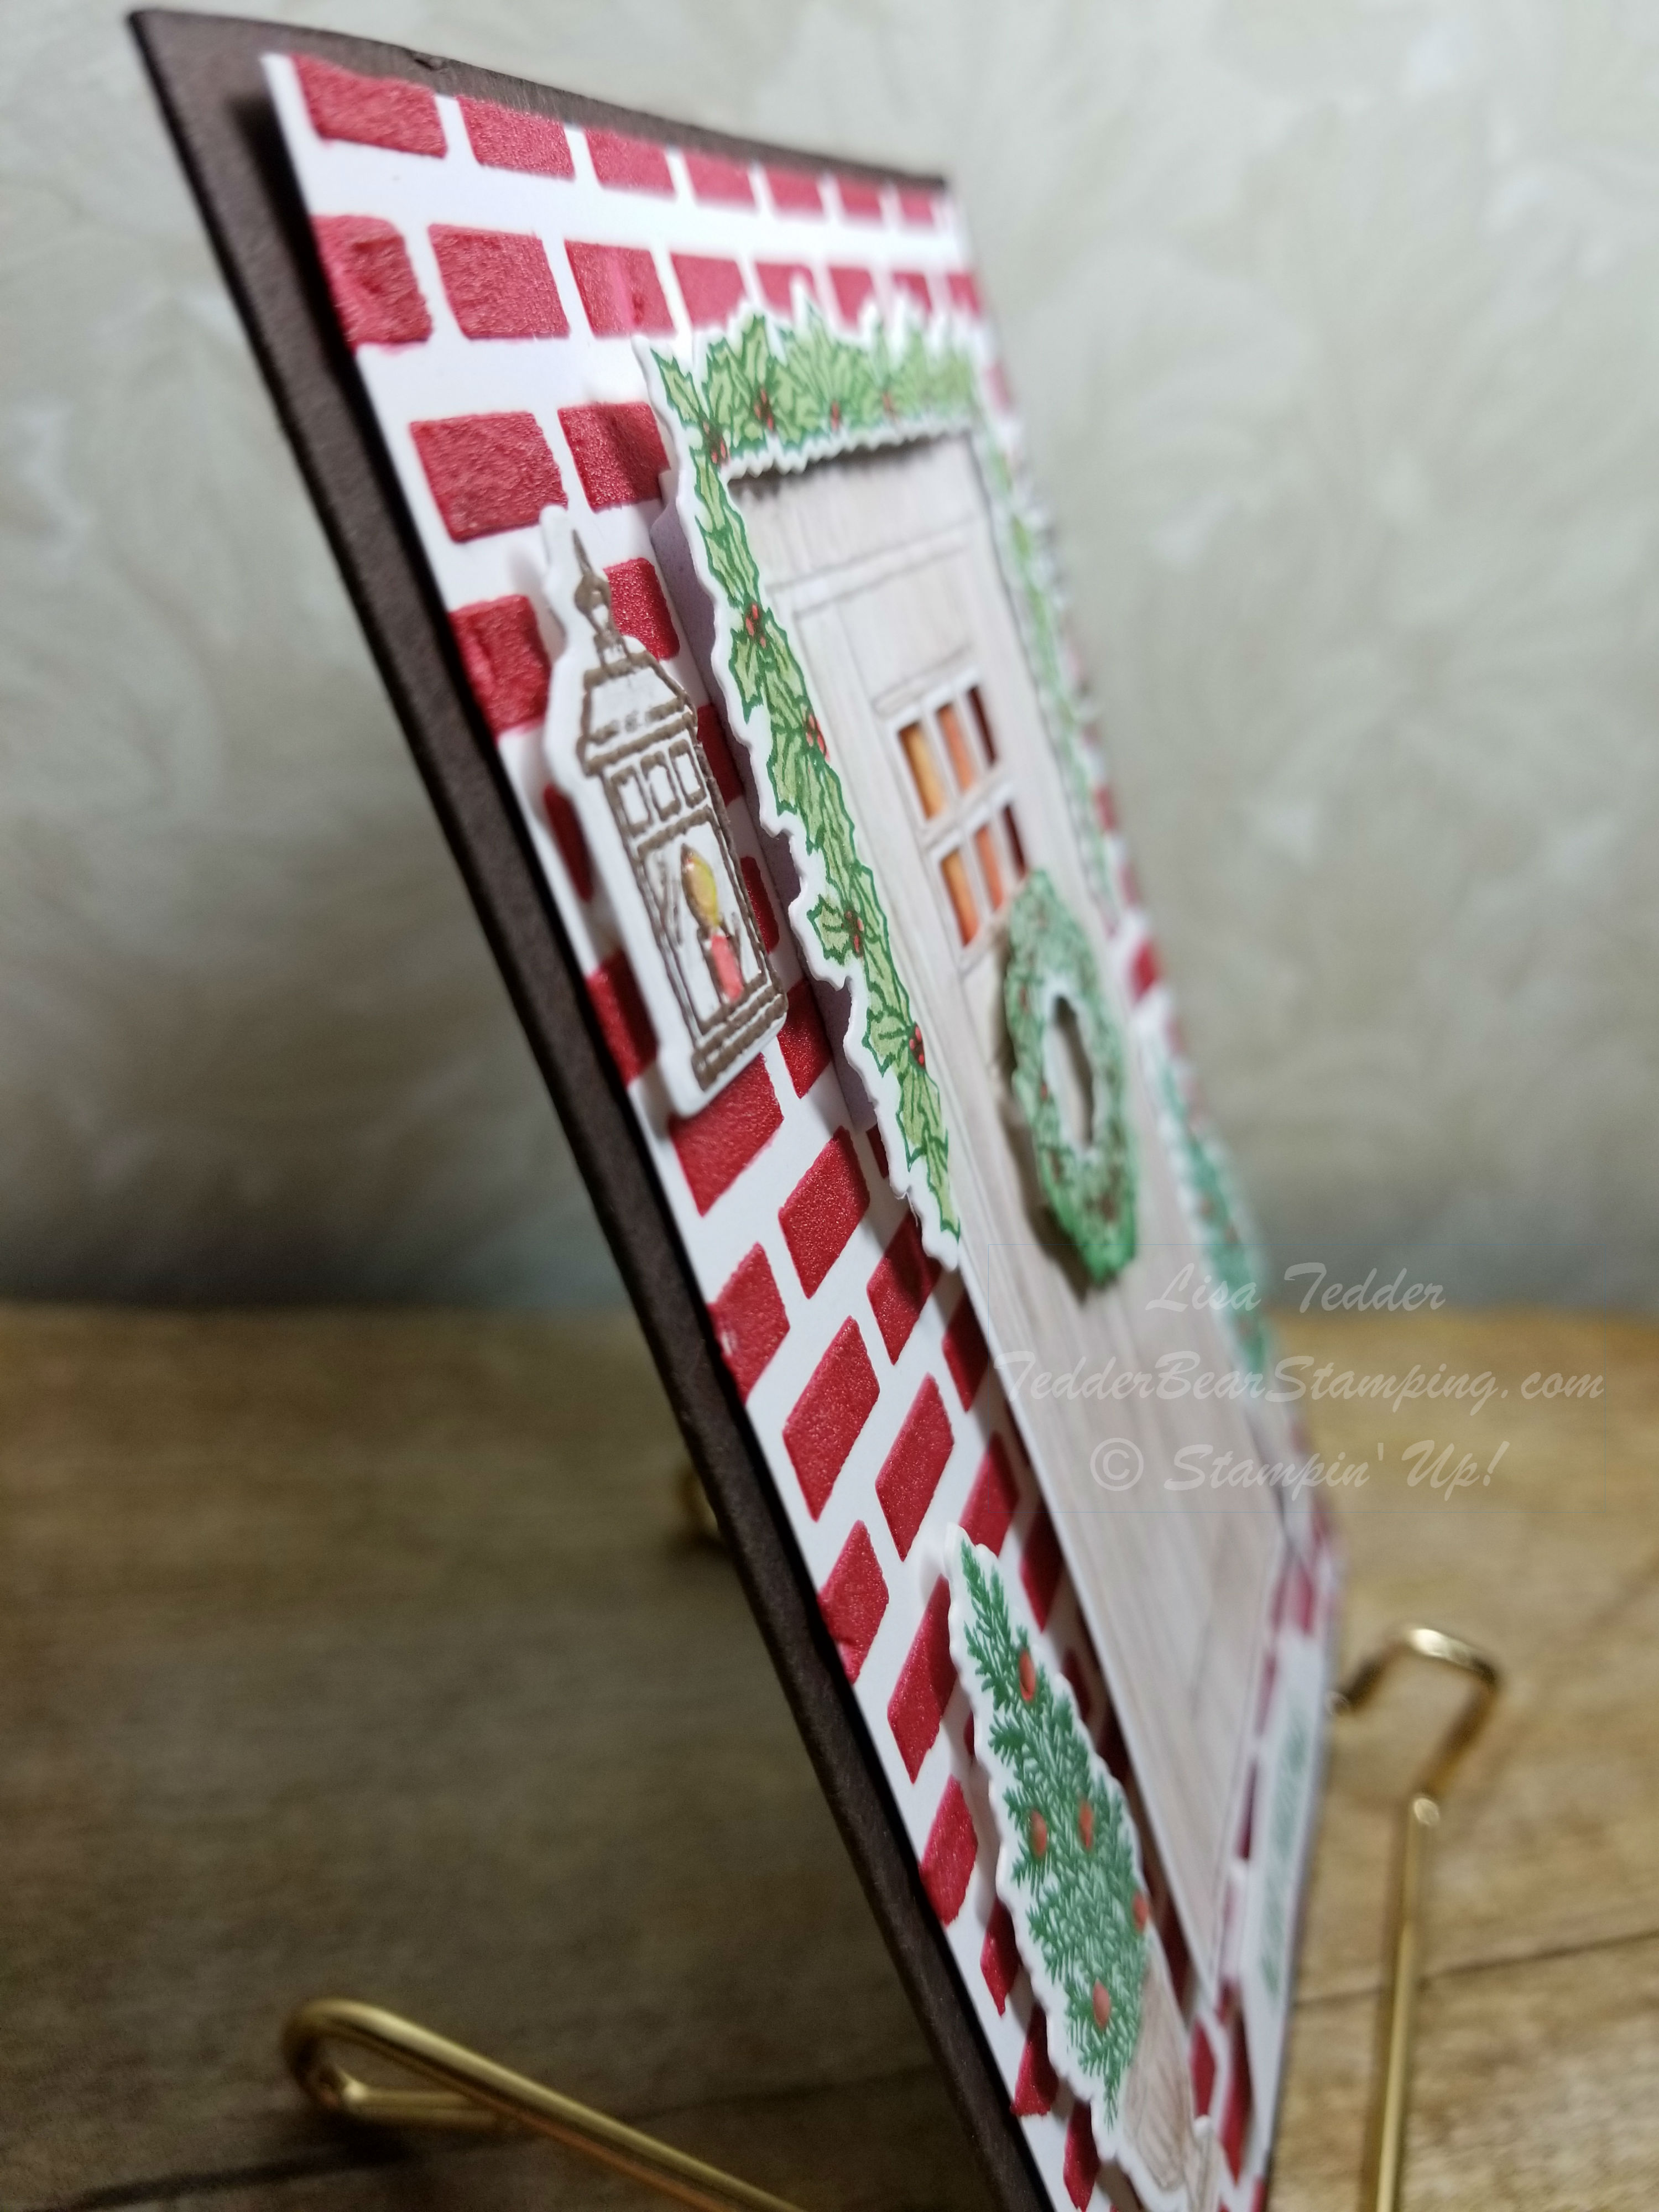
Today I am sharing with you a design I came up with using the stamp set from Stampin’ Up! called At Home with You! I know I have shown other cards using this stamp set, but when you add the Embossing Paste and the Pattern Party Decorative Masks it takes the card a step further than I had before!! The embossing paste really makes the front of the card a house! Here is a picture of the card:
I added two drops of Cherry Cobbler reinker to the Paste and mixed it on my Silicone Craft Sheet (soooo easy to clean after!) and then spread it over the Brick pattern on my Whisper White Cardstock (5 1/4″ x 4″ tape it down so it won’t move). It was MUCH easier than I thought it would be! It dried in just 30 minutes! For this NON patient person that was awesome! I did the brick first and then by the time I was ready for the front of the card, it was dry! Yay for me! No waiting!
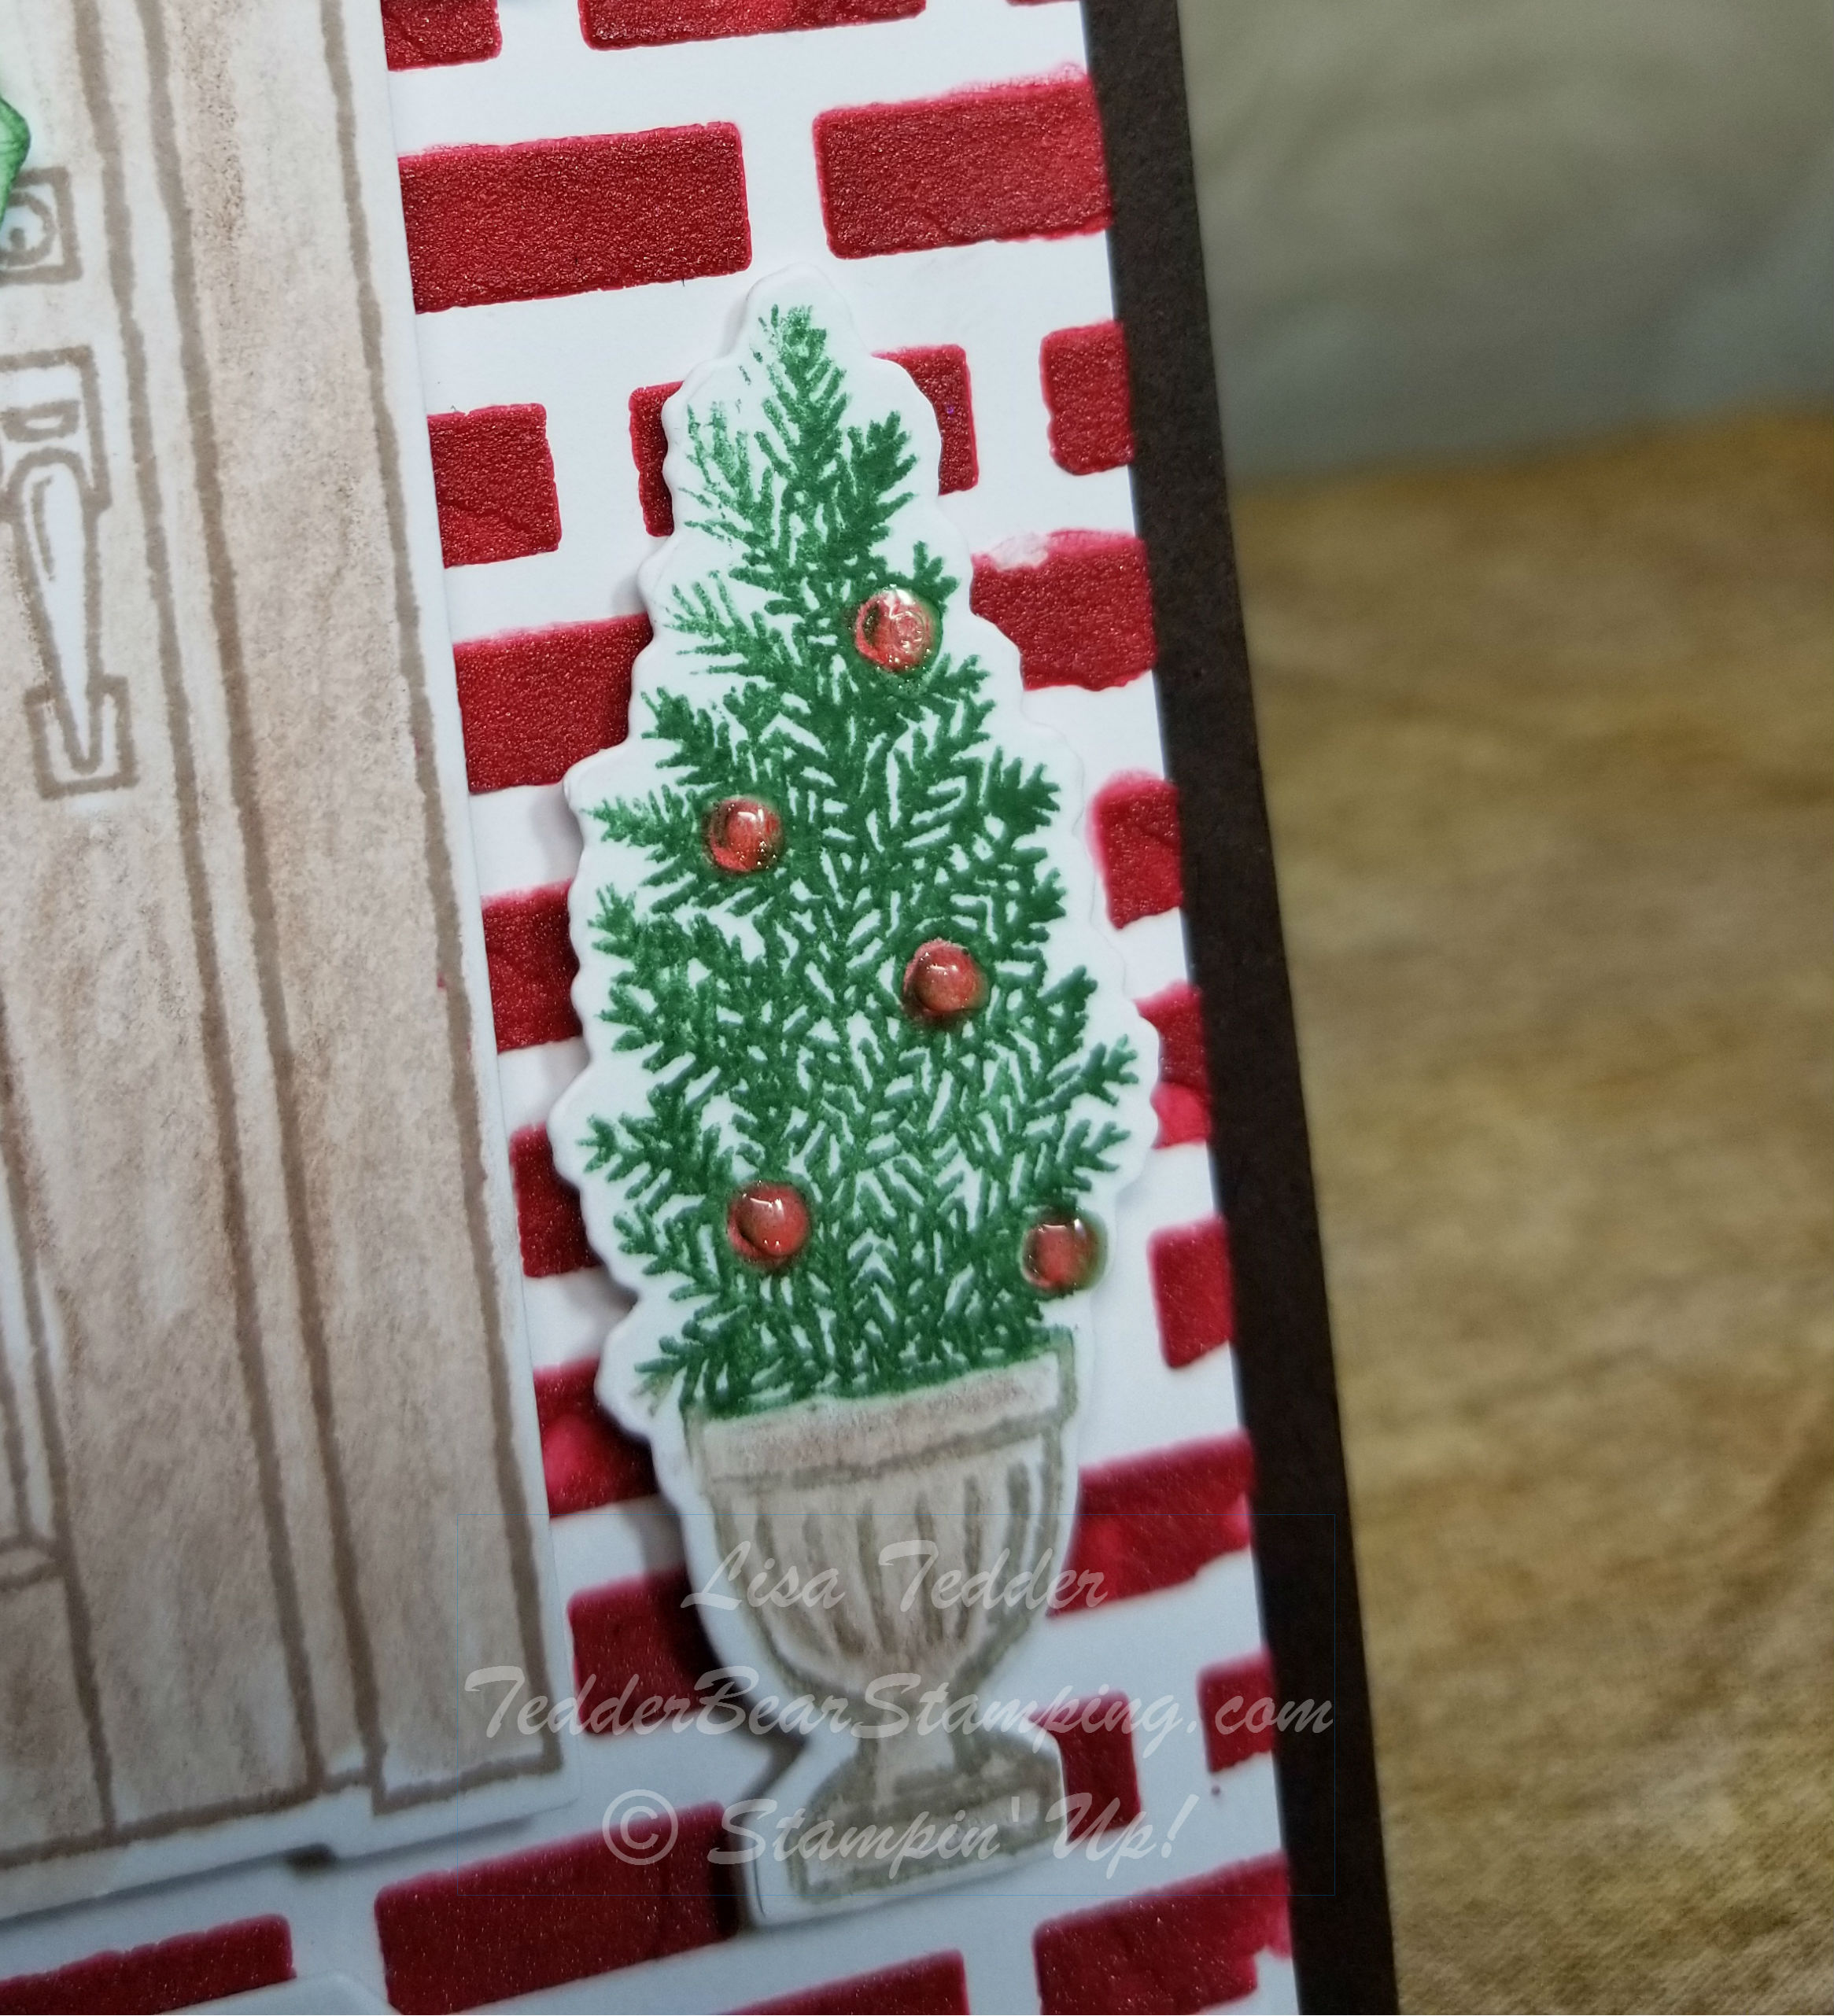
Here is a close up of the bushes with the ornaments:
I used the Fine Tip Glue Pen and let it dry.
And finally a close up of a side view:
I want to try the battery lights for this card, but I’m a little intimidated by it…….anyone do that before?
I will be making more Christmas cards as time goes on! I plan on having a Christmas card class next month……I better get going on designing! 🙂
I also have blog candy!!
You can get in on the drawing by posting comments here on this blog (any post! or multiple posts!) or on my Facebook page and I will put your name down each and every time you comment! But be aware…..there are some that follow me that take that comment VERY seriously! I’ve had her comment on each and every post that I make and she also comments on my Facebook page, Twitter AND my Instagram! She’s one serious girl! YOU know who you are, and I appreciate you very much! 🙂
The moral of the story is if you REALLY want to win my Blog Candy comment on everything! I put the names into a Name Generator so I have NO say on who wins!
Here is what you can win!:
I LOVE Washi Tape, don’t you??!!
I have enjoyed making this post for you! I hope you have too! Come back and see what I have been working on! Click on the Subscribe button so you don’t miss anything!
You can click on any picture below that shows the items I used for this card, you will be taken to my Online Store! Please use Hostess Code: C62FFAR3 This code will only be available until the 22nd of June. If you purchase from my Store (don’t HAVE to use the code!) I will send you a handmade card PLUS a thank you gift!!
Hope you have a great rest of your week!!
Lisa Tedder
TedderBearStamping
A California Girl living in North Carolina
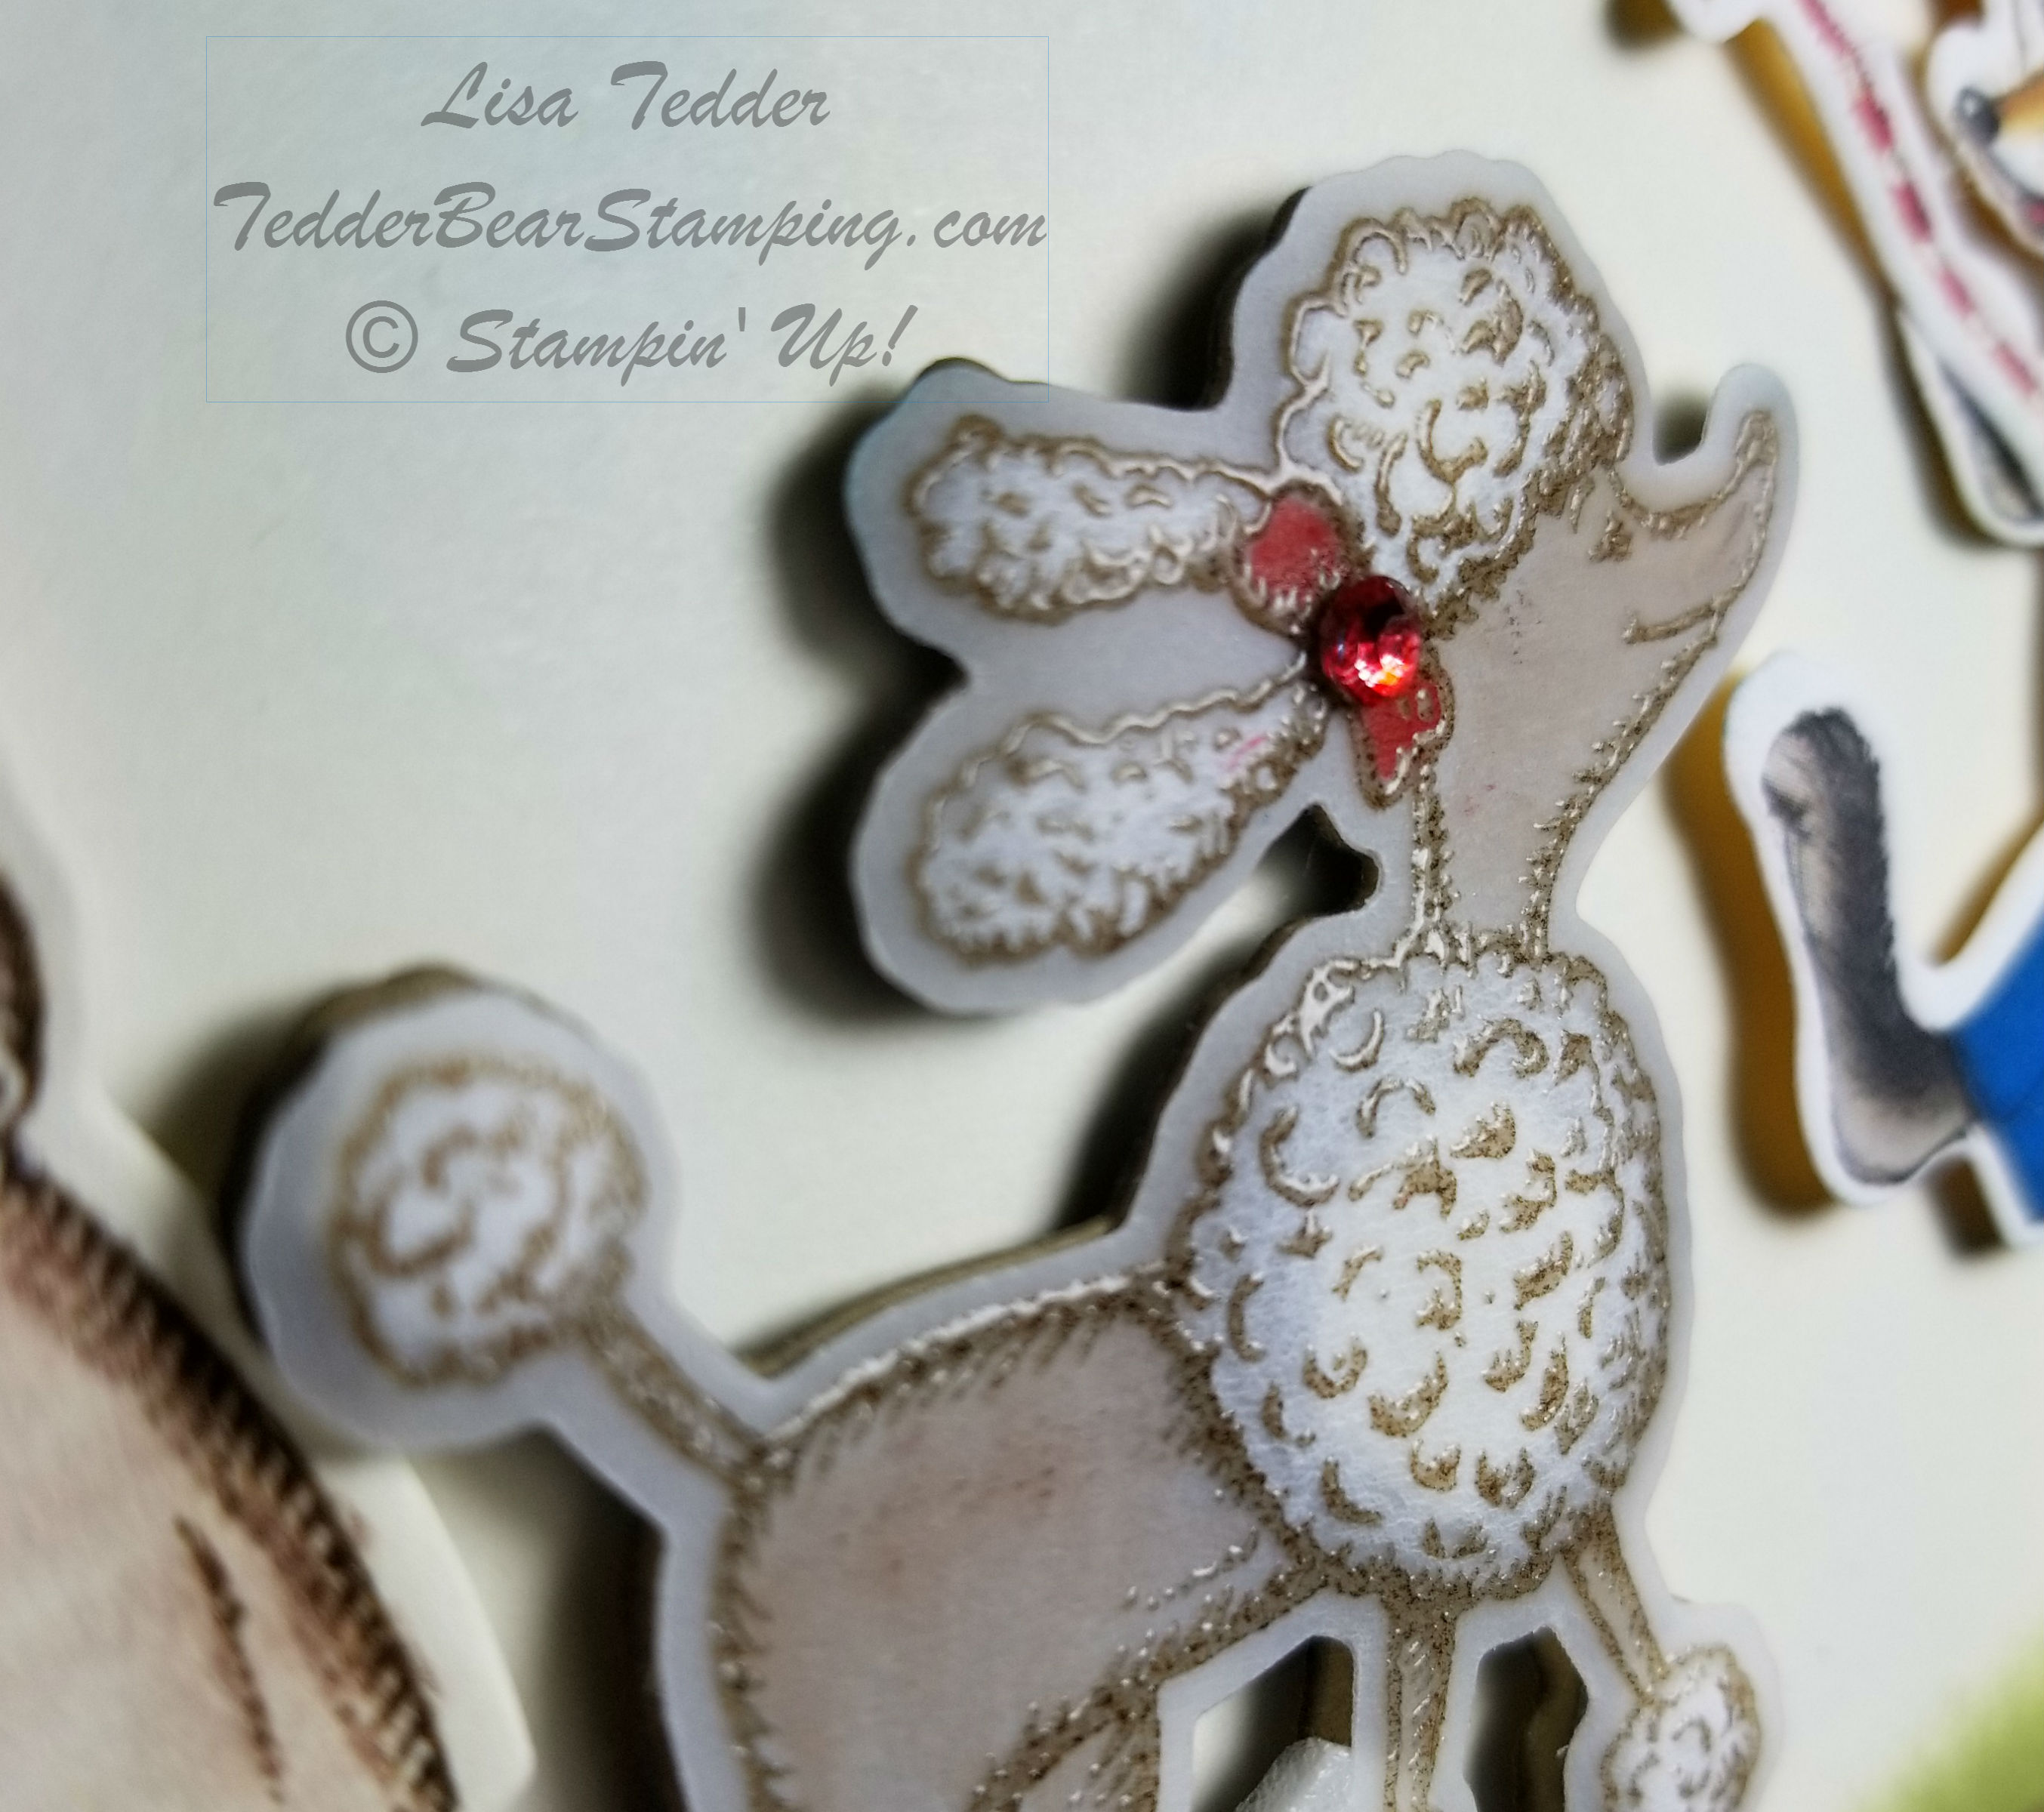
Once again I am TRYING to be in the top ten for Kylie’s International Blog Hop, will you help me?? I came close last time, but would really like to get there this time! Can you tell that the dog is fluffy and two colors!? Read on to see how it was done!
Please vote for me by going to Kylie’s blog hop page! To vote, you will click on the heart in the right corner of the pictures, preferably mine!! 🙂
The theme this month is Baby. My card isn’t traditional ‘baby’ but I think it would make a GREAT Birthday card for any baby, OR on the inside it could say that you are expecting!! That you are HAVING a baby!!
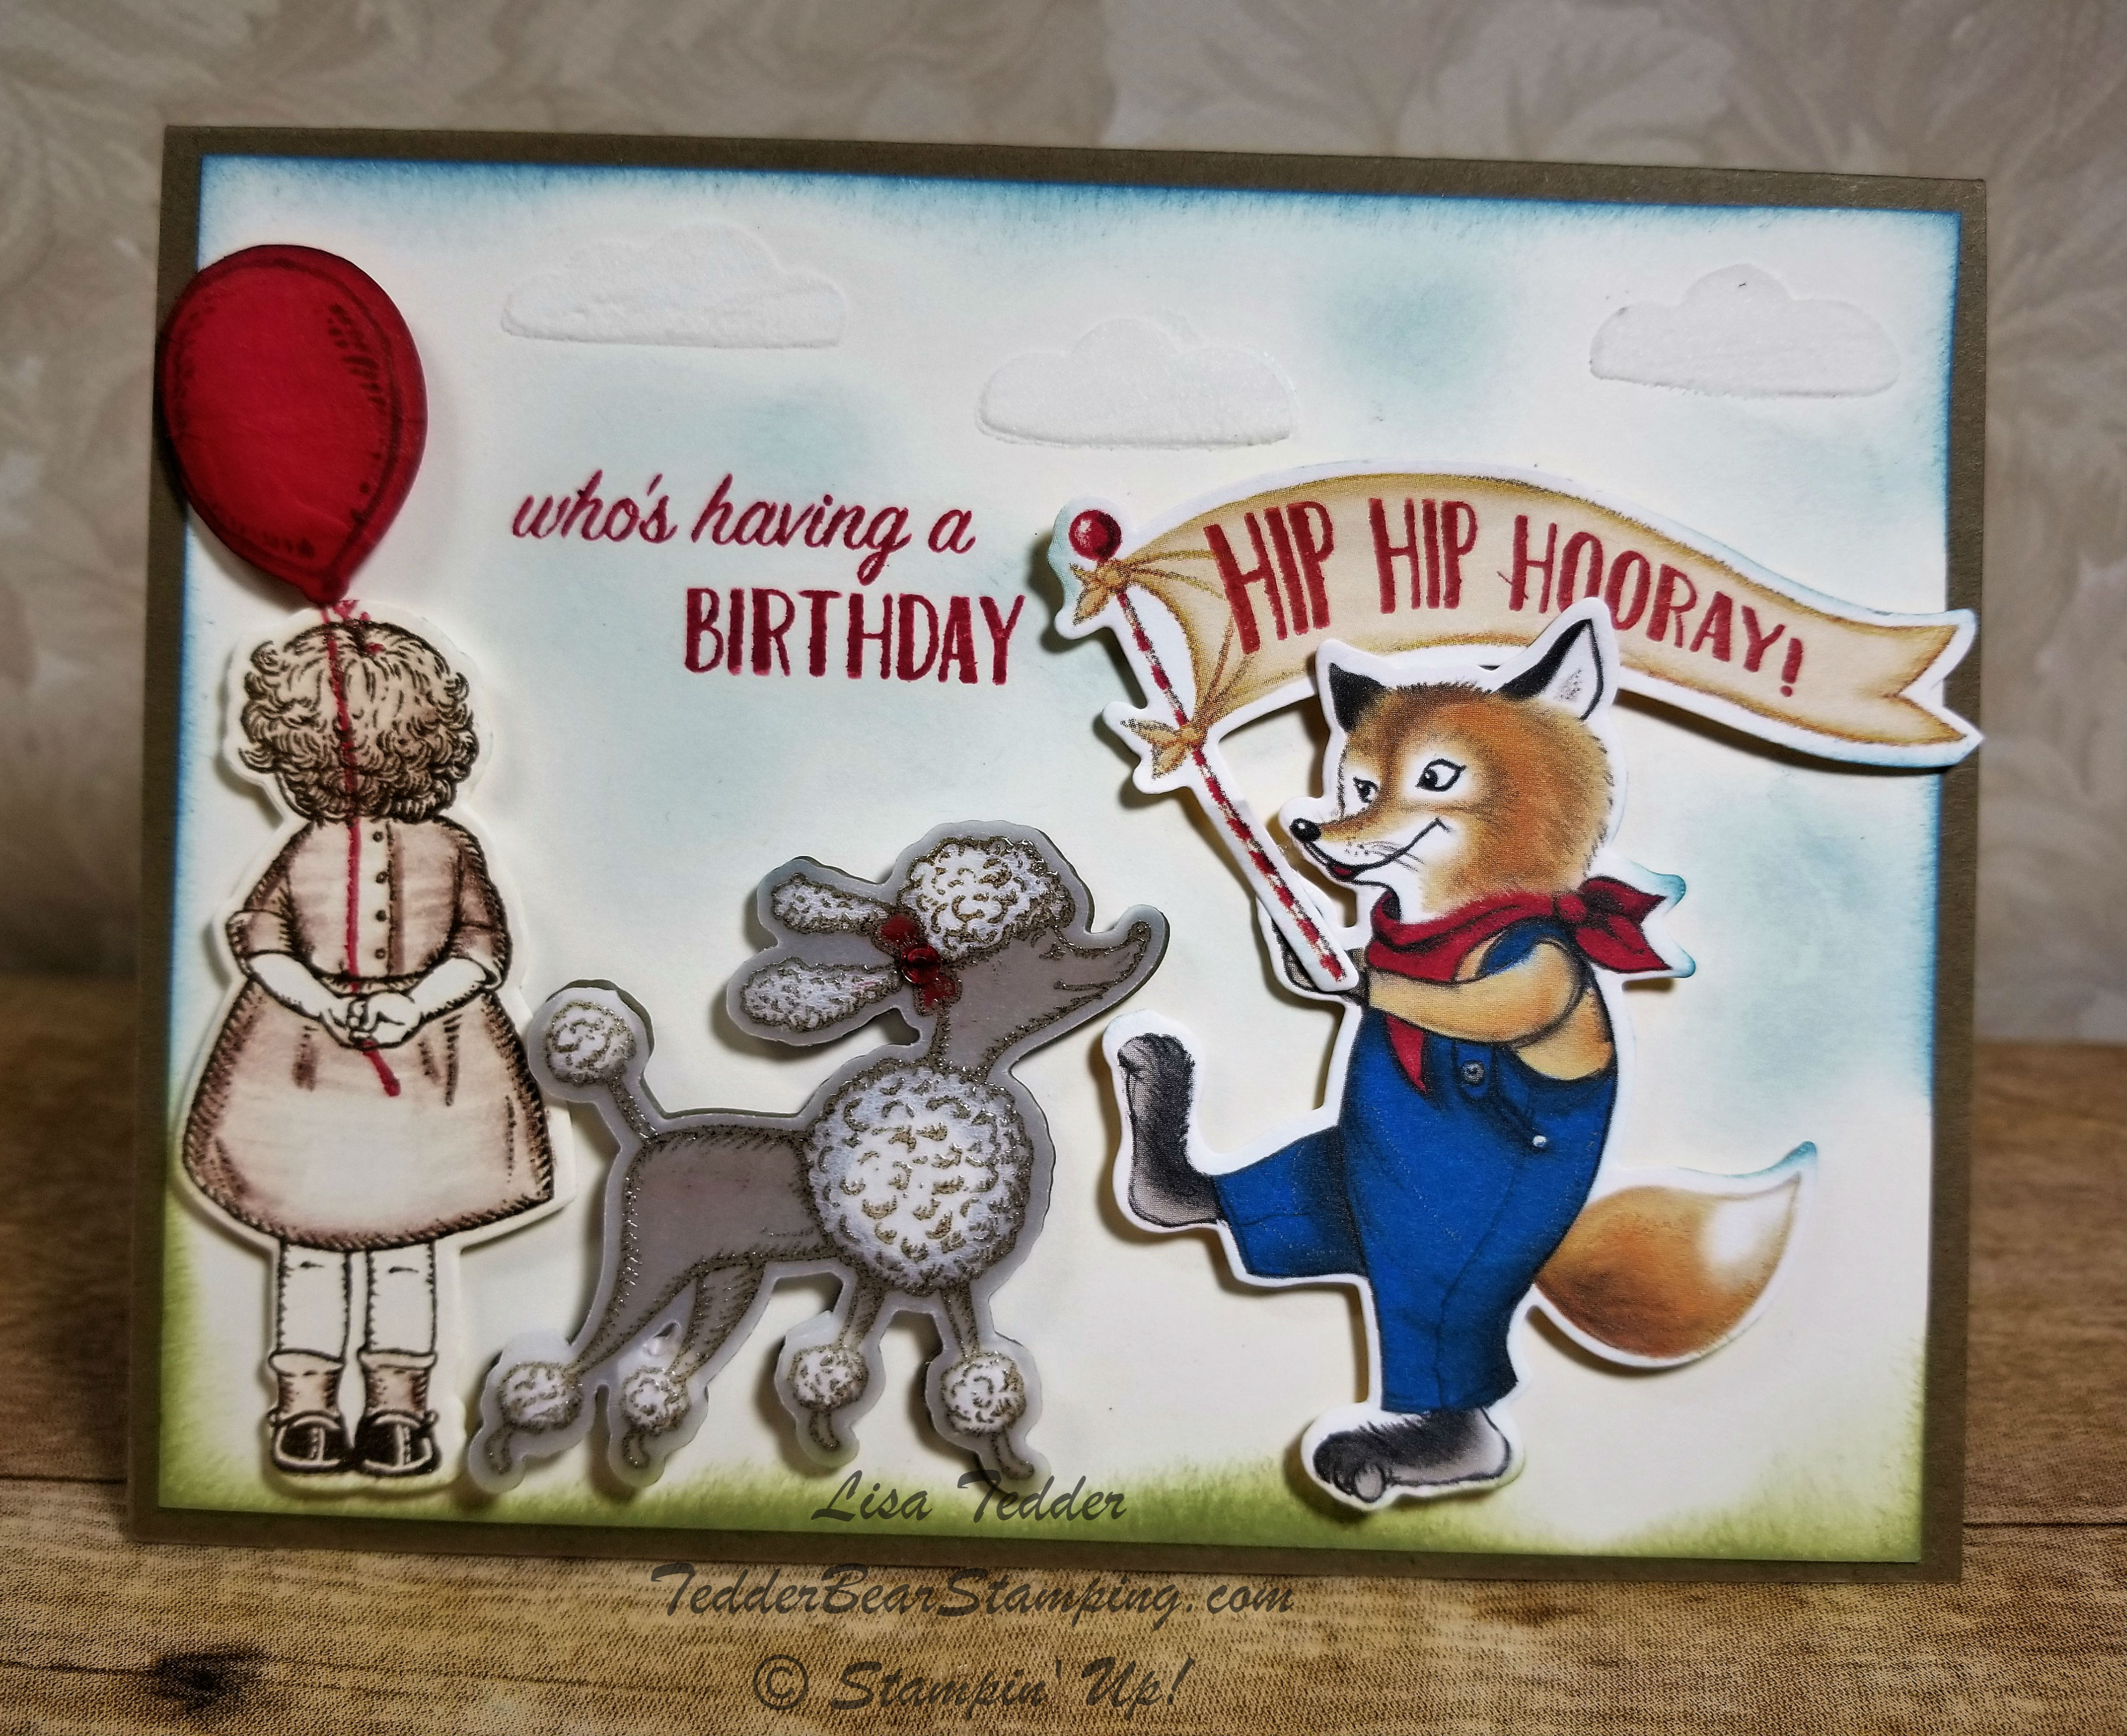
Here’s my card:
Isn’t it cute!!?? Same as last month, I had a totally different card planned, but I didn’t think it mustered! I came home from a stamp class today and sat right down and made this one! I love how the dog has such puffy fur! Want to know how I did that?
That’s Vellum that I stamped the dog on, using Soft Suede (then embossed with clear), I then turned it over onto one of our stamp mats, and using the stylus from the Score Board I press in circular motions (gently at first!!) on the places for the white fur, it makes the Vellum raise up and turn white!! Cool Right!!?? I then cut ANOTHER dog out of Soft Suede (using the thinlit of course!) and popped up the Vellum, putting the mini dimensionals (YUM!) under the pom pom balls on his feet and front!! You can’t see them, can you!? That’s because the Vellum is so white that you can place them behind and it disappears! I LOVE this technique!
Can you see the clouds in the sky?! Those are made with Stampin’ Up!’s Embossing Paste and the masks!
The little girl AND the dog are stamped, but the fox is cut out of the Designer Series Paper! LOVE, love, love this suite!
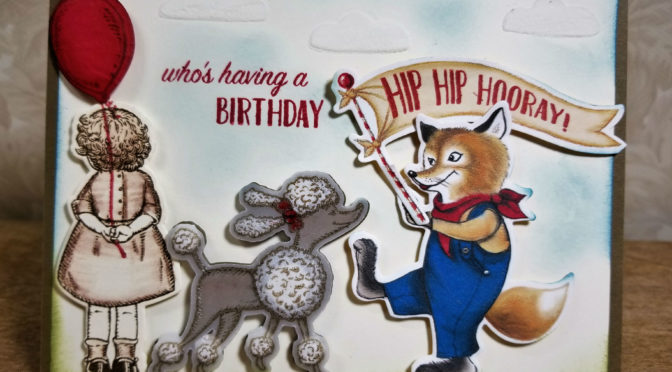
Here’s a close up of the puffy:
The ‘fixin’s’ for this card are listed below, click on any picture and you will be taken to my Online Store! When you order from me, you will receive a handmade card, plus a little thank you gift! Please use the Hostess code: C62FFAR3
I love stamping, and if you live near me I would love for you to come stamp with me! I hope you enjoyed this post as much as I have!
I also have blog candy!!
You can get in on the drawing by posting comments here on this blog (any post! or multiple posts!) or on my Facebook page and I will put your name down each and every time you comment! But be aware…..there are some that follow me that take that comment VERY seriously! I’ve had her comment on each and every post that I make and she also comments on my Facebook page, Twitter AND my Instagram! She’s one serious girl! YOU know who you are, and I appreciate you very much! 🙂
The moral of the story is if you REALLY want to win my Blog Candy comment on everything! I put the names into a Name Generator so I have NO say on who wins!
Lisa Tedder
TedderBearStamping
A California Girl living in North Carolina!
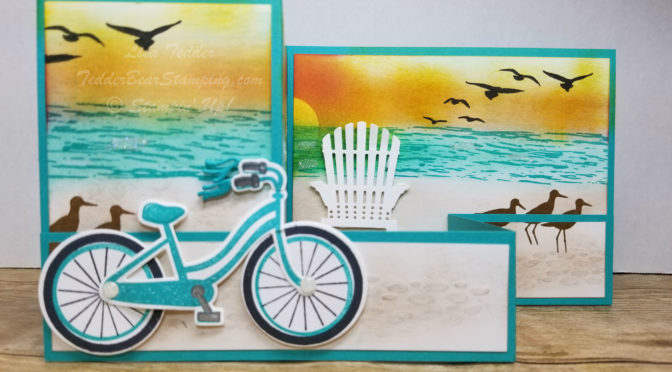
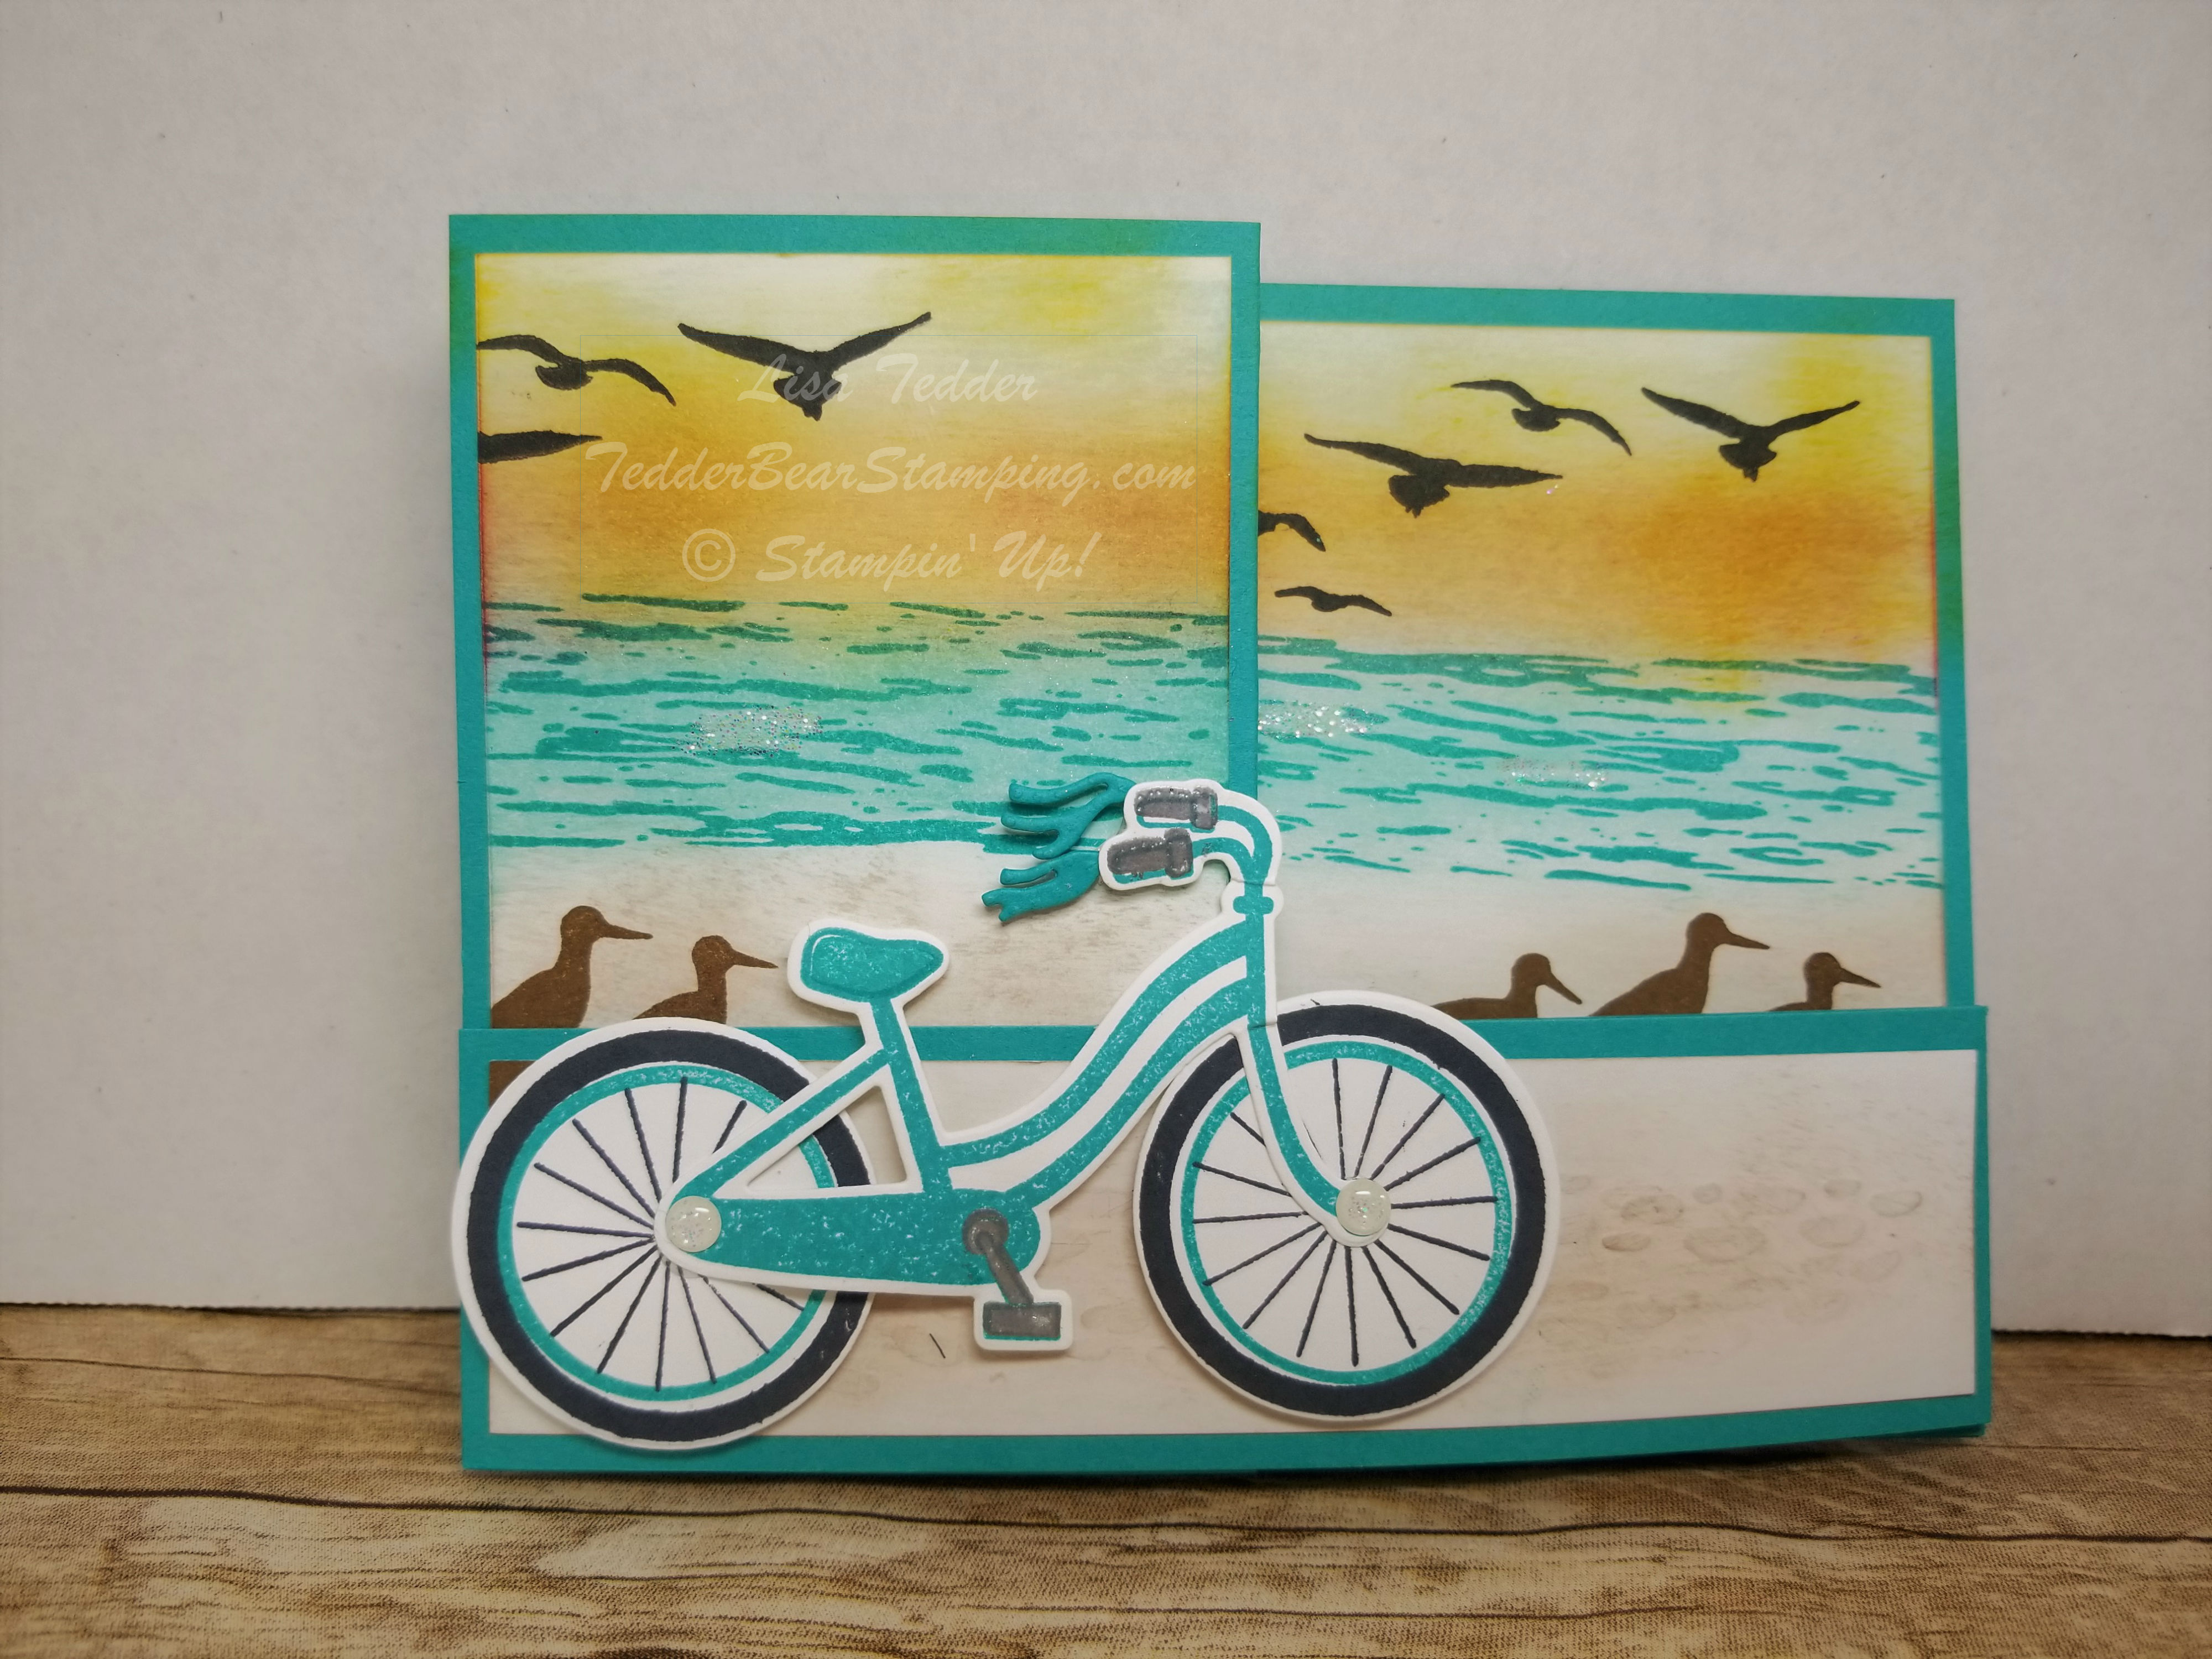
I was perusing Pinterest seeing what I could make, and I found a Z fold card by Karen Watts and loved her scene! Of course I had to start making my own! And being me, I HAD to add to what I saw on her card AND put in my NEW stamp sets that I just got from the NEW catalog by Stampin’ Up!
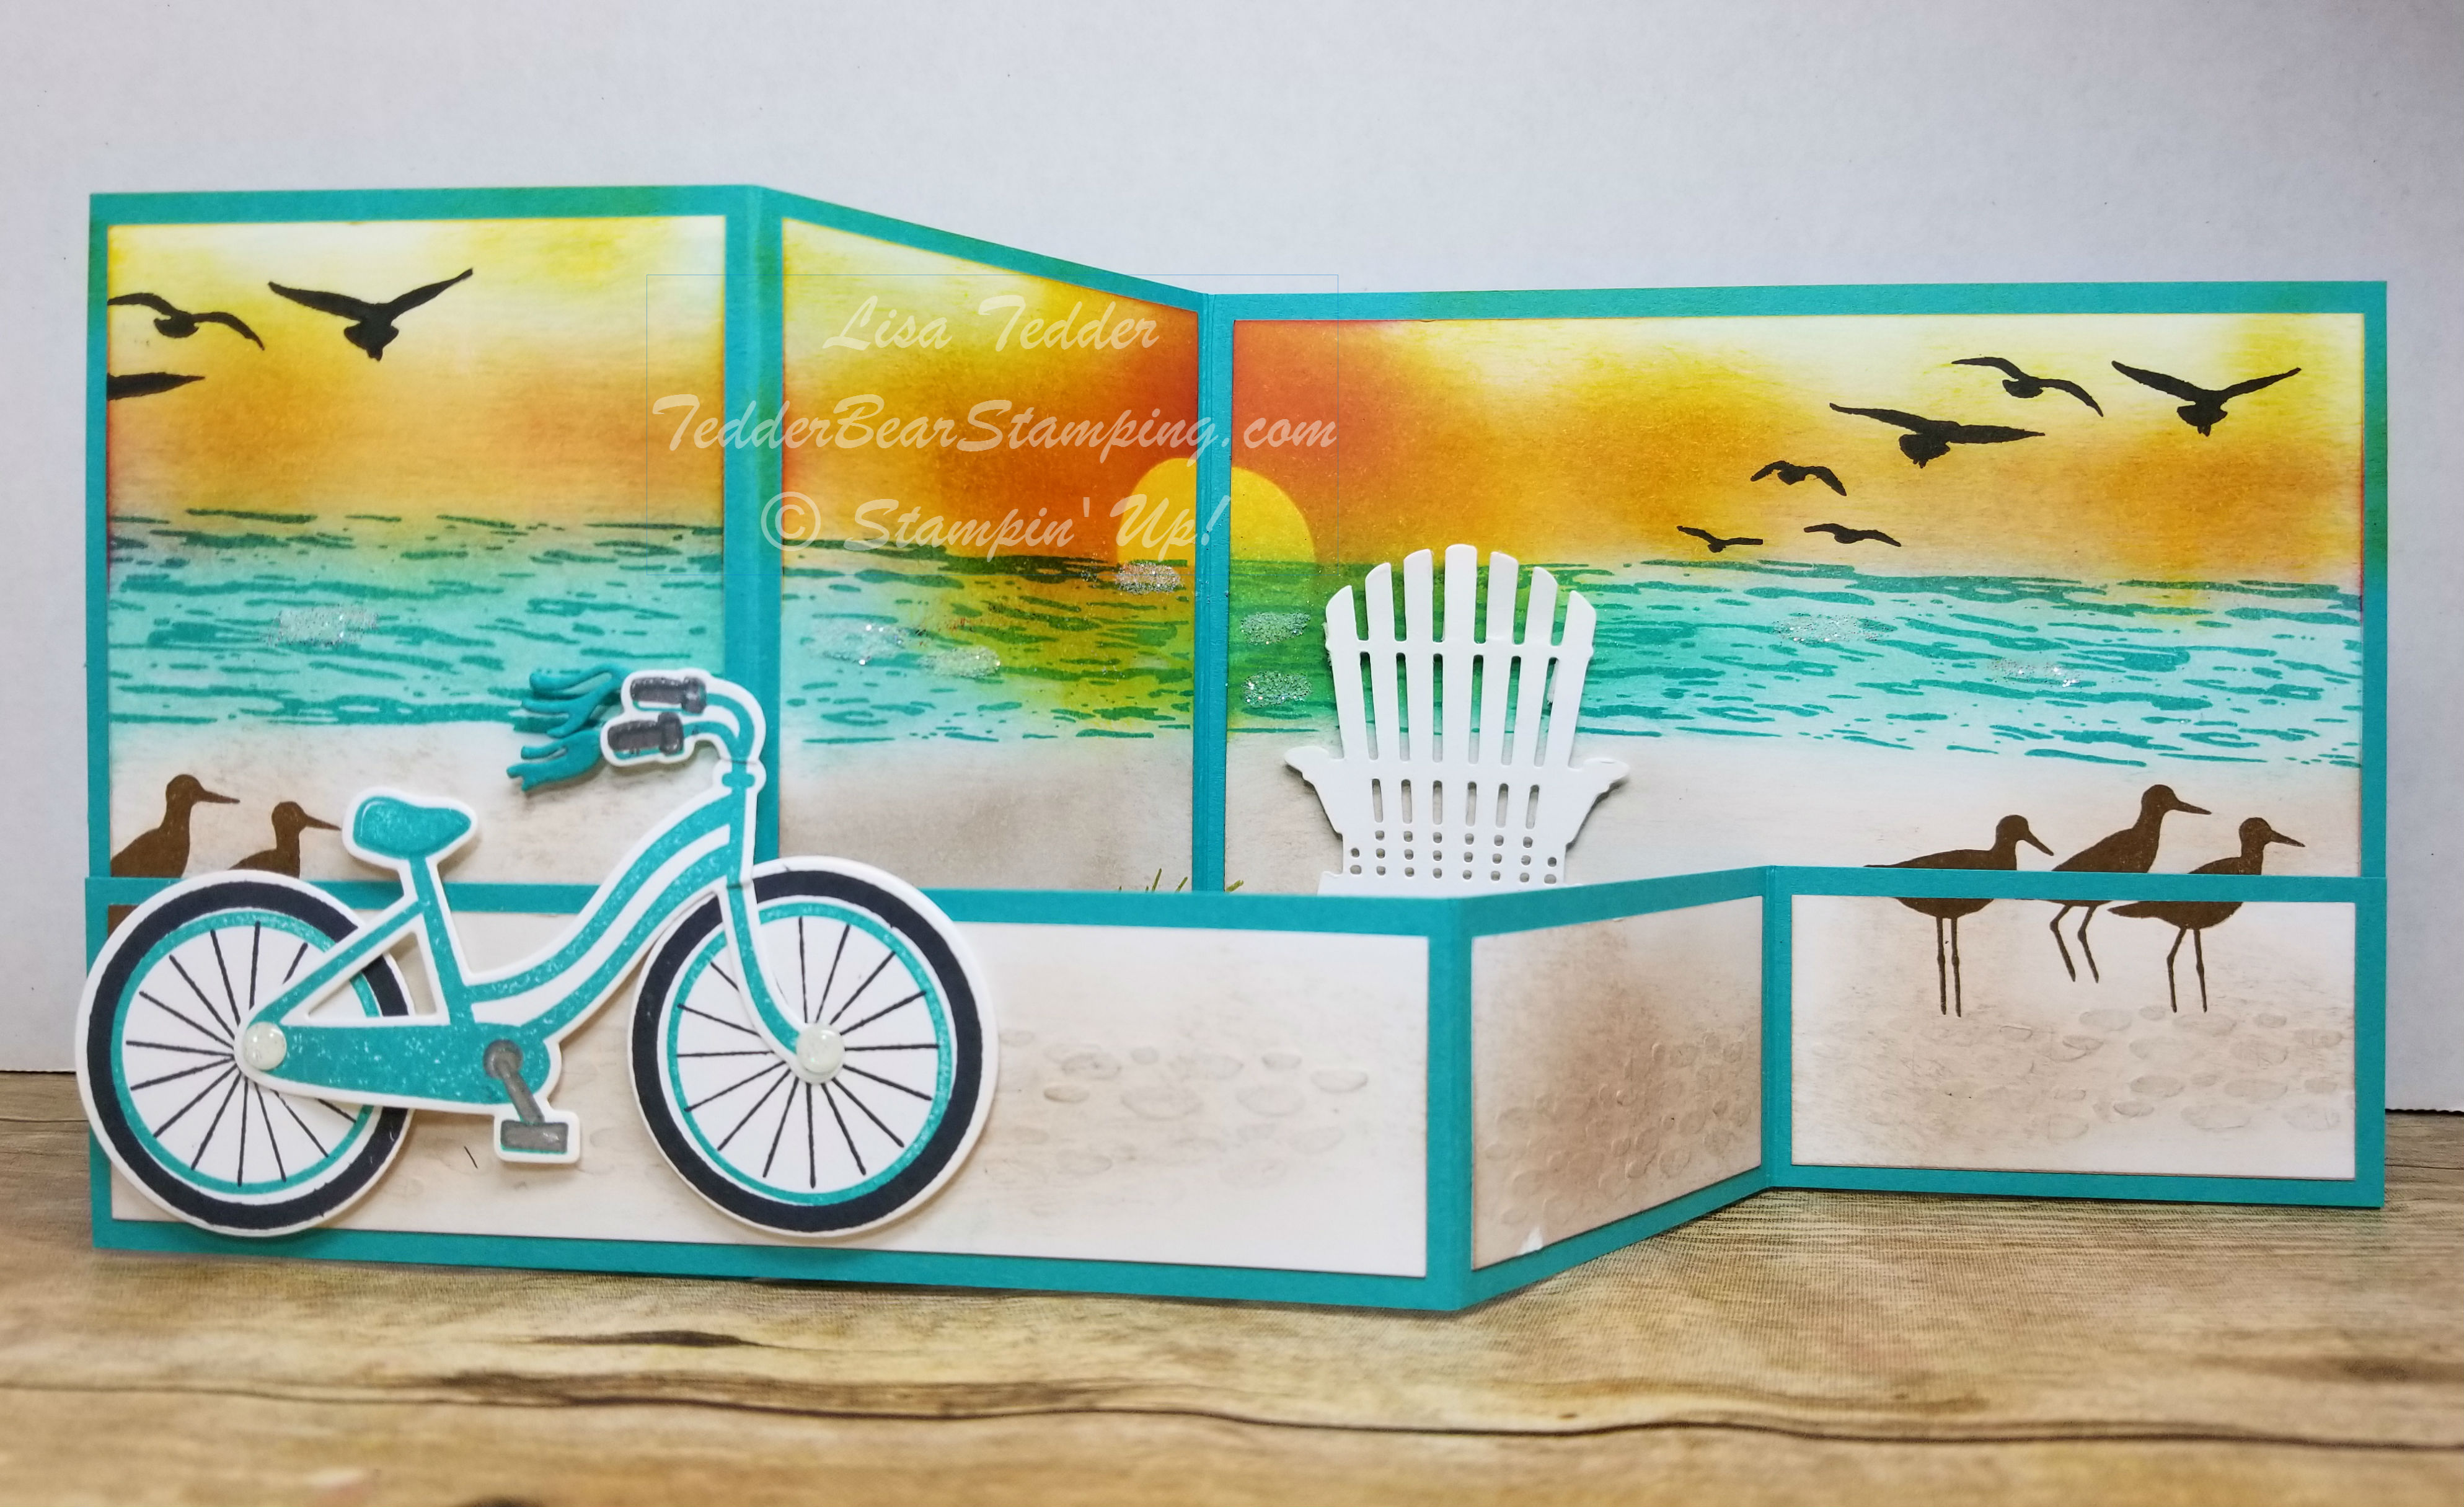
I wanted to use the Bike Ride, have the bike going along the beach, and since I had a beach I HAD (again) to use High Tide for the water! High Tide is the greatest stamp set for making water! And since I was using the water I also used the grass, birds on the beach and the birds that are flying! Birds!! For those that know me everytime I use the word/stamp birds, I think of Bambi and say it like Flower said it……..BIRD! 🙂
I also wanted to pull in Seasonal Layers with their Beach Chair! That is such a fun set! Ok, I admit it…….Stampin’ Up! has waaaaaaay too many cute sets! They are fun to play with and BOY they are great for making a story!
Here is my card closed:
Cute, right?!!
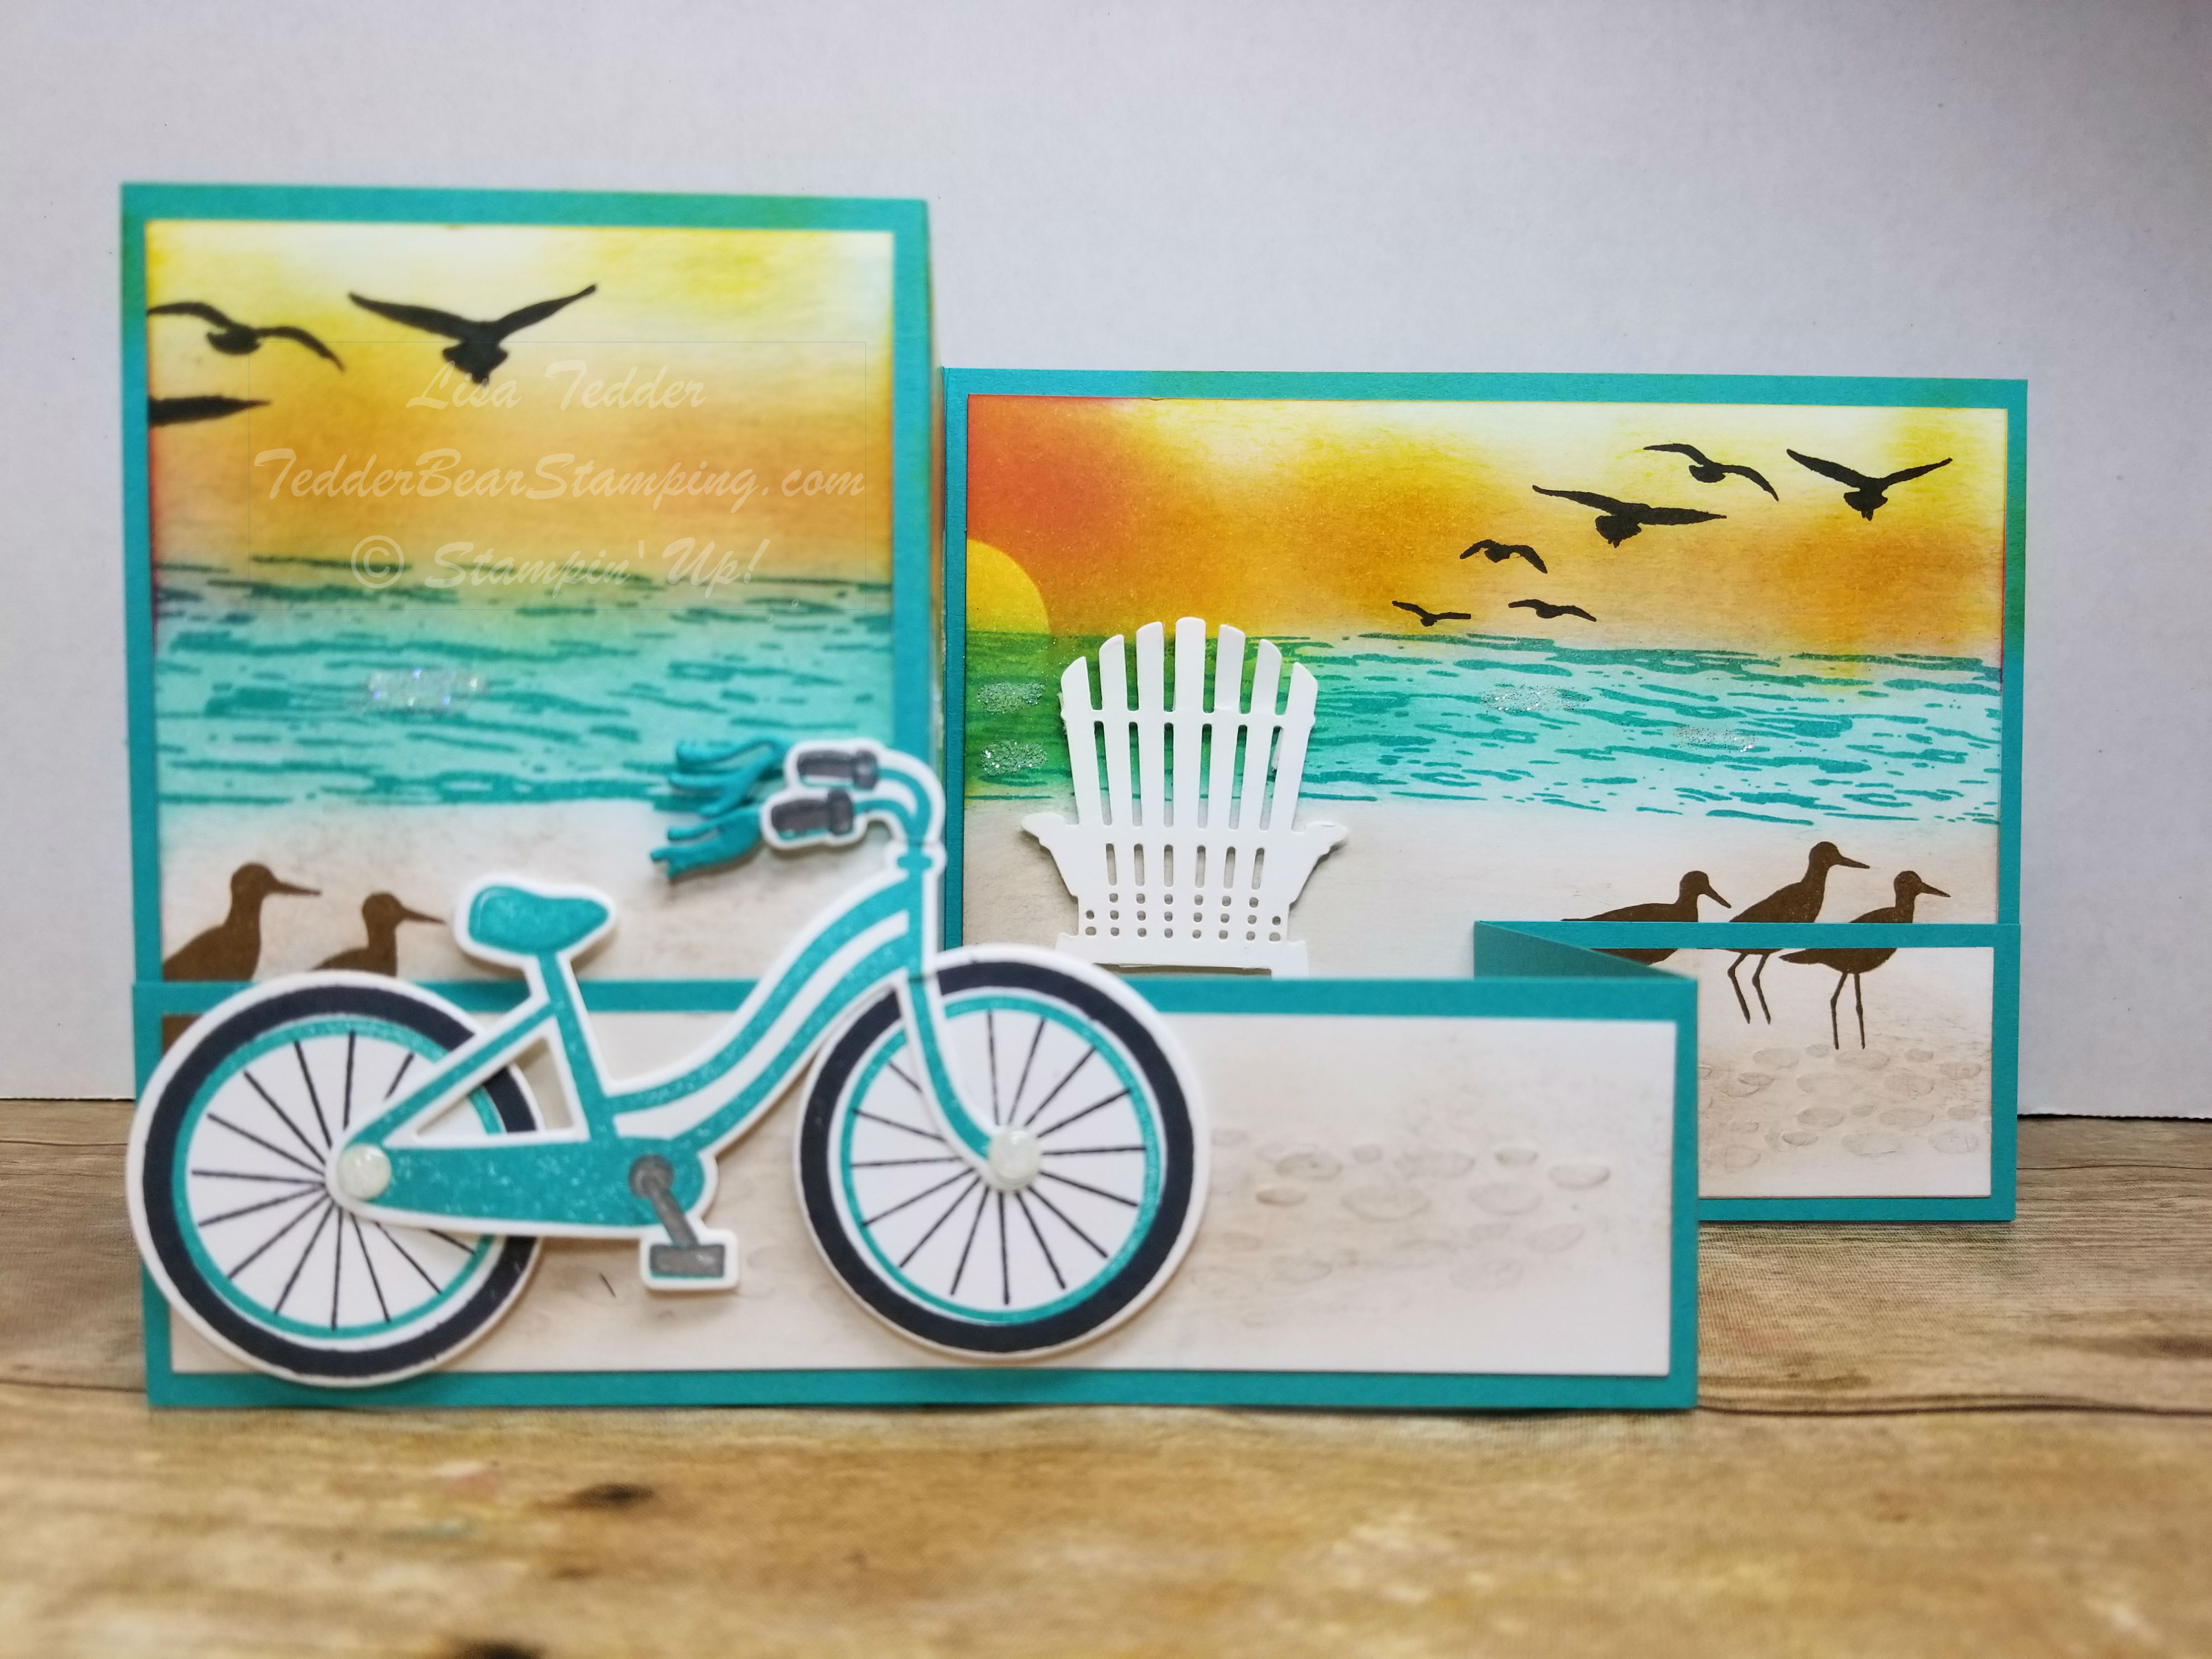
Here is the card partially open:
There’s the chair! And now open all the way:
I LOVE how it came out, don’t you!? Not sure what sentiment to put on, or if it needs one……what do you think? Sometimes when I send out my greeting cards, I don’t put a greeting on it, since I want to say what I want to say and let the card speak for itself! Do you ever do that?
The Deets:
Cardstock
Bermuda Bay: 4 1/4″ x 11″ scored at 8 1/4″, 1 1/2″ x 11, scored in the same places (when you put on card, the folds are opposite)
Whisper White: 5 1/4″ x 4″, 2 1/2″ x 4 (x’s 2), 5 1/4″ x 1 1/4″, 2 1/2″ x 1 1/4″ (xs 2) and scraps for stamping and chair.
I used a post it for the sun, JUST be sure and cut the circle in HALF before you sponge sun! LOL For some reason my mind couldn’t fathom that when I stamped the ocean that it would cover the circle….kind of hard when I didn’t take off the circle when I stamped the ocean OVER the circle! Let me tell you, for some reason (though I’ve done it before) it didn’t dawn on me to cut the circle in half since I was ONLY using half of it to mask the sun. Sheesh!! I’m sure I am the ONLY one that happens to!
Now, on to my Blog Candy!!
You can get in on the drawing by posting comments here on this blog (any post! or multiple posts!) or on my Facebook page and I will put your name down each and every time you comment! But be aware…..there are some that follow me that take that comment VERY seriously! I’ve had her comment on each and every post that I make and she also comments on my Facebook page, Twitter AND my Instagram! She’s one serious girl! YOU know who you are, and I appreciate you very much! 🙂
The moral of the story is if you REALLY want to win my Blog Candy comment on everything! I put the names into a Name Generator so I have NO say on who wins!
It’s Washi Tape!! These are from (lf – rt), Affectionately Yours and Botanical Gardens!! Yes, these can be yours! I am running this blog candy starting yesterday (since I said I would!) until July 4th! I think that is a great day to be giving something away for FREE! Celebrating our Freedom in a way!
Good Luck!
Click on any image below and you will be taken to my Online Store! Please use the Hostess Code: C62FFAR3 Any order you place with me online, I will be sending you a handmade card plus a little thank you gift!
I really enjoyed making this card and this post, I hope you did too! Let me know what you think! Until next time!
Lisa Tedder
TedderBearStamping
A California girl living in North Carolina
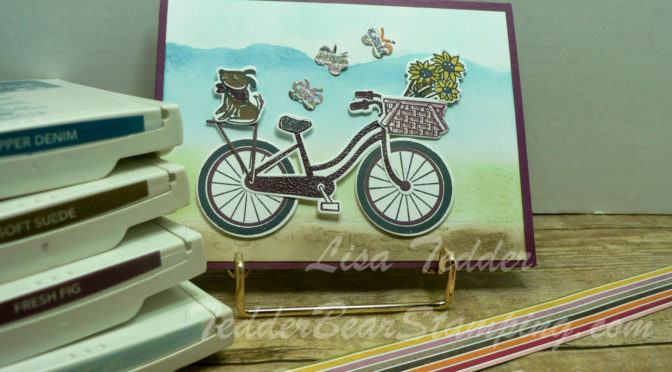
Today the mail came and inside was my framelits for Bike Ride from Stampin’ Up! Of course I had to give it a try!
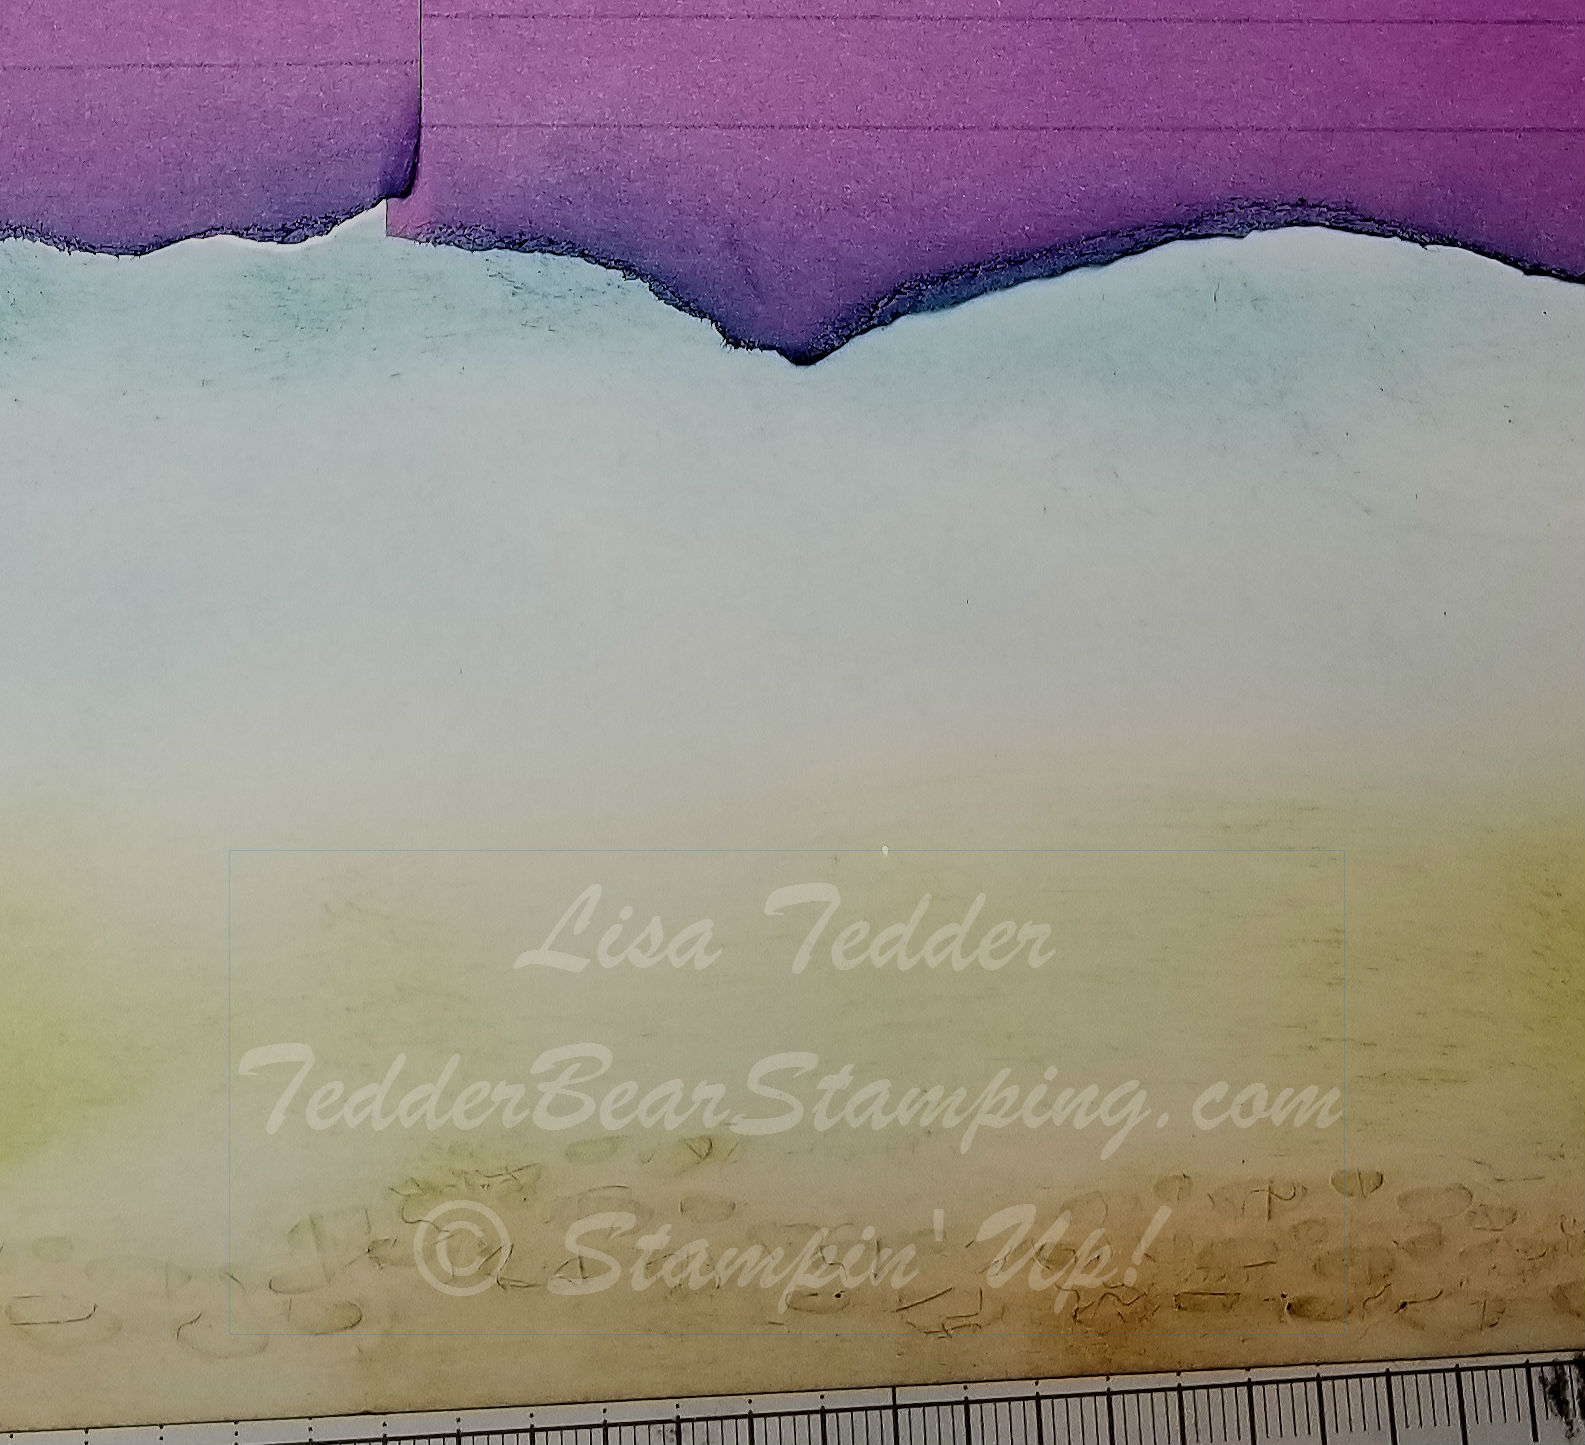
I wanted mountains in my picture so I tore some Post-It notes and stuck them to the top of my card:
I then sponged lightly Dapper Denim at the top, making the part closer to the Sticky Notes darker, and then fading the color away.
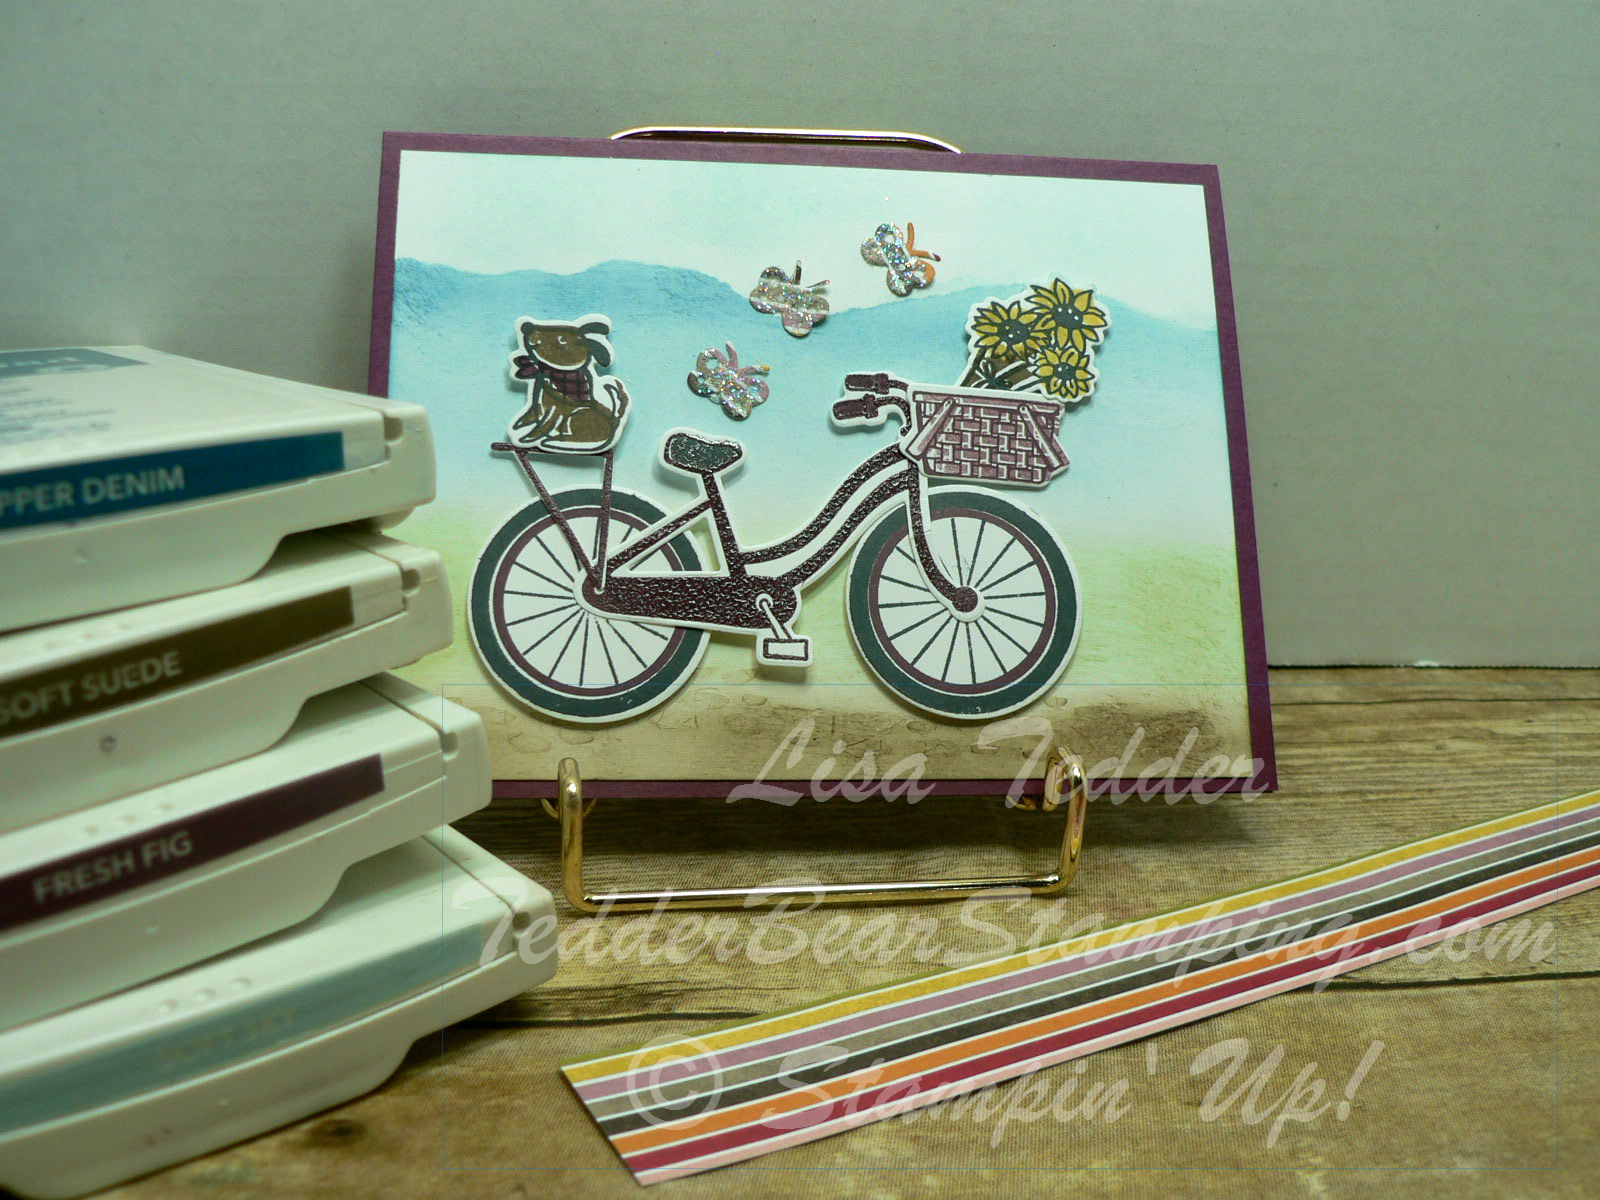
I ran the cardstock that I was using through the Big Shot with the bumpy rock thinlit under the paper, then ran it though. This gave the Cardstock the bumps! They look like rocks so I sponged over them using Soft Suede, this highlighted the rocks! I was so tickled by this! Normally you put your thinlit OVER your cardstock to cut it out, but this time I wanted the impression. Came out pretty didn’t it!?
I stamped the Bike in Fresh Fig, SU’s NEW In Color! I also stamped the basket in it! The dog’s scarf is Fresh Fig too!
Here is the card:
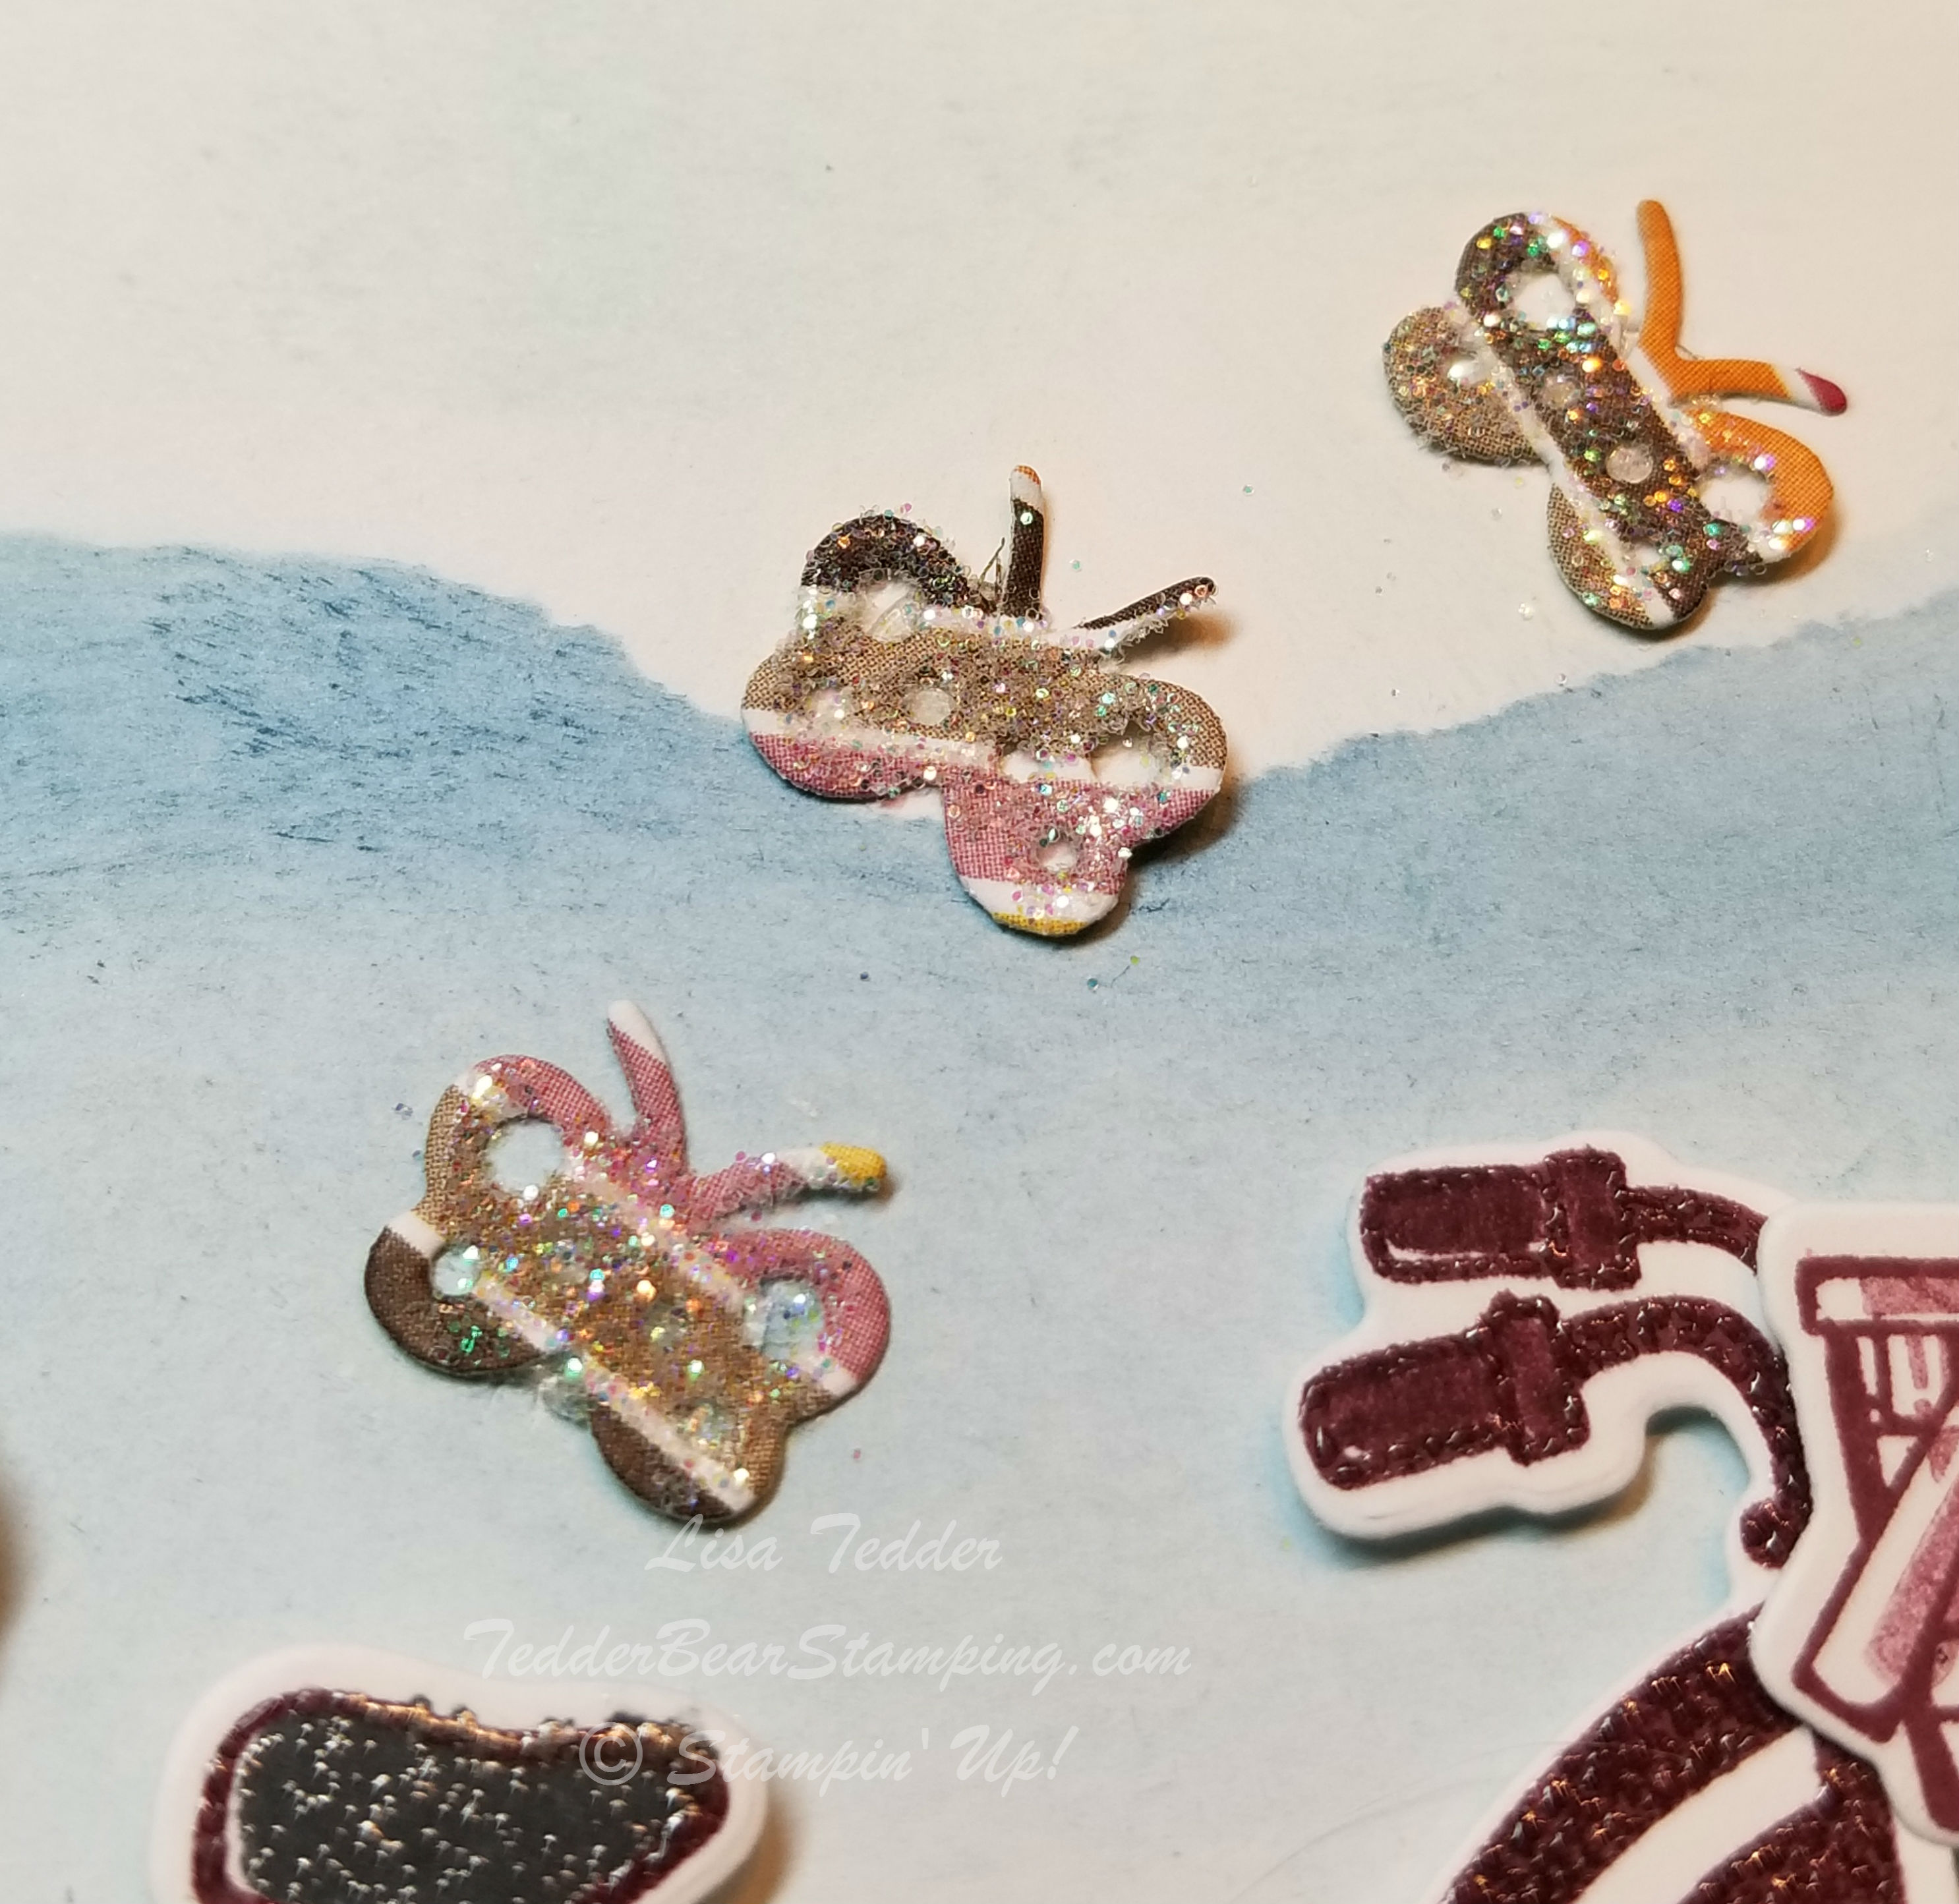
The thinlits I used are the bike frame, dog, basket, flowers and butterflies. Oh! And my favorite the rocks!
The butterflies are cut out of the Designer Series Paper Birthday Memories:
I LOVE this thinlit! Just cut out the butterfly and it has the antenna, wings and ALL! I HAD to add Dazzling Diamonds to make them look even prettier!
The Measurements are the normal card size with the Base being in Fresh Fig 8 1/2″ x 4 1/4″, scored at the 5 1/2″ line to make the card.
The Whisper White is 4″ x 5 1/4″ And scraps for all the cut outs! This was a really fun card to make!! I love how you can make so many different things be on the bike! Just change out your background and the stamp set can be for sooooo many different occasions!
I hope you enjoyed your visit today! I have more Blog Candy to give away on here tomorrow!! Be sure and visit so you can be in the drawing to win!
Click on any of the pictures below to be taken to my Online Store! If you purchase goodies from me, I will send you a handmade card and a little gift! Please use the Hostess Code: C62FFAR3
Lisa Tedder
TedderBearStamping
A California girl living in North Carolina Product List
Today I am going to share with you a card I am making in this month’s classes! I just LOOOOOVE this new stamp set Birthday Delivery! The best part of this set is that the thinlits cut out the stamped image AND the image printed on the DSP!! (Designer Series Paper)
If you are in a hurry and don’t want to stamp and color an image (it doesn’t happen very often!) you can always just take out the DSP and cut your image out of that! Stampin’ Up! has made it so simple to do a fast and easy card!
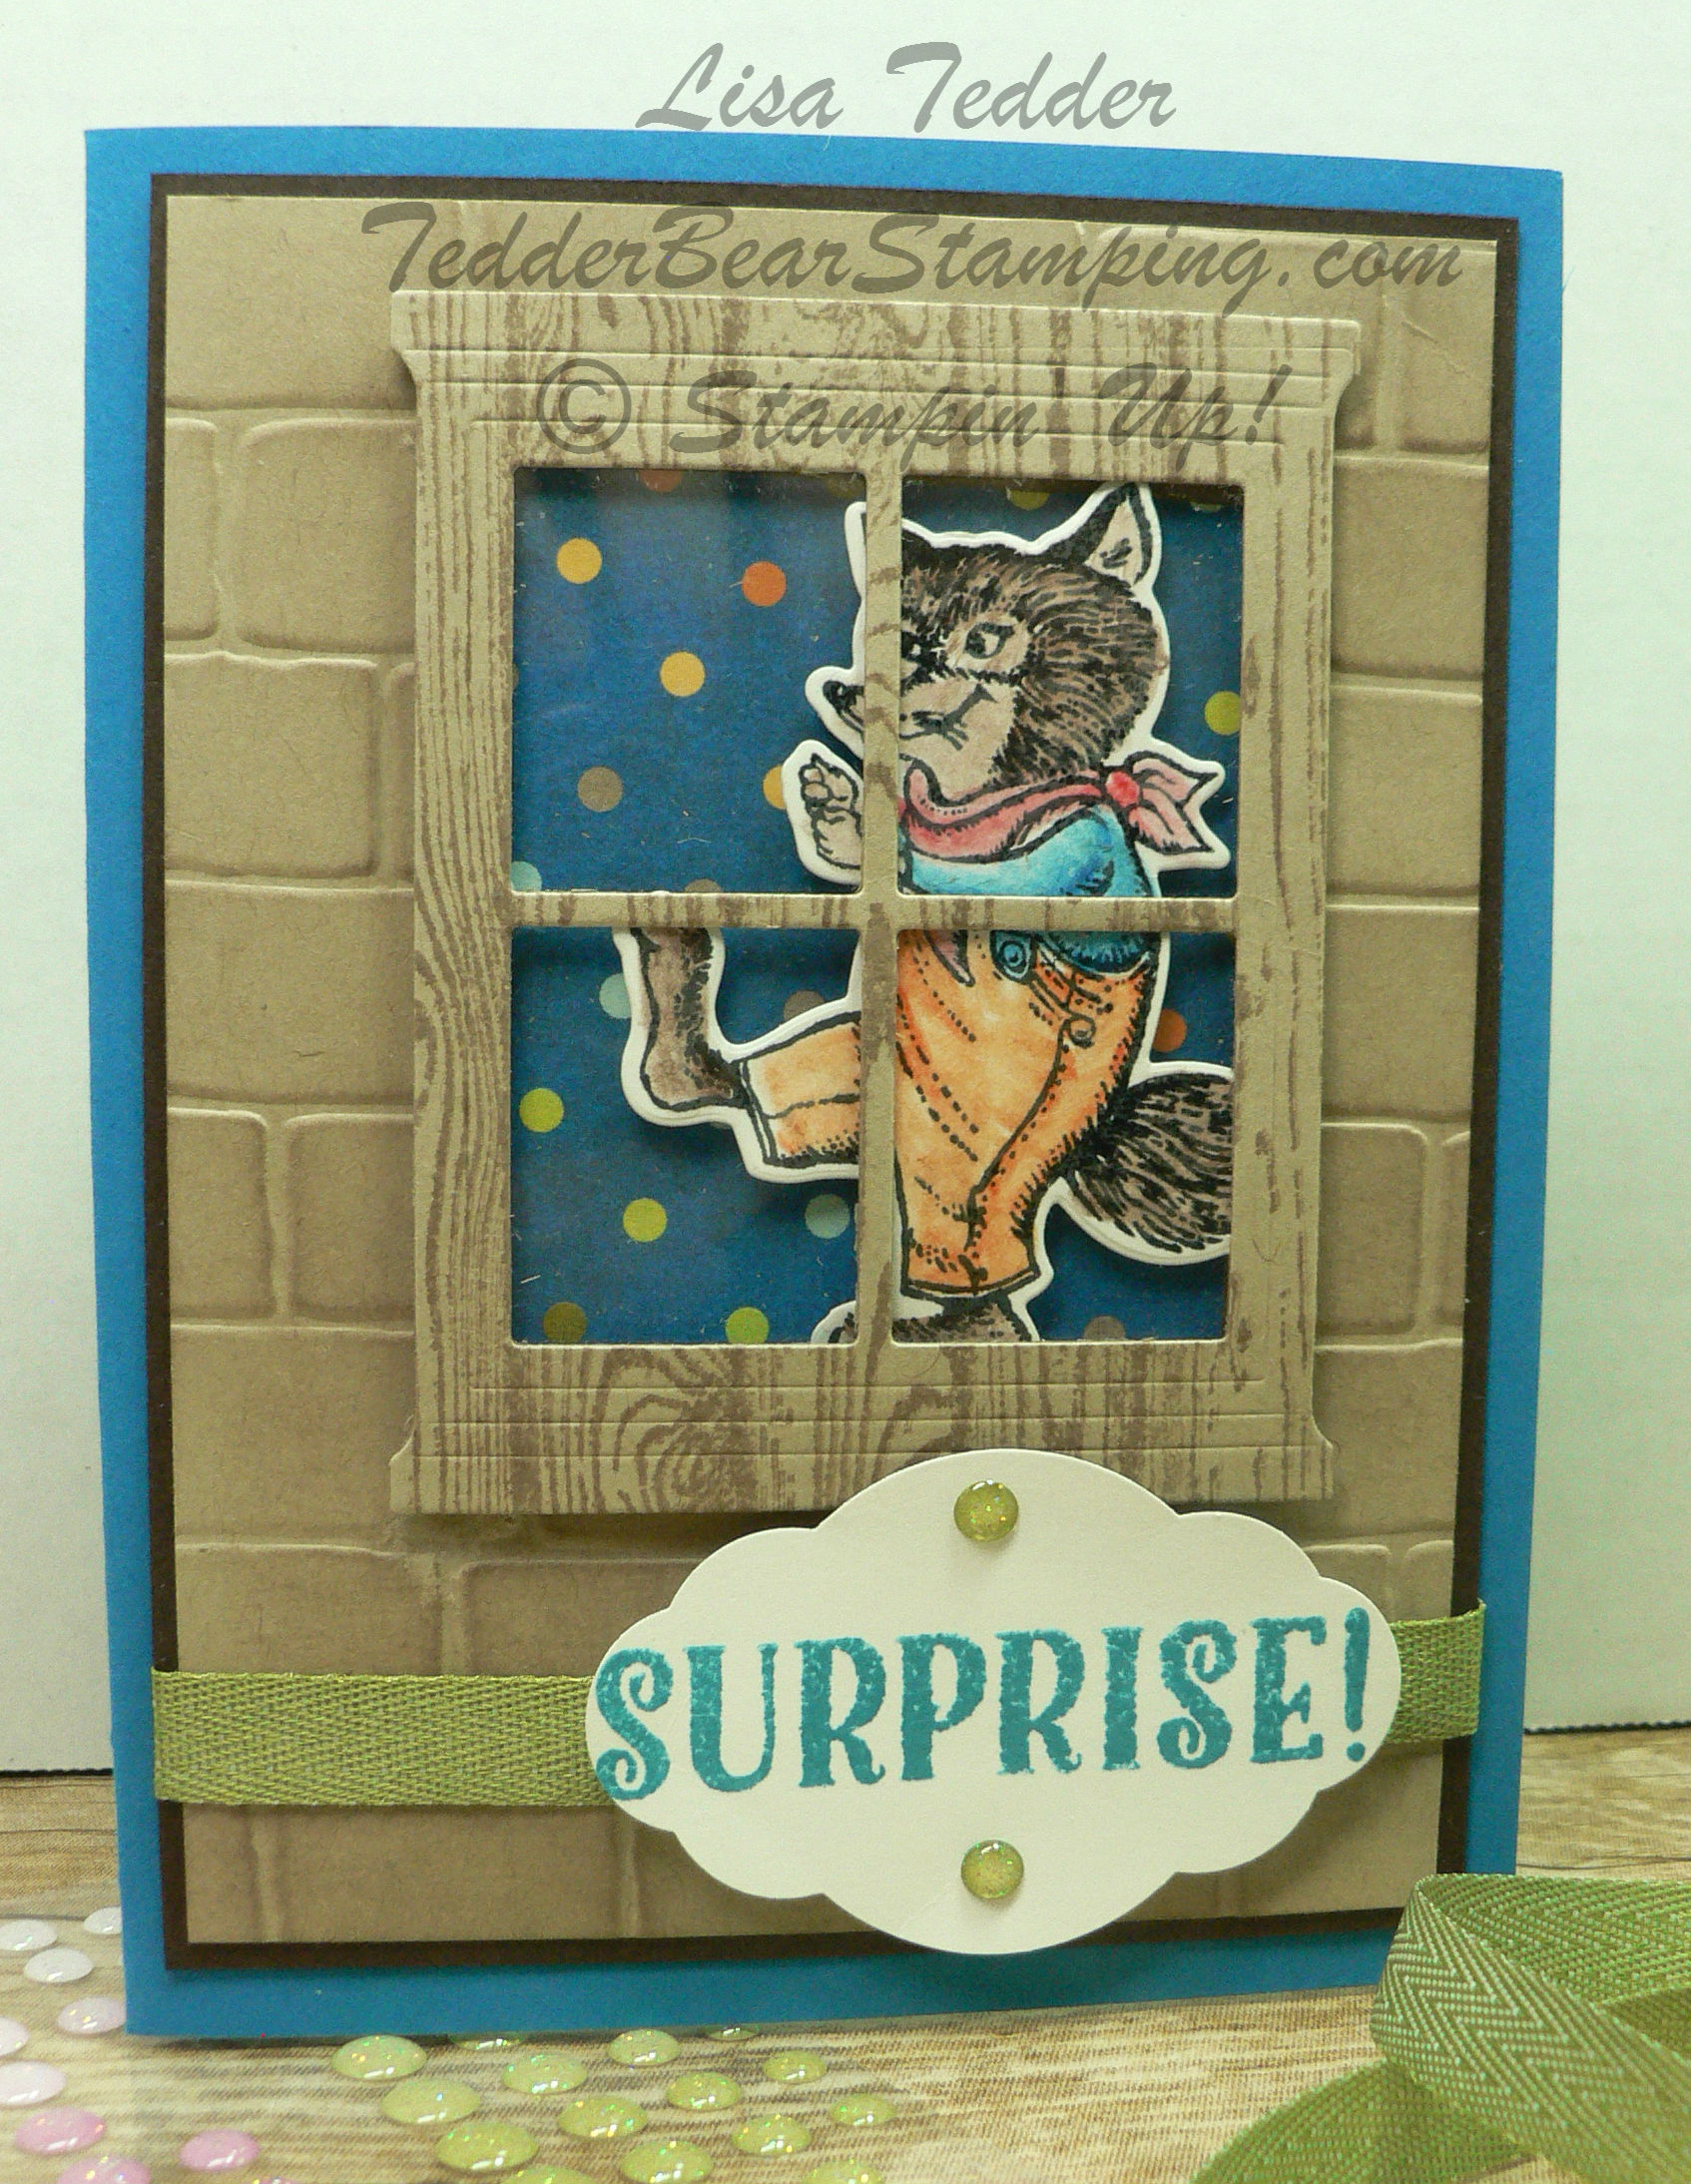
Here is the card I am doing in June’s class:
Isn’t he cute!!?? I used the Watercolor Pencils to color him in, and the Blender Pen to smoothe it all out! This is my new favorite way to color! No more streaks! No more worrying about putting too much ink on! Those pencils makes my job in blending so much easier! You HAVE to try them out!
I used the new punch, Pretty Label to stamp the Surprise! on and it fit perfectly! I used the Brick Wall embossing folder to make the ‘house’ part of the card and I used the Hearth and Home thinlits to make the window! Using Window Sheets the same width of the ‘window’ makes this look like a real window!
This is an impressive card, but it really is so easy! I hope you enjoyed this! Click on any product picture below and you will be taken straight to my online store!! When you place an order with me, I will send you a handmade card AND a small gift to let you know how much I appreciate you! Please use this Hostess code when ordering: C62FFAR3
Lisa Tedder
TedderBearStamping
A California Girl living in North Carolina!
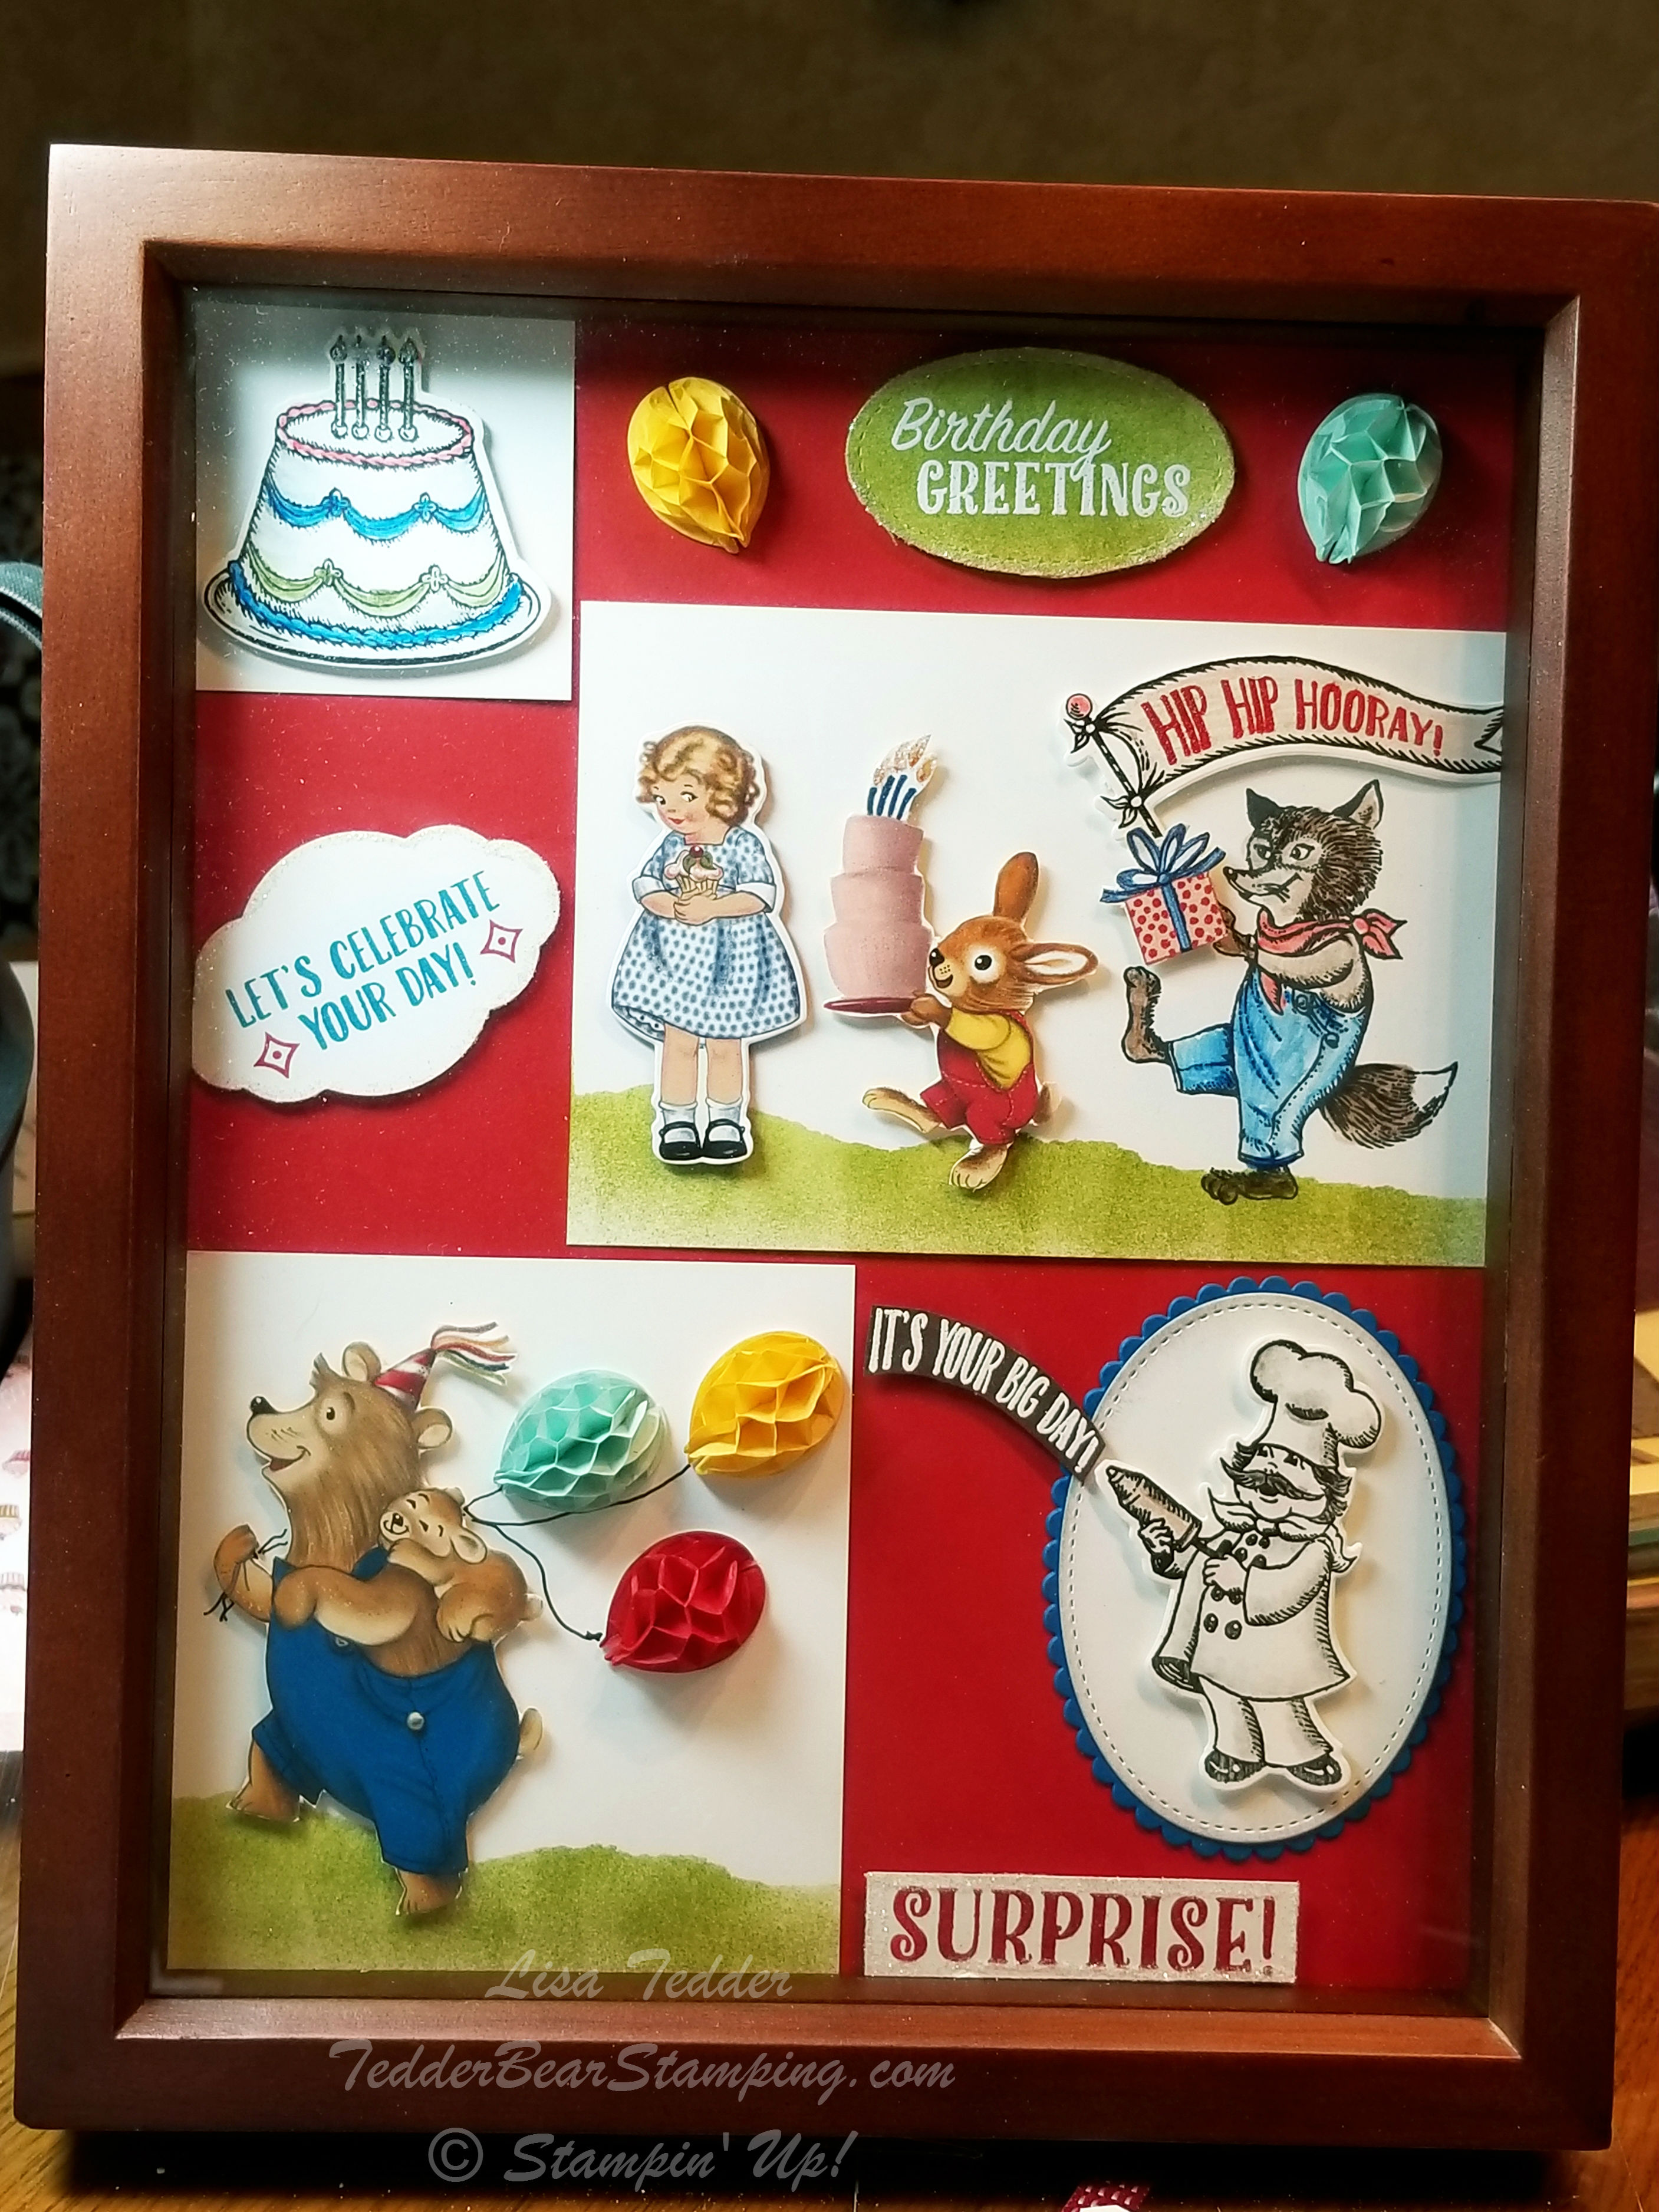
Last Friday, I had my Catalog Launch Party and I had two Prizes that those who attended could win!
The first one uses the Birthday Delivery bundle! LOVE this bundle, it is so much fun to play with! Did you know that the thinlits not only fit the STAMPED images, but also fits the images on the Designer Series Paper (aka DSP)?! It’s so versatile and you KNOW I love to get more from my stamping dollars!
I LOVE how the Chef has his can that will spray out the words “It’s your big day!” Isn’t that so cute! The balloons are fun to add, I had to ‘fussy cut’ the bear but it was super simple. I’m sorry to say that I gave this away BEFORE I measured it! I ‘think’ it was 8″ x 10″. I made it on Thursday and I had a winner for it on Friday! For the grass I sponged using Old Olive with a mask giving it that great wavy look!
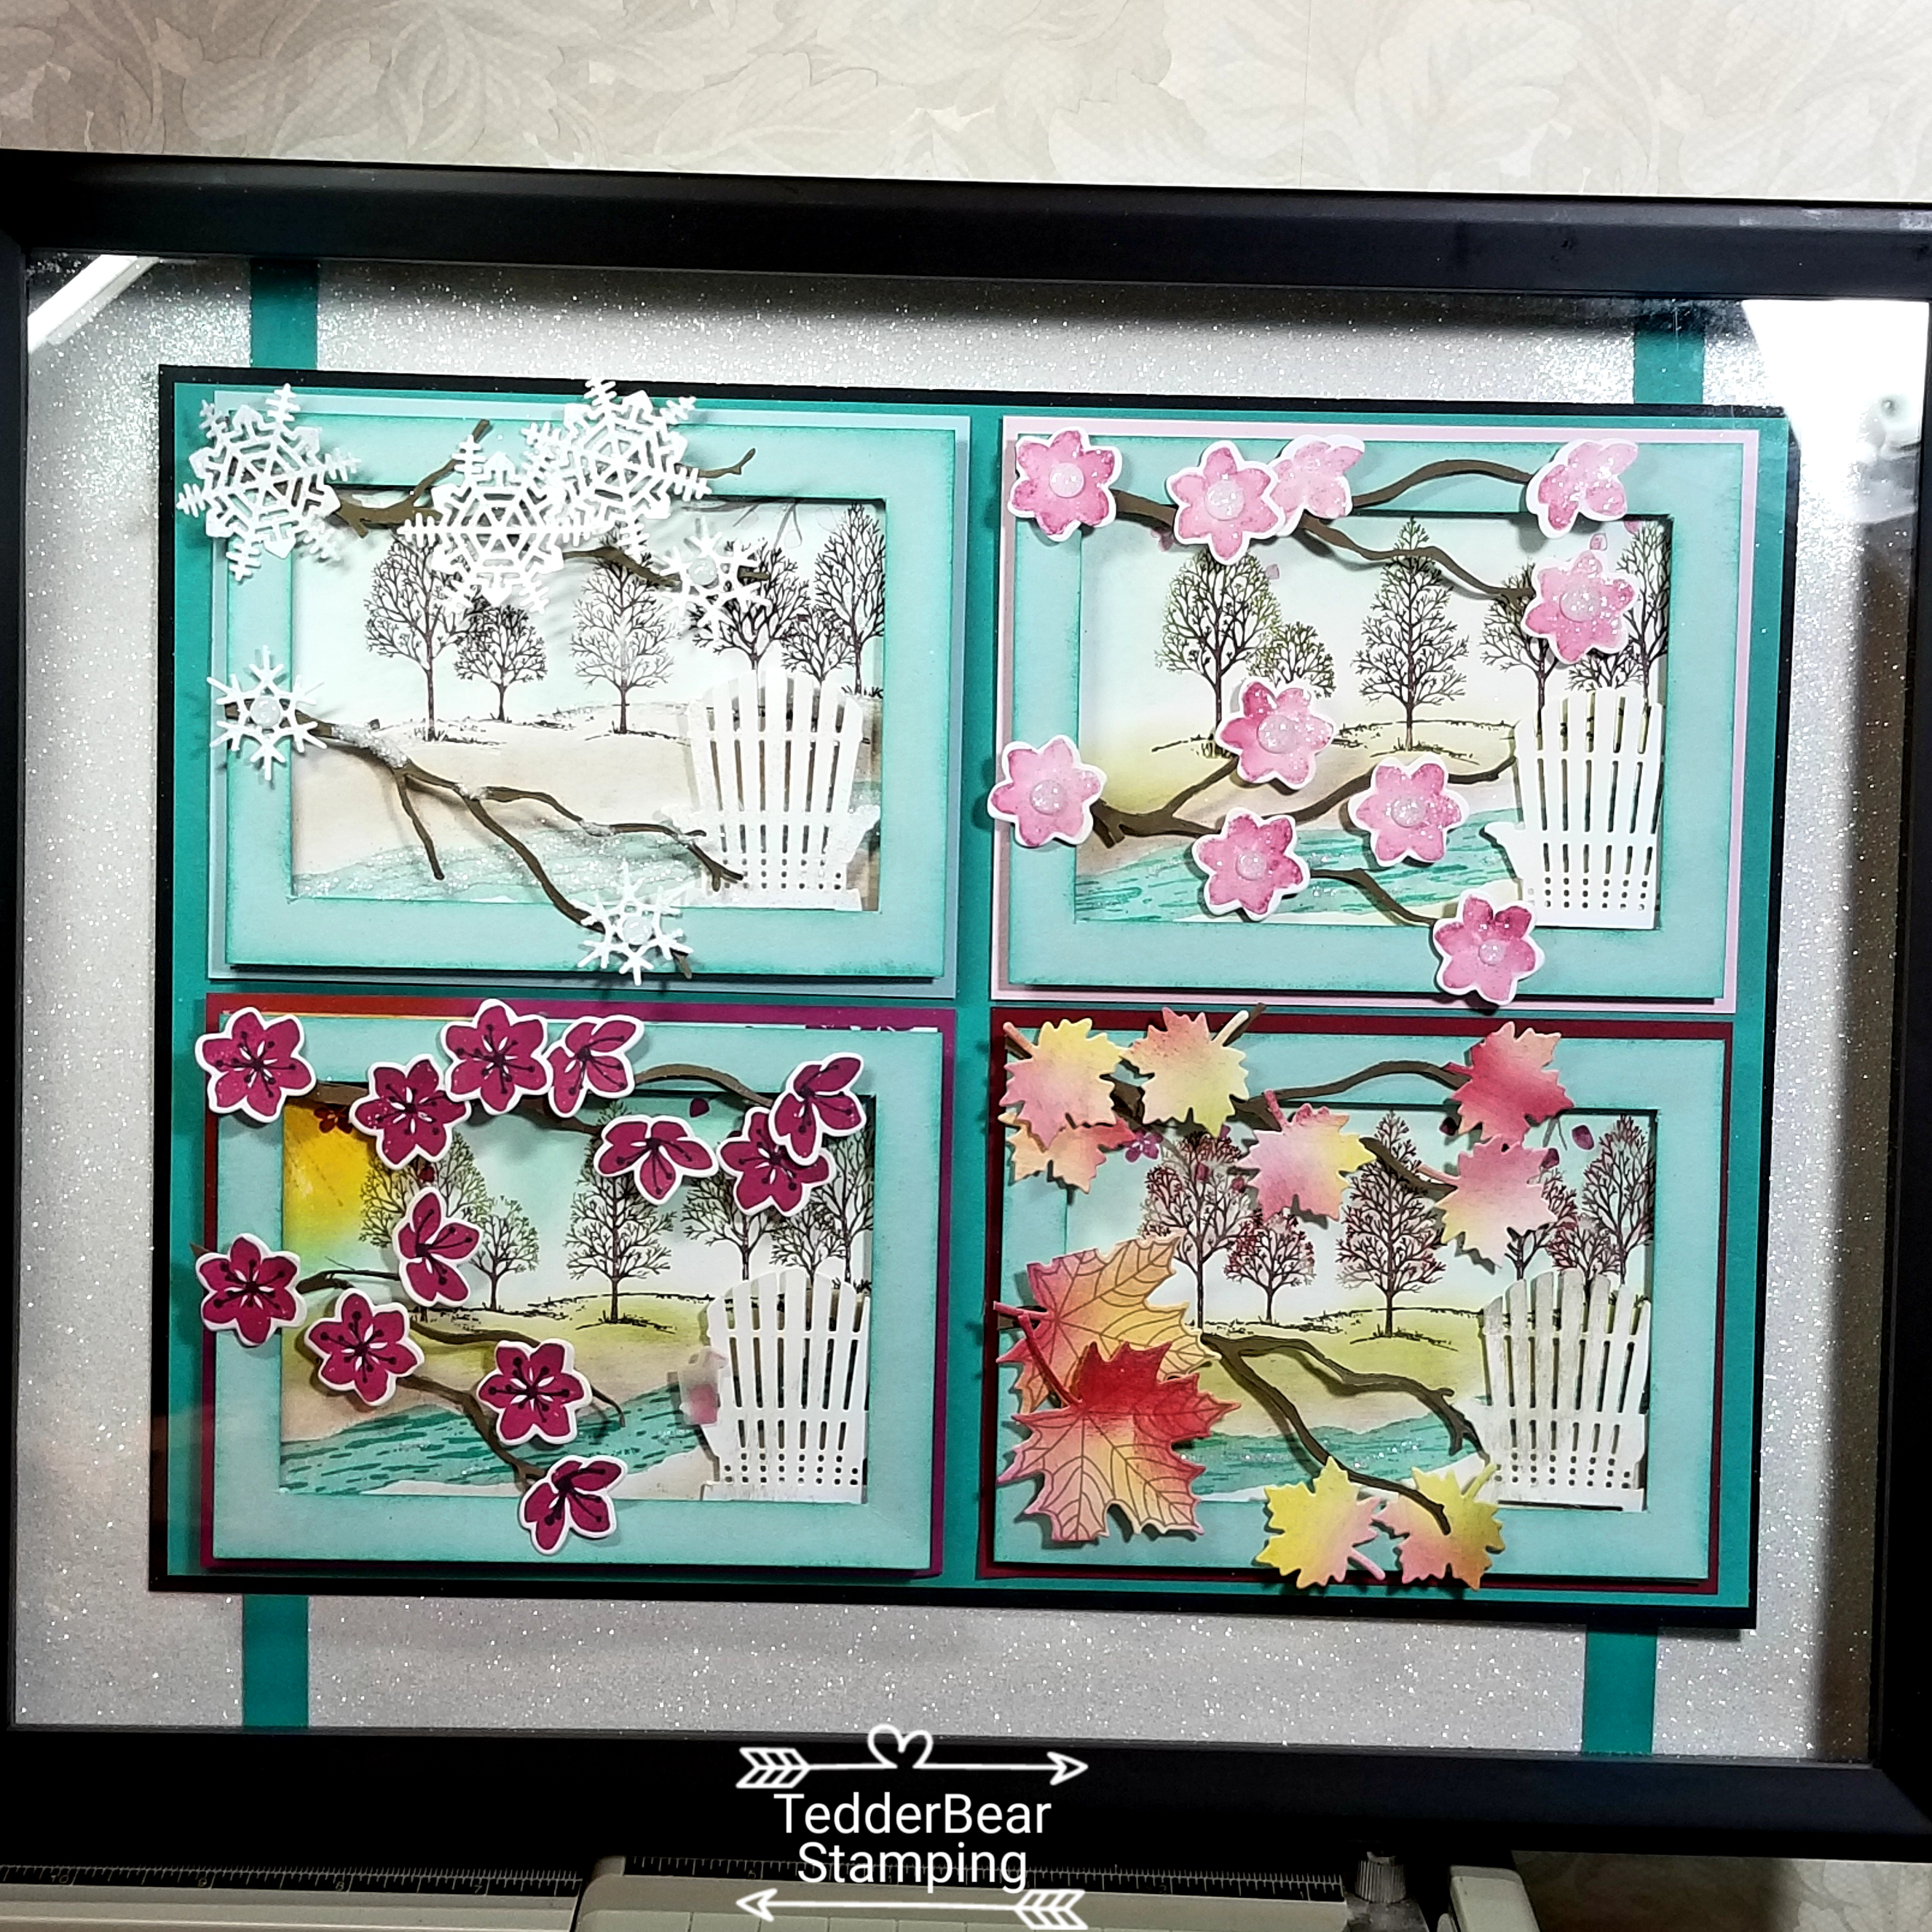
For my other Prize I did a take on a card I made in another post:
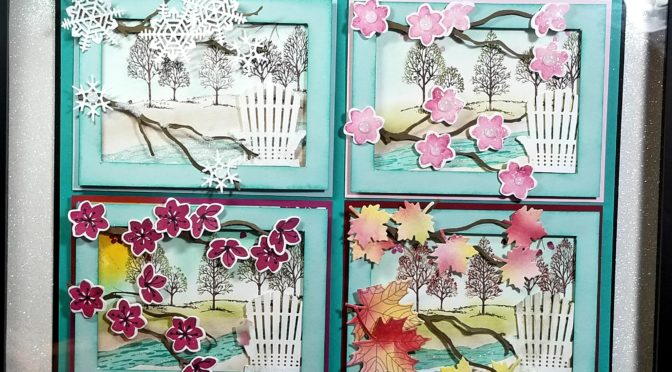
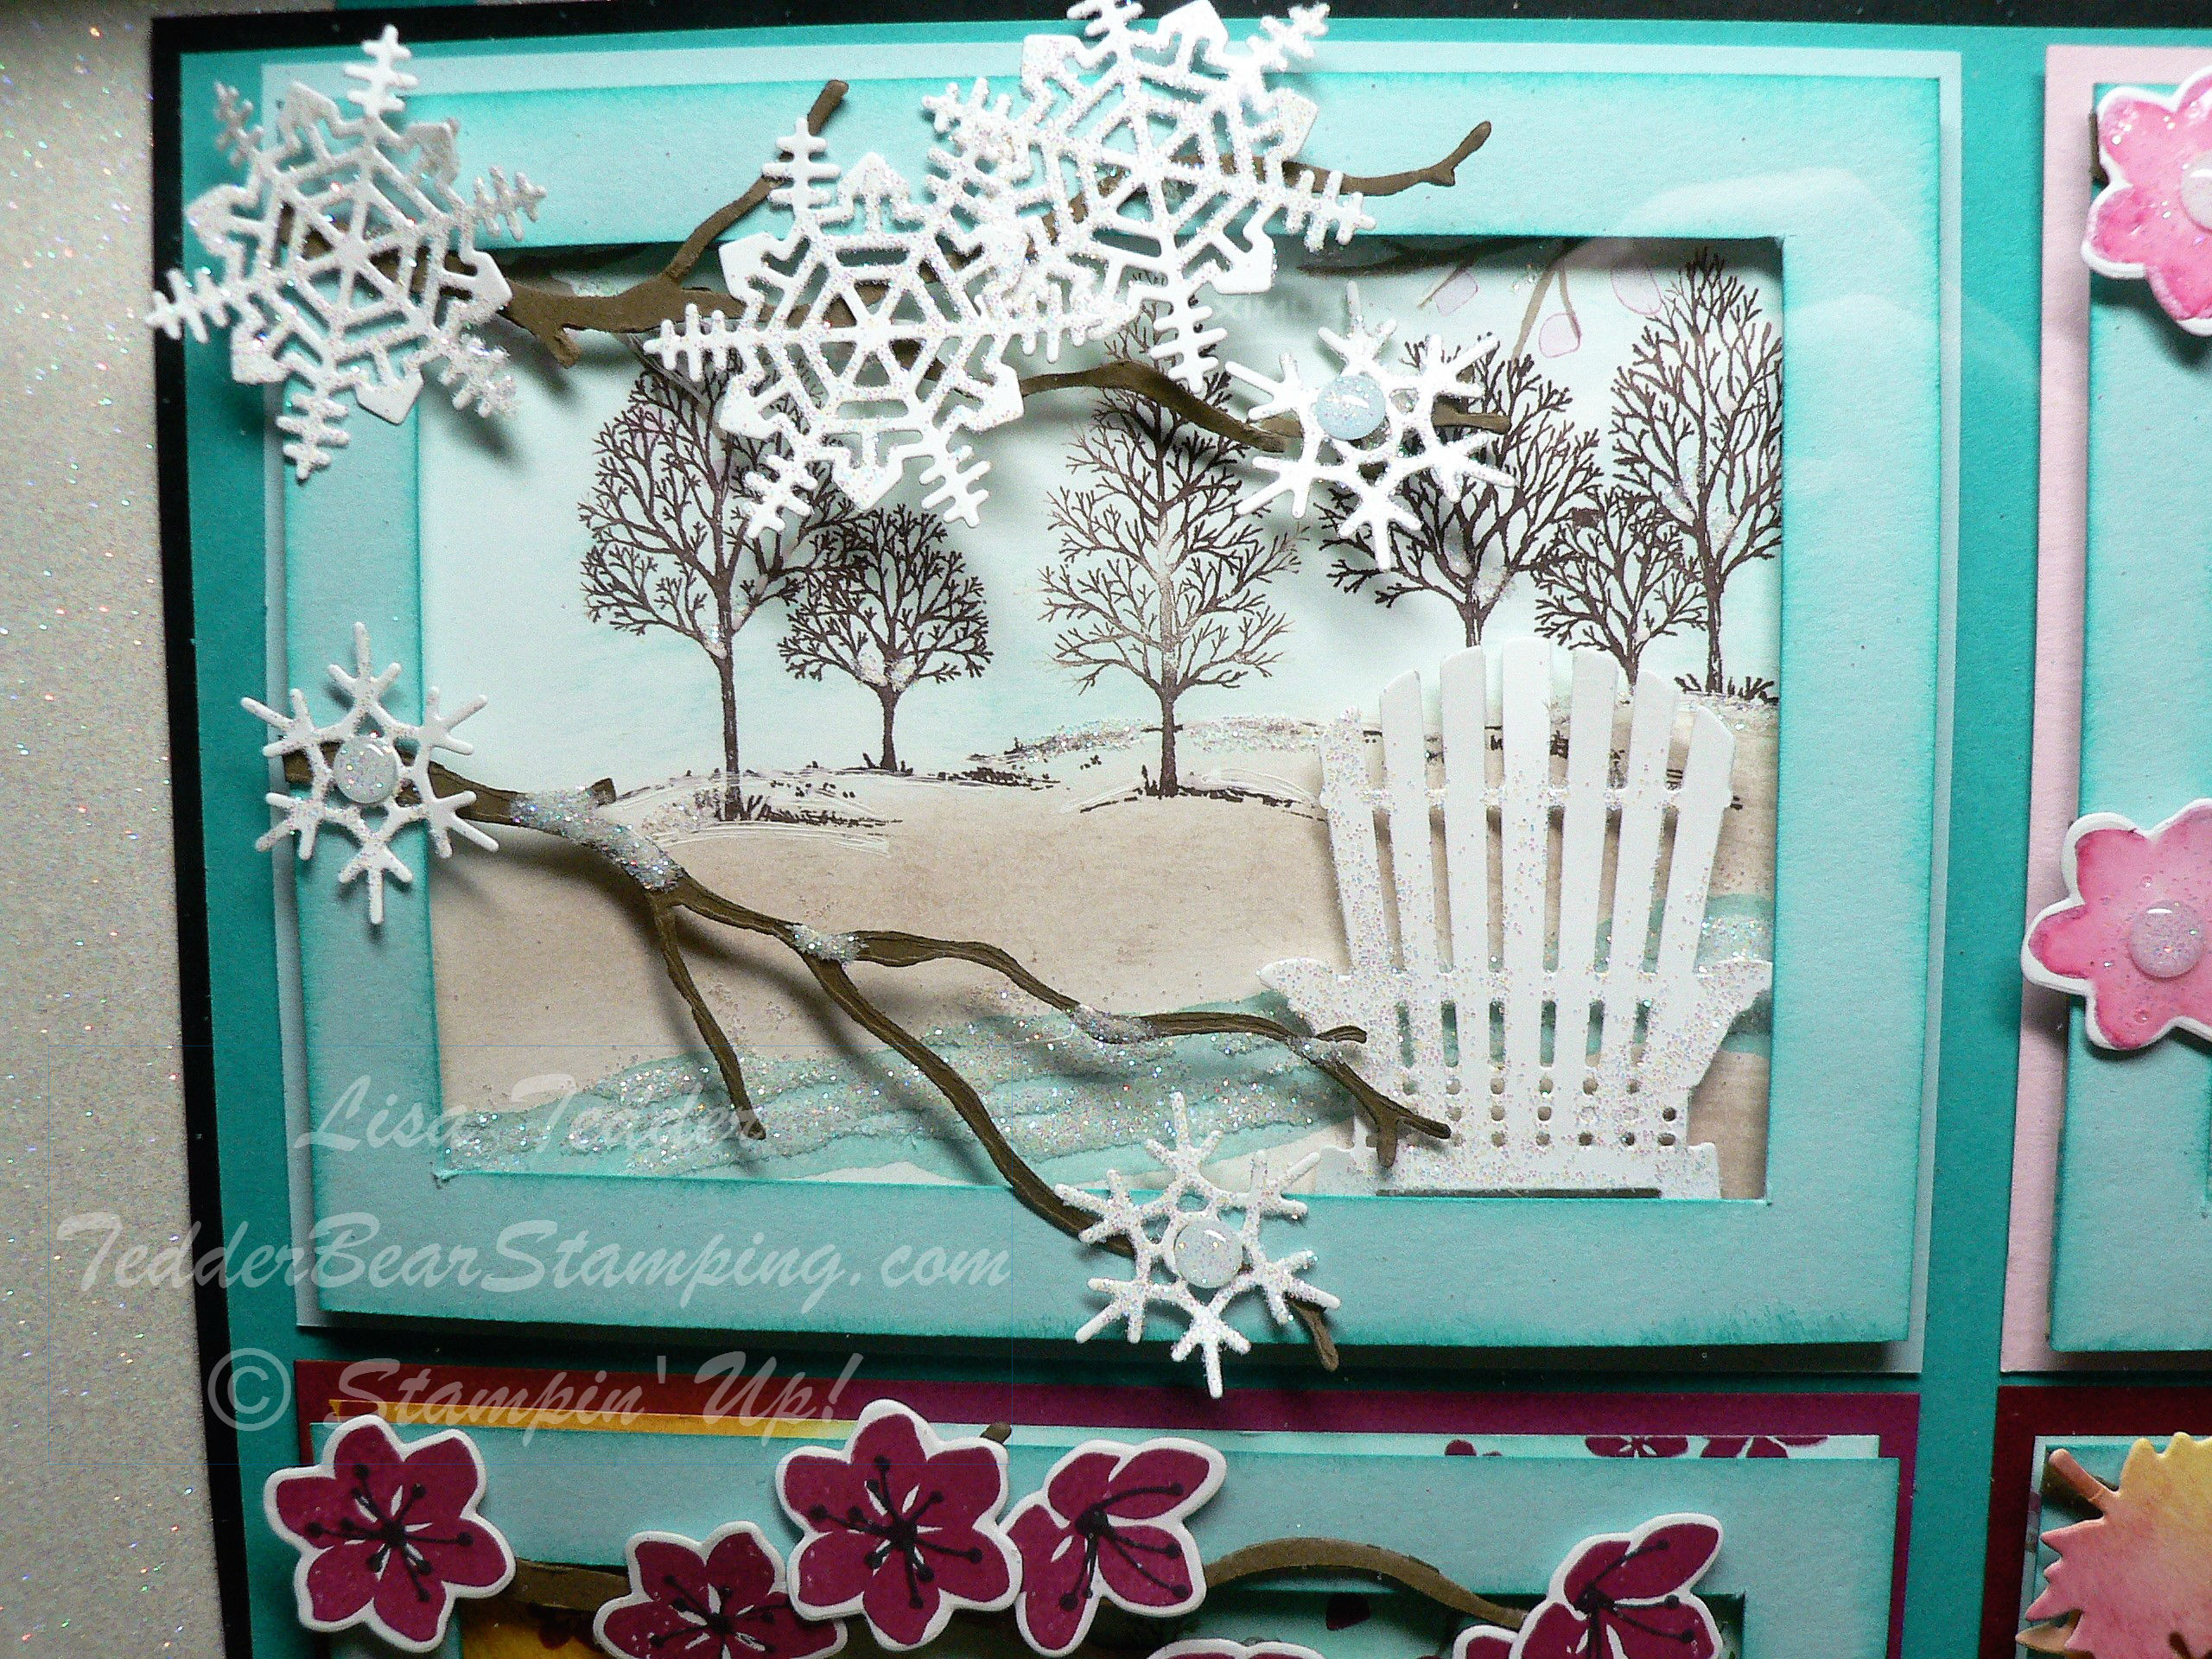
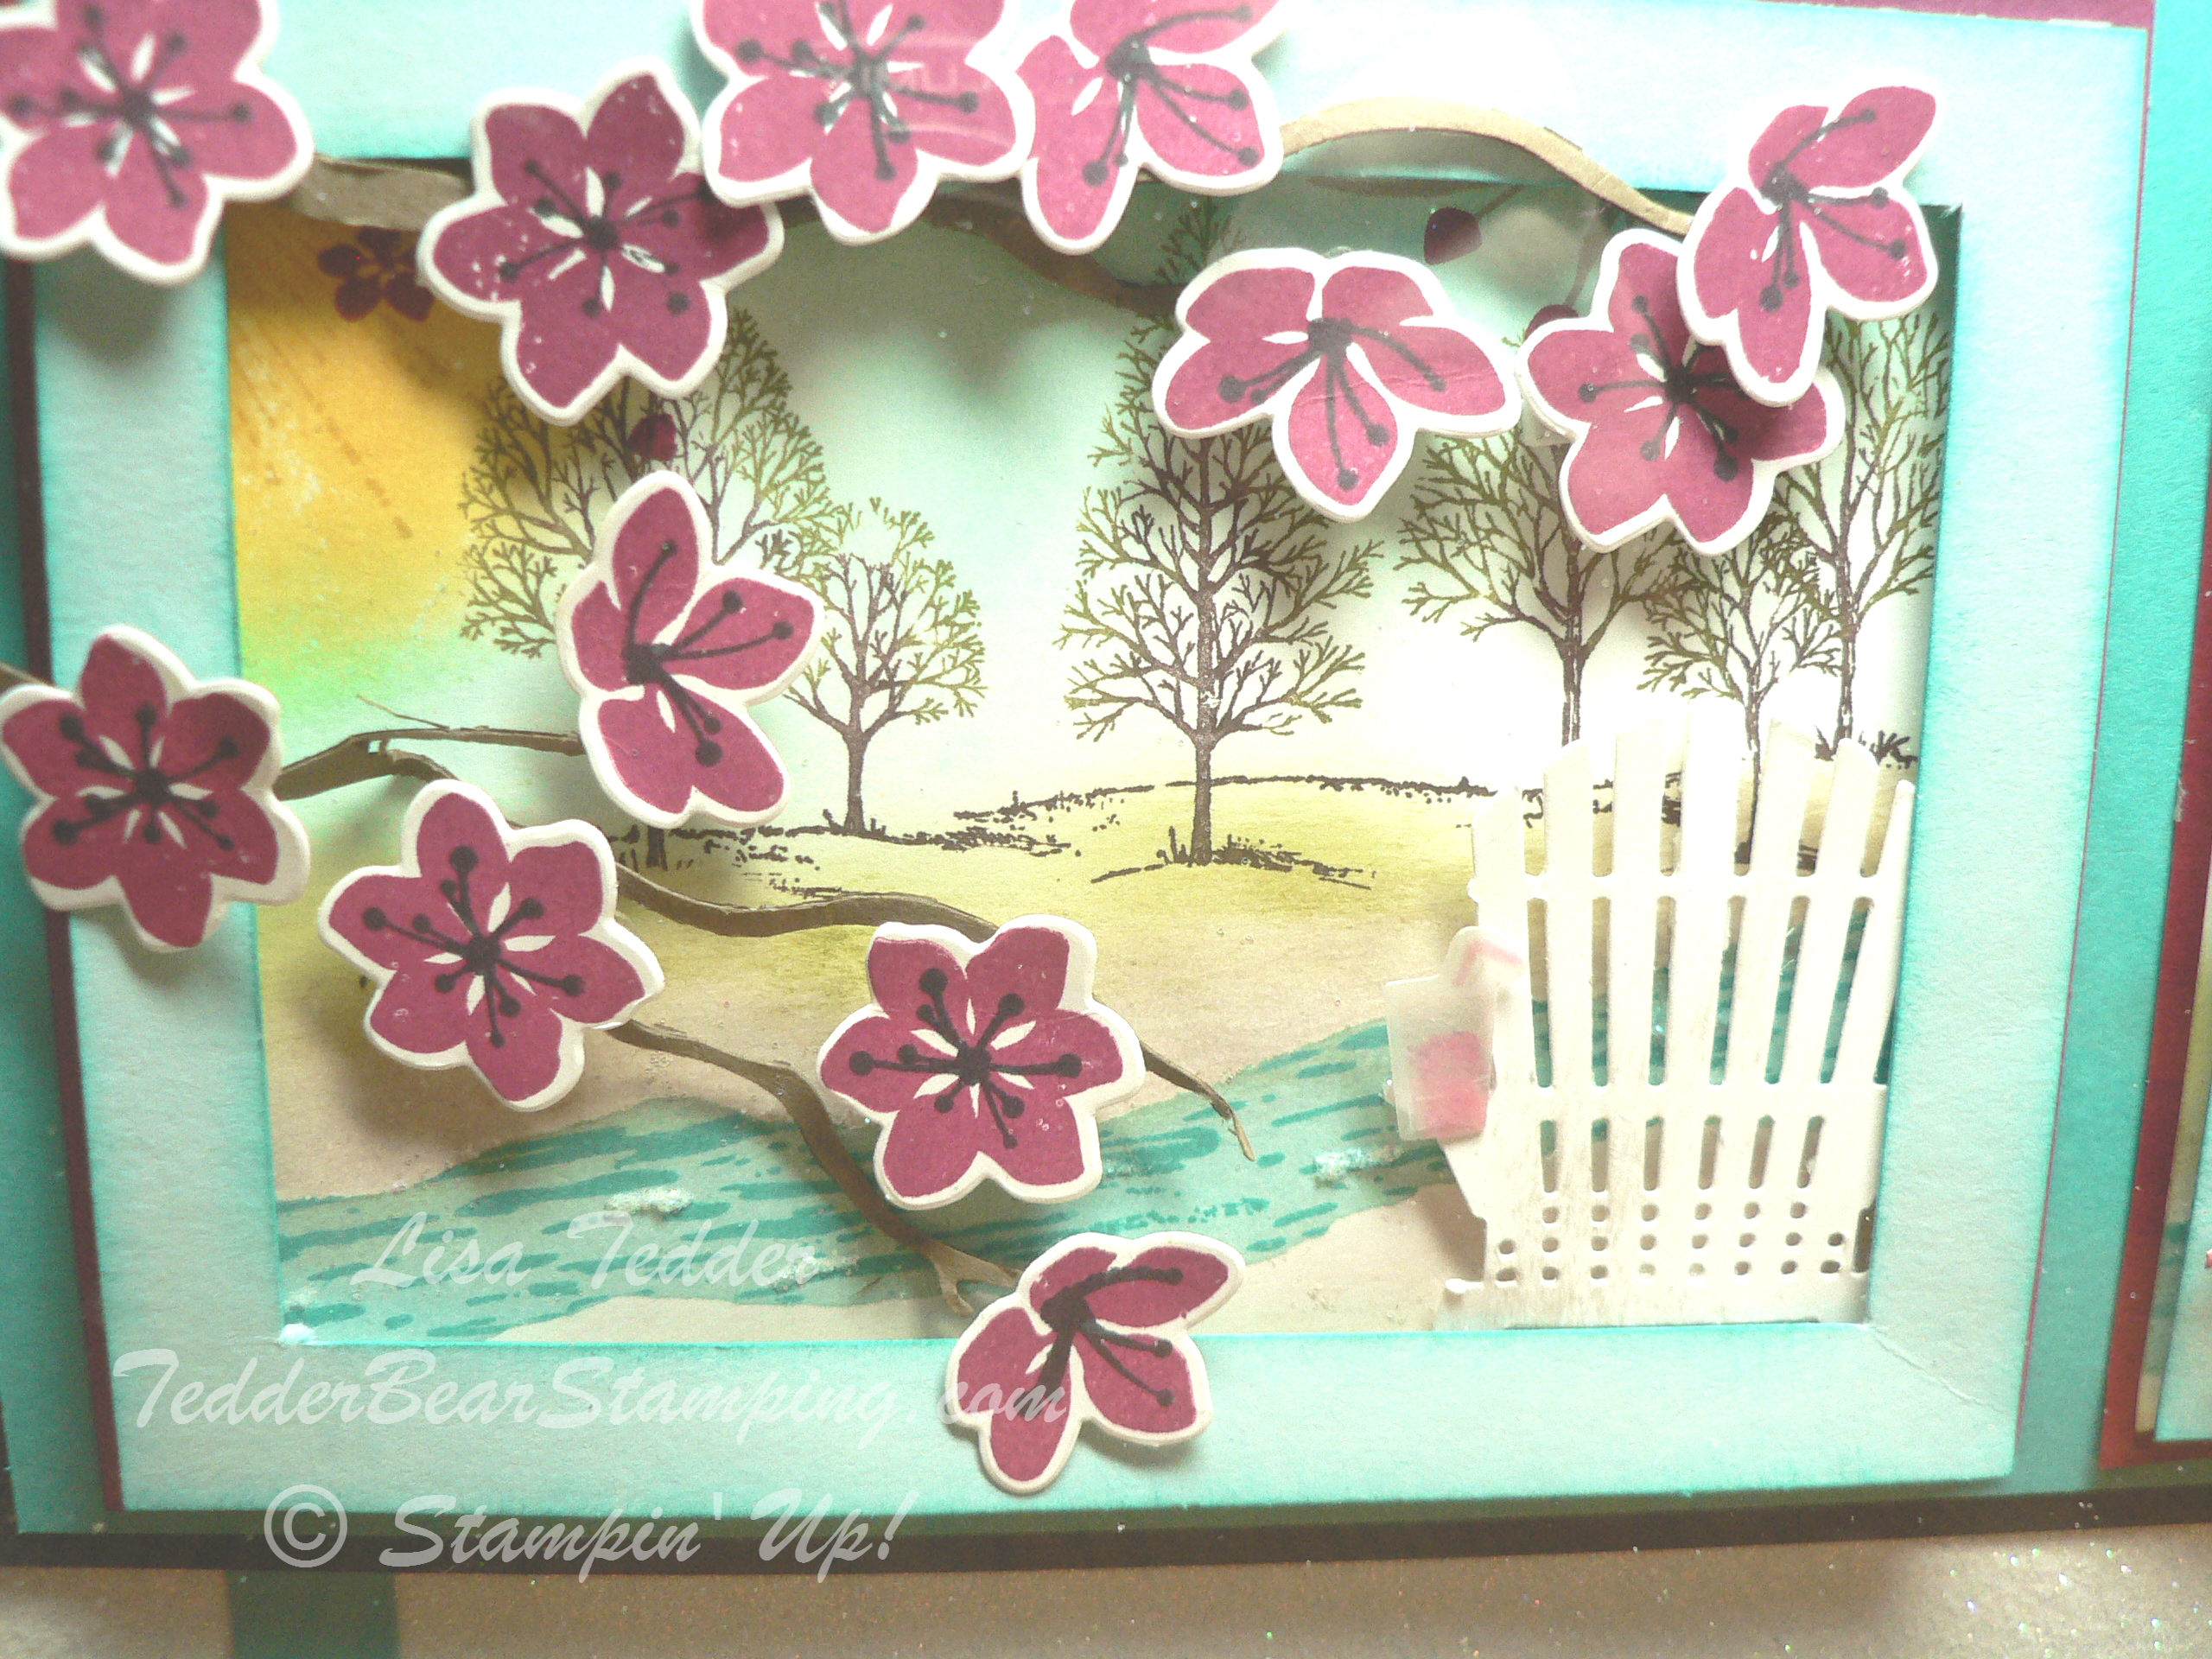
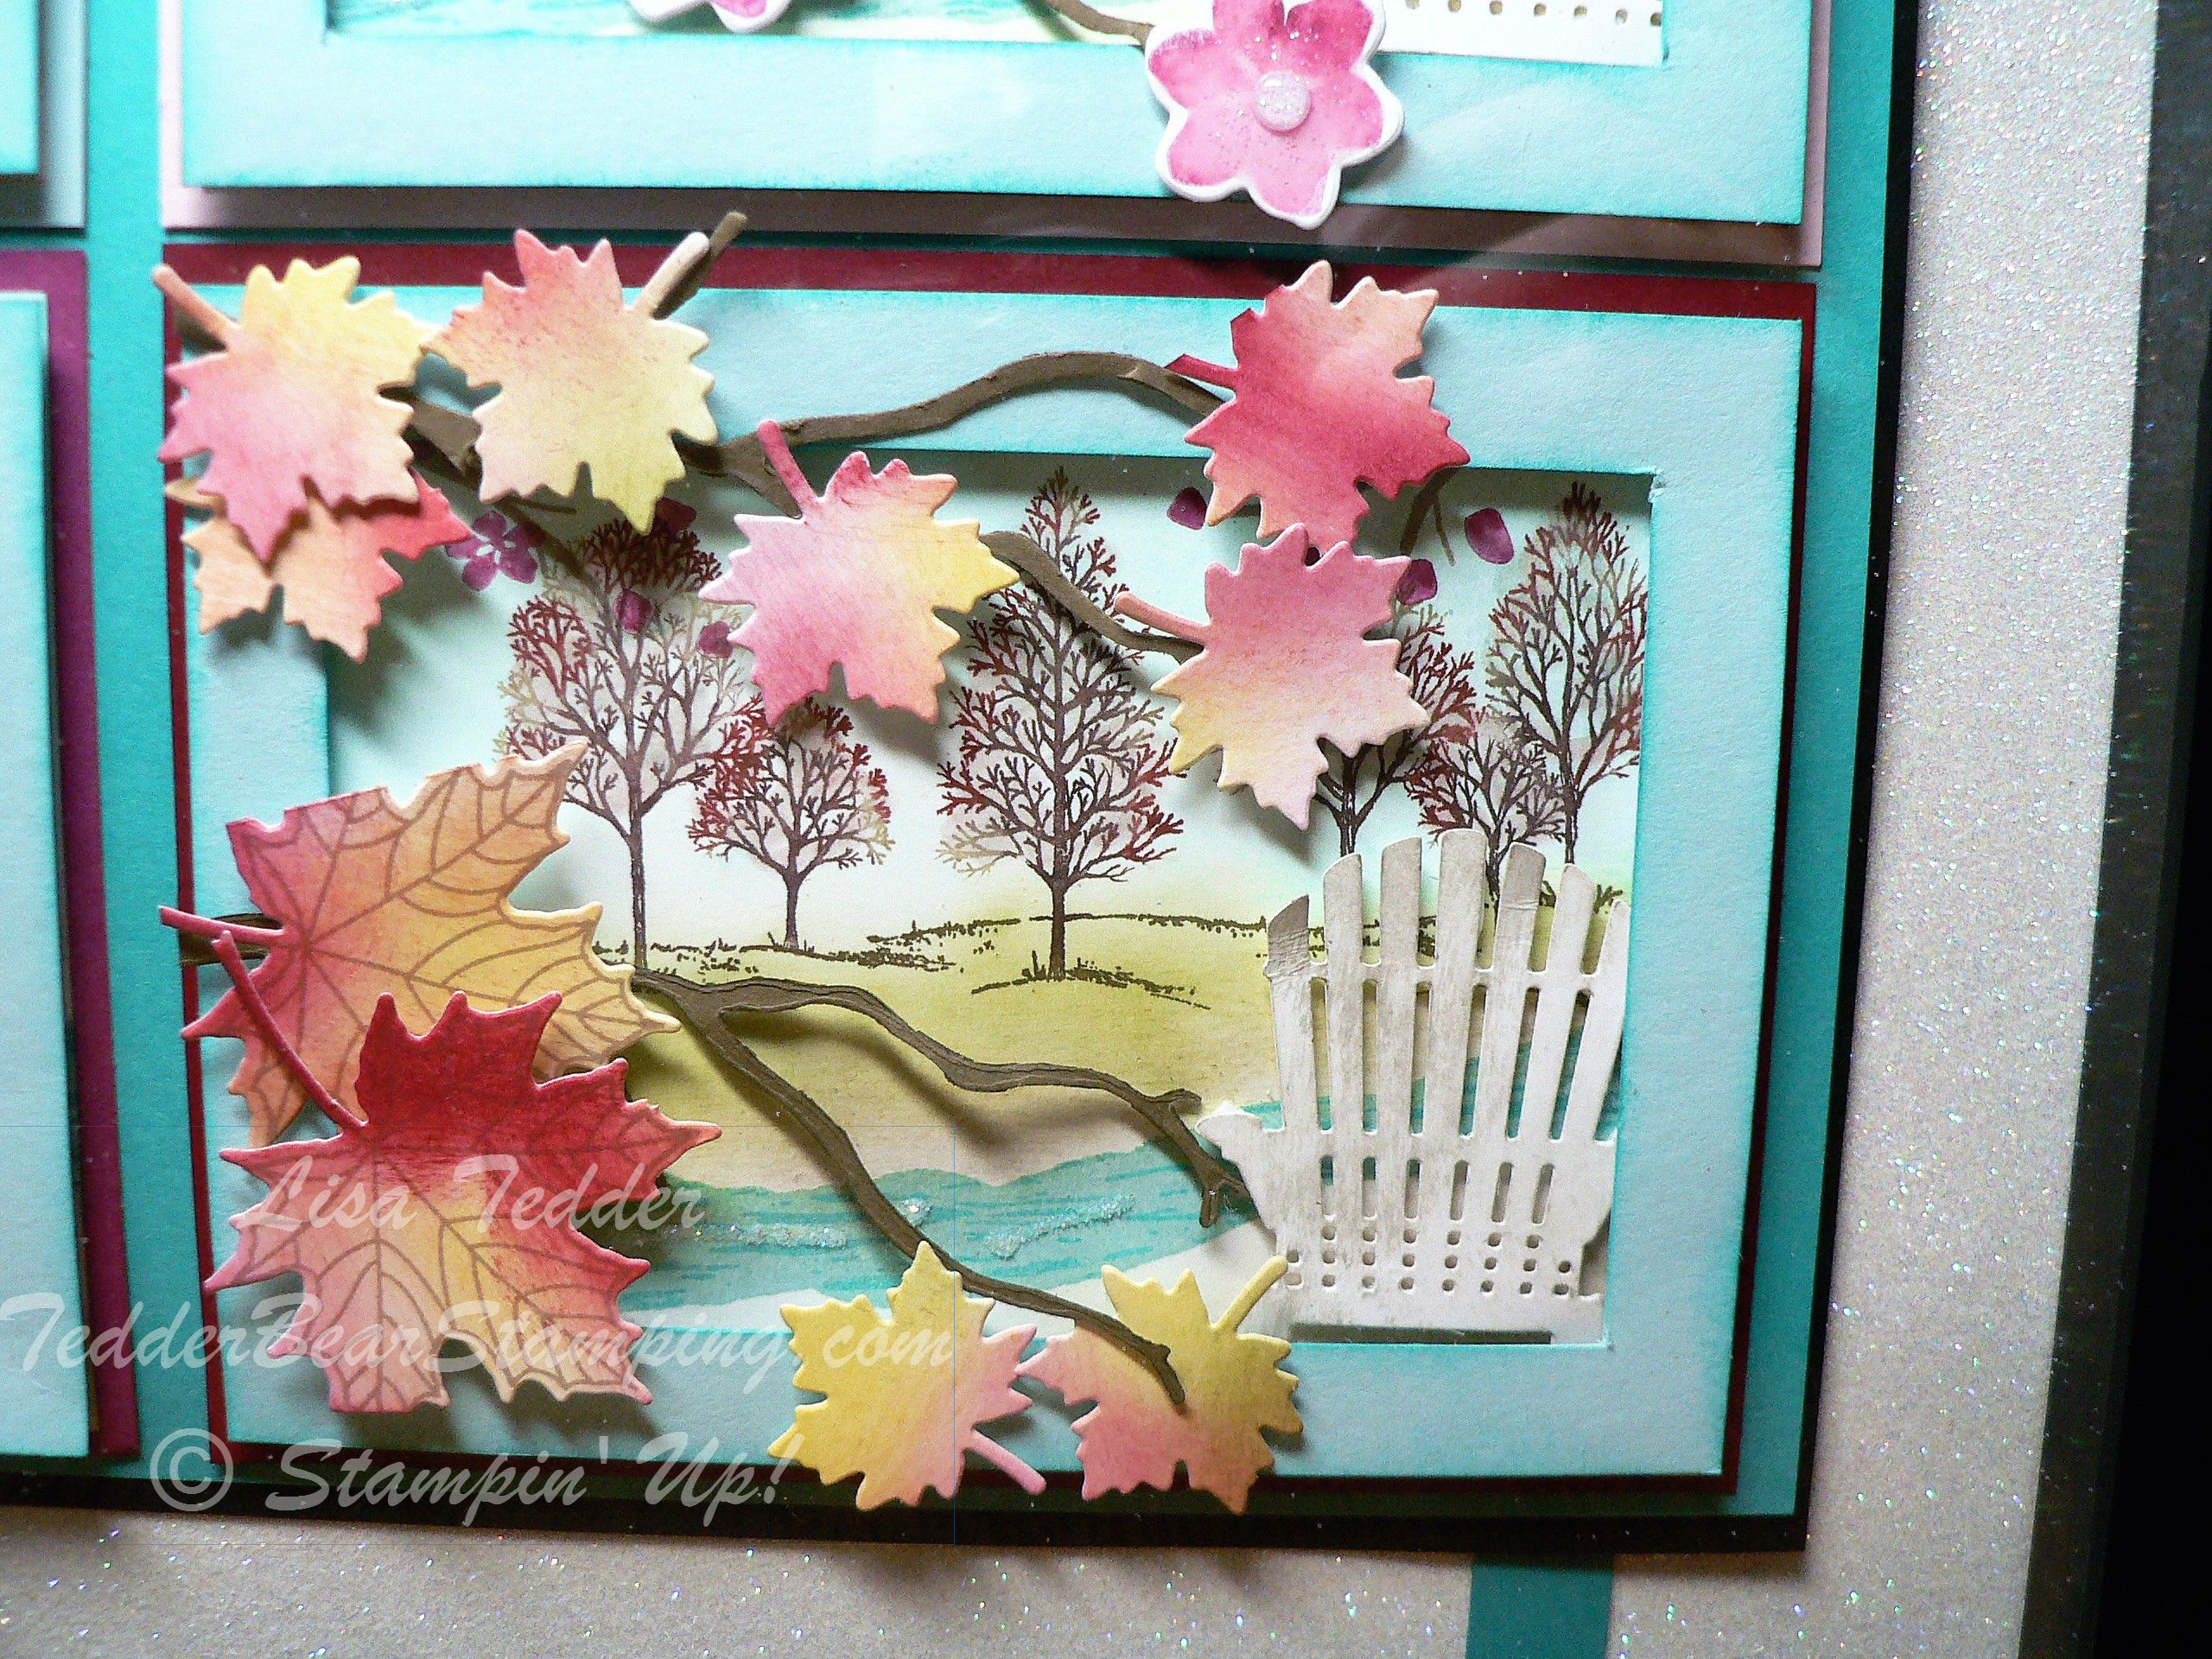
I loved how this came out, and decided to see how it would look framed with all the seasons! I have to admit I was soooooo excited when I was done, and a little disappointed that I had to GIVE IT AWAY! LOL I used Dazzling Diamonds to make the water sparkle, especially on the winter one to make the water look icy! Here is a closer look at each Season:
The water is icy and the chair is sparkly with Dazzling Diamonds!
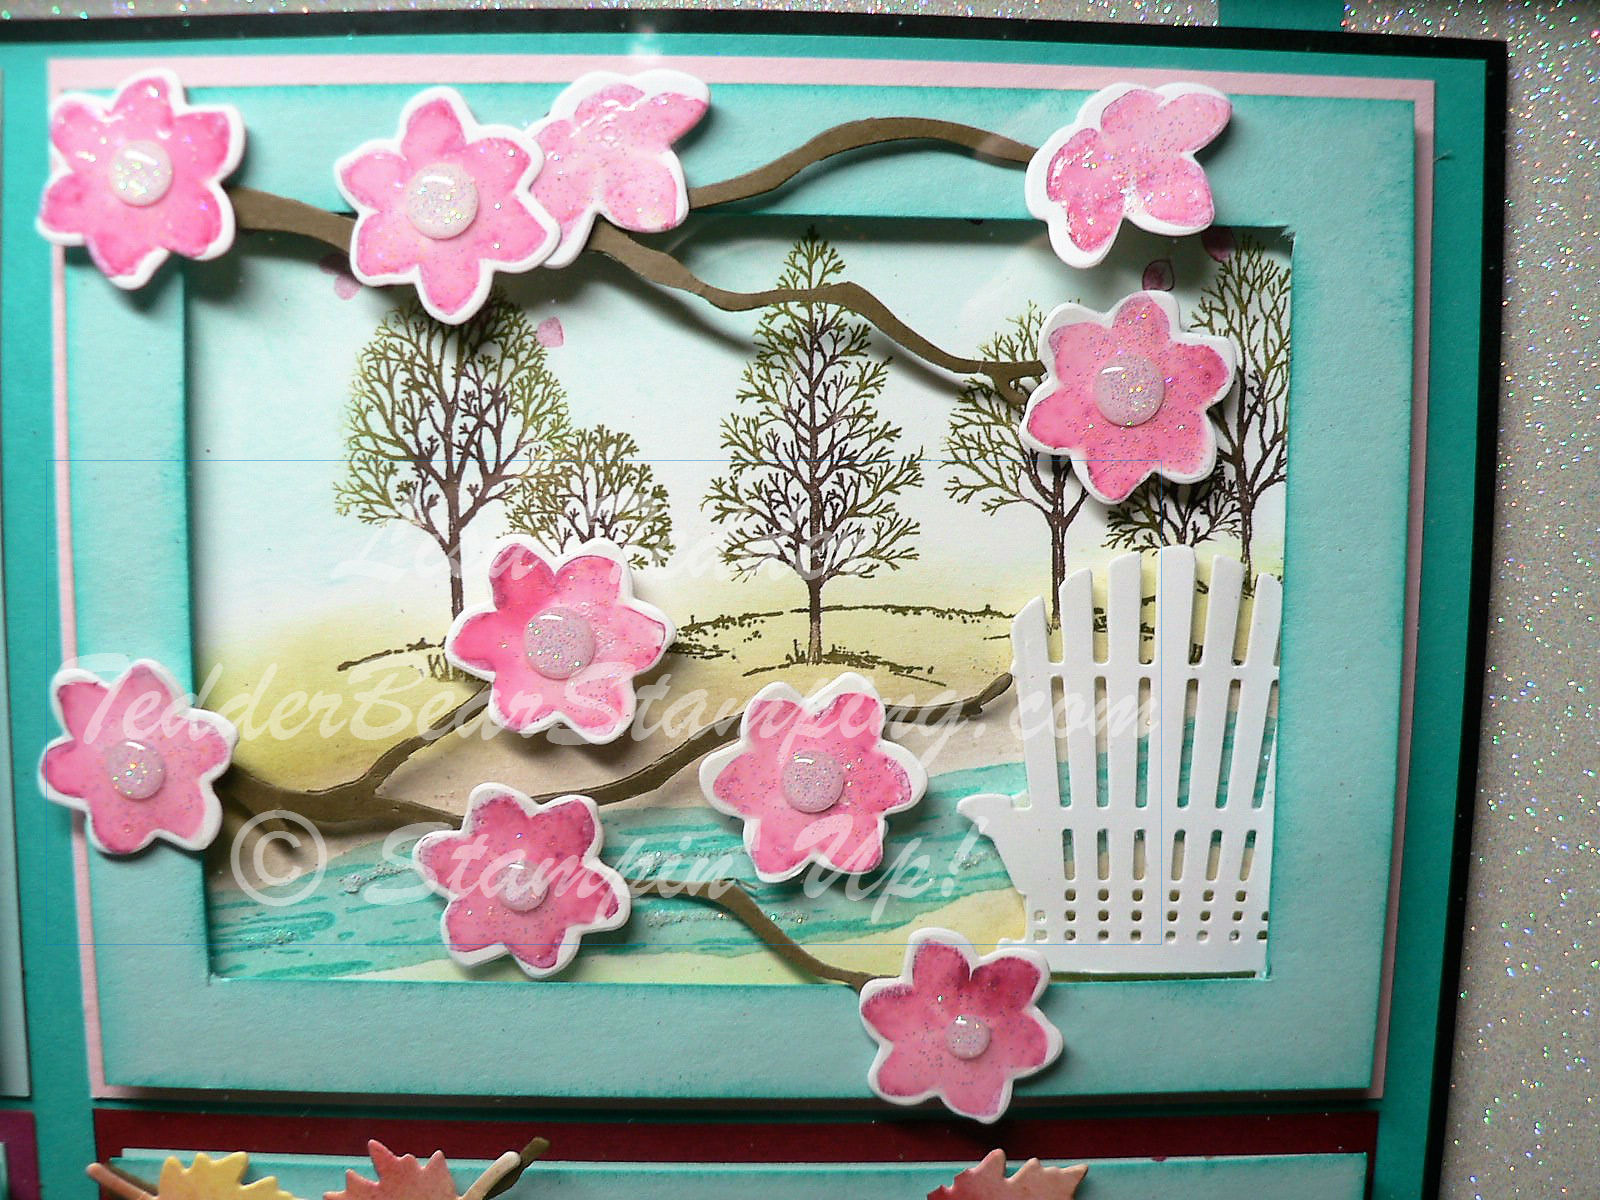
The trees are just budding with leaves and the Chair is in Pristine condition!
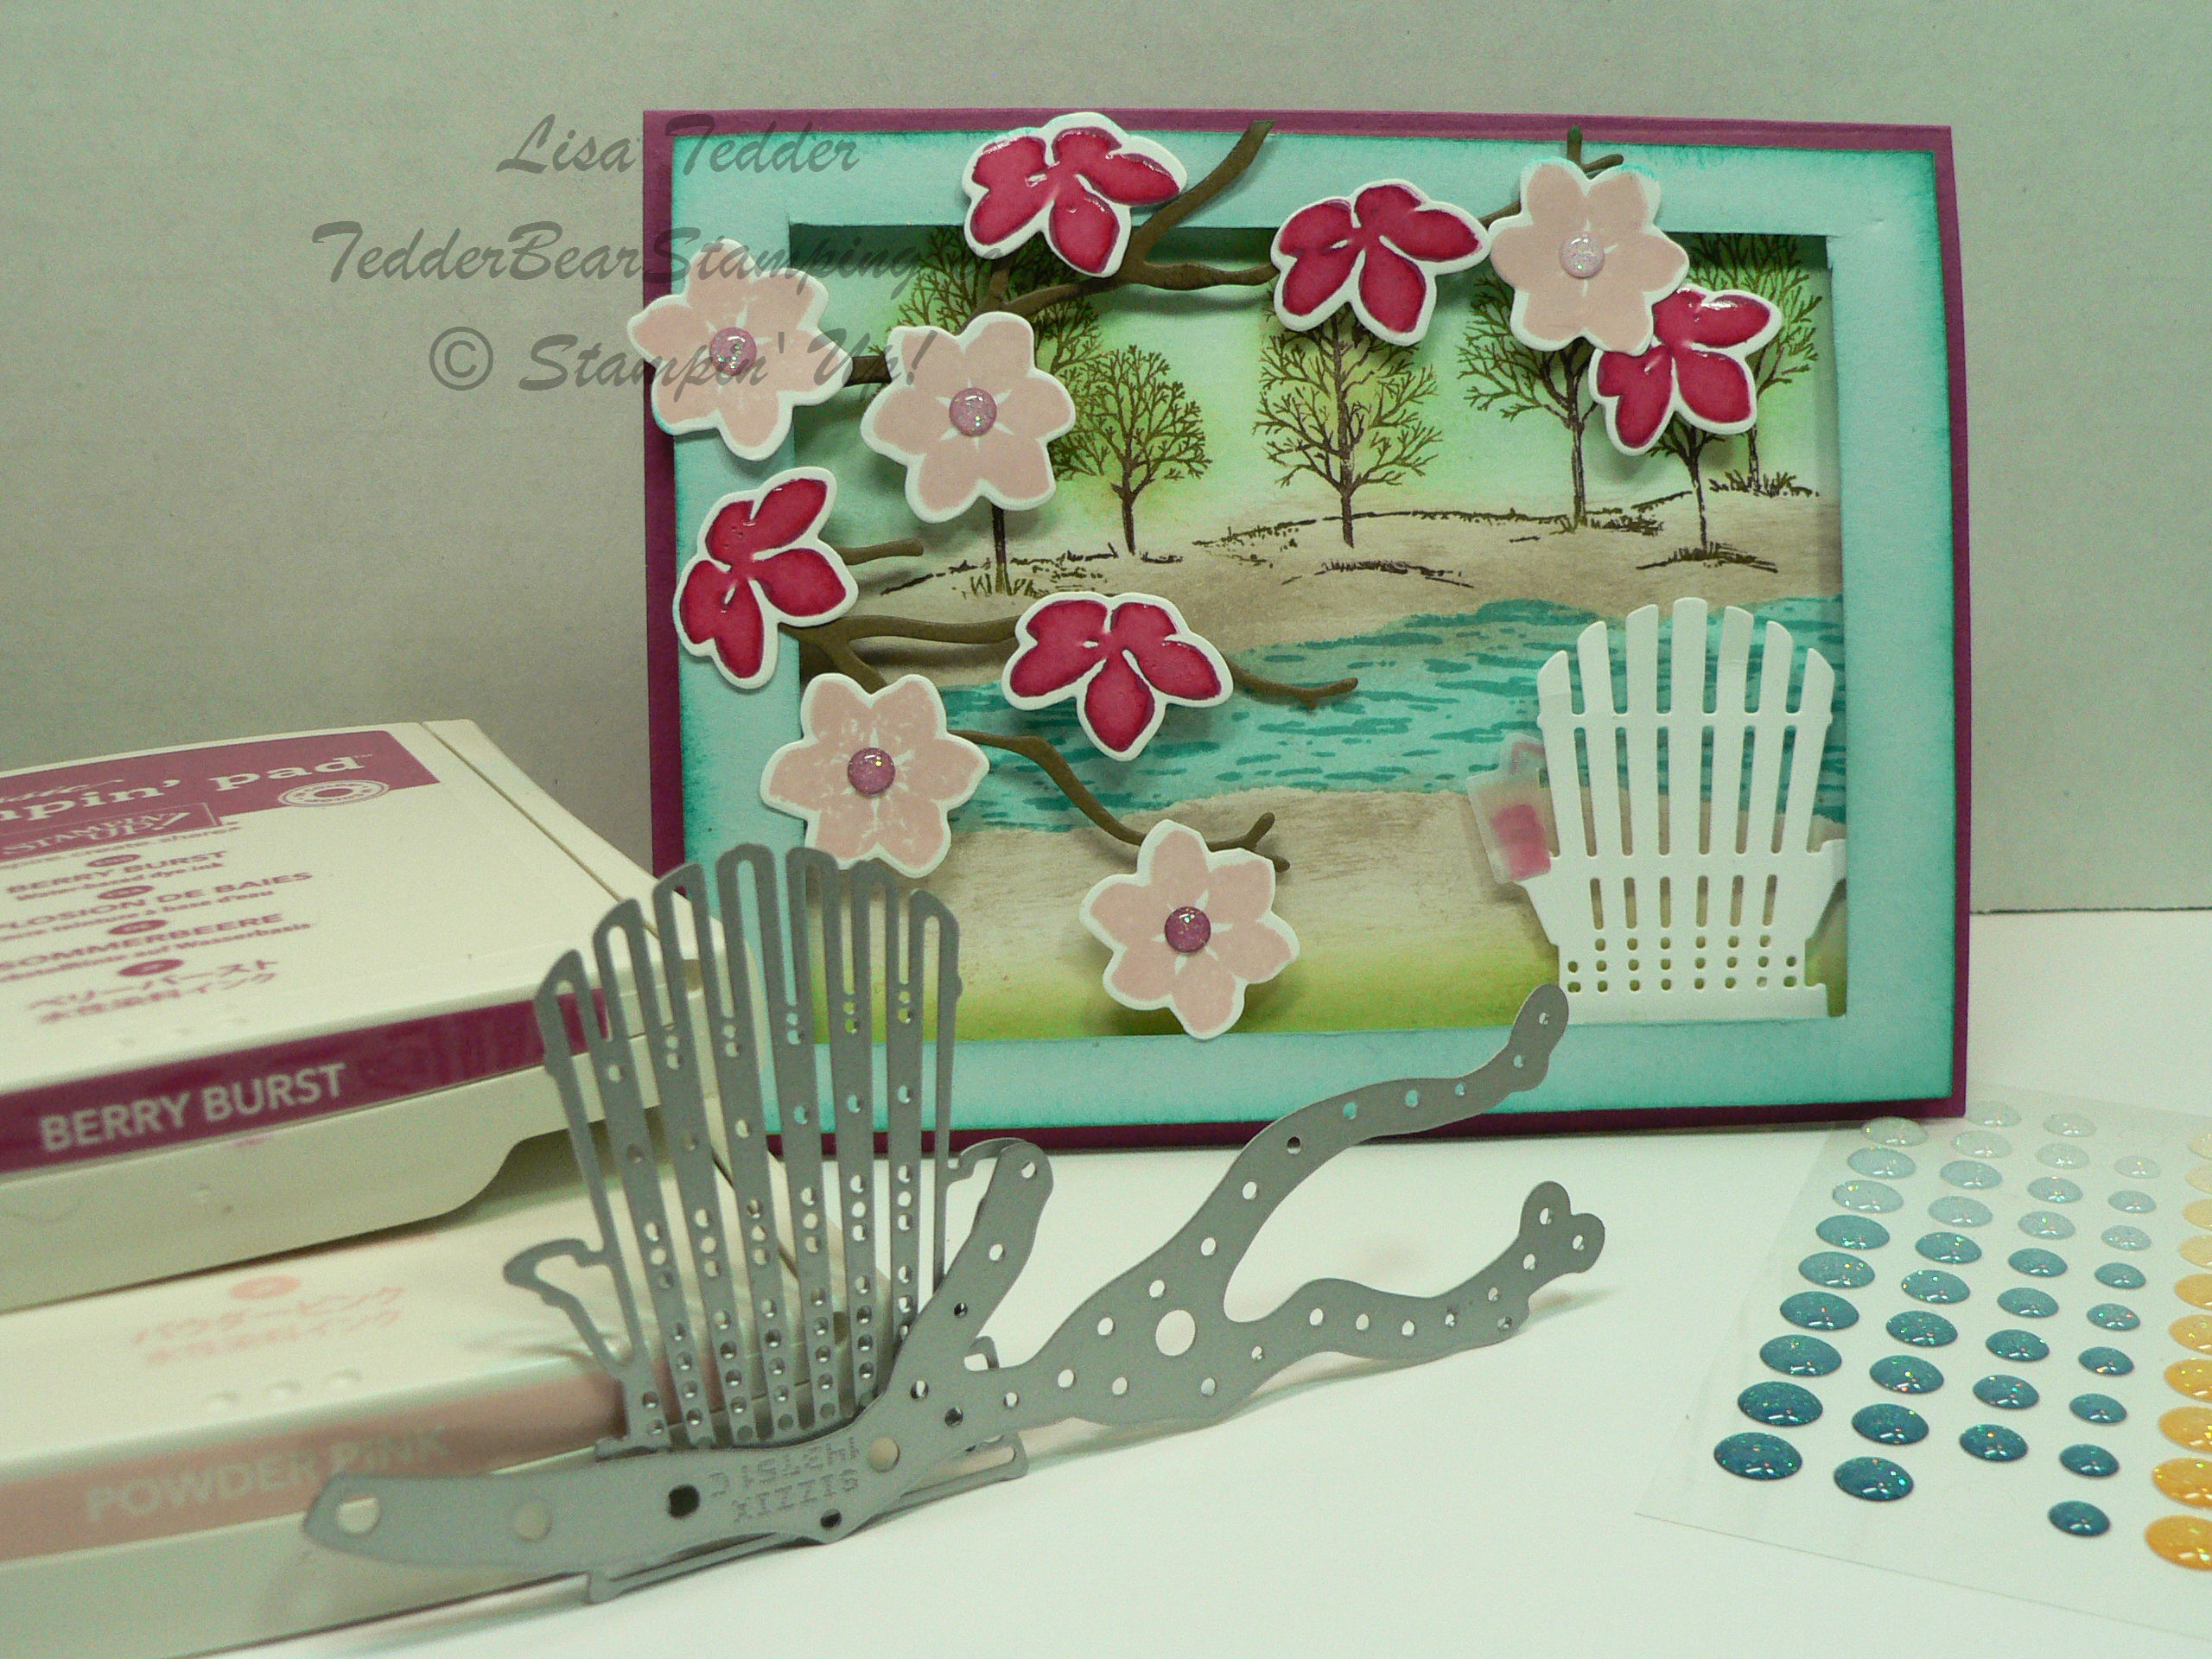
Summer time! The sun is shining! The blooms are out! The chair is a ‘little’ dirty, but we have that iced drink so we don’t care!!
Fall is here! The leaves are changing! The chair is almost ready to be cleaned for the end of the season!
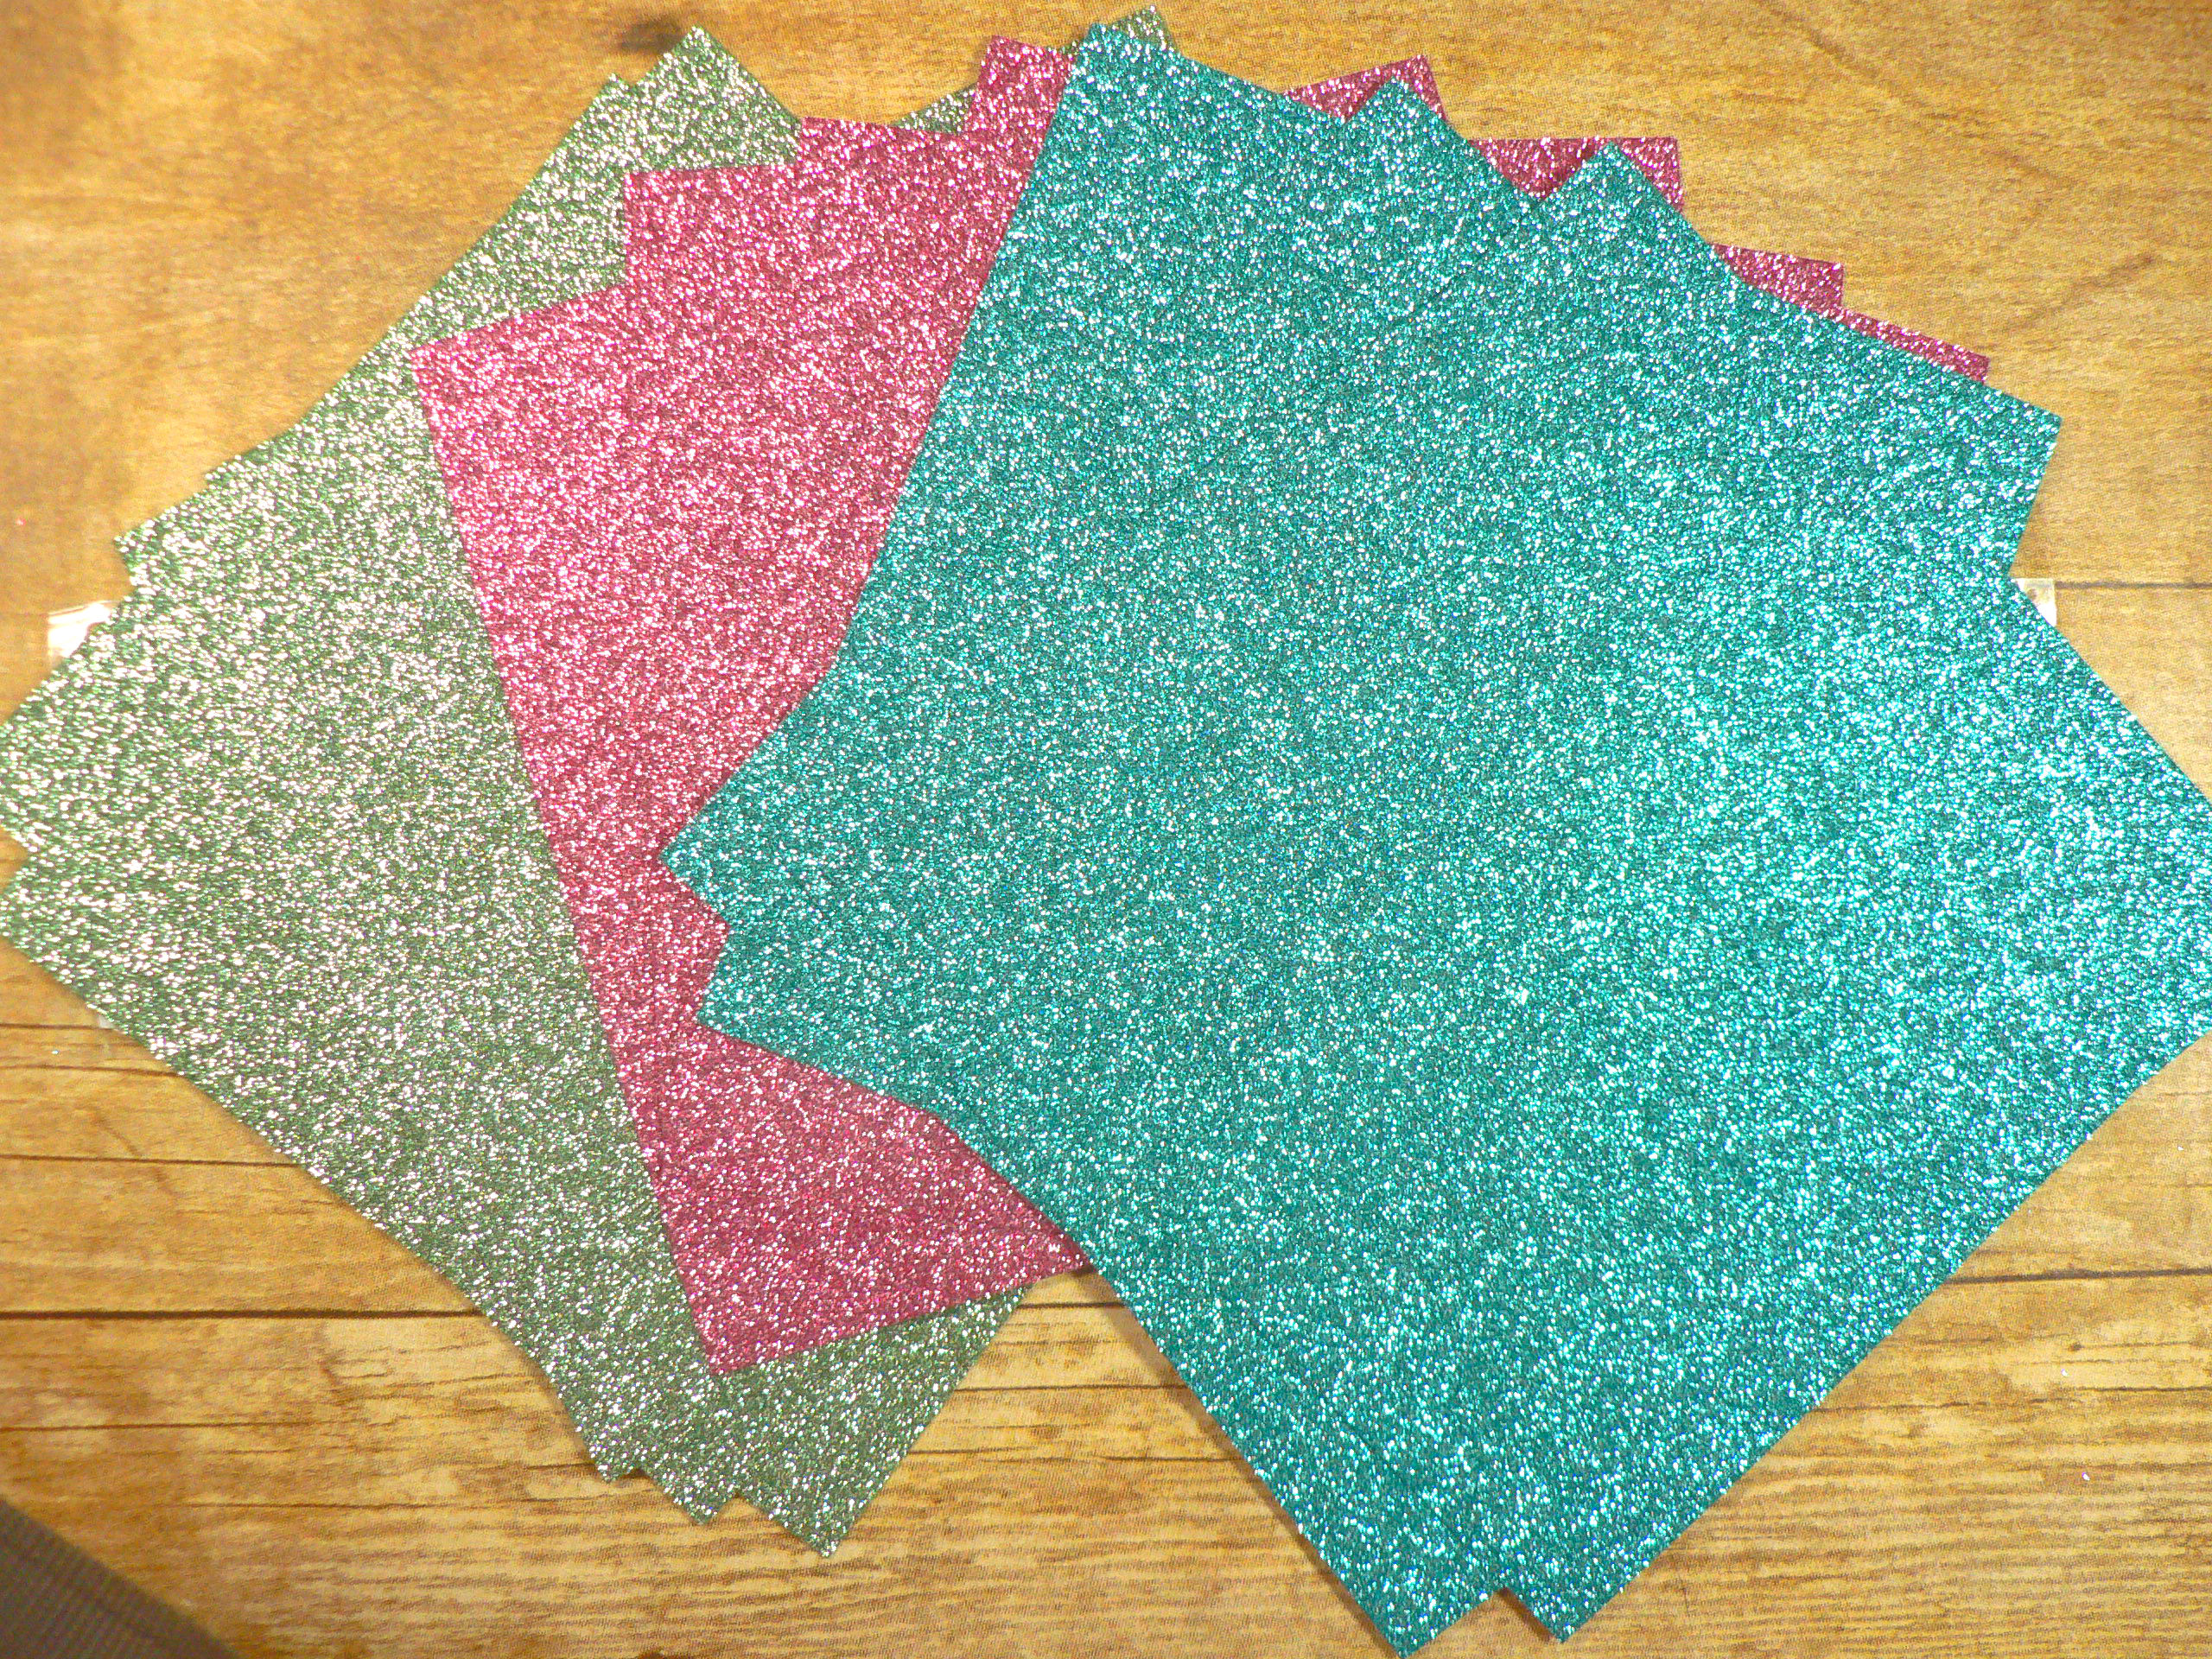
Here is the full view! Notice the Dazzling Diamonds background paper? The measurements for this beauty is 11″ x 14″………..which is why I had to add the strips of Bermuda Bay. Can’t have a place that has a seam! There’s only ONE seam, but for symmetry I put two strips in!
For this Colorful Seasons framed art, I took off with the given name of the set……..Colorful SEASONS! I chose to make four scenes but having the scene stay the same but change it up to see the Seasons! I had a blast making this! I used Lovely as a Tree to be my backdrop, and the best thing is that you can make this stamp set look different just by using markers!
Dimensions:
Dazzling Diamonds Glimmer Paper #135315, 12″ x 11″ and 12″ x 2″
Bermuda Bay ( Brights Cardstock pack) #145409, 1/2″ x 11″ x’s 2
Basic Black #124267, 12″ x 9″
Bermuda Bay (see # above), 11 3/4″ x 8 3/4″
Seasons:
Pool Party (Winter) 4 1/4″ x 5 1/2″
Pink Pirouette (Spring) 4 1/4″ x 5 1/2″
Berry Burst (Summer) 4 1/4″ x 5 1/2″
Cherry Cobbler (Fall) 4 1/4″ x 5 1/2″
All Seasons are on Whisper White cardstock 4″ x 5 1/4″, ‘frame’ is Pool Party 5 1/4″ x 4″ with a 1/2″ cut out on inside all around.
Water is Soft Sky and Bermuda Bay for all seasons except winter which is Soft Sky and Whisper White.
Trees are colored with markers: Tree trunk is all Early Espresso, Leaves are Old Olive (spring and summer), Fall is Cajun Craze and Crushed Curry.
For the water I used the Fine Tip Glue Pen to make the water sparkle with Dazzling Diamonds on top.
For the winter tree branch thinlit I used the White Gel pen (retired) to make snow on the top, with Dazzling Diamonds over it to make the branches be snowy!
That’s it for the Dimensions!
I hope you like this post! This took me a couple days to create but only because I had to think it up! Once started, it took a couple of hours.
I will be making one for myself as soon as I am able! I will probably take this to the winner on Monday so will have to make one before then, just in case I need a life size reference!!
I have my Blog Candy to give away TOMORROW!! Wow, that went fast! You can get in on the drawing by posting comments here on this blog (any post! or multiple posts!) or on my Facebook page and I will put your name down each and every time you comment!
Here is a reminder of what you can win:
These are soooooo pretty!! Good luck!
I’m off to make some cards for my upcoming classes! I’m sure I will be sharing them with you as time allows!
Below my name is pictures of what I used to make this project…..you can click on any picture and you will be taken to my online store! If you place an order with me, I will send you a handmade card and a small token of my appreciation! Please use this Hostess Code for you order: C62FFAR3
Lisa Tedder
TedderBearStamping
A California girl living in North Carolina! Product List
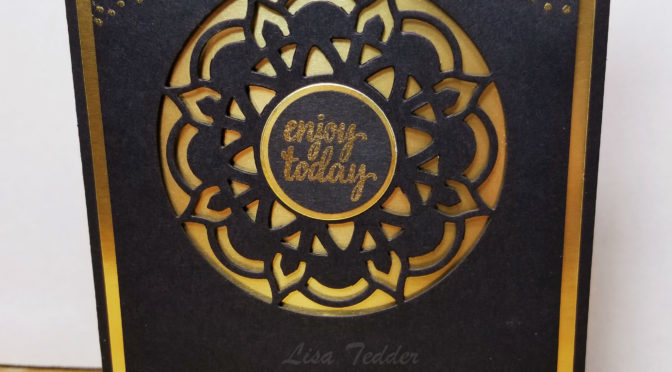
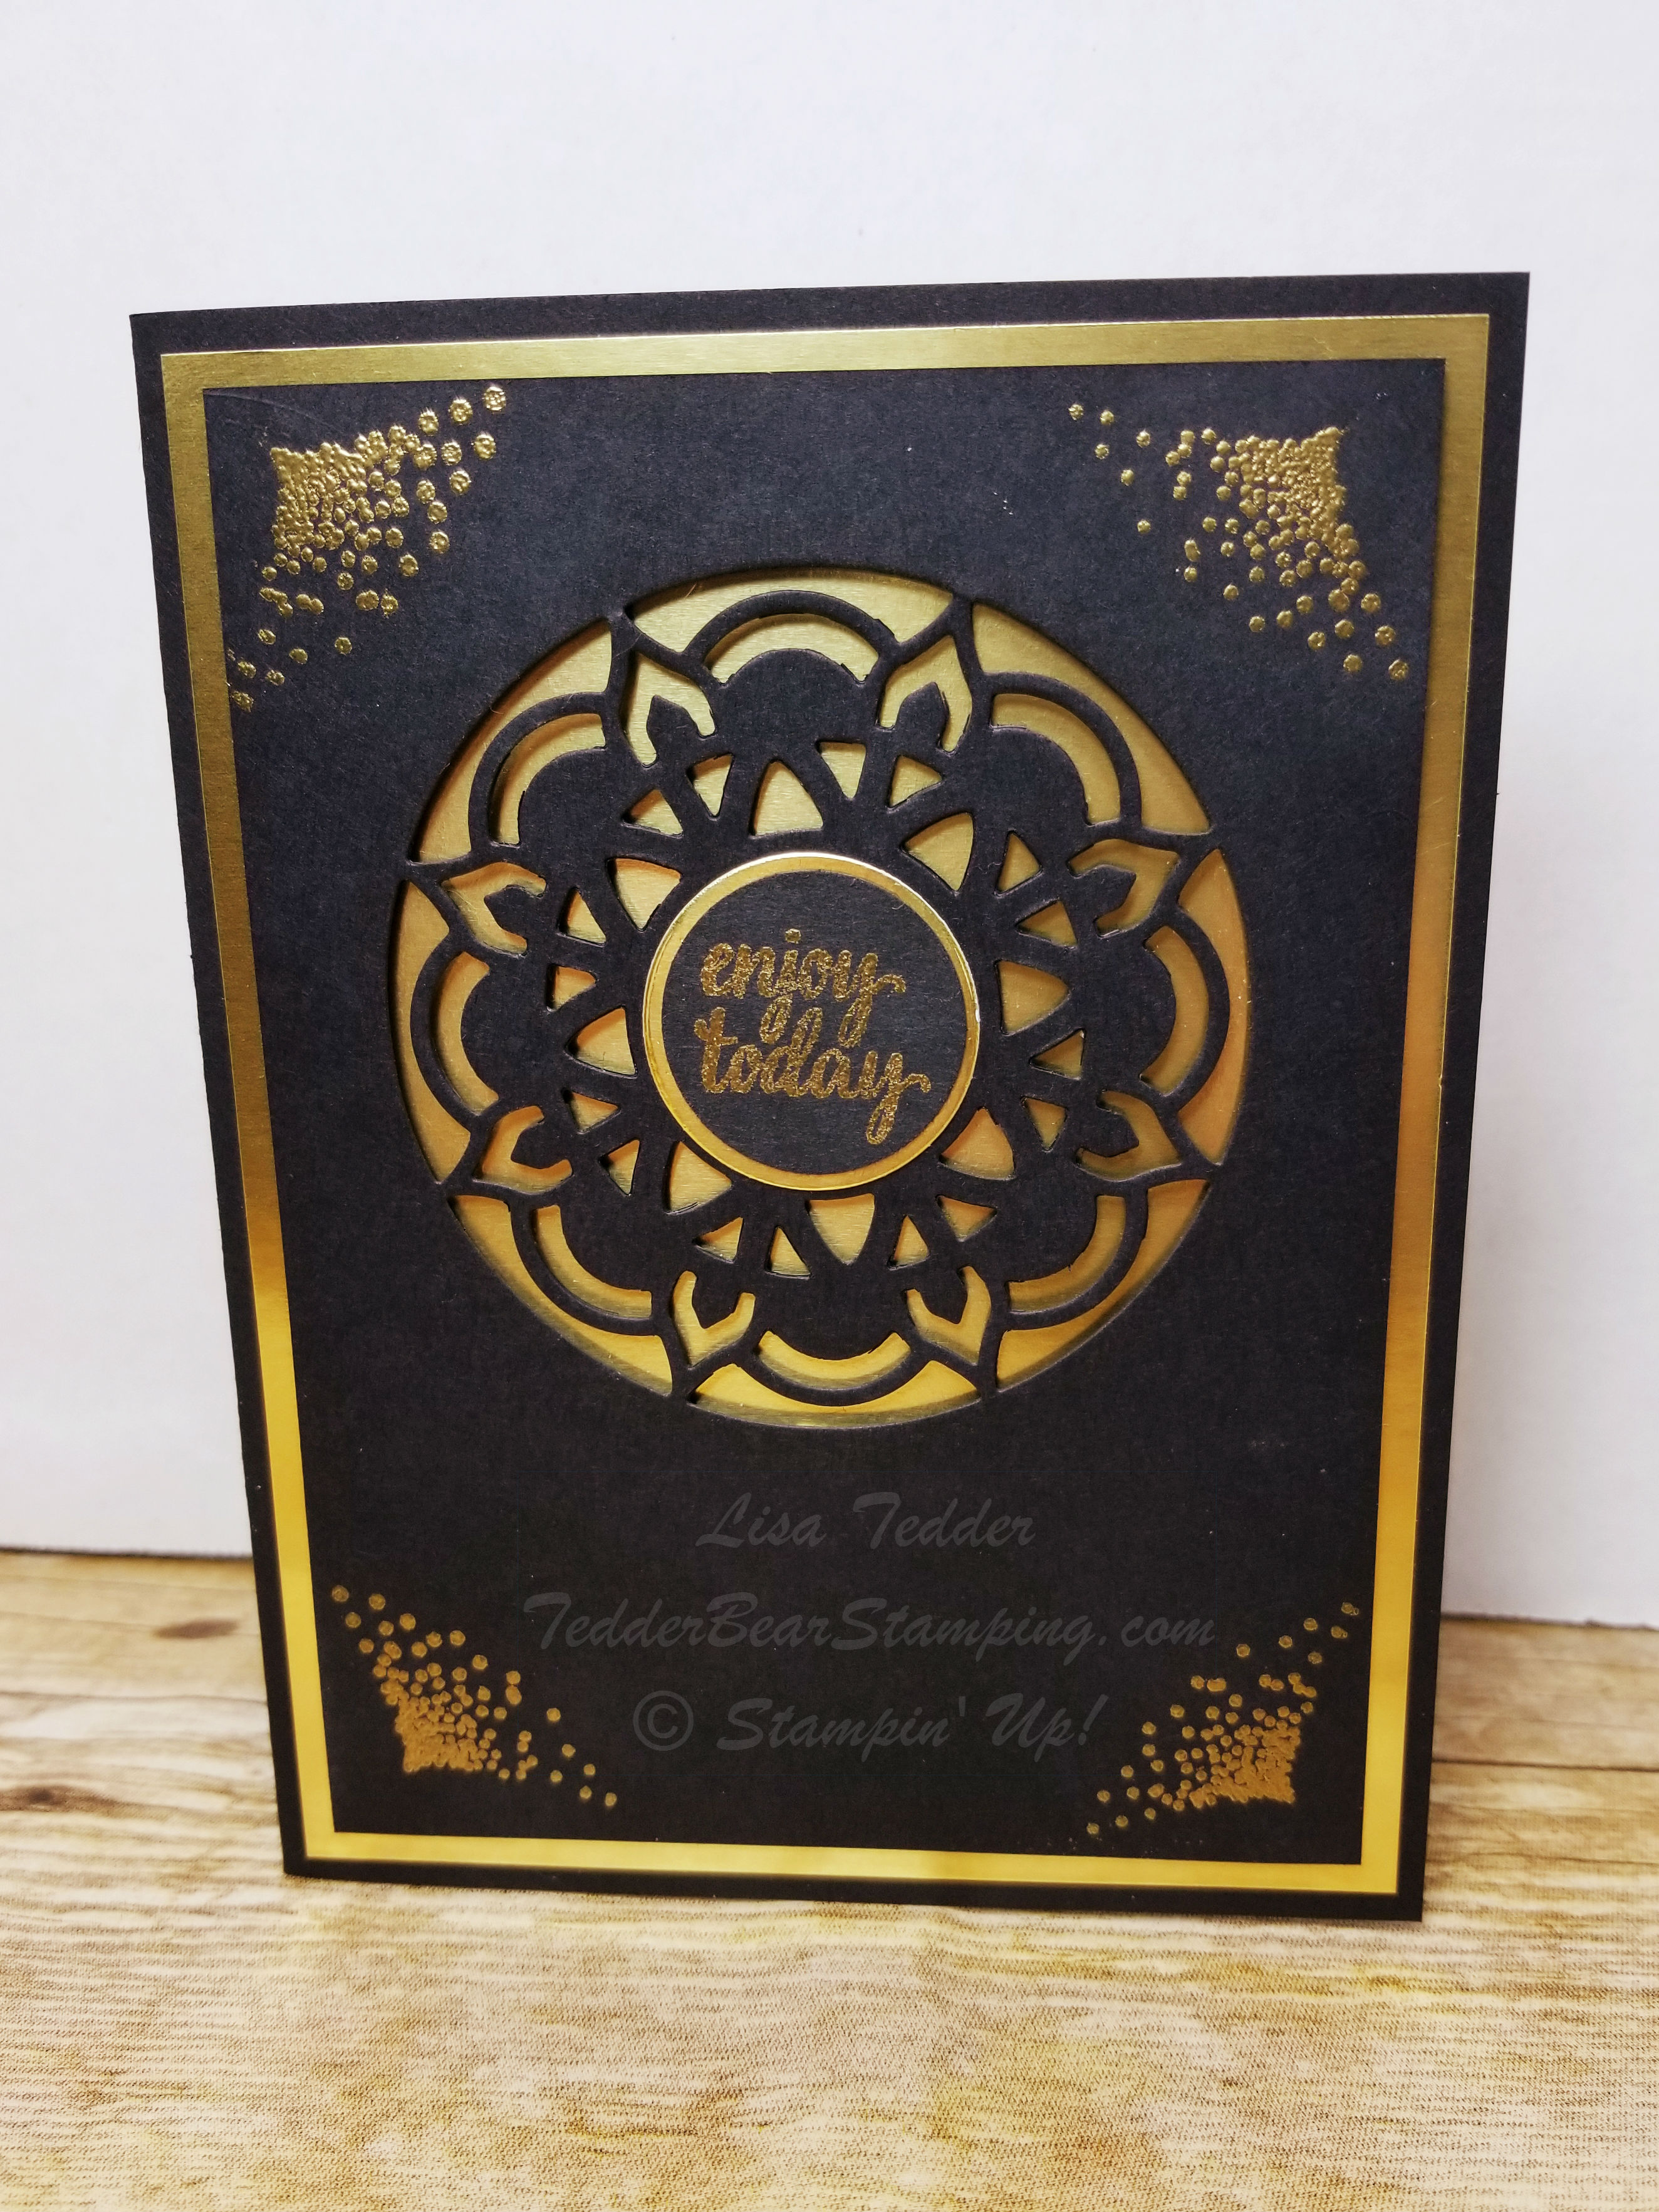
I had a class yesterday and we made three cards, one of which I am going to share with you today! I was inspired by Priscilla Ivler. I LOVE getting ideas from others and tweaking it a bit!
Here is the card we made:
Isn’t it stunning?!! It’s not a ‘hard’ card, you just have to work on getting the thinlit to let go of the paper without ripping it. My Die Brush has seen better days and the bristles are falling out! Yay! We get a new one in the NEW catalog!!
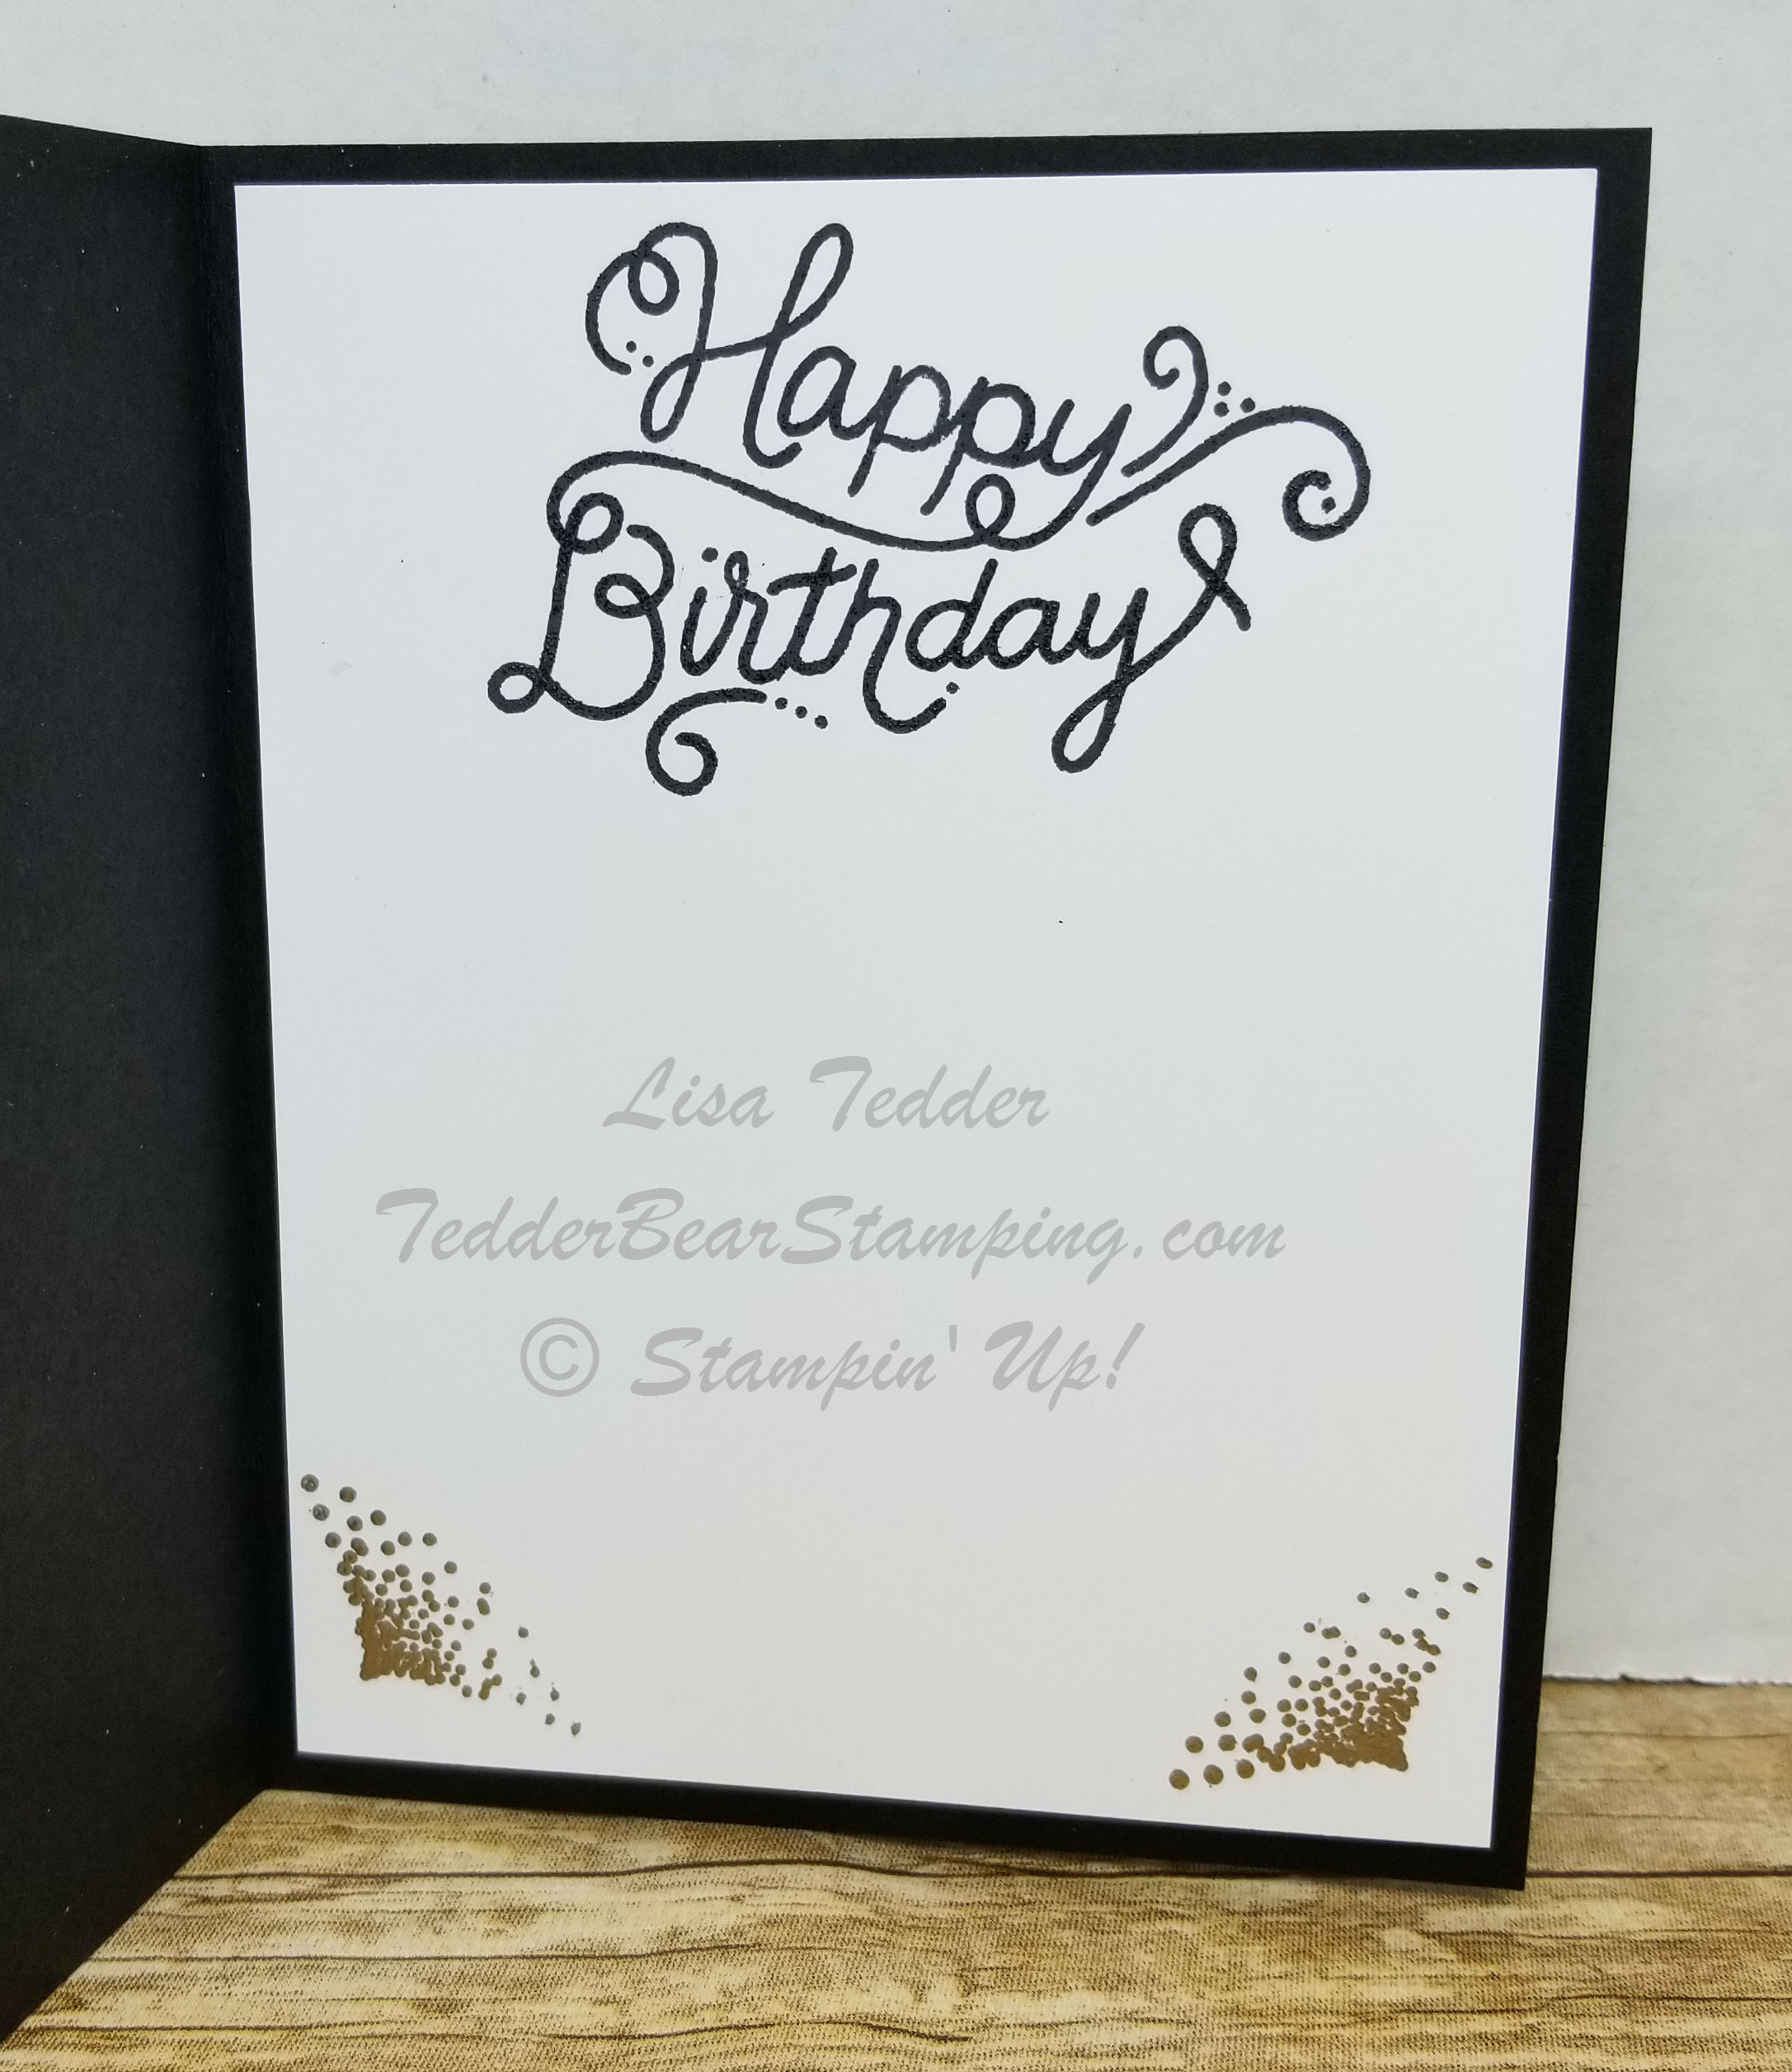
Here is the inside:
Everyone at class loved it! And in person it is even prettier than here! I know it’s hard to believe!
This is going to be a quick post today, if you want the dimensions just let me know and I will send them to you!
See? PLENTY of ways to win free goodies!! I will be continuing with my blog candy until I feel like you don’t want free stamping supplies! Think that will ever happen? Nah! I wouldn’t think so!
Lisa Tedder
TedderBearStamping
A California Girl living in North Carolina Product List


 Burlap Ribbon")


")


