Olde Tyme Christmas

Hey Guys!

Easy and Fun Olde Tyme Christmas Card to wow your friends and family! Stamping, tearing & sponging is all it takes to make this beautiful card!

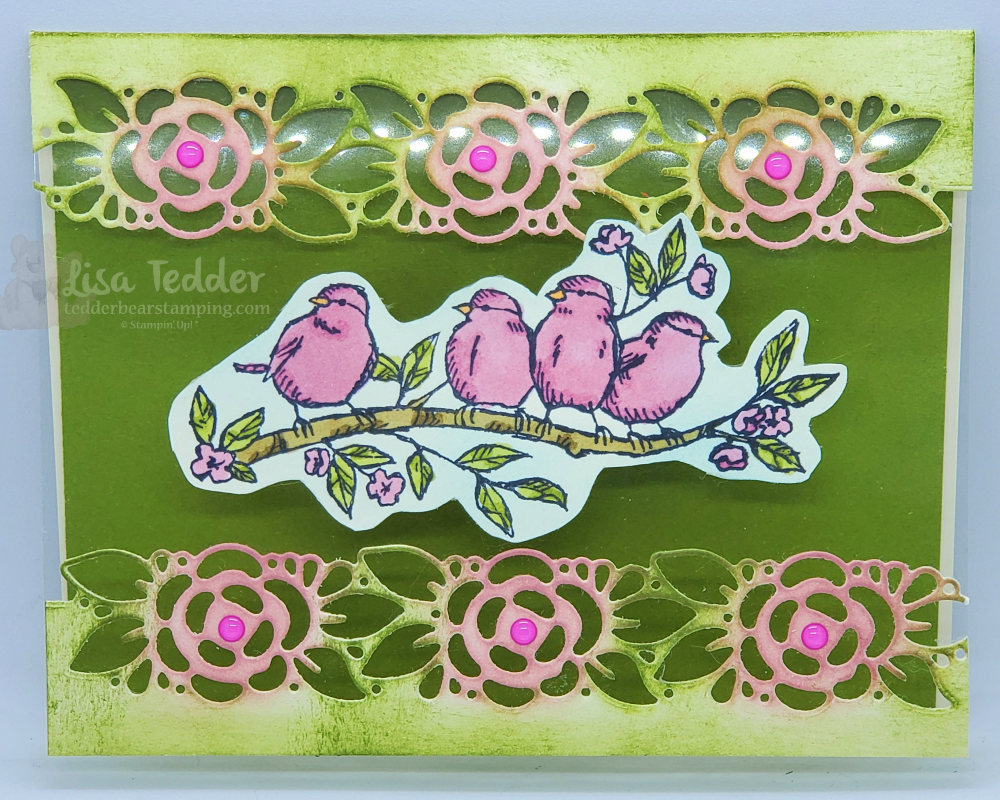
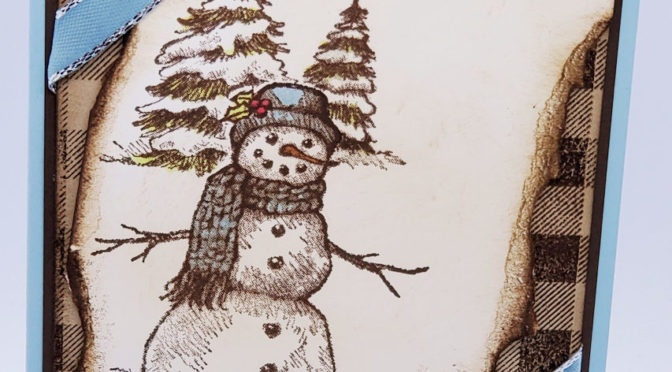
Today I am sharing with you an Olde Tyme Christmas Card! This handmade card uses the NEW stamp set from Stampin’ Up! called Snow Wonder. This will wow your friends and family! First, when stamped the image has a lot of hash marks and that, to me, looks like it is an Old Fashioned drawing. Second I tried to emboss it with white and see what it looked like…..not so great! The hash marks made it all bunch up and it had no definition.

As a result, I then tried it in Early Espresso and WOW that looked so good! Colored the carrot, hat and scarf with my Stampin’ Blends, using light colors. As long as I used light colors it didn’t take away from the Olde Tyme Christmas look. Since I was making it look older I tore the paper (after stamping everything else) and sponged Early Espresso on the edges!

EAsy and Fun Olde Tyme Christmas Card
Easy and fun Olde Tyme Christmas Card

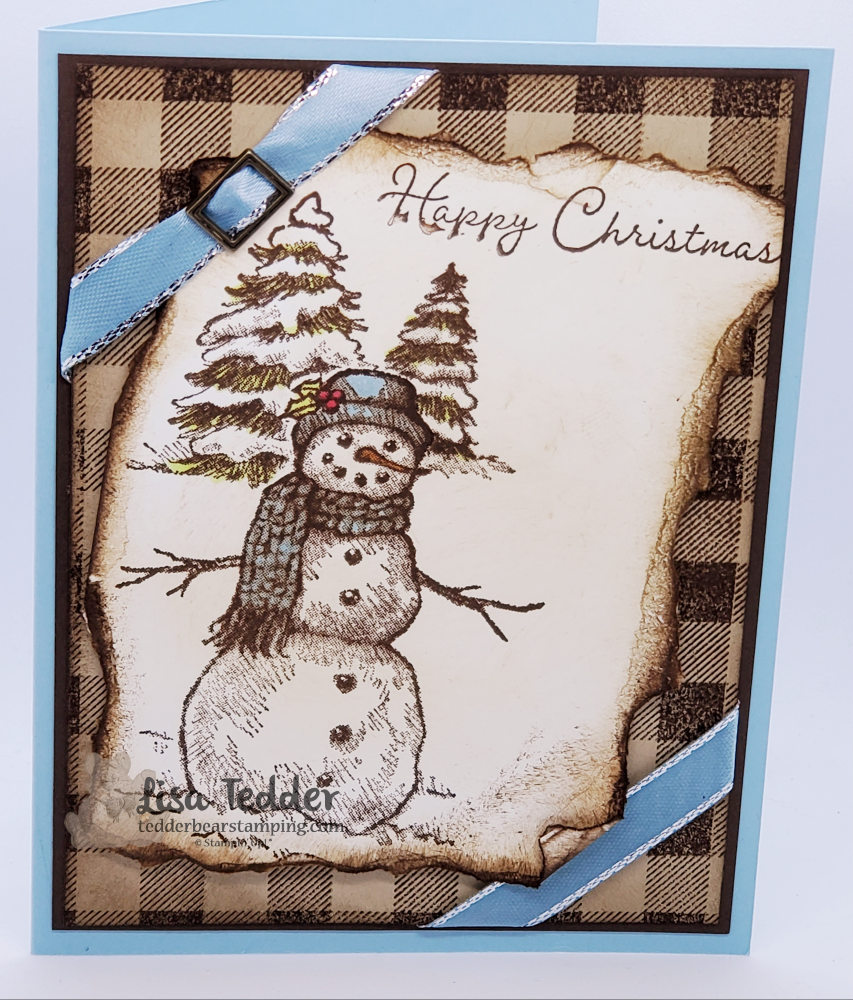
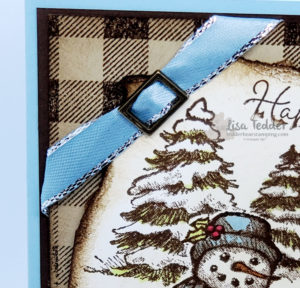
Since I colored the scarf with Bashful Blue, I thought pulling in that color would be pretty on the ribbon in the corners. So, I colored the ribbon with a Bashful Blue Dark Blend, popped up the image on a piece I stamped with Buffalo Check and wrapped it on the corners. In the same vein, did you notice that I used an antique slide on the ribbon at the top?! I think that added a more Olde Tyme feel to it! To sum up, for the base I used more of the Bashful Blue to pull it all together! What do you think?

For those that REALLY love That Olde Tyme Christmas look here is another one that I had done in the past, click here to see it. Likewise, here is another one that is on YouTube! Love this card check it out!

Here are the specifics for this card:

Stamps:
Snow Wonder
Buffalo Check
Ink:
Early Espresso
Crumb Cake
Blends: Granny Apple Green (on the leaves on the hat & on trees), Real Red Dk for the berries in the hat & Balmy Blue on the hat/scarf, Pumpkin Pie dk for nose
Paper:
Balmy Blue 8 1/2″ x 5 1/2″
Early Espresso 5 1/4″ x 4″
Crumb Cake 3 7/8″ x 5 1/8″
Whisper White 4″ x 5 1/4″ then tear around image
Misc:
Antiqued corners & slides elements
3/8″ Metallic edged Ribbon (colored with Balmy Blue Blend)
Dimensionals

As always, the items listed above will be in picture form below. Click on any of them and you will be taken to my OnLine Store so you can purchase what you need to replicate this card! First, If you purchase from me you will receive from me a pdf with 16 projects that includes pictures and step by step instructions! Second, this is my Thank You for working with me in my business! Here is a sneak peek:

pdf tutorials for $35 purchase in my Online Store

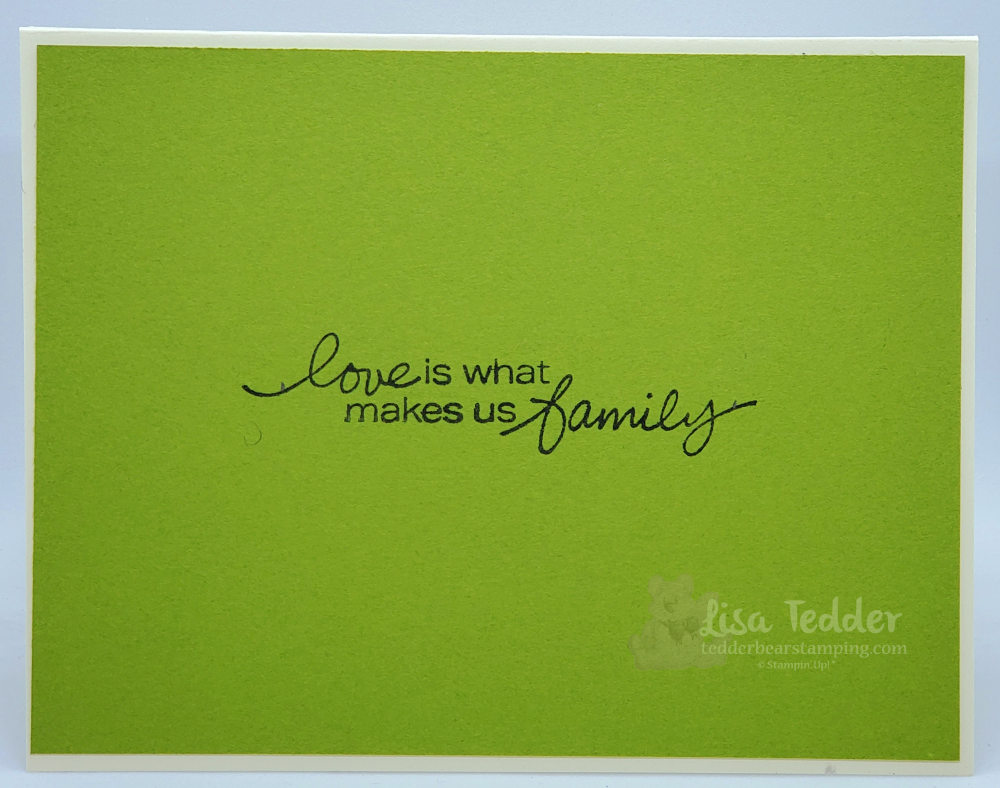
I hope you enjoyed this Olde Tyme Christmas! Please leave a comment below to let me know what you think! Also, subscribe to my blog and my Newsletter so you won’t miss any updates from me!

Lisa Tedder
A California girl living in North Carolina

Product List

NEW Technique: Spot On!

Hey Guys!

Today I am sharing with you a New technique that I discovered that I am calling Spot On! Have you ever wondered what, if anything you should do with your Stampin’ Spots other than take them on the road? This technique is for you! It’s really easy and really packs a punch (which is why I love it!) Want to see it?

Rub the stampin’ spots onto the Folder spritz and that’s why I called this technique Spot On!

Go see my video if you haven’t seen it yet so you can see how to make this! Every card will be different, and you can make it really bold by changing the color of the spot’s you use! This Technique I am calling Spot On! because the name fits! Take your stamping spots and rub on the side of the folder that is indented, being sure to cover the surface with two – three colors (I only used two for all my samples). I spritzed it with an Rubbing Alcohol/Champagne Mist mixture to give it sparkle and to get the color to spread.

Then I put my cardstock in the folder (I used Shimmer White because it is slightly thicker and can handle the wetness without pilling). Heat set it when you get it out (you can spritz once more to get the color to run a bit more)…..once dry, run one of the colors you used over the raised portion from the Folder to pick up the design. EAsy Peasy! If you would like to see other Techniques click here.

Here are two other ideas I used:

Technique Spot On! Using Free as a Bird and Scripty Folder 3D.

And one more:

Another Spot On Technique using Absolutely Argyle Folder & Forever Fern Stamp set.

As always here are the specifics for my Main card:

Stamps:
Peaceful Moments

Inks:
Spots: Pool Party & Blushing Bride
Markers: Pool Party & Blushing Bride
Pool Party for sponging
Blend: Pool Party

Paper:
Blushing Bride 8 1/2″ x 5 1/2″
Basic Black 5 1/8″ x 3 7/8″
Shimmery White 5″ x 3 3/4″, scraps for sentiment

Misc:
1/4″ Crinkled Seam Binding
Elegant Faceted Gems
Stampin’ Seal adhesive
Dimensionals
Parisian Flourish 3D folder
Spritzer, you can use Stampin’ Spritzer
Shimmer Paint: Champagne Mist
Alcohol

Below you will find a pictorial list of the supplies used, click on any of them to be taken to my OnLine Store. If you purchase from me $35 or more you will receive from me in your email a pdf with 16 tutorials for projects with pictures! I would love to be your Stampin’ Up! Demonstrator, let me know what I can do to make your crafting life easier!

Lisa Tedder
A California girl living in North Carolina

Product List

Simple Stamping Beauty

Hey Guys!

Today I am sharing with you a card that uses Simple Stamping, and Simple Stamping can be beautiful! I DID have it have layers, because I can’t do a card that doesn’t have layers! Here is another ‘Simple Stamping’ card that I have done in the past!

Here is a pic of my card:

Simple Stamping Beauty!

Simple Stamping means that you aren’t doing anything special to the card other than stamping. I added ribbon because it needed it! Another thing I added is the New In Color 2020-2022 Enamel Dots. There isn’t any Die Cuts on this card, which I hardly ever do! I hope you like it!

As always here are the specifics for this card:

Stamps:
Beautiful Friendship
Inks:
Highland Heather
Just Jade
Magenta Madness
Paper:
Magenta Madness 8 1/2″ x 5 1/2″
Basic Black 5″ x 3 3/4″, small strip to place over ribbon
Whisper White 4 3/4″ x 3 1/2″
Misc:
2020-2022 In Color Enamel Dots
Magenta Madness 1/4″ In Color Ribbon

It’s not often that I do Simple Stamping! You’ll have to let me know if you want to see more of that or you prefer my usual style. I get bored making too easy cards hence the reason I go a little over and above. 🙂

Hope you enjoyed your visit! Below you will see the supplies listed in picture form. Click on any of the pictures and you will be taken to my OnLine Store. Any purchase of $35 and you will be sent a pdf file with 16 tutorials with step by step directions and Photos! If you are in need of a Demonstrator from Stampin’ Up! you can choose me!

Lisa Tedder
A California living in North Carolina

Product List

Criss Cross Fancy Fold

Hey Guys!

Today I am sharing with you a Fancy Fold called Criss Cross. I saw it on Pinterest and wanted to give it a try! Also, I got an idea in my head and thought this fancy fold would be perfect! Here is a video if you want to see it made.

Here is my card:

Front of the Criss Cross Fancy Fold
Inside of the Fancy Fold, don’t you love the paw prints?!

This Criss Cross Fancy Fold card was so much fun to make! Very easy too! I especially love how the paw prints on the inside look black because we put the black behind the cut outs. Don’t you think that is stinkin’ Cute?!!

Here are the specifics for this card:

Stamps:
Pampered Pets Bundle
Tasteful Touches

Inks:
Real Red
Memento Black
Blends: Color Lifter & Smoky Slate

Paper:
Real Red 4 1/4″ x 11 scored at 2 3/4″ on both ends. 1″ x 4″ (x3)
Basic Black 5 1/4″ x 4″, 7/8″ x 3 7/8″ (x3), 4 1/8″ x 3 5/8″ (x2)
Whisper White 5″ x 3 3/4″, 3/4″ x 3 3/4″ (x3), scraps for the 2 cats and 1 mouse
Playful Pets DSP 4″ x 2 1/2″ (x2)

Misc:
Die cutting Machine
Red Rhinestones
Stampin’ Seal
Old World Paper 3D folder
Dimensionals
Dual Lock by 3M

As always, below will be pictures of the supplies used, click on any of them to be taken to my OnLine Store where you can get everything for this project (except the Dual Lock). For every $35 you spend each month, you will receive from me a tutorial of 16 projects with step by step instructions and pictures! I would love to be your Stampin’ Up! Demonstrator!

Thanks for stopping by! Please subscribe to my Newsletter, YouTube Channel AND this blog! That way no matter what you won’t miss anything!

Lisa Tedder
A California girl living in North Carolina

Product List

It’s a Mystery Fold!

Hey Guys!

I’m on a roll! I’ve done 4 videos in 4 weeks! You can go to my YouTube channel to see the other videos I’ve done. To see this cards video you can click here. Looking OnLine I saw this fold card from Etsy, she was charging to make that card, and I figured I would try to figure it out on my own. And I did! What is great is that it fits into one of Stampin’ Up!’s envelopes and I made it work! After I saw this on Etsy, I saw someone else from Europe do the same cut but their cards are bigger than the United States so I’m even more proud that I figured it out by myself! Here is my card:

This is the card open. Isn’t that dog stinkin’ cute!? Love that I got the fold idea from Etsy!

And the front of the card:

Here is that Snooty Kitty! I have one of those do you?

And here is my cheat sheet!

Dash Lines are Score Lines, Straight uncut lines is where you cut.

As usual, here are the specifics to this card:

Stamps:
Pampered Pets Bundle #154069
Here’s a Card #149438
Itty Bitty Birthday #148618

Inks:
Memento Black #132708
Real Red #147084
Blends: Real Red #154899, Smoky Slate #154904

Paper:
Whisper White 12 x 12 cardstock #124302 12″ x 5 1/4″ scored @ 4″ & 8″
Whisper White #100730 3 5/8″ x 4 7/8″ 2 3/8″ x 1 7/8″, scraps for dog and sentiment
Basic Black #1210453 7/8″ x 5 1/8″
Real Red #102482 3 3/4″ x 5″ (x4), 1 1/8″ x 2 1/4″ (x4), 2 1/2″ x 2″
Playful Pets DSP #152489 3 5/8″ x 4 7/8″ (x2), 3 3/4″ x 2″ & cut out cat

Misc:
Playful Pets Trim Combo #152466
Playful Pets Trinkets #152465
Paper Trimmer #152392
Brick & Mortar 3D Folder #149643
Tasteful Labels Dies #152886
Dimensionals #104430
Glue Dots #103683
MultiPurpose Liquid Glue #110755

Below you will see these same supplies listed in picture form. Click on any of them and you will be taken to my OnLine Store! Any purchase for $35.00 or more you will receive from me a Tutorial of 16 projects with step by step instructions along with photos! Here is a sneak peek if you buy from me this month.

PDF included with all orders above $35!

Wasn’t this card super cute!!? Loving how it came out! This will probably be sent out to my Grandkids….I think they will love it as much as I do!

Hey, I keep forgetting to tell you that I have a newsletter that I send out each month, be sure and sign up so you can get notified of new things coming out and get ideas for crafting!

Thank you for stopping by! Please leave me a comment so I know you are reading this. Come back again! You can subscribe to my Blog and get notified when I post next.

Lisa Tedder
A California girl living in North Carolina

Product List

Keep opening until Reveal!

Hey Guys!

We do the best we can. How are you holding up? I am working on it, I am doing videos every week, and there is one for this card! You can go to YouTube and check it out! Having ups and downs are normal right? Being a normally happy person, I try very hard to not let the World get me down. Making this card made my very happy! I even had my friend over and we made it together! This card is fun because it has a lot to see, you open it and keep on opening for the final reveal!

Triple Fold card closed
One flap back, see how I had these two pieces of DSP meet in the middle?
Triple Fold all the way open!

The Dies for this Suite are really fun! The World Globe can be wherever you live! And cutting it out of Brass Foil is the best! The Brass Foil is so pretty, it seems like it is brighter and deeper in color than the Gold Foil. Don’t get me wrong I still love the Gold Foil but this one is a keeper for sure!

Here are the specifics for this card:

Stamps:
Beautiful World Bundle
Stacked Stones

Inks:
Early Espresso
Misty Moonlight

Paper:
Early Espresso 12″ x 12″, scraps for globe stand….scored @ 2″, 4″, 8″ & 10…..then turn score @ 4″ & 8″ cut away four corners and one from each side flap (see video)
Misty Moonlight 3 3/4″ sq., scrap for behind globe
Whisper White 3 5/8″ sq, scrap for sentiment
World of Good Specialty DSP 3 3/4″ x 1 7/8″ (x2) for inside & outside flaps,
3 3/4″ sq for outside flap.
Brass Foil

Misc:
Die Cutting Machine
Forever Greenery Trim Combo Pack
Dimensionals
Tasteful Touches Dies
Elegant Faceted Gems
Dual Lock from 3M

Below you will see these same supplies listed in picture form. Click on anyone of them to be taken to my OnLine Store! For any purchase over $35.00 you will receive from me a Tutorial for 16 cards! This tutorial has step by step instructions + pictures! Here is a sneak peek:

PDF included with all orders above $35!

For the July I will be sending you 3D tutorials you can make! You won’t want to miss it! If you live in the USA and are needing a Demonstrator with Stampin’ Up!, let me know what I can do to help you! I love helping people be creative!

Thanks for stopping by! Please leave a comment and let me know what you think! See you again soon!

Lisa Tedder
A California girl living in North Carolina

Product List

Sunflower Shaker Card

Hey Guys!

Today I am sharing with you a card I made using the Jar of Flowers stamp set AND the Mason Jar Shaker Domes! I LOVE shaker cards, and this one was so fun! The stamp of the Mason Jar is so cute! These are REVERSIBLE stamps! So, you stamp the image in Pool Party to mimic a Real Mason Jar turn the stamp over and you can shade it with the same stamp!

Here is my card:

No one can resist a shaker card! You just HAVE to shake it!

The Designer Series Paper (DSP) is supposed to be a table with the brick being the wall. Do you see that? I wasn’t so sure how to make it look like a table, so this is what I came up with.

When I did the brick, I used real red cardstock and then ran the Memento Black ink over it to look more weathered and real. For the double bow ribbon I used the Forever Greenery Combo pack, the gold really sets off the gold in the DSP. And for the inside of the jar I used the Flowers for every season Gems. Really fun to to shake!

Here are the specific for this card:

Stamps:
Jar of Flowers
Comfort & Hope

Inks:
Early Espresso (for flowers)
Memento Black (for brick and Sentiment)
Pool Party (for water and for the jar)
Old Olive (for stems)
Blends: Old Olive, Daffodil Delight, Pumpkin Pie, Crumb Cake

Paper:
Bumble Bee 8 1/2″ x 5 1/2″
Gold Foil 5 3/8″ x 4 1/8″
Black 5 1/4″ x 4″ (x2)
Real Red 5″ x 3 3/4″
DSP 1 1/4″ x 3 3/4″
Whisper White 3″ x 5″ (for flowers AND inside jar) 5″ x 3 3/4″ (for inside)

Misc:
Forever Greenery Trim (gold )
Flowers for Every Season Gems
Stampin’ Seal
Brick & Mortar 3d folder
Dimensionals
Stitched So Sweetly Dies
Mason Jar Shaker Domes

Below my name are the products in picture form, click on any of them to be taken to my OnLine Store. ANY order over $35 will get you a pdf of 16 cards with step by step instructions including pictures! Here is a sneak peek:

PDF included with all orders above $35!

Thank you so much for stopping by!  Please leave a comment so I know you like what you saw AND that you saw it!  LOL  For all I know I am writing this is as private journal and nobody is reading it!  LOL

Lisa Tedder
A California girl living in North Carolina

Product List

Celebrate Sunflowers & Watercolor Pencils

Hey Guys!

So, I was on Facebook the other day and this card from Amanda Charlesworth made me put down everything I was doing and make it! I had to make this card! I LOVE when that happens.

Using Watercolor Pencils, makes this image pop!

Not only was I inspired by Amanda, but I made the card exactly like she did because I wanted to see if I could color it as well as she did. I think it came out really well! What do you think?

Don’t you love it when you see something that stops you in your tracks and you want to try your hand at it? That’s what happened with this card.

Here are the specifics for this card:

Stamps:
Celebrate Sunflowers

Inks:
Crushed Curry
Old Olive
StazOn Saddle Brown
Memento Black

Cardstock:
Whisper White Thick 8 1/2″ x 5 1/2″
Whisper White 5″ x 3 3/4″ (x2) one for sunflower and leaves
Cinnamon Cider 3 3/4″ x 3/4″, 5 1/4″ x 4″
Old Olive scrap

Misc:
Champagne Rhinestones
Dimensionals
Lovely Labels Pick a Punch
Watercolor Pencils (Daffodil Delight, Early Espresso, Old Olive, Pumpkin Pie)
Watercolor Pencils Assortment 2 (Granny Apple Green)
Sponges
Blender Pen

Below are the same supplies listed in Picture form, click on any of them and you will be taken to my OnLine Store. Any purchase you make over $35 you will receive 16 step by step tutorials with Pictures! Here is a sneak Peek:

All these tutorials for purchase of $35!


This stamp set was the first one I HAD to have! So pretty!! I have offered a class using Celebrate Sunflowers where I made 5 cards and I loved everyone of them! You can see that post here. Doesn’t everyone love a Sunflower? We always had some growing, but it was very hard to keep the squirrels from jumping on them and knocking them over.

Thank you for stopping by! Please leave a comment to let me know that you are liking what I post, it also makes me happy!

Lisa Tedder
A California girl living in North Carolina

Product List

Grace’s Garden & Mountain Air

Hey Guys!

Today I am sharing with you a card, plus video using the Stamp sets from Stampin’ Up! Grace’s Garden & Mountain Air. BOTH of these stamps are super fun to play with, so hop on over to my video to learn how easy it is to make this card.

My backyard in CA looked like this! Such a Fun and Easy card!

Pinterest had a card from Kerry Bunting that made me want to expand on her idea, thanks for the inspiration Kerry!

Supplies used for this card:

Stamps:
Mountain Air
Grace’s Garden Bundle

Inks:
Memento Black
Balmy Blue
Seaside Spray
Garden Green
Craft White
Blends: Real Red D, Old Olive

Cardstock:
Seaside Spray 8 1/2″ x 5 1/2″, 4 3/4″ x 3 1/2″ (x2)
Basic Black 5″ x 3 3/4″ (x2)
Whisper White 2 3/4″ x 4″ (gate), 3 1/4″ sq (circle)

Misc:
Dimensionals
Stitched Frames
Die Cutting Machine
stamping sponges
Stitched So Sweetly Dies

Below you will see these same supplies in picture form. Click on any of the pictures and you will be taken to my OnLine Store to purchase the supplies for this card!

For anyone who purchases $35.00 from me, you will receive a file of tutorials with step by step instructions (with Picture!) to make 16 cards! And let me tell you, these cards are really good!

You can get all these Tutorials!

I am a Stampin’ Up! Demonstrator in the US, if you are in need of a demo who can help you be creative, I am your girl!

Thanks for stopping by! Please leave a comment so I know what you think, and don’t forget to subscribe to my YouTube Channel! And if you would like to see another card using the Mountain Air stamp, visit my blog here for a special fold card!

Lisa Tedder
A California girl living in North Carolina

Product List

Window Sheet Card

Hey Guys!

Today I am sharing with you a card that was inspired by a card online. You can find a video of my card here. I think the creator is french, and her name is Lezards de Cilou. Here is the card that influenced me:

She called it a Tripod card.

Having seen other cards made with Window Sheets as the front of the card, I wanted to have another go! If you would like to see an additional card I made using Window Sheets click here. Here is what I made today:

Sorry that the lights are reflecting off the Window Sheet!

And on the inside we have the sentiment that is hidden by the birds when it is closed:

This card is so pretty in person! The colors go so well together! I love how Stampin’ Up!’s product coordinates together. When I realized this 19 years ago, I knew that I wanted to get the discount and become a Demo! What I didn’t know is that I would STILL be doing it AND loving every part of it!

Here are the specifics for this card:

Stamps: Free as a Bird, Lovely You (Brand NEW!!)
Inks: Memento Black, Old Olive, Rococo Rose, Blends: Rococo Rose, Old Olive, Soft Suede
Paper:Very Vanilla 5 1/2″ x 5 1/2″ scored @ 4 1/4″, 1 1/2″ x 5 1/2″, Whisper White 2″ x 4″ (for stamping birds, then fussy cut around, Old Olive 5 1/4″ x 4″, Window Sheet 5 1/2″ x 4 1/8″
Misc: 2020 – 2022 In Color Enamel Dots, MultiPurpose Liquid Glue, Stamping Sponges

When cutting the Ornate Flowers border, cut it on the edge of the cardstock so you can place the other edge against the Window Sheet. You will need to color the flowers by sponging over the center of the flowers using Rococo Rose, and the leaves with Old Olive, you will also want to sponge the edges of the cut out with the Old Olive, this will make it blend. To place this on the Window Sheet, use a Silicone Craft Sheet, place a puddle of Liquid Glue and pounce the sponge over the glue and holding the cut out still, pounce the back so you won’t see where you put the glue. This makes it so much prettier on the other side of the Window Sheet.

Hope you are doing well!

Lisa Tedder
A California girl living in North Carolina

Product List

Learn how to make cards that won't end up in the trash!