Cutesy Holiday & Christmas Cards

Holiday Cards your family will LOVE!

Hey Guys!,

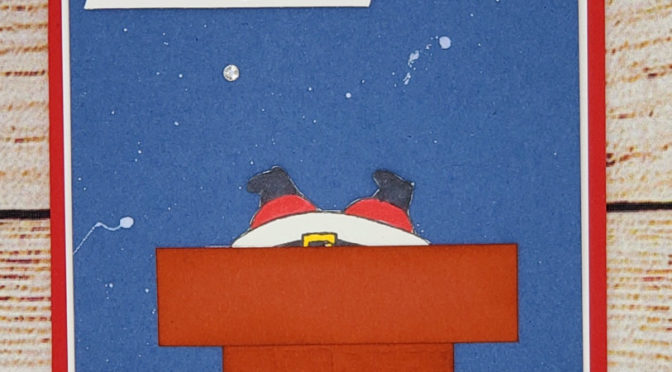
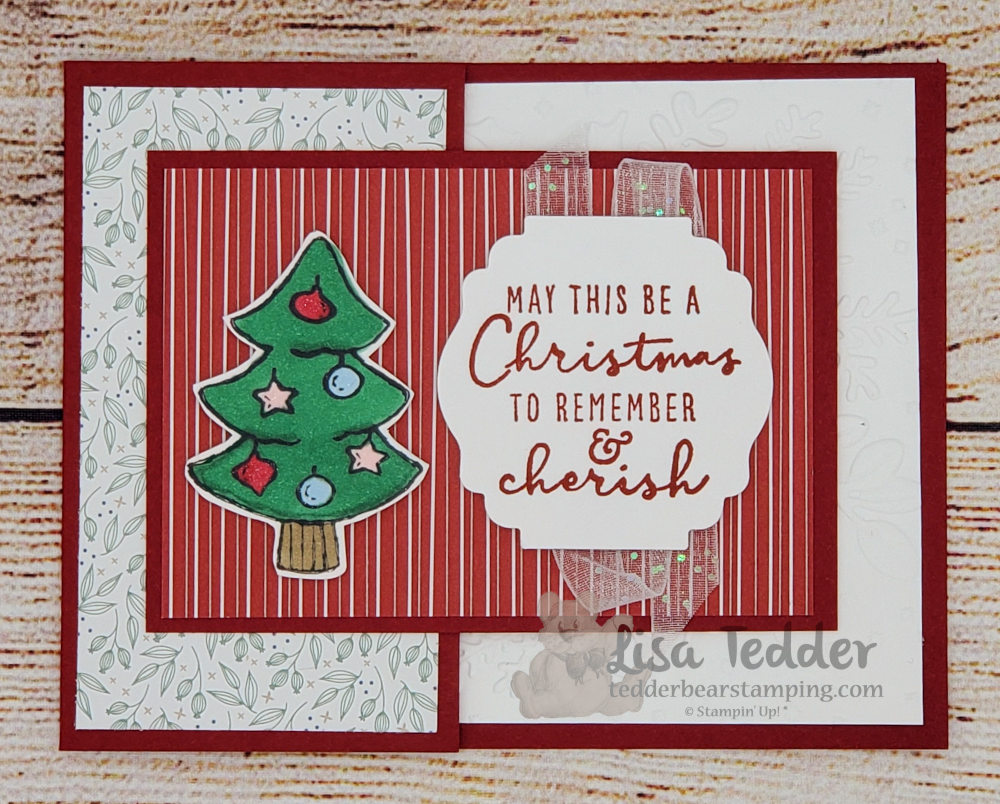
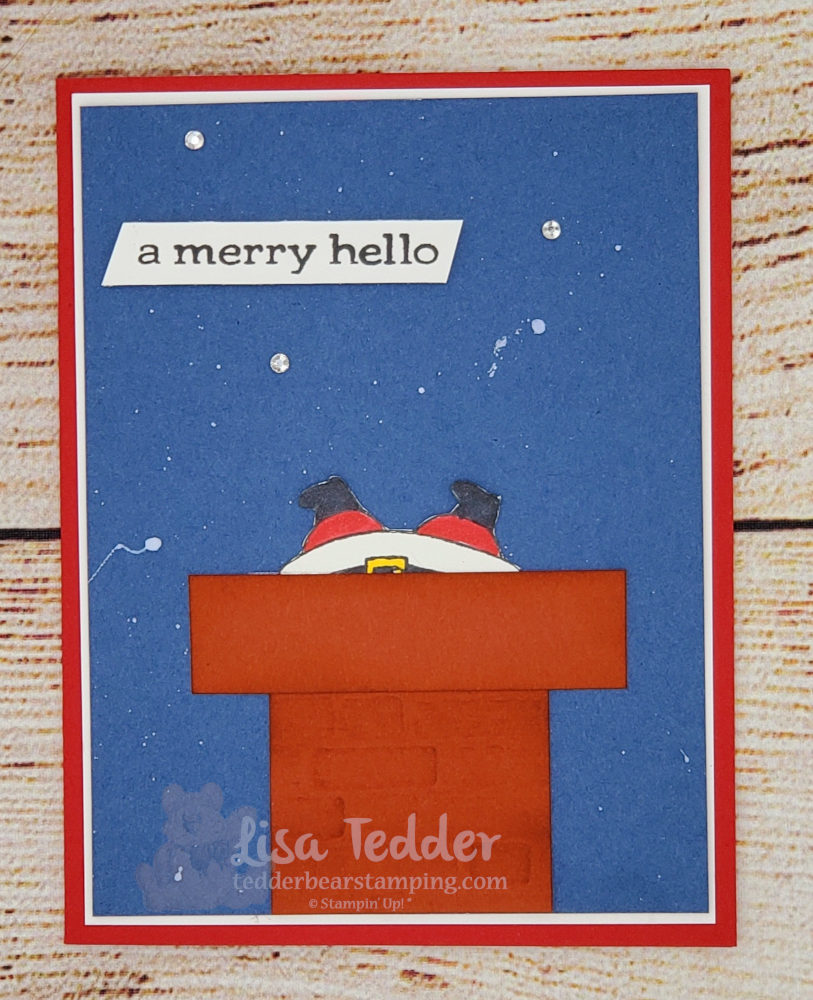
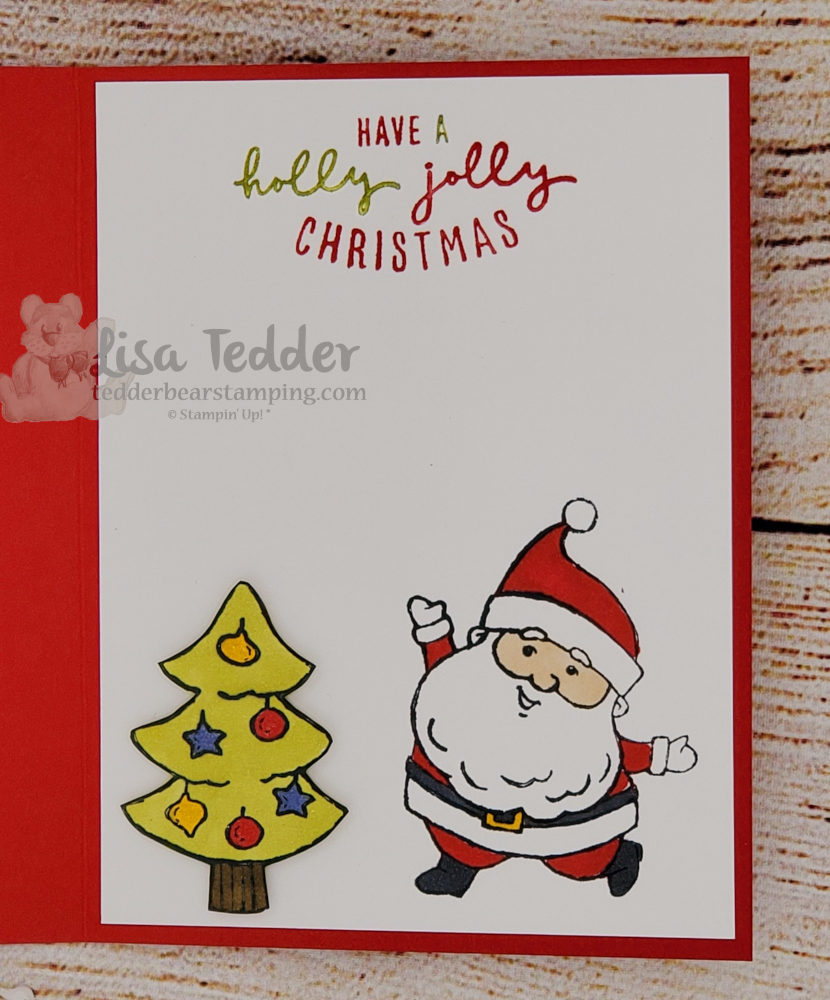
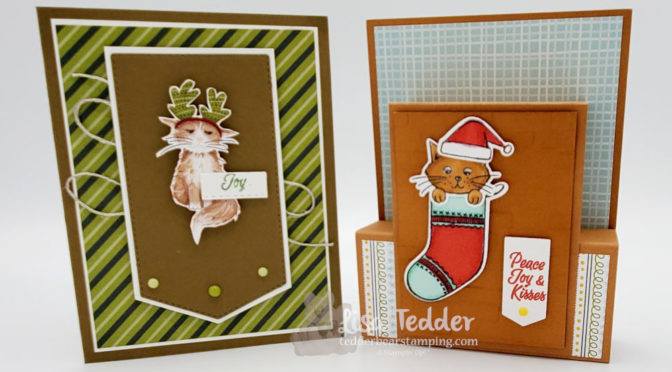
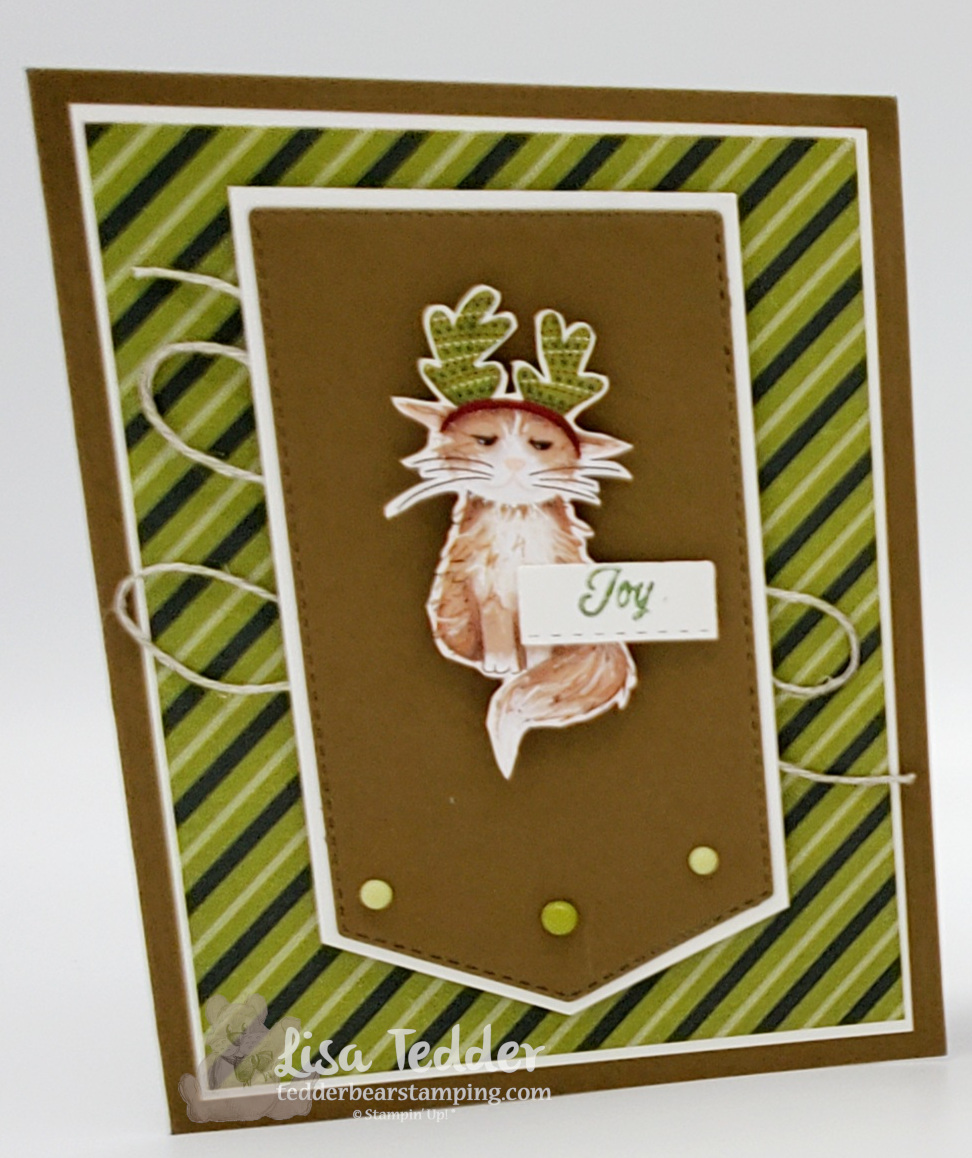
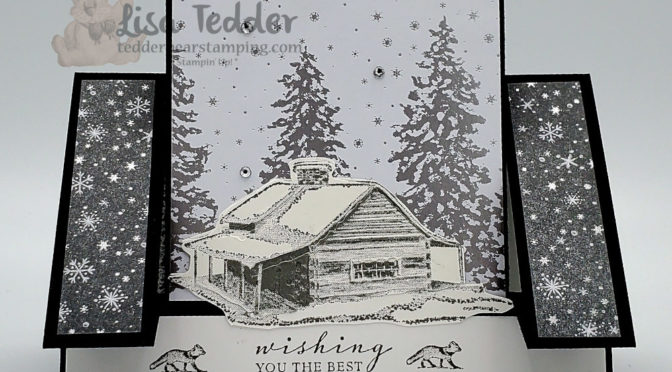
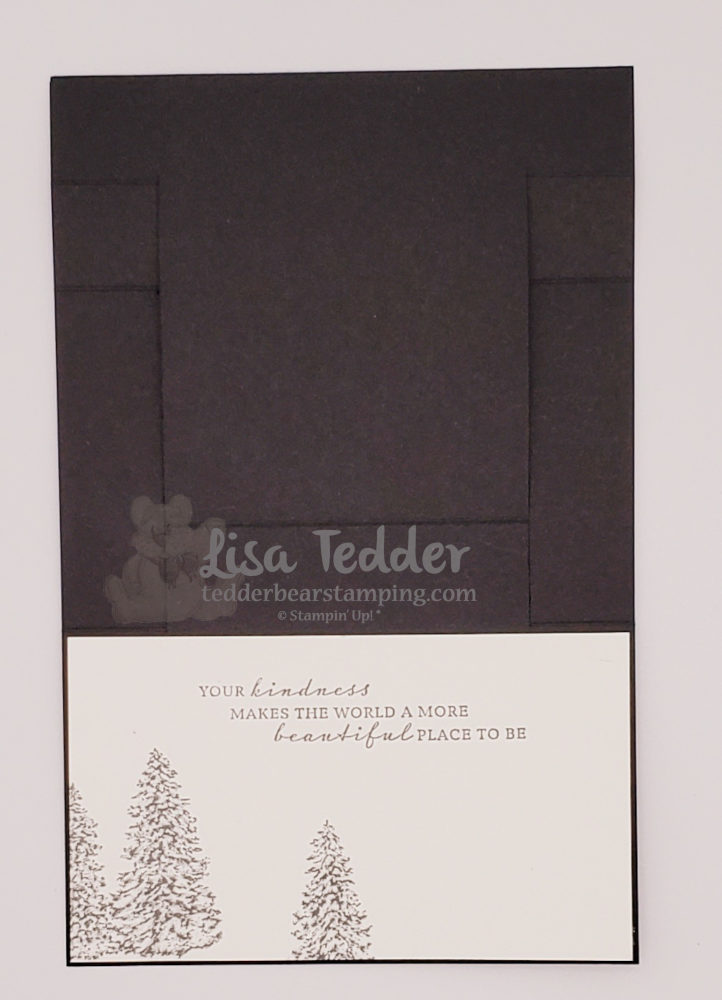
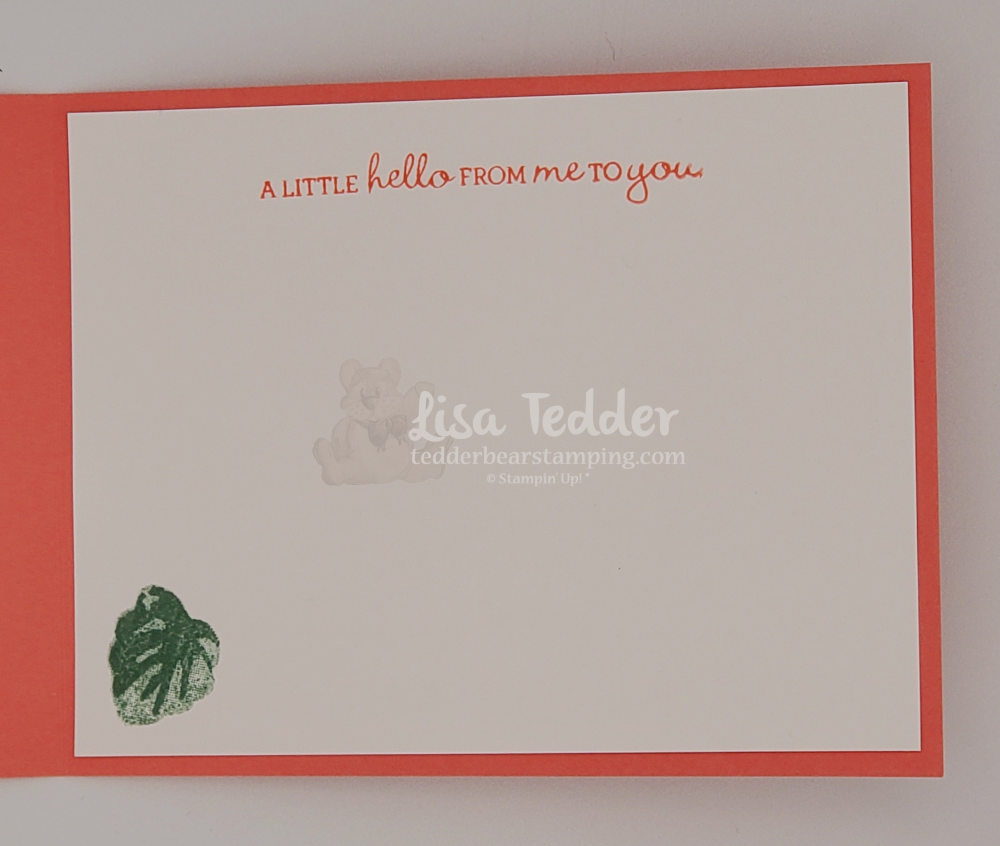
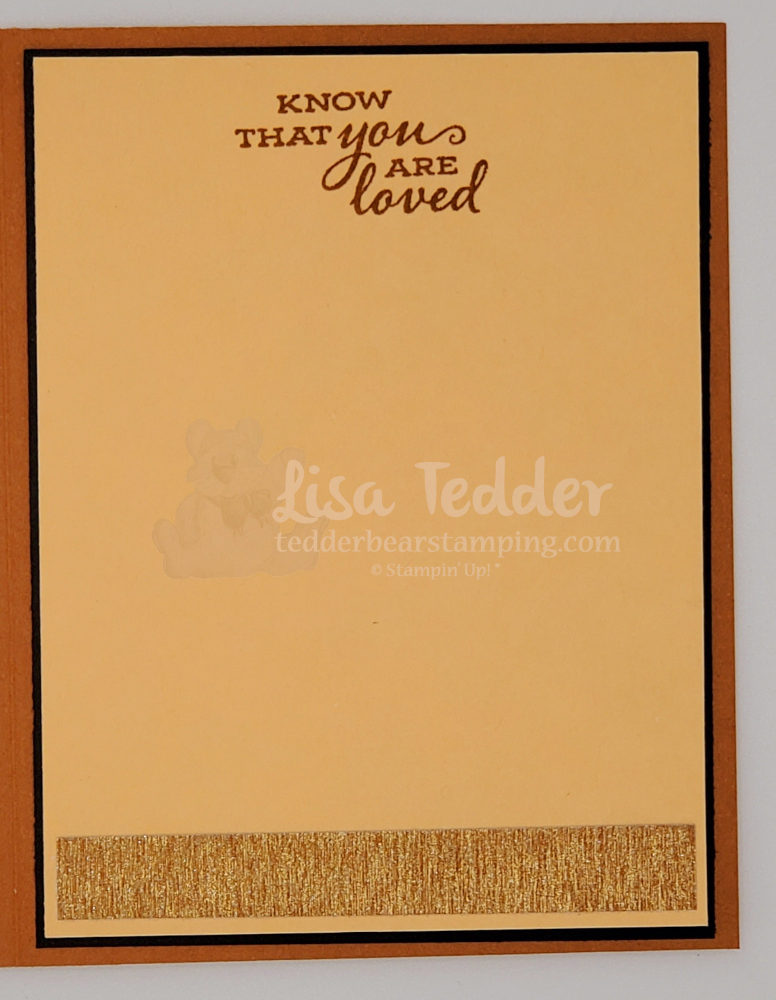
Today I am sharing with you two Cutesy Christmas cards, these are Holiday cards your family will love! Another great stamp set from Stampin’ Up! called Be Jolly. Also used on these cards is the Christmas to Remember stamp set. Besides showing you here on my blog you can also catch how to make them on my YouTube channel!

Cutesy Christmas Card, your family will love
Cutesy Holiday and Christmas cards, your family will love
Love this card, your family will too!

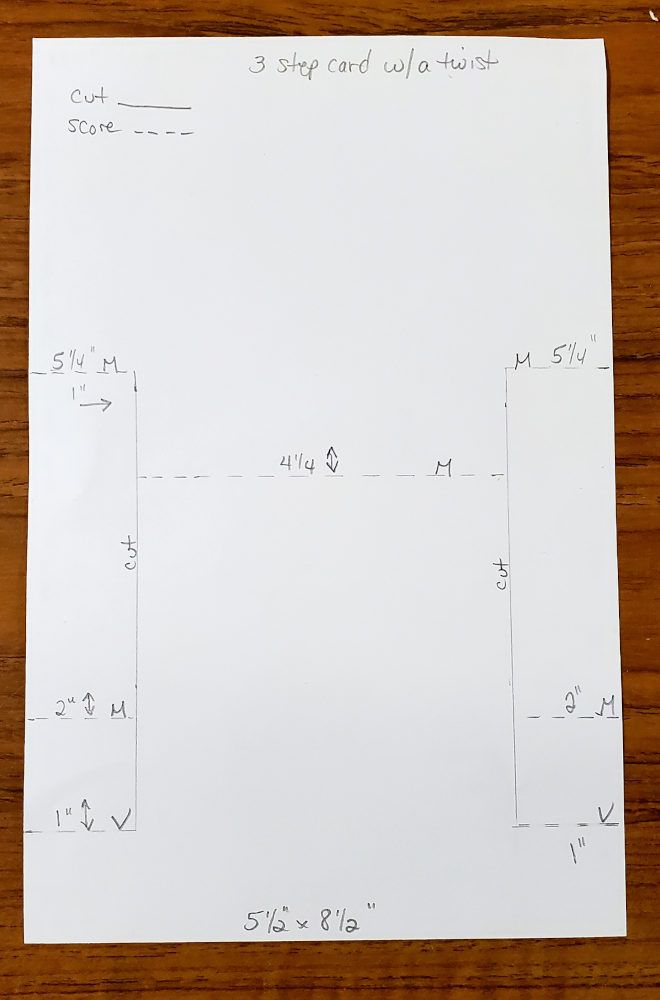
As usual, here are the supplies/dimensions for these cards.

Stamps:

  • Be Jolly
  • Christmas to Remember

Inks:

  • Cherry Cobbler
  • Memento Black
  • Cajun Craze

Markers:

  • Old Olive
  • Real Red

Blends:

  • Real Red
  • Basic Black
  • Shaded Spruce
  • Cherry Cobbler
  • Balmy Blue
  • Ivory
  • Daffodil Delight

Paper:

Card 1:

  • Cherry Cobbler 4 1/4″ x 11″, cut 3 off long side, use this piece as your front layer
  • Basic White 5 1/4″ x 4, scrap for sentiment/tree
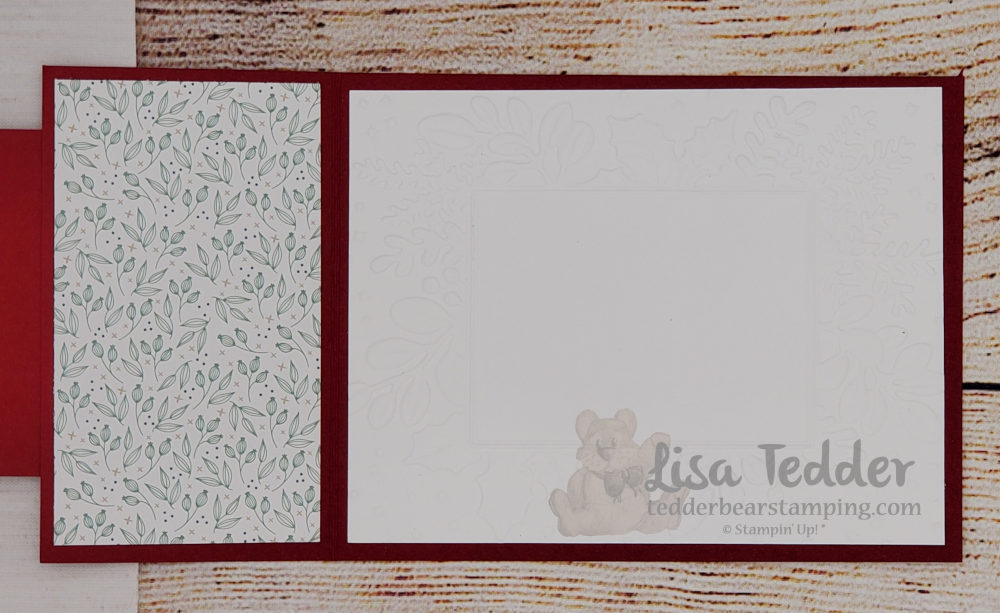
  • Tidings Of Christmas Designer Series Paper (DSP) 2 3/4″ x 4″ (front layer), 2 1/4″ x 4″ (x2) – both sides of front flap

Card 2:

  • Real Red 5 1/2″ x 8 1/2″ scored at 4 1/4″
  • Basic White 4″ x 5 1/4″ (x2), scraps for Santa in chimney and inside, tree, 3/8″ x 2 3/4″ sentiment
  • Misty Moonlight 3 7/8″ x 5 1/8″
  • Cajun Craze 3/4″ x 2 3/4″, 1 3/4″ sq

Misc:

  • Brick & Mortar 3D folder
  • White refill ink
  • Water Painters
  • Blending Brush
  • Wink of Stella
  • Label Me Lovely Punch
  • Basic Rhinestones
  • Dimensionals
  • White 3/8″ Glittered Organdy Ribbon

Identically below my signature you will see the list above in picture form. Furthermore, you can click on any of the pictures and be taken to my OnLine Store where you can purchase them. Subsequently if you purchase $35 or more you will receive from me a pdf with 16 projects with pictures and step by step instructions, just by placing a qualifying order! Here is a sneak peek:

Free with a Qualifying order!

To Summarize, I want you to know that I appreciate you so much! Moreover I hope you come visit me during my Live on YouTube! Please come back next week so I can show you what I have made!

Lisa Tedder
A former California girl living in North Carolina

Product List

Let’s get scary!

Halloween is coming up fast!

Hey Guys,

Halloween is coming up fast, Let’s get scary or NOT! Basically, I LOVE Halloween, especially when I am scrapbooking! As you know, Halloween comes up every year and when your kids are young you take a lot of pictures when they go out to Trick or Treat. Therefore, you have all the pictures to put in a scrapbook every year, and I think that each page for every year needs to be different. Hence, the reason why I love Halloween, I have to get really creative with my pages. Subsequently, I felt the need to be creative with my cards that I made for my YouTube video today! Hopefully you will love them as much as I do!

Let’s get scary! Halloween is coming fast!
Not that scary! But it’s still cute!!
inside

As can be seen, I always list the supplies/dimensions below. Overall, I want it to be easy for you to figure out how I made what you see. Consequently, below you will see all the supplies in written form but also below my signature you will see them in picture from, click on any of the pictures and you will be taken to my OnLine Store! Without a doubt, I would LOVE to be your Stampin’ Up! Demonstrator if you live in the United States! Not only will you get my undivided attention, but you will also get from qualifying orders ($35 or more) a pdf that has 16 projects with pictures and step by step instructions!

Supplies:

Stamps:

  • Cutest Halloween

Inks:

  • Memento Black
  • Smoky Slate
  • Black Marker

Card 1

Paper:

  • Basic Black 4 1/4″ x 11″ scored @ 3/8″, 1 7/8″, 3 5/8″, 5 1/8″ & 5 1/2″
  • Cute Halloween 6″ x 6″ Designer Series Paper 4 1/8″ x 4 3/8″ Place Long edge at top of trimmer, cut 3 pieces 1 3/8″, 1 5/8″ & 1 3/8″, keeping in order so when you put them on the front, they will ‘line’ up. Also cut a piece of coordinating DSP 1/2″ x 4″, You will need to use punch with Bundle to punch out ghost from DSP & the kitties and pumpkin for inside
  • Pumpkin Pie 4″ x 5 1/4″, scrap for die on front
  • Scrap of Black Glitter Paper for fence

Card 2

  • Basic Black 5 1/2″ x 8 1/2″ scored at 4 1/4″, 1/2″ x 4″ (for sentiment)
  • Granny Apple Green 4″ x 5 1/4″ (x2)
  • Basic White scrap for 4 ghosts and sentiment
  • Black Glitter Paper scrap for 3 cobwebs

Misc:

  • Black Gingham Ribbon
  • Dimensionals
  • Frightful Tags Dies
  • Glue Dots
  • Wobble
  • Blending Brush (for edges of ghosts)

Without a doubt, Halloween is a fun Holiday for me to scrapbook, but now I love doing cards too that I can send to my grand kids! My hope is that you enjoy this too, and that you will join me on my YouTube Live on Thursday’s @ 4 eastern. Until next week!

Lisa Tedder
A former California girl living in North Carolina

Product List

Christmas Fancy Fold

Sweet Little Stockings It’s TOO cute!

Hey Guys!,

Today I am showing a a Christmas Fancy fold, featuring Sweet Little Stockings because it’s Too cute!! Obviously, if you have been watching my videos or following me for a while you know that I love animals, always have! As soon as I saw this set from SU!, of course I just had to have it! Specifically since I have a soft spot for Cats and Dogs, and with this set it’s too cute not to use! Evidently I also love Fancy Folds so I decided to put the two of them together. You can watch today’s video here.

Christmas Fancy Fold featuring Sweet Little Stockings , it’s too cute!!
Another Fancy fold featuring Sweet Little Stockings, it’s too cute also!

Comparatively, the 2nd card just cracked me up! Certainly cats are standoffish, and only come to you when THEY want to, and this face on this cat makes me laugh! Obviously he LOVES being dressed up! How many of you have cats, and how many of you ever dress them up? Despite always having cats, I don’t think I have EVER dressed one up!

As Always below is the Supplies/Dimensions for these cards. Whereas the first one is for you if you need help and the one further down is to help you if you want to purchase any of them! Basically I would love it if you would choose me to be your Stampin’ Up! Demonstrator if you live in the US. Consequently you only need to click on the images listed below my signature and you will be whisked away to my OnLine Store!

For every $35 you spend you will not only get a thank you card, but you will also get that weeks card kit that I show on my YouTube Live each week! You’ll also get a pdf with SIXTEEN projects that have step by step instructions plus pictures! Of course this is my thank you for choosing me and I want you to know that I really appreciate it!!

Supplies:
Stamps:

Supplies:
Stamps:

  • Sweet Little Stockings
  • Lighthearted Lines

Inks:

  • Memento Black
  • Real Red

Markers:

  • Garden Green

Blends:

  • Real Red
  • Pool Party
  • Cinnamon Cider

Paper:
Card 1:

  • Cinnamon Cider 4 1/4″ x 10 1/2″ scored @ 5 1/2″, 6 3/4″, 8 3/4″ and 9 1/4″ & 2 3/4″ x 3 3/4″ & 3″ x 5 3/4″ scored @ 4″ & 5 1/4″
  • Sweet Stockings Designer Series Paper (DSP) 4″ x 5 1/4″, 1 3/4″ x 4″
  • Basic White 5 1/4″ x 4″, scraps for stamping

Card 2:

  • Soft Suede 5 1/2″ x 8 1/2″ score at 4 1/4″, 2 3/4″ x 4 3/4″ (for Front Die)
  • Basic White 3 7/8″ x 5 1/8″ (x2), 2 3/4″ x 4 3/4″ (for layer behind Die), scrap for ‘Joy”
  • Sweet Stockings DSP 3 3/4″ x 5″, plus fussy cut out cat.

Misc:

  • Brick & Mortar 3D Embossing Folder
  • Stockings Dies (comes in the Bundle)
  • Matte Decorative Dots
  • Linen Thread
  • Blending Brush
  • Dimensionals

In the Hope that you enjoyed this blog post and that maybe you watched the YouTube Live, please come back again next Thursday! Evidently I am enjoying myself and hope to be doing this for a long time!

Lisa Tedder
A Former California girl living in North Carolina

Product List

Fancy Fold & Who let the Sheep out!?

This new fold is easy AND pretty!

Hey Guys!

I’m home and I’ve got a great new fancy fold for you, that’s pretty AND easy! Above all, I love new folds and especially love them when they aren’t hard! Thus, when I saw this fold done by Lavonne S. I had to give it a try! This is the same fold as doing a 3 step card, but with making the folds go a different way you have a brand new Fancy Fold! Earlier today I did my Live on my YouTube channel where I showed you how to make these cards, I hope you join me and if you join while I’m live you can be in the drawing to have one of these cards mailed to you!

I love new folds and especially love them when they aren’t hard!
l, I love new folds and especially love them when they aren’t hard!

Besides doing fancy fold cards I love cutesy cards and the Counting Sheep stamp set fits that bill perfectly! Plus, this stamp set is one you can get for FREE! Yes, you heard that right this stamp set is a Sale-a-Bration (SAB) set and when you buy something for $50 you can pick Counting Sheep as your free set. Of course that is only if you purchase before the end of September! For this reason, you can buy the bundle for the Peaceful Cabin! Indeed, this bundle you can get for $54 and that will let you pick out a free SAB item! Basically that is a ‘Win-Win’!!

Counting Sheep
Counting Sheep inside

As always below is my list of supplies needed for both cards, there is also picture images below my name that you can click on to be taken straight to my OnLine Store!

Supplies:

Stamps:

  • Peaceful Cabin Bundle
  • Counting Sheep

Inks:

  • Memento Black
  • Old Olive
  • Basic Gray

Blends:

  • Smoky Slate
  • Petal Pink
  • Color Lifter

Markers:

  • Melon Mambo
  • Old Olive

Paper

Card 1:

  • Basic Black 5 1/2″ x 8 1/2″, see picture above for scoring and cutting
  • Peaceful Place Designer 3 1/4″ x 3 3/8″, 3/4″ x 3″ (x2)
  • Basic White 3 1/8″ x 5 3/8″, 3/4″ x 5 3/8″, scraps for stamping cabin twice

Card 2:

  • Old Olive 5 1/2″ x 8 1/2″ scored at 4 1/4″
  • Basic Black 4″ x 5 1/4″ (x2)
  • Basic White 3 3/4″ x 5″ (x2), scraps for sheep/party hat
  • Scraps for balloons/sun/cloud: Pumpkin Pie, Soft Succulent, Mango Melody, Magenta Madness, Old Olive, Mango Melody, Balmy Blue
  • Crumb Cake for fence

Misc:

  • Basic Rhinestones
  • Dimensionals
  • Blender Brush

On the positive side I’ve shown you two awesome cards! On the negative side I am done with this post! LOL Subsequently I hope you have enjoyed it! Again, you can catch me on my YouTube channel every Thursday at 4:00 eastern where I will have a Live class for you!

Lisa Tedder
A former California girl living in North Carolina

Product List

Two Fancy Fold cards!

Sweet as a Peach makes really gorgeous cards!

Hey Guys!

Today I am showing you Two fancy fold cards! Of course you already knew it, but Sweet as a Peach makes really gorgeous cards! While that may be true this stamp set was NOT on my list! That being said, I am soooo happy that I got it! These cards are so pretty and I absolutely love them! Of course, I am going to show you and you will agree with me! When you go see the video you will see what I’m talking about! And, if you missed any of my posts you can go to my channel and see all kinds of projects that I know you will love!

What did I tell you!? This has a fancy fold, this one is a peek a boo.
Don’t you love it?!
This is an easel card, told you I had two fancy fold cards!

As always, below are two different ways that I have listed my supplies for both of these cards. One is a list with dimensions and the other is in picture form, click on any of them and you will be taken to my OnLine Store! For every Qualifying purchase ($35 or more) you will receive from me the card packet of the week from my Live YouTube video AND you will also get a pdf with 16 projects (changes monthly) with step by step instructions with pictures! Now, I told you that Sweet as a Peach makes really gorgeous cards, of course you can see how pretty they are now!

Stamps:

  • Sweet as a Peach

Inks:

  • Pale Papaya
  • Calypso Coral
  • Pear Pizzazz
  • Early Espresso
  • Pear Pizzazz marker
  • Soft Succulent marker
  • Early Espresso marker

Paper:

Card 1:

  • Pale Papaya 4 1/4″ x 11″, scored @ 5 1/2″, then from the bottom measure up 2 1/2″ and trim along the crease and remove the upper piece.
  • Basic White 3 3/4″ x 5″, scraps for stamping all the peaches/stems/flowers/sentiment
  • You’re a Peach DSP 2 3/8″ x 5 1/4″
  • Early Espresso 3 7/8″ x 5 1/8″

Card 2:

  • Calypso Coral 5 1/2″ x 8 1/2″, score at 2 1/8″ & 4 1/2″, 4 1/4 x 5 1/2″
  • Early Espresso 3 3/4″ x 5″ (x2), scrap for Die
  • Basic White 3 1/2″ x 4 7/8″, scraps for peaches/leaves/sentiment
  • You’re a Peach DSP 3 1/2″ x 4 7/8″

Misc:

  • 3/8″ open weave ribbon Pale Papaya
  • Hippo’s and Friends Dies
  • Dimensionals
  • Stampin’ Cut & Emboss Machine
  • Genial Gems

Previously I told you that you can get a pdf for a Qualifying order, here is a sneak peek of what you can get!

Sneak Peek of pdf with 16 projects

On account of me visiting my friend Carol, I was not live when I did this video, but you can watch it at anytime, and I will still be posting weekly videos! Also, I will try to do some Lives to talk about what I am doing and maybe even bring a project or two! So, you will have to stay tuned! Thank you so much for stopping by, I hope you love these cards as much as I do!

Lisa Tedder
A former California girl living in North Carolina

Who wants to go to the Tropics!?

Free stamp class using Timeless Tropical!

Hey Guys!

Who wants to go to the Tropics with me?! Basically, I love anything tropical, so for my Free stamp class I’m using Timeless Tropical from Stampin’ Up! Because I am from Southern California, living in North Carolina I want as much tropical goodness around me that I can get. So I used this free stamp class to make something tropical!

Therefore making tropical cards is a MUST! Particularly when they are super cute:

Who wants to go to the tropics!?
Free stamp class using Timeless Tropical

Whenever I do a blog post I always list all the supplies needed in two places! Of course, it will be in list form but it will also be in picture form below, click on any of the pictures and you will be taken to my OnLine Store where you can purchase from me! Consequently, if you order from me in the next week, please use this Host code. Then you will receive from me with any Qualifying order not only a pdf filled with 16 projects, but you will also receive that weeks class project packet!

Supplies:

Stamps:

  • Timeless Tropical

Ink:

  • Soft Suede
  • Soft Succulent
  • Soft Succulent marker
  • Soft Suede Marker

Blends:

  • Daffodil Delight
  • Crumb Cake

Paper:

Card 1:

  • Crumb Cake 5 1/2″ x 8 1/2″, scored @ 4 1/4″, 5 1/8″ x 3 7/8″ (for inside) scraps for dies
  • Soft Suede 3 7/8″ x 5 1/8″ (put through Bark 3D embossing folder)
  • Calypso Coral 4″ x 5 1/4″ (x2), scraps for flowers
  • Soft Succulent scraps for Pineapple tops/leaves

Card 2:

  • Soft Succulent 5 1/2″ x 8 1/2″ scored @ 4 1/4″, scraps for leaves
  • Early Espresso 3 7/8″ x 5 1/8″ (x2)
  • Basic White 3 3/4″ x 5″ (x2), scraps for flower/tree
  • Soft Suede scrap for ‘aloha’

Misc:

  • In The Tropics Dies
  • Stitched so Sweetly dies
  • Bakers Twine Essentials pack
  • Simply Elegant Trim
  • 2020-2022 In Color Square Gems
  • 1 1/2″ circle punch or Layering Circles
  • Wink of Stella
  • Dimensionals
  • Stampin’ Cut & Emboss machine
  • Dauber
  • Holiday Rhinestones

Equally important to ME liking tropical things, I hope that YOU love it too! If by chance you missed my Live, be sure to check it out anyway, this was a fun class to do! Moreover, on my videos I usually have great tips that you can use in your crafting! Also, if you missed last weeks blog post, where I made Pansy cards, you can still check it out! Always, I want to thank you for coming to my blog and for being there for me and my small business! Indeed, I would be honored if you chose me as your demonstrator! Finally, please come back!

Lisa Tedder
A former California Girl living in North Carolina

Product List

Quick & Easy cards using Pansy Petals

Easy cards that will still WOW you!

Hey Guys!,

Surprisingly, you can make quick & easy cards using Pansy Petals! Surely you know by now that I won’t make cards without them being beautiful to boot! Indeed, easy cards that will still WOW you is my mission! With this purpose in mind, here is the video that you can watch if you missed the Live!

For this reason I am presenting to you two cards that I love! Here is the picture of both cards!

Quick & Easy card using Pansy Patch
Inside card 1
Quick & easy card using Pansy Patch
inside card 2

As always below are the supplies for both cards and below my signature are pictures featuring the same thing, click on any of them and you will taken to my OnLine Store! Thus, if you decide to make a Qualifying purchase of $35 or more, you will also get the card packet of the cards I made that week!

Stamps:

  • Pansy Petals Suite

Inks:

  • Flirty Flamingo
  • Memento Black
  • Blackberry Bliss
  • Soft Succulent
  • Black Stampin’ Write Marker
  • Black Blend dark

Paper:
Card 1:

  • Fresh Freesia 5 1/2″ x 8 1/2″ scored @ 4 1/4″, scraps for pansy
  • Blackberry Bliss 4″ x 5 1/4″ (x2), scraps for pansy/tag
  • Pansy Petals DSP 2 1/2″ x 5 1/4″
  • Basic White 3 3/4″ x 5″, scraps for pansy/sentiment on tag
  • 2021-2023 In Color Shimmer Vellum for leaves

Card 2:

  • Flirty Flamingo 4 1/4″ x 11″, scraps for pansy
  • Basic Black 1 1/8″ x 4 3/8″ (x2), 5/8″ x 2 1/4″
  • Basic White 4″ x 5 1/4″,1/2″ x 2 1/4″
  • Cherry Cobbler scrap
  • 6″ x 6″ DSP Brights

Misc:

  • Tailor Made Tags
  • Tailored Tags punch
  • Playing with Patterns resin dots
  • Basic Rhinestones
  • Dimensionals
  • Wink of Stella
  • 3/8″ Open Weave ribbon-Evening Evergreen
  • Brick & Mortar embossing folder
  • Stampin’ Cut & Emboss Machine

Overall, I do this for you! For instance you might not want to always do ‘over the top’ cards, you might want something fast and easy, yet still gorgeous! On the positive side, I am thrilled with being able to make pretty quick & easy cards using Pansy Patch! Meanwhile, if you decide to have me be your Stampin’ Up! Demonstrator and you purchase from me, here is what you can get in the next month if you make a Qualifying order!

You get all of these tutorials for a Qualifying order!!

In Conclusion, I really hope you join me on my Thursday Live’s on YouTube! Of course, I love being able to talk with you, but I love hearing that you appreciate the cards I make, and I inspire you! Now, THAT makes me so happy!!

Lisa Tedder
A former California girl living in North Carolina

Product List

Join me in Celebrating 18 YEARS with SU!

Hey Guys!

I am so excited to share with you my happiness in being a Stampin’ Up! Demonstrator for 18 years! Because I want to share it with you, I am offering an Ordering Special!

If you go watch this video, I talk all about the funny reason I started stamping, how I found SU! (I didn’t right away!), what I made when I first started, the reasons why I don’t ever want to retire and more!

For the ordering special I am offering different levels so here is what I am offering:

level 1: For every purchase you will get a PDF of 4 cards using the Prince & Princess Host set (see picture below).

level 2: Your purchase of $50 you will receive the PDF AND a free embellishment!

level 3: Purchases over $75 you will get the PDF, Free embellishment AND the Stamp set!!

Finally Level 4: for all purchases of $100 you will get all of the above PLUS the kit packet for all 4 cards sent to you by mail!!

Here is the link to use when shopping: https://www.stampinup.com?hostcode=NX3GADZA

*****You MUST use THIS link to get these specials and no other specials will be applied since this is such a deal!*****

All orders must be received by July 21st. I will be sending the PDF’s out right after the 21st, and the packets for those who chose level 2 or above will go out the first week of August. I will need time for it to be delivered to me, then I can send them to you!

Here is the stamp set that I will be using:

Get this set for FREE with your level 3 or above order!

I haven’t received the stamp myself yet, but you know that I will make nothing but beautiful cards using this set! I’ll post on my Facebook site as soon as I get them in and made. I love making new cards and this is a set that I really wanted!

Thank you for all your support and I am excited to share with you my Achievement!

Lisa Tedder
A former California girl living in North Carolina

One stamp set but two VERY different cards

Free stamp class using Plentiful Plants

Hey Guys!,

For Todays Live video I am showing you one stamp set but two very different cards! Additionally for this free stamp class we are using Plentiful Plants from Stampin’ Up! Evidently I love making two very different cards from one stamp set since I have been doing that lately! Previously I have done other stamp classes on this blog that I’ve done the same thing, you can check out one here if you missed it!

As can be seen, here is the first card you will see on my Live Video:

One card for the Free stamp class using Plentiful Plants
Inside card 1
One stamp set TWO very different cards
Inside free stamp class using Plentiful Plants

Whenever I do my blog posts about cards I’ve done I always give you a list of all the supplies used, today is no exception!

Supplies:

Stamps:

  • Plentiful Plants Bundle

Inks:

  • Pale Papaya
  • Memento Black
  • Evening Evergreen
  • Soft Succulent
  • Cinnamon Cider
  • Crumb Cake

Paper – Card 1:

  • Basic Black 5 1/2″ x 8 1/2″ scored @ 4 1/4″, 3 1/8″ sq., 2 1/2″ x 5 1/4″
  • Pale Papaya 4″ x 5 1/4″ (run through Painted Texture 3D folder)
  • Polished Pink 3 1/16″ sq.
  • Basic White 4″ x 5 1/4″, 2 7/8″ sq., scrap for sentiment – 1/2″ x 2 1/4″ then trim
  • In Color 2021-2023 DSP 2″ x 4 3/4″

Card 2:

  • Evening Evergreen 5 1/2″ x 8 1/2″ score @ 4 1/4″, 3 3/4″ x 5″, scraps for plant
  • Gold Foil 4″ x 5 1/4″ cut out middle to use later if desired
  • Cinnamon Cider scraps for baskets
  • Basic White 5 1/4″ x 4″, scraps to stamp pots, plants, sentiment
  • Crumb Cake scrap run through Brick Folder

Misc:

  • Paper Lattice
  • Gold Gems
  • Brick & Mortar 3D folder
  • Painted Texture 3D folder
  • Loose Flower Flourishes
  • In Color Jewels
  • Fresh Freesia/Pale Papaya/Soft Succulent ribbon
  • Dimensionals
  • Basic Rhinestones

Unquestionably, my favorite thing to do other than stamping is to give things to those who support my business! Moreover, the more I can give you the happier I am and hopefully you are too! Whenever you purchase $35 or more from my OnLine Store, you will get my Free stamp class packet from the week you purchase. And you will also get a pdf with 16 projects that has step by step instructions and pictures! Here is a sneak peek:

All these projects Yours, with a Qualifying order!!

Lastly, I want to thank you for being here! Certainly, coming here supports my business too! Truly, I appreciate you! Thank you so much! Please come back, I’ll have another Stamp class for you!

Lisa Tedder
A former California girl living in North Carolina

Product List

These cards are Stunning!

Sunflowers are the best, I can’t stop looking at these cards!

Hey Guys!,

In the first place, These cards are Stunning, I can’t stop looking at them! Of course, everyone loves sunflowers, it’s because Sunflowers are the best, and these cards are so pretty. I did a YouTube Live showing how I made these, so if you missed it check it out! So, here is the first card:

Isn’t this card stunning?!! Thanks to Elaine’s Creations for the inspiration!
Inside
Sunflowers are the best!
Inside

However, here are the supplies used for both cards:

Stamps:

  • Celebrating Sunflowers Bundle

Inks:

  • Granny Apple Green
  • Pale Papaya
  • Cinnamon Cider

Paper:
Card 1:

  • Thick Basic White 5 1/2″ x 8 1/2″ scored at 4 1/4″
  • Basic White 4″ x 5 1/4″, 3 7/8″ x 4 7/8″ (inside)
  • Expressions in Ink Specialty Designer Series Paper 4 1/8″ x 5 3/8″
  • Pale Papaya 4″ x 5 1/4″

Card 2:

  • Cinnamon Cider 5 1/2″ x 8 1/2″ scored at 4 1/4″, scrap for sprigs of wheat
  • Basic Black 3 7/8″ x 5 1/2″, 4″ x 5 1/4″ (inside), 3 1/2″ sq. sunflower outline
  • Gold & Rose Gold 6 x 6 Metallic Specialty Paper (I used the Gold) 3 3/4″ x 5 1/2″, 1/2″ x 3 3/4″ (it’s what’s left over after cutting the bigger piece)
  • Pale Papaya 3 1/2″ sq. for Sunflower, 3/4″ x 3 3/4″ (for sentiment), 3 7/8″ x 5 1/8″ (for inside)

Misc:

  • Lovely Labels Pick a Punch
  • Genial Gems
  • Dimensionals
  • 3/8″ Open Weave Pale Papaya Ribbon
  • Tasteful Textile 3D folder
  • Blending Brushes

Similarly, as I said above, the supplies will also be provided below in picture form. Therefore, if you click on any of the pictures you will be taken to my OnLine Store. Thus, if you purchase $35 or more you will get the Class kit from that week’s video! Also you will get a pdf that has 16 projects with step by step instructions along with pictures! Subsequently this is my Thank You for supporting my small business!

As a rule when I send you the class packet all the die cutting is done for you, unless you would have to stamp it first. In this case, you would get everything in all the pictures since the only stamping is on the sentiment, but I will still send you the strip, so all you have to do is add your sentiment! Furthermore, these cards are stunning, I can’t stop looking at them, you will want to make them, I’m sure!

In conclusion, I want to remind you of the Besties Club, we have so much fun and I know you would love it! Furthermore, click here to see all the details!

Lisa Tedder
A former California girl living in North Carolina

Product List

Learn how to make cards that won't end up in the trash!